
Owner's Manual
Page 6
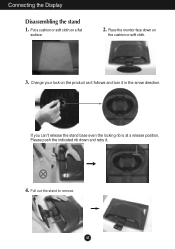
A5 Put a cushion or soft cloth on the product as it follows and turn it . 4. Pull out the stand to remove. Connecting the Display Disassembling the stand 1. If you can't release the stand base even the locking rib is at a release position, Please push the indicated rib down on the cushion or soft cloth. 3. Change your lock on a flat surface. 2. Place the monitor face down and retry it in the arrow direction.
A5 Put a cushion or soft cloth on the product as it follows and turn it . 4. Pull out the stand to remove. Connecting the Display Disassembling the stand 1. If you can't release the stand base even the locking rib is at a release position, Please push the indicated rib down on the cushion or soft cloth. 3. Change your lock on a flat surface. 2. Place the monitor face down and retry it in the arrow direction.
Owner's Manual
Page 8
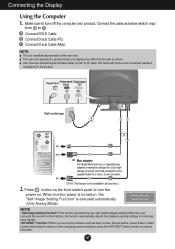
... your display may differ from the view as blurry screen, blurred letters, screen flicker or tilted screen while using the device or after changing screen resolution, press the AUTO/SET function button to improve resolution. Press button on the front switch panel to turn the power on....When monitor power is executed automatically. (Only Analog Mode) NOTE ' Self Image Setting Function'? A7 User must use , a separate plug adapter is needed to change the 15 pin high density (3 row) D-sub VGA connector on , the 'Self Image Setting Function' is turned on the supplied cable to 2 . DVI...
... your display may differ from the view as blurry screen, blurred letters, screen flicker or tilted screen while using the device or after changing screen resolution, press the AUTO/SET function button to improve resolution. Press button on the front switch panel to turn the power on....When monitor power is executed automatically. (Only Analog Mode) NOTE ' Self Image Setting Function'? A7 User must use , a separate plug adapter is needed to change the 15 pin high density (3 row) D-sub VGA connector on , the 'Self Image Setting Function' is turned on the supplied cable to 2 . DVI...
Owner's Manual
Page 10
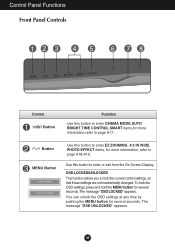
... button for several seconds. The message "OSD UNLOCKED" appears. Use this button to lock the current control settings, so that these settings are not inadvertently changed. The message "OSD LOCKED" appears. To lock the OSD settings, press and hold the MENU button for several seconds. A9
... button for several seconds. The message "OSD UNLOCKED" appears. Use this button to lock the current control settings, so that these settings are not inadvertently changed. The message "OSD LOCKED" appears. To lock the OSD settings, press and hold the MENU button for several seconds. A9
Owner's Manual
Page 11
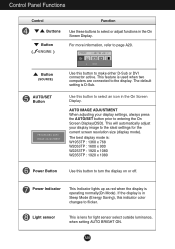
... press the AUTO/SET button prior to page A20. The default setting is : W1953TP : 1360 x 768 W2053TP : 1600 x 900 W2253TP : 1920 x 1080 W2353TP : 1920 x 1080 Power Button Use this indicator color changes to the ideal settings for light sensor select outside luminance, when setting AUTO BRIGHT ON. Use this button to select...
... press the AUTO/SET button prior to page A20. The default setting is : W1953TP : 1360 x 768 W2053TP : 1600 x 900 W2253TP : 1920 x 1080 W2353TP : 1920 x 1080 Power Button Use this indicator color changes to the ideal settings for light sensor select outside luminance, when setting AUTO BRIGHT ON. Use this button to select...

Owner's Manual
Page 16
A15 On Screen Display(OSD) Selection and Adjustment Main menu Sub menu Description TRACKING TRACKING HORIZONTAL To move image up and down. This item allows you to remove any vertical bars or stripes visible on the screen background. CLOCK PHASE MENU : Exit : Decrease : Increase SHARPNESS SET : Select another sub-menu To minimize any horizontal noise and clear or sharpen the image of characters. To adjust the focus of the screen. The horizontal screen size will also change. To adjust the clearness of the display. VERTICAL To move image left and right.
A15 On Screen Display(OSD) Selection and Adjustment Main menu Sub menu Description TRACKING TRACKING HORIZONTAL To move image up and down. This item allows you to remove any vertical bars or stripes visible on the screen background. CLOCK PHASE MENU : Exit : Decrease : Increase SHARPNESS SET : Select another sub-menu To minimize any horizontal noise and clear or sharpen the image of characters. To adjust the focus of the screen. The horizontal screen size will also change. To adjust the clearness of the display. VERTICAL To move image left and right.
Owner's Manual
Page 18
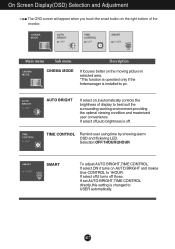
... menu Sub menu Description CINEMA MODE It focuses better on the moving picture in selected area. *This function is operated only if the fortemanager is changed to pc. Selection:OFF/1HOUR/2HOUR SMART To adjust AUTO BRIGHT,TIME CONTROL.
... menu Sub menu Description CINEMA MODE It focuses better on the moving picture in selected area. *This function is operated only if the fortemanager is changed to pc. Selection:OFF/1HOUR/2HOUR SMART To adjust AUTO BRIGHT,TIME CONTROL.
Owner's Manual
Page 19
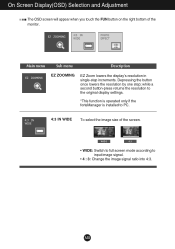
... button-press returns the resolution to the original display settings. *This function is operated only if the forteManager is installed to input image signal. • 4 : 3: Change the image signal ratio into 4:3. A18 WIDE 4:3 • WIDE: Switch to full screen mode according to PC. 4:3 IN WIDE To select the image size of...
... button-press returns the resolution to the original display settings. *This function is operated only if the forteManager is installed to input image signal. • 4 : 3: Change the image signal ratio into 4:3. A18 WIDE 4:3 • WIDE: Switch to full screen mode according to PC. 4:3 IN WIDE To select the image size of...
Owner's Manual
Page 20
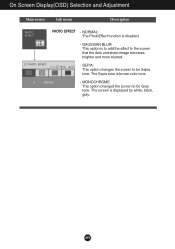
SEPIA: This option changes the screen to be Sepia tone. MONOCHROME: This option changed the screen to be Gray tone. On Screen Display(OSD) Selection and Adjustment Main menu Sub menu Description PHOTO EFFECT - The screen is disabled. - NORMAL: The PhotoEffect function is displayed by white, black, gray. GAUSSIAN BLUR: This option is brown color tone. - The Sepia tone is to add the effect to the screen that the dark and sharp image becomes brighter and more blurred. - A19
SEPIA: This option changes the screen to be Sepia tone. MONOCHROME: This option changed the screen to be Gray tone. On Screen Display(OSD) Selection and Adjustment Main menu Sub menu Description PHOTO EFFECT - The screen is disabled. - NORMAL: The PhotoEffect function is displayed by white, black, gray. GAUSSIAN BLUR: This option is brown color tone. - The Sepia tone is to add the effect to the screen that the dark and sharp image becomes brighter and more blurred. - A19
Owner's Manual
Page 22
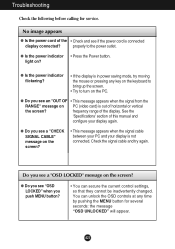
... is not connected. G Is the power indicator • Press the Power button. You can secure the current control settings, so that they cannot be inadvertently changed. Troubleshooting Check the following before calling for several seconds: the message "OSD UNLOCKED" will appear. G Do you see an "OUT OF • This message appears...
... is not connected. G Is the power indicator • Press the Power button. You can secure the current control settings, so that they cannot be inadvertently changed. Troubleshooting Check the following before calling for several seconds: the message "OSD UNLOCKED" will appear. G Do you see an "OUT OF • This message appears...
Owner's Manual
Page 23
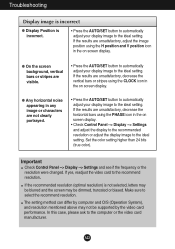
... mentioned above may be supported by the video card performance. Important Check Control Panel --> Display --> Settings and see if the frequency or the resolution were changed. In this case, please ask to the ideal setting. G Any horizontal noise appearing in the on screen display. If yes, readjust the video card to...
... mentioned above may be supported by the video card performance. Important Check Control Panel --> Display --> Settings and see if the frequency or the resolution were changed. In this case, please ask to the ideal setting. G Any horizontal noise appearing in the on screen display. If yes, readjust the video card to...
Owner's Manual
Page 24
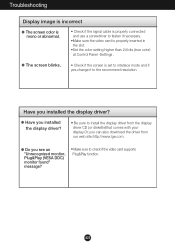
... cable is properly connected and use a screwdriver to fasten if necessary. •Make sure the video card is set to interlace mode and if yes,change it to check if the video card supports Plug&Play function.
... cable is properly connected and use a screwdriver to fasten if necessary. •Make sure the video card is set to interlace mode and if yes,change it to check if the video card supports Plug&Play function.
Owner's Manual
Page 25
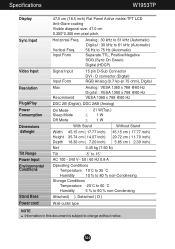
Input Form Analog : 30 kHz to 61 kHz (Automatic) Digital : 30 kHz to 61 kHz (Automatic) 56 Hz to change without notice. Vertical Freq. A24 D connector (Digital) RGB Analog (0.7 Vp-p/ 75 ohm), Digital Max Recommend Analog : VESA 1360 x 768 @60 Hz Digital : VESA 1360 x 768 @...
Input Form Analog : 30 kHz to 61 kHz (Automatic) Digital : 30 kHz to 61 kHz (Automatic) 56 Hz to change without notice. Vertical Freq. A24 D connector (Digital) RGB Analog (0.7 Vp-p/ 75 ohm), Digital Max Recommend Analog : VESA 1360 x 768 @60 Hz Digital : VESA 1360 x 768 @...

Owner's Manual
Page 26
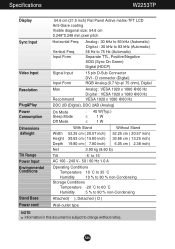
...(H)*0.2766(V) mm pixel pitch Horizontal Freq. Input Form Analog : 30 kHz to 83 kHz (Automatic) Digital : 30 kHz to 83 kHz (Automatic) 56 Hz to change without notice. D connector (Digital) RGB Analog (0.7 Vp-p/ 75 ohm), Digital Max Recommend Analog : VESA 1600 x 900 @60 Hz Digital : VESA 1600 x 900 @60 Hz VESA...
...(H)*0.2766(V) mm pixel pitch Horizontal Freq. Input Form Analog : 30 kHz to 83 kHz (Automatic) Digital : 30 kHz to 83 kHz (Automatic) 56 Hz to change without notice. D connector (Digital) RGB Analog (0.7 Vp-p/ 75 ohm), Digital Max Recommend Analog : VESA 1600 x 900 @60 Hz Digital : VESA 1600 x 900 @60 Hz VESA...
Owner's Manual
Page 27
... Connector DVI - A26 Input Form Analog : 30 kHz to 83 kHz (Automatic) Digital : 30 kHz to 83 kHz (Automatic) 56 Hz to change without notice. Vertical Freq. Specifications W2253TP Display Sync Input Video Input Resolution Plug&Play Power Consumption Dimensions &Weight Tilt Range Power Input Environmental Conditions Stand Base Power cord 54...
... Connector DVI - A26 Input Form Analog : 30 kHz to 83 kHz (Automatic) Digital : 30 kHz to 83 kHz (Automatic) 56 Hz to change without notice. Vertical Freq. Specifications W2253TP Display Sync Input Video Input Resolution Plug&Play Power Consumption Dimensions &Weight Tilt Range Power Input Environmental Conditions Stand Base Power cord 54...

Owner's Manual
Page 28
A27 Input Form Analog : 30 kHz to 83 kHz (Automatic) Digital : 30 kHz to 83 kHz (Automatic) 56 Hz to change without notice. D connector (Digital) RGB Analog (0.7 Vp-p/ 75 ohm), Digital Max Recommend Analog : VESA 1920 x 1080 @60 Hz Digital : VESA 1920 x 1080 @60 Hz VESA ...
A27 Input Form Analog : 30 kHz to 83 kHz (Automatic) Digital : 30 kHz to 83 kHz (Automatic) 56 Hz to change without notice. D connector (Digital) RGB Analog (0.7 Vp-p/ 75 ohm), Digital Max Recommend Analog : VESA 1920 x 1080 @60 Hz Digital : VESA 1920 x 1080 @60 Hz VESA ...


