
Owner's Manual (English)
Page 2
... not being provided by the manufacturer. Overloaded AC outlets and extension cords are frayed power cords and broken plugs. To Prevent Fire or Hazards: Always turn the display OFF if you are Dangerous High Voltages inside . It can cause injury to human, problem to the product. Do not drop an object...
... not being provided by the manufacturer. Overloaded AC outlets and extension cords are frayed power cords and broken plugs. To Prevent Fire or Hazards: Always turn the display OFF if you are Dangerous High Voltages inside . It can cause injury to human, problem to the product. Do not drop an object...

Owner's Manual (English)
Page 4
... its front facing downward on a soft cloth. 2. Hinge Body Stand Body 3. Your monitor may fall and get damaged or injure your foot. A3 Connecting the stand 1. Do not carry the product upside down holding only the stand base. ... the direction of the Stand Base, and connect it into the Stand Body. 4. Once assembled take the monitor up the monitor, ensure that the power to the monitor, the computer system, and other attached devices is turned off. Connecting the Display Before setting up carefully and face the front side Stand Body Stand Base...
... its front facing downward on a soft cloth. 2. Hinge Body Stand Body 3. Your monitor may fall and get damaged or injure your foot. A3 Connecting the stand 1. Do not carry the product upside down holding only the stand base. ... the direction of the Stand Base, and connect it into the Stand Body. 4. Once assembled take the monitor up the monitor, ensure that the power to the monitor, the computer system, and other attached devices is turned off. Connecting the Display Before setting up carefully and face the front side Stand Body Stand Base...
Owner's Manual (English)
Page 6
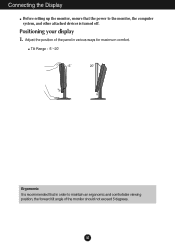
Adjust the position of the monitor should not exceed 5 degrees. A5 Tilt Range : -5˚~20˚ Ergonomic It is turned off. Connecting the Display Before setting up the monitor, ensure that the power to the monitor, the computer system, and other attached devices is recommended that in order to maintain an ergonomic and comfortable viewing position, the forward tilt angle of the panel in various ways for maximum comfort. Positioning your display 1.
Adjust the position of the monitor should not exceed 5 degrees. A5 Tilt Range : -5˚~20˚ Ergonomic It is turned off. Connecting the Display Before setting up the monitor, ensure that the power to the monitor, the computer system, and other attached devices is recommended that in order to maintain an ergonomic and comfortable viewing position, the forward tilt angle of the panel in various ways for maximum comfort. Positioning your display 1.

Owner's Manual (English)
Page 7
...the AUTO/SET function button to a 15 pin 2 row connector. 2. Power Cord 2 1 Signal Cable Varies according to turn off the computer and product. When monitor power is a simplified representation of the signal cable. A6 Press button on the supplied cable to improve resolution. PC Wall... Apple Macintosh use shielded signal interface cables (D-sub 15 pin cable, DVI cable) with optimal display settings.When the user connects the monitor for the first time, this function automatically adjusts the display to maintain standard compliance for individual input signals. 'AUTO/SET' Function?...
...the AUTO/SET function button to a 15 pin 2 row connector. 2. Power Cord 2 1 Signal Cable Varies according to turn off the computer and product. When monitor power is a simplified representation of the signal cable. A6 Press button on the supplied cable to improve resolution. PC Wall... Apple Macintosh use shielded signal interface cables (D-sub 15 pin cable, DVI cable) with optimal display settings.When the user connects the monitor for the first time, this function automatically adjusts the display to maintain standard compliance for individual input signals. 'AUTO/SET' Function?...

Owner's Manual (English)
Page 9
W1934S : 1440 x 900 - If the display is under normal operating conditions AUTO/SET Button Use this button to enter a selection in the On Screen Display. W1934SE : ... size (display mode). Power Indicator This Indicator lights up blue when the display operates normally(On Mode). Control Panel Functions Buttons Use these buttons to turn the display on or off. W2234S : 1680 x 1050 - AUTO IMAGE ADJUSTMENT When adjusting your display image to amber. This will automatically adjust your display settings...
W1934S : 1440 x 900 - If the display is under normal operating conditions AUTO/SET Button Use this button to enter a selection in the On Screen Display. W1934SE : ... size (display mode). Power Indicator This Indicator lights up blue when the display operates normally(On Mode). Control Panel Functions Buttons Use these buttons to turn the display on or off. W2234S : 1680 x 1050 - AUTO IMAGE ADJUSTMENT When adjusting your display image to amber. This will automatically adjust your display settings...

Owner's Manual (English)
Page 15
Using this function when white and black colors are displayed. This function will be turned on. Activate this function, the signal level is an analog signal. Use this does not improve the screen image, restore the factory default settings. If ..., perform the white balance function again. SETUP WHITE BALANCE MENU : Exit : Adjust : Adjust SET : Select another sub-menu POWER INDICATOR If the output of the monitor to set ON at any time, the power indicator will go off. If you set the power indicator on the screen. If this function to...
Using this function when white and black colors are displayed. This function will be turned on. Activate this function, the signal level is an analog signal. Use this does not improve the screen image, restore the factory default settings. If ..., perform the white balance function again. SETUP WHITE BALANCE MENU : Exit : Adjust : Adjust SET : Select another sub-menu POWER INDICATOR If the output of the monitor to set ON at any time, the power indicator will go off. If you set the power indicator on the screen. If this function to...

Owner's Manual (English)
Page 16
... the OSD controls at any key on the PC. You can secure the current control settings, so that they cannot be inadvertently changed. properly to turn on the keyboard to bring up the screen. • Try to the power outlet. frequency range of the • Check and see an "OUT OF...
... the OSD controls at any key on the PC. You can secure the current control settings, so that they cannot be inadvertently changed. properly to turn on the keyboard to bring up the screen. • Try to the power outlet. frequency range of the • Check and see an "OUT OF...


