
Owner's Manual
Page 1
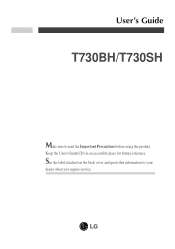
See the label attached on the back cover and quote this information to read the Important Precautions before using the product. Keep the User's Guide(CD) in an accessible place for furture reference. User's Guide T730BH/T730SH Make sure to your dealer when you require service.
See the label attached on the back cover and quote this information to read the Important Precautions before using the product. Keep the User's Guide(CD) in an accessible place for furture reference. User's Guide T730BH/T730SH Make sure to your dealer when you require service.
Owner's Manual
Page 2
... properly. The power supply cord is easily accessible after installation. Operate the monitor only from a power source indicated in the specifications of this monitor, observe the following basic rules for its installation, use, and servicing. Overloaded AC outlets and extension cords are frayed power cords and broken plugs. They may result in any way, please contact the manufacturer or the nearest authorized repair service provider for a replacement. Call your...
... properly. The power supply cord is easily accessible after installation. Operate the monitor only from a power source indicated in the specifications of this monitor, observe the following basic rules for its installation, use, and servicing. Overloaded AC outlets and extension cords are frayed power cords and broken plugs. They may result in any way, please contact the manufacturer or the nearest authorized repair service provider for a replacement. Call your...
Owner's Manual
Page 3
... not use this monitor. Keep children from the wall outlet. Therefore, NEVER: Block the bottom ventilation slots by placing the monitor on the monitor screen because overspray may result in a fire hazard. Some internal parts carry hazardous voltages. They make an ideal container in which may cause electrical shock. Important Precautions To Prevent Fire or Hazards: Always turn the monitor OFF...
... not use this monitor. Keep children from the wall outlet. Therefore, NEVER: Block the bottom ventilation slots by placing the monitor on the monitor screen because overspray may result in a fire hazard. Some internal parts carry hazardous voltages. They make an ideal container in which may cause electrical shock. Important Precautions To Prevent Fire or Hazards: Always turn the monitor OFF...

Owner's Manual
Page 4
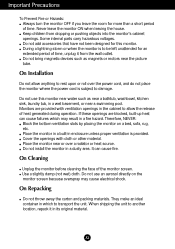
... base of connection. Insert the hooks into the locked position. Carefully set the monitor face-down with the matching slots in the picture. Align the hooks on the tilt/swivel stand with the underside facing you. Connecting the Monitor Before setting up the monitor, ensure that the power is turned off to the monitor, computer system, and other attached devices. Connecting the Tilt/Swivel stand 1. NOTE This illustration depicts the general model...
... base of connection. Insert the hooks into the locked position. Carefully set the monitor face-down with the matching slots in the picture. Align the hooks on the tilt/swivel stand with the underside facing you. Connecting the Monitor Before setting up the monitor, ensure that the power is turned off to the monitor, computer system, and other attached devices. Connecting the Tilt/Swivel stand 1. NOTE This illustration depicts the general model...
Owner's Manual
Page 5
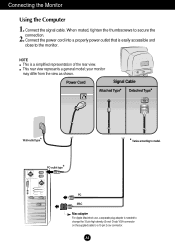
... VGA connector on the supplied cable to model. Connecting the Monitor Using the Computer 1. Connect the power cord into a properly power outlet that is easily accessible and close to secure the connection. 2. This rear view represents a general model; A4 When mated, tighten the thumbscrews to the monitor. Connect the signal cable. your monitor may differ from the view as shown. PC MAC Mac adapter For Apple Macintosh use, a separate plug adapter is a simplified representation of the rear view. Power Cord Signal Cable...
... VGA connector on the supplied cable to model. Connecting the Monitor Using the Computer 1. Connect the power cord into a properly power outlet that is easily accessible and close to secure the connection. 2. This rear view represents a general model; A4 When mated, tighten the thumbscrews to the monitor. Connect the signal cable. your monitor may differ from the view as shown. PC MAC Mac adapter For Apple Macintosh use, a separate plug adapter is a simplified representation of the rear view. Power Cord Signal Cable...
Owner's Manual
Page 6
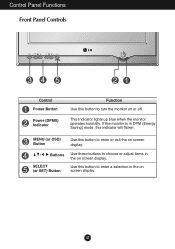
MENU (or OSD) Button Use this button to choose or adjust items in the on screen display. A5 Buttons SELECT (or SET) Button Use these buttons to enter or exit the on screen display. This Indicator lights up blue when the monitor operates normally. If the monitor is in DPM (Energy Saving) mode, this indicator will flicker. Use this button to turn the monitor on or off. Control Panel Functions Front Panel Controls Control Power Button Power (DPMS) Indicator Function Use this button to enter a selection in the on screen display.
MENU (or OSD) Button Use this button to choose or adjust items in the on screen display. A5 Buttons SELECT (or SET) Button Use these buttons to enter or exit the on screen display. This Indicator lights up blue when the monitor operates normally. If the monitor is in DPM (Energy Saving) mode, this indicator will flicker. Use this button to turn the monitor on or off. Control Panel Functions Front Panel Controls Control Power Button Power (DPMS) Indicator Function Use this button to enter a selection in the on screen display.
Owner's Manual
Page 7
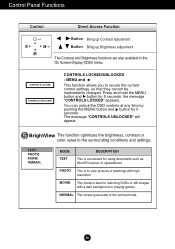
... be inadvertently changed. MOVIE This mode is best for using documents such as Word Processor or spreadsheet. Control Panel Functions Control Direct Access Function Button Bring up Contrast adjustment Button Bring up Brightness adjustment The Contrast and Brightness functions are also available in the On Screen Display (OSD) menu. PHOTO This is convenient for watching DVDs or still images with high resolution. BrightView This function optimizes the brightness, contrast or color value to view pictures or paintings...
... be inadvertently changed. MOVIE This mode is best for using documents such as Word Processor or spreadsheet. Control Panel Functions Control Direct Access Function Button Bring up Contrast adjustment Button Bring up Brightness adjustment The Contrast and Brightness functions are also available in the On Screen Display (OSD) menu. PHOTO This is convenient for watching DVDs or still images with high resolution. BrightView This function optimizes the brightness, contrast or color value to view pictures or paintings...
Owner's Manual
Page 8
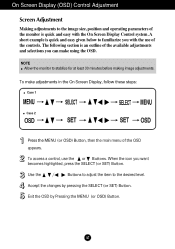
To make using the OSD. To access a control, use of the OSD appears. On Screen Display (OSD) Control Adjustment Screen Adjustment Making adjustments to the image size, position and operating parameters of the monitor is an outline of the available adjustments and selections you can make adjustments in the On Screen Display, follow these steps: Case 1 Case 2 Press the MENU (or OSD) Button, then the main menu of the controls. Accept the changes by Pressing the MENU (or OSD) Button. A7 When the icon...
To make using the OSD. To access a control, use of the OSD appears. On Screen Display (OSD) Control Adjustment Screen Adjustment Making adjustments to the image size, position and operating parameters of the monitor is an outline of the available adjustments and selections you can make adjustments in the On Screen Display, follow these steps: Case 1 Case 2 Press the MENU (or OSD) Button, then the main menu of the controls. Accept the changes by Pressing the MENU (or OSD) Button. A7 When the icon...
Owner's Manual
Page 9
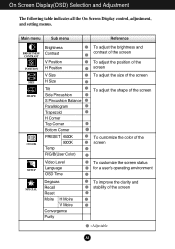
... all the On Screen Display control, adjustment, and setting menus. Main menu Sub menu BRIGHTNESS/ CONTRAST POSITION SIZE SHAPE COLOR Brightness Contrast V Position H Position V Size H Size Tilt Side Pincushion S Pincushion Balance Parallelogram Trapezoid H Corner Top Corner Bottom Corner PRESET 6500K 9300K Temp R/G/B(User Color) SETUP Video Level Language OSD Time SPECIAL Degauss Recall Reset Moire H Moire V Moire Convergence Purity Reference To adjust the brightness and contrast of the screen To adjust the position of the screen To adjust the size of the screen To adjust the shape...
... all the On Screen Display control, adjustment, and setting menus. Main menu Sub menu BRIGHTNESS/ CONTRAST POSITION SIZE SHAPE COLOR Brightness Contrast V Position H Position V Size H Size Tilt Side Pincushion S Pincushion Balance Parallelogram Trapezoid H Corner Top Corner Bottom Corner PRESET 6500K 9300K Temp R/G/B(User Color) SETUP Video Level Language OSD Time SPECIAL Degauss Recall Reset Moire H Moire V Moire Convergence Purity Reference To adjust the brightness and contrast of the screen To adjust the position of the screen To adjust the size of the screen To adjust the shape...
Owner's Manual
Page 10
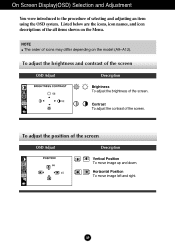
... on the model (A9~A12). Horizontal Position To move image up and down. On Screen Display(OSD) Selection and Adjustment You were introduced to the procedure of the screen. Contrast To adjust the contrast of selecting and adjusting an item using the OSD system. A9 To adjust the brightness and contrast of the screen OSD Adjust Description Brightness To adjust the brightness of the screen OSD Adjust Description Vertical Position To move image left and right. To adjust the position of the...
... on the model (A9~A12). Horizontal Position To move image up and down. On Screen Display(OSD) Selection and Adjustment You were introduced to the procedure of the screen. Contrast To adjust the contrast of selecting and adjusting an item using the OSD system. A9 To adjust the brightness and contrast of the screen OSD Adjust Description Brightness To adjust the brightness of the screen OSD Adjust Description Vertical Position To move image left and right. To adjust the position of the...
Owner's Manual
Page 11
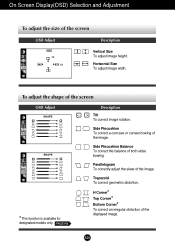
... adjust the shape of both sides bowing. Side Pincushion Balance To correct the balance of the screen OSD Adjust * This function is available for designated models only. 8 Description Tilt To correct image rotation. A10 Horizontal Size To adjust image width. H Corner* Top Corner* Bottom Corner* To correct an irregular distortion of the screen OSD Adjust Description Vertical Size To adjust image height. On Screen Display(OSD) Selection and Adjustment To adjust the size of the displayed image...
... adjust the shape of both sides bowing. Side Pincushion Balance To correct the balance of the screen OSD Adjust * This function is available for designated models only. 8 Description Tilt To correct image rotation. A10 Horizontal Size To adjust image width. H Corner* Top Corner* Bottom Corner* To correct an irregular distortion of the screen OSD Adjust Description Vertical Size To adjust image height. On Screen Display(OSD) Selection and Adjustment To adjust the size of the displayed image...

Owner's Manual
Page 12
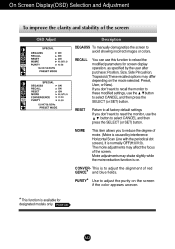
... level used for a user's operating environment OSD Adjust Description VIDEO LEVEL This item is 0.7V. OSD Menus are displayed. Adjust the time to select the monitor's input signal level. LANGUAGE To choose the language in 12 languages: English, German, French, Spanish, Italian, Swedish, Finnish, Portuguese, Korean, Chinese, Russian and Polish. If the screen becomes suddenly washedout or blurred, please select 1.0V and try again. RED GREEN Set your own color...
... level used for a user's operating environment OSD Adjust Description VIDEO LEVEL This item is 0.7V. OSD Menus are displayed. Adjust the time to select the monitor's input signal level. LANGUAGE To choose the language in 12 languages: English, German, French, Spanish, Italian, Swedish, Finnish, Portuguese, Korean, Chinese, Russian and Polish. If the screen becomes suddenly washedout or blurred, please select 1.0V and try again. RED GREEN Set your own color...
Owner's Manual
Page 13
... to reset the monitor, use the button to adjust the alignment of moire. (Moire is on. Moire adjustments may shake slightly while the moire reduction function is caused by the user after purchase: Position, Size, Side Pincushion, Trapezoid (These recalled options may affect the focus of the screen OSD Adjust H Description DEGAUSS To manually demagnetize the screen to adjust the purity on the mode selected: Preset, User...
... to reset the monitor, use the button to adjust the alignment of moire. (Moire is on. Moire adjustments may shake slightly while the moire reduction function is caused by the user after purchase: Position, Size, Side Pincushion, Trapezoid (These recalled options may affect the focus of the screen OSD Adjust H Description DEGAUSS To manually demagnetize the screen to adjust the purity on the mode selected: Preset, User...
Owner's Manual
Page 14
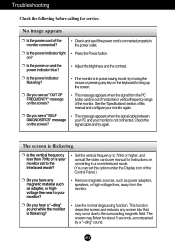
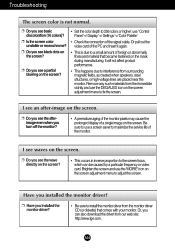
... blue? • Adjust the brightness and the contrast. ❐ Isthepowerindicator flickering? • If the monitor is your monitor set this manual and configure your monitor? • Remove magnetic sources, such as adapter, or highvoltage line near to the power outlet. ❐ Is the power indicator light • PressthePowerbutton. The screen is flickering. ❐ Is the vertical frequency less than 70Hz or is in power saving mode, try again. Troubleshooting Check the following before calling for instructions...
... blue? • Adjust the brightness and the contrast. ❐ Isthepowerindicator flickering? • If the monitor is your monitor set this manual and configure your monitor? • Remove magnetic sources, such as adapter, or highvoltage line near to the power outlet. ❐ Is the power indicator light • PressthePowerbutton. The screen is flickering. ❐ Is the vertical frequency less than 70Hz or is in power saving mode, try again. Troubleshooting Check the following before calling for instructions...
Owner's Manual
Page 15
...: use ' Control Panel '->' Display '->' Settings '->' Color Palette ' • Check the connection of the signal cable. Troubleshooting The screen color is due to adjust the screen. Or, you installed the monitor driver? ❐ Haveyouinstalledthe monitor driver? • Be sure to interference from our web site: http://www.lge.com. I see an after-image on the screen. ❐ Doyouseetheafterimage even when you see a partial blurring on the screen? • Set the color depth to maximize the service life...
...: use ' Control Panel '->' Display '->' Settings '->' Color Palette ' • Check the connection of the signal cable. Troubleshooting The screen color is due to adjust the screen. Or, you installed the monitor driver? ❐ Haveyouinstalledthe monitor driver? • Be sure to interference from our web site: http://www.lge.com. I see an after-image on the screen. ❐ Doyouseetheafterimage even when you see a partial blurring on the screen? • Set the color depth to maximize the service life...
Owner's Manual
Page 16
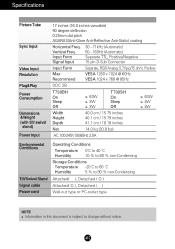
... Tilt/Swivel Stand Signal cable Power cord Operating Conditions Temperature 0˚C to 40 ˚C Humidity 10 % to 80 % non-Condensing Storage Conditions Temperature -20˚C to 60 ˚C Humidity 5 % to 90 % non-Condensing Attached( ), Detached ( O ) Attached( O ), Detached ( ) Wall-out type or PC-outlet type NOTE Information in this document is subject to change without notice. A15 Specifications Picture Tube Sync Input Video Input Resolution Plug&Play Power...
... Tilt/Swivel Stand Signal cable Power cord Operating Conditions Temperature 0˚C to 40 ˚C Humidity 10 % to 80 % non-Condensing Storage Conditions Temperature -20˚C to 60 ˚C Humidity 5 % to 90 % non-Condensing Attached( ), Detached ( O ) Attached( O ), Detached ( ) Wall-out type or PC-outlet type NOTE Information in this document is subject to change without notice. A15 Specifications Picture Tube Sync Input Video Input Resolution Plug&Play Power...

Owner's Manual
Page 18
Digitally yours
Digitally yours

Owner's Manual
Page 18
Digitally yours
Digitally yours


