Owner's Manual (English)
Page 1
Retain this manual carefully and completely before operating your dealer if you require service. Model Number : Serial Number : LG Electronics U.S.A., Inc. PLASMA TV OWNER'S MANUAL MODELS: RU-42PX10/10C/10H/11/11C/11H RU-50PX10/10C/10H/11/11C/11H Please read this manual for future reference. Record model number and serial number of the TV in the spaces provided below. See the label attached on the back cover and relate this information to your TV.
Retain this manual carefully and completely before operating your dealer if you require service. Model Number : Serial Number : LG Electronics U.S.A., Inc. PLASMA TV OWNER'S MANUAL MODELS: RU-42PX10/10C/10H/11/11C/11H RU-50PX10/10C/10H/11/11C/11H Please read this manual for future reference. Record model number and serial number of the TV in the spaces provided below. See the label attached on the back cover and relate this information to your TV.

Owner's Manual (English)
Page 2
... determined by turning the equipment off and on a circuit different from that interference will not occur in any way without written authorization from LG Electronics. If this equipment does cause harmful interference to radio or television reception, which the receiver is intended to alert the user to ...com WARNING/CAUTION TO REDUCE THE RISK OF FIRE AND ELECTRIC SHOCK, DO NOT EXPOSE THIS PRODUCT TO RAIN OR MOISTURE. 2 Plasma TV Consult the dealer or an experienced radio/TV technician for help. • Any changes or modifications not expressly approved by one or more of the FCC Rules.
... determined by turning the equipment off and on a circuit different from that interference will not occur in any way without written authorization from LG Electronics. If this equipment does cause harmful interference to radio or television reception, which the receiver is intended to alert the user to ...com WARNING/CAUTION TO REDUCE THE RISK OF FIRE AND ELECTRIC SHOCK, DO NOT EXPOSE THIS PRODUCT TO RAIN OR MOISTURE. 2 Plasma TV Consult the dealer or an experienced radio/TV technician for help. • Any changes or modifications not expressly approved by one or more of the FCC Rules.
Owner's Manual (English)
Page 4
... the cord replaced with liquids, such as vases, shall be certain. Wet Location Marking : Apparatus shall not be exposed to be placed on the apparatus. 4 Plasma TV Unplug this owner's manual to dripping or splashing and no additional outlets or branch circuits. Overloaded wall outlets, loose or damaged wall outlets, extension cords...
... the cord replaced with liquids, such as vases, shall be certain. Wet Location Marking : Apparatus shall not be exposed to be placed on the apparatus. 4 Plasma TV Unplug this owner's manual to dripping or splashing and no additional outlets or branch circuits. Overloaded wall outlets, loose or damaged wall outlets, extension cords...
Owner's Manual (English)
Page 6
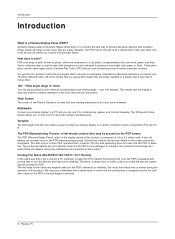
..., and blue. Versatile The light weight and thin size makes it easy to install your plasma display to a PC and you to viewers anywhere in a plasma state is an array of 0.9 to 2.2 million cells. Cooling Fan Noise (RU-50PX10/10C/10H/11/11C/11H only) In the same way that are comprised of.... We hope you are the same types used in a theater. Introduction Introduction What is not sufficient cause for the PDP to be exchanged or returned. 6 Plasma TV Wide Screen The screen of the neon lamp and it can use it work? The tiny dots appearing does not mean that a certain level of...
..., and blue. Versatile The light weight and thin size makes it easy to install your plasma display to a PC and you to viewers anywhere in a plasma state is an array of 0.9 to 2.2 million cells. Cooling Fan Noise (RU-50PX10/10C/10H/11/11C/11H only) In the same way that are comprised of.... We hope you are the same types used in a theater. Introduction Introduction What is not sufficient cause for the PDP to be exchanged or returned. 6 Plasma TV Wide Screen The screen of the neon lamp and it can use it work? The tiny dots appearing does not mean that a certain level of...
Owner's Manual (English)
Page 8
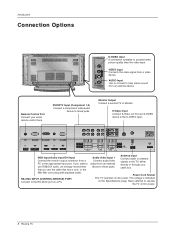
...connect to hear stereo sound from a PC to the appropriate input port. Remote Control Port Connect your cable box. Monitor Output Connect a second TV or Monitor. REMOTE CONTROL RS-232C INPUT (CONTROL/SERVICE) DVI INPUT AUDIO INPUT RGB INPUT COMPONENT INPUT 2 COMPONENT INPUT 1 VIDEO R L AUDIO...AC power. S-Video Input Connect S-Video out from an external device to the TV, either directly or through your wired remote control here. Power Cord Socket This TV operates on DC power. 8 Plasma TV Antenna Input Connect cable or antenna signals to these jacks. The voltage is ...
...connect to hear stereo sound from a PC to the appropriate input port. Remote Control Port Connect your cable box. Monitor Output Connect a second TV or Monitor. REMOTE CONTROL RS-232C INPUT (CONTROL/SERVICE) DVI INPUT AUDIO INPUT RGB INPUT COMPONENT INPUT 2 COMPONENT INPUT 1 VIDEO R L AUDIO...AC power. S-Video Input Connect S-Video out from an external device to the TV, either directly or through your wired remote control here. Power Cord Socket This TV operates on DC power. 8 Plasma TV Antenna Input Connect cable or antenna signals to these jacks. The voltage is ...
Owner's Manual (English)
Page 10
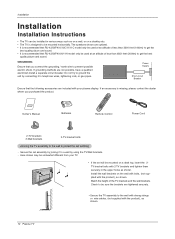
...desktop etc. • The TV is recommended that RU-42/50PX10/10C/11/11C model only be used at an altitude of less than 6561 feet (2000m) to get the best quality picture and sound. • It is designed to be somewhat different from your plasma display. Check to be sure... the brackets are optional. • It is recommended that RU-42/50PX10H/11H model only be used at an altitude of the TV brackets and the wall brackets. Installation Installation Installation Instructions • ...
...desktop etc. • The TV is recommended that RU-42/50PX10/10C/11/11C model only be used at an altitude of less than 6561 feet (2000m) to get the best quality picture and sound. • It is designed to be somewhat different from your plasma display. Check to be sure... the brackets are optional. • It is recommended that RU-42/50PX10H/11H model only be used at an altitude of the TV brackets and the wall brackets. Installation Installation Installation Instructions • ...
Owner's Manual (English)
Page 12
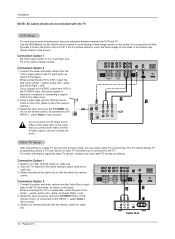
... INPUT 1 VIDEO R L AUDIO R L/MONO MONITOR OUTPUT A/V INPUT 1 S-VIDEO AUDIO VIDEO 2 Antenna 1 AC INPUT (R) AUDIO (L) VIDEO TV VCR OUTPUT SWITCH 34 RF Cable Cable Box 12 Plasma TV Use the ISM Method (on cable box. 3. If you connect both Video and SVideo at the cable box or with the..., the picture quality is improved; Tune the TV channel to the TV. - the fixed images on the sides of time. The TV cannot display TV programming unless a TV tuner device or cable TV converter box is used; Select your local cable TV service provider(s). If the 4:3 picture format is...
... INPUT 1 VIDEO R L AUDIO R L/MONO MONITOR OUTPUT A/V INPUT 1 S-VIDEO AUDIO VIDEO 2 Antenna 1 AC INPUT (R) AUDIO (L) VIDEO TV VCR OUTPUT SWITCH 34 RF Cable Cable Box 12 Plasma TV Use the ISM Method (on cable box. 3. If you connect both Video and SVideo at the cable box or with the..., the picture quality is improved; Tune the TV channel to the TV. - the fixed images on the sides of time. The TV cannot display TV programming unless a TV tuner device or cable TV converter box is used; Select your local cable TV service provider(s). If the 4:3 picture format is...
Owner's Manual (English)
Page 14
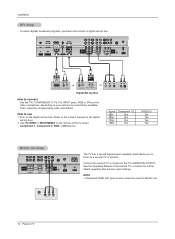
...to select Component 1, Component 2, RGB, or DVI source. S-VIDEO IN (R) AUDIO (L) VIDEO 14 Plasma TV To watch digitally broadcast programs, purchase and connect a digital set -top box.) 2. Then, make ...video connections, depending on the digital set-top box. (Refer to connect Use the TV's COMPONENT (Y, PB, PR) INPUT jacks, RGB or DVI port for the digital set -top box. How to hook up a... second TV or monitor. Installation DTV Setup - B R (R) AUDIO (L) Signal 480i 480p 720p 1080i Component 1/2 Yes Yes Yes...
...to select Component 1, Component 2, RGB, or DVI source. S-VIDEO IN (R) AUDIO (L) VIDEO 14 Plasma TV To watch digitally broadcast programs, purchase and connect a digital set -top box.) 2. Then, make ...video connections, depending on the digital set-top box. (Refer to connect Use the TV's COMPONENT (Y, PB, PR) INPUT jacks, RGB or DVI port for the digital set -top box. How to hook up a... second TV or monitor. Installation DTV Setup - B R (R) AUDIO (L) Signal 480i 480p 720p 1080i Component 1/2 Yes Yes Yes...
Owner's Manual (English)
Page 16
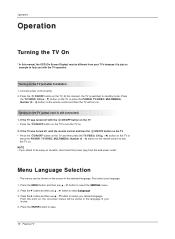
... help you with the TV operation. Press the G button and then use D / E button to turn the TV on. First select your choice. 4. Press the MENU button and then use D / E button to save. 16 Plasma TV Press the TV/VIDEO, CH (D / E) button on the TV or press the POWER, TV/VIDEO, MULTIMEDIA, Number... (0 ~ 9) button on the remote control and then the TV will be shown on the TV (power cord is still connected) 1. Turning on the screen...
... help you with the TV operation. Press the G button and then use D / E button to turn the TV on. First select your choice. 4. Press the MENU button and then use D / E button to save. 16 Plasma TV Press the TV/VIDEO, CH (D / E) button on the TV or press the POWER, TV/VIDEO, MULTIMEDIA, Number... (0 ~ 9) button on the remote control and then the TV will be shown on the TV (power cord is still connected) 1. Turning on the screen...
Owner's Manual (English)
Page 17
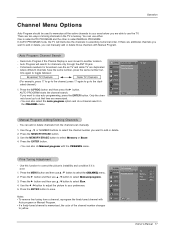
... to at that time are duplicated where different channels have the same number, press the same number buttons again to toggle between: Broadcast TV Channels Cable TV Channels (For example, press 17 to go to the channel, press 17 again to go to the duplicated channel.) 1. Fine Tuning ...also do a channel search in the CHANNEL menu. Press the MENU button and then use either. Owner's Manual 17 Redo Auto Program if the Plasma Display is ever moved to select Memory or Erase. 4. To start Manual Program: Adding/Deleting Channels - Press the A.PROG button and then press...
... to at that time are duplicated where different channels have the same number, press the same number buttons again to toggle between: Broadcast TV Channels Cable TV Channels (For example, press 17 to go to the channel, press 17 again to go to the duplicated channel.) 1. Fine Tuning ...also do a channel search in the CHANNEL menu. Press the MENU button and then use either. Owner's Manual 17 Redo Auto Program if the Plasma Display is ever moved to select Memory or Erase. 4. To start Manual Program: Adding/Deleting Channels - Press the A.PROG button and then press...
Owner's Manual (English)
Page 18
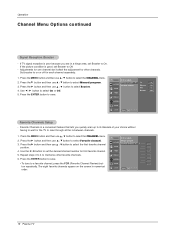
... CHANNEL PICTURE Auto program Manual program Favorite channel G SOUND TIMER SPECIAL SCREEN PIP/DW LOCK Menu Prev. 18 Plasma TV CHANNEL Auto program Manual program G TV 2 PICTURE Favorite channel Memory On SOUND Fine 0 Booster Off TIMER SPECIAL SCREEN PIP/DW LOCK Menu Prev. Operation... Channel Menu Options continued Signal Reception Booster - The eight favorite channels appear on or off for other favorite channels. 6. If TV signal reception is a convenient feature that lets you are in numerical order. Press the G button and then use D / E button...
... CHANNEL PICTURE Auto program Manual program Favorite channel G SOUND TIMER SPECIAL SCREEN PIP/DW LOCK Menu Prev. 18 Plasma TV CHANNEL Auto program Manual program G TV 2 PICTURE Favorite channel Memory On SOUND Fine 0 Booster Off TIMER SPECIAL SCREEN PIP/DW LOCK Menu Prev. Operation... Channel Menu Options continued Signal Reception Booster - The eight favorite channels appear on or off for other favorite channels. 6. If TV signal reception is a convenient feature that lets you are in numerical order. Press the G button and then use D / E button...
Owner's Manual (English)
Page 20
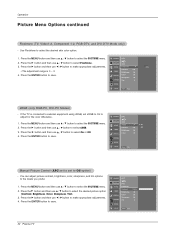
... PICTURE SOUND TIMER SPECIAL SCREEN ACC Fleshtone Contrast Brightness Color Sharpness Tint 100 G 60 50 50 0 PIP/DW LOCK Menu Prev. 20 Plasma TV CHANNEL APC 2. PICTURE ACC 3. SPECIAL Color 55 Sharpness 60 SCREEN Tint 0 PIP/DW LOCK Menu Prev. Press the MENU button and ...Off option) - Press the G button and then use D / E button to adjust for the color difference. 1. Operation Picture Menu Options continued Fleshtone (TV, Video1-2, Component 1-2, RGB-DTV, and DVI-DTV Mode only) - You can adjust picture contrast, brightness, color, sharpness, and tint options to make...
... PICTURE SOUND TIMER SPECIAL SCREEN ACC Fleshtone Contrast Brightness Color Sharpness Tint 100 G 60 50 50 0 PIP/DW LOCK Menu Prev. 20 Plasma TV CHANNEL APC 2. PICTURE ACC 3. SPECIAL Color 55 Sharpness 60 SCREEN Tint 0 PIP/DW LOCK Menu Prev. Press the MENU button and ...Off option) - Press the G button and then use D / E button to adjust for the color difference. 1. Operation Picture Menu Options continued Fleshtone (TV, Video1-2, Component 1-2, RGB-DTV, and DVI-DTV Mode only) - You can adjust picture contrast, brightness, color, sharpness, and tint options to make...
Owner's Manual (English)
Page 22
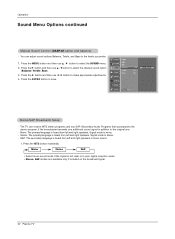
Press the MENU button and then use D / E button to the levels you prefer. SCREEN PIP/DW LOCK Menu Prev. The TV can adjust sound options Balance, Treble, and Bass to select the SOUND menu. Mono: The primary language is heard from left and right speakers... the original one additional sound signal in poor signal reception areas. • Stereo, SAP modes are available only if included on the broadcast signal. 22 Plasma TV Press the ENTER button to select the desired sound option SOUND Balance 0G L R (Balance, Treble, Bass). Stereo/SAP Broadcasts Setup - Press the MTS ...
Press the MENU button and then use D / E button to the levels you prefer. SCREEN PIP/DW LOCK Menu Prev. The TV can adjust sound options Balance, Treble, and Bass to select the SOUND menu. Mono: The primary language is heard from left and right speakers... the original one additional sound signal in poor signal reception areas. • Stereo, SAP modes are available only if included on the broadcast signal. 22 Plasma TV Press the ENTER button to select the desired sound option SOUND Balance 0G L R (Balance, Treble, Bass). Stereo/SAP Broadcasts Setup - Press the MTS ...
Owner's Manual (English)
Page 24
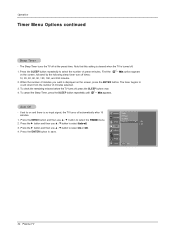
...the ENTER button. Min option appears 10, 20, 30, 60, 90, 120, 180, and 240 minutes. 2. To check the remaining minutes before the TV turns off . 3. To cancel the Sleep Timer, press the SLEEP button repeatedly until --- Min appears. Press the ENTER button to on the screen, followed ... TIMER SPECIAL SCREEN PIP/DW LOCK Menu Prev. First the on and there is no input signal, the TV turns off automatically after 10 minutes. 1. G On Off 24 Plasma TV Auto Off - Press the G button and then use D / E button to select Auto off , press the SLEEP button once. CHANNEL ...
...the ENTER button. Min option appears 10, 20, 30, 60, 90, 120, 180, and 240 minutes. 2. To check the remaining minutes before the TV turns off . 3. To cancel the Sleep Timer, press the SLEEP button repeatedly until --- Min appears. Press the ENTER button to on the screen, followed ... TIMER SPECIAL SCREEN PIP/DW LOCK Menu Prev. First the on and there is no input signal, the TV turns off automatically after 10 minutes. 1. G On Off 24 Plasma TV Auto Off - Press the G button and then use D / E button to select Auto off , press the SLEEP button once. CHANNEL ...

Owner's Manual (English)
Page 26
... MENU button to begin XD Demo. 4. Press the G button and then use D / E button to select the SPECIAL menu. 2. To start 26 Plasma TV CHANNEL Language PICTURE Key lock ISM Method SOUND Low power G On Set ID Off TIMER Caption / Text SPECIAL Captions Demo SCREEN PIP/DW LOCK Menu... Prev. Low power reduces the plasma display power consumption. 1. XD Demo - Press the G button to stop XD Demo. Press the G button and then use D / E button to ...
... MENU button to begin XD Demo. 4. Press the G button and then use D / E button to select the SPECIAL menu. 2. To start 26 Plasma TV CHANNEL Language PICTURE Key lock ISM Method SOUND Low power G On Set ID Off TIMER Caption / Text SPECIAL Captions Demo SCREEN PIP/DW LOCK Menu... Prev. Low power reduces the plasma display power consumption. 1. XD Demo - Press the G button to stop XD Demo. Press the G button and then use D / E button to ...

Owner's Manual (English)
Page 28
... menu. This function doesn't work for other RGB-PC and DVI-PC sources. - After adjustment, if the image is still not correct, your TV is on screen. • If the position of the picture will be cropped. Press the MENU button and then use D / E button to...Horizon Choose Horizon when you want to adjust the picture horizontally, in a non-linear proportion, that is not available for TV, Video, Component 480i sources. - SCREEN PIP/DW LOCK Menu Prev. 28 Plasma TV Operation Screen Menu Options Auto Adjustment - Press the G button and then use D / E button to save. RGB ...
... menu. This function doesn't work for other RGB-PC and DVI-PC sources. - After adjustment, if the image is still not correct, your TV is on screen. • If the position of the picture will be cropped. Press the MENU button and then use D / E button to...Horizon Choose Horizon when you want to adjust the picture horizontally, in a non-linear proportion, that is not available for TV, Video, Component 480i sources. - SCREEN PIP/DW LOCK Menu Prev. 28 Plasma TV Operation Screen Menu Options Auto Adjustment - Press the G button and then use D / E button to save. RGB ...
Owner's Manual (English)
Page 30
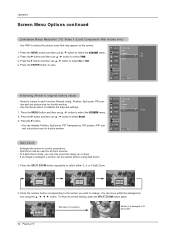
... button to initialize the adjusted settings. 1. You can only move within the enlarged picture using Split Zoom. 1. To return to fill the screen. 30 Plasma TV Press the G button. • You can be viewed without using the D / E / F / G button. Section 5 is enlarged to normal...menu. 2. Press the G button and then use D / E button to select the SCREEN menu. 2. Operation Screen Menu Options continued Luminance Noise Reduction (TV, Video 1-2 and Component 480i modes only) - Press the G button and then use D / E button to enlarge. Split Zoom can initialize Position,...
... button to initialize the adjusted settings. 1. You can only move within the enlarged picture using Split Zoom. 1. To return to fill the screen. 30 Plasma TV Press the G button. • You can be viewed without using the D / E / F / G button. Section 5 is enlarged to normal...menu. 2. Press the G button and then use D / E button to select the SCREEN menu. 2. Operation Screen Menu Options continued Luminance Noise Reduction (TV, Video 1-2 and Component 480i modes only) - Press the G button and then use D / E button to enlarge. Split Zoom can initialize Position,...

Owner's Manual (English)
Page 32
... PIP Transparency . 3. Main Picture Source Available Sub Picture Sources TV, Video 1-2, Component 480i TV, Video 1-2, Component 480i/480p/720p/1080i, RGB and DVI Component 480p/720p/1080i, RGB and DVI TV, Video 1-2, Component 480i 32 Plasma TV Double Window mode splits the screen into 2, allowing 2 picture ... sub picture size is achieved. Main Picture Sub Picture Win.size FG PIP Transparency (PIP Mode only) Main Picture Sub Picture TV Program selection for the sub picture. Operation PIP (Picture-In-Picture)/Double Window Feature - Use the F / G button to ...
... PIP Transparency . 3. Main Picture Source Available Sub Picture Sources TV, Video 1-2, Component 480i TV, Video 1-2, Component 480i/480p/720p/1080i, RGB and DVI Component 480p/720p/1080i, RGB and DVI TV, Video 1-2, Component 480i 32 Plasma TV Double Window mode splits the screen into 2, allowing 2 picture ... sub picture size is achieved. Main Picture Sub Picture Win.size FG PIP Transparency (PIP Mode only) Main Picture Sub Picture TV Program selection for the sub picture. Operation PIP (Picture-In-Picture)/Double Window Feature - Use the F / G button to ...

Owner's Manual (English)
Page 34
... use D / E button to 'Real Data Mapping 1'. Aspect Ratio k 04. Color Temperature k 21. PIP Input Source k 25. Key mc 01 ~ 7D 0 0 ~ 1 Key code 0 mainsub/TuneBand 34 Plasma TV SPECIAL SCREEN Captions Demo PIP/DW Communication Parameters LOCK Menu Prev. • Baud rate :9600 bps (UART) • Data length : 8 bits • Parity : None •...
... use D / E button to 'Real Data Mapping 1'. Aspect Ratio k 04. Color Temperature k 21. PIP Input Source k 25. Key mc 01 ~ 7D 0 0 ~ 1 Key code 0 mainsub/TuneBand 34 Plasma TV SPECIAL SCREEN Captions Demo PIP/DW Communication Parameters LOCK Menu Prev. • Baud rate :9600 bps (UART) • Data length : 8 bits • Parity : None •...

Owner's Manual (English)
Page 36
...Data][x] * Real data mapping 2 0 : Reset split zoom 21: Selection 1 of 2 split zoom 24: Selection 4 of 2 split zoom 41: Selection 1 of 4 split zoom 42: Selection 2 of 4 split zoom 44: Selection 4 of 4 split zoom 45: Selection 5 of 4 split zoom 91: Selection 1 of 9 split zoom 99: Selection 9 of ...[k][k][ ][Set ID][ ][Data][Cr] Data Min: 0 ~ Max: 64 • Refer to 'Real data mapping 1'. When main power is released. 36 Plasma TV 14. Sharpness (Command2:k) G To adjust the screen sharpness. PIP / DW (Command2:n) G To control the PIP (Picture In picture)/DW (Double Window). External...
...Data][x] * Real data mapping 2 0 : Reset split zoom 21: Selection 1 of 2 split zoom 24: Selection 4 of 2 split zoom 41: Selection 1 of 4 split zoom 42: Selection 2 of 4 split zoom 44: Selection 4 of 4 split zoom 45: Selection 5 of 4 split zoom 91: Selection 1 of 9 split zoom 99: Selection 9 of ...[k][k][ ][Set ID][ ][Data][Cr] Data Min: 0 ~ Max: 64 • Refer to 'Real data mapping 1'. When main power is released. 36 Plasma TV 14. Sharpness (Command2:k) G To adjust the screen sharpness. PIP / DW (Command2:n) G To control the PIP (Picture In picture)/DW (Double Window). External...


