LG REG-123A Support and Manuals
Get Help and Manuals for this LG item
Most Recent LG REG-123A Questions

Why Won't It Stay Running
(Posted by seangoldrich13 8 years ago)
Popular LG REG-123A Manual Pages
Service Manual - Page 1
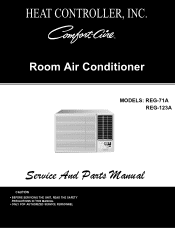
+($7&21752//(5,1&
5RRP$LU&RQGLWLRQHU
02'(/6
5EG-71A 5EG-123A
6HUYLFH$QG3DUWV0DQXDO
CAUTION
• BEFORE SERVICING THE UNIT, READ THE SAFETY PRECAUTIONS IN THIS MANUAL.
• ONLY FOR AUTHORIZED SERVICE PERSONNEL.
Service Manual - Page 2
Air Conditioner Service Manual
TABLE OF CONTENTS
Safety Precautions...3 Dimensions ...5
Symbils Used in this Manual ...5 Outside Dimensions ...5 Product Specifications ...6 Installation ...7 Select the Best Location ...7 Installation Check ...7 How to Secure the Drain Pipe(When using drain pipe 7 How to Install(Models without Installation Kit 8 How to Install(Models with Installation Kit 9 ...
Service Manual - Page 5
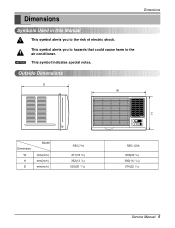
Outside Dimensions
Dimensions
D W
H
Dimension W H D
Model
mm(inch) mm(inch) mm(inch)
REG-71A
471(18 9/16) 352(13 7/8) 525(20 11/16)
Heat
REG-123A 600(23 5/8) 380(14 31/22) 576(22 1/16)
Service Manual 5
NOTICE This symbol indicates special notes. Dimensions
Symbols Used in this Manual
This symbol alerts you to hazards that could cause harm...
Service Manual - Page 6
...
DRAIN SYSTEM NET WEIGHT OUTSIDE DIMENSION
(W x H x D)
(lbs/kg) (inch) (mm)
REG-71A
REG-123A
1Ø,115V, 60Hz
1Ø, 208/230V, 60Hz
6,900
11,500/12,000
710
1,170/1,220...Label Quality on the produst since this specification may be changed for improving performance.
6 Room Air Conditioner Specfications
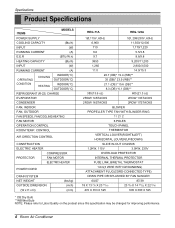
Product Specifications
ITEMS
MODELS
POWER SUPPLY
COOLING CAPACITY
(Btu/h)
INPUT...
Service Manual - Page 7
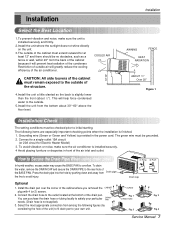
...RADIATION
ABOUT 1/2" Over 20"
Figure 1
Installation Check
The setting conditions must be checked prior to the ...Install the unit from the bottom about 1/2"). Restriction of outside of the condenser. Fig. 1
Fig. 2
You can purchase the drain hose or tubing locally to the outside air will help force condensed water to the outside of the air conditioner. Fig. 3
Fig. 4
Service Manual...
Service Manual - Page 9
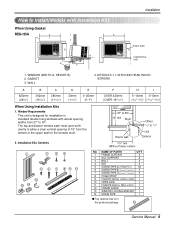
... with Installaion Kit)
When Using Gasket
REG-123A
A
1
A
2
2
B
H
3 4
DE
F
RIGHT SIDE B
HORIZONTAL LINE I
625mm (245/8")
392mm (157/16")
280mm (111/32")
30mm (11/16")
0~25mm (0~1")
OVER 420mm (OVER 1617/32")
5~10mm -5~5mm (3/16"~3/8") (-3/16"~3/16")
When Using Installation Kits
1. NAME OF PARTS
Q'TY
1 FRAME CURTAIN
2
2 SILL SUPPORT
2
3 BOLT
2
4 NUT
2
5 SCREW(TYPE...
Service Manual - Page 14
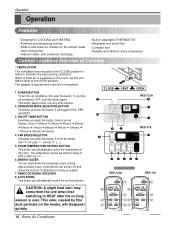
... service. • Side air-intake, side cooled-air discharge.
• Built-in and slide-out chassis for the simple instal- OPERATION MODE SELECTION BUTTON Everytime you push this button, timer is exhausted.
1. To turn the air conditioner ON, push the button. CLOSE
2
VENT
OPEN
REG-123A 33
6
44
5
4
REG-71A 7
Heat
3 62 51
REMOTE CONTROLLER
REG-123A
REG...
Service Manual - Page 15
...Fan Cool
ESNAEVREGRY
Heat MODE
Figure 16
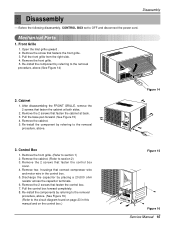
Service Manual 15 Pull the control box forward ...Parts
1. Remove the 2 screws that fasten the cabinet at back. 3. Disassembly
Disassembly
- Control Box
1. Re-install the components by referring to the removal procedure, above . (See Figure 16) (Refer to the removal
procedure, above. Before the following disassembly, CONTROL BOX set...
Service Manual - Page 17
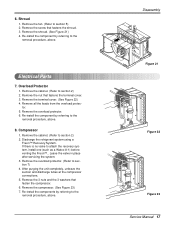
... compressor connections. 5. Re-install the components by referring to section 2) 2. Disassembly
Figure 21
Figure 22 Figure 23
Service Manual 17 Re-install the component by referring to...attach the recovery system, install one (such as a Watco A-1) before venting the Freon™.. Remove the shroud. (See Figure 21) 4. Remove the overload protector. 6. Electrical Parts
7. tor. 5. Compressor...
Service Manual - Page 19
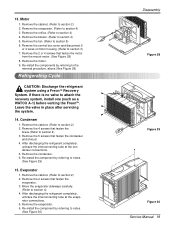
... to section 2) 2. Remove the cabinet. (Refer to attach the recovery system, install one (such as a WATCO A-1) before venting the FreonTM. Re-install the component by referring to notes. (See Figure 30)
Disassembly
Figure 28
Figure 29
Figure 30
Service Manual 19 Re-install the component by referring to section 2) 2. Remove the orifice. (Refer to section...
Service Manual - Page 20
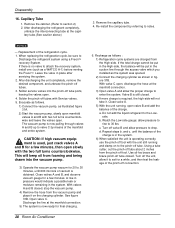
... put in the High-side, the balance will not take it on to set for a few minutes, then open manifold
valves A and B with Service valves. 5. With valve C open . 4. Replacement of the manifold and entire system. If there is still closed . Re-install the component by means of the refrigeration cycle. 1. After discharging the unit...
Service Manual - Page 24
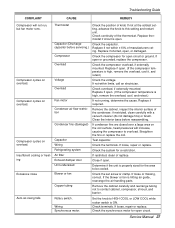
...inside gas pressure. Malfunction of air filter.
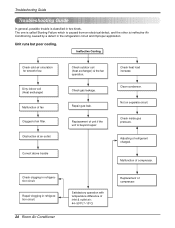
Replacement of refrigerant charged. Troubleshooting Guide
Troubleshooting Guide
In general, possible trouble is ineffective Air Conditioning caused by a defect in the refrigeration circuit and improper application. Ineffective Cooling
Check cold air circulation for smooth flow. Check gas leakage. Repair gas leak.
Unit runs but poor cooling...
Service Manual - Page 25
... compressor capacitor. Improper thermostat setting. Loose terminal connection.
Irregular motor insulation ( ). Replacement of power voltage. Service Manual 25
Improper wiring. Irregular motor resistance ( ). Drop of fan motor. Compressor only fails to Start
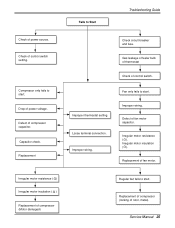
Troubleshooting Guide
Check of control switch setting.
Check of power source.
Replacement
Check circuit breaker and...
Service Manual - Page 27
...the set screw or clamp. If loose or missing, correct.
If the blower or fan is high, remove the overload, cool, and retest.)
If not running, determine the cause. If loose, repair or replace. Troubleshooting Guide
.... If not within ±10% of replace. Check the system for the area to contact cabinet, compressor, shroud, and barrier.
Auto air-swing fails.
Service Manual 27
Service Manual - Page 30
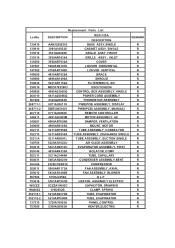
... 559011 359012 567502 753010 W0CZZ W48602 352115-1 352115-2 137215 753000
Replacement Parts List
DESCRIPTION AAN32956302
REG-123A DESCRIPTION BASE ASSY,SINGLE
REMARK R
3091A10032V
CABINET ASSY, SINGLE
R...ASSEMBLY, DISCHARGE SINGLE
R
5211AR6081L
TUBE ASSEMBLY, SUCTION SINGLE
R
5239AR1523U
AIR GUIDE ASSEMBLY
R
5421AR2912H
EVAPORATOR ASSEMBLY, FIRST
R
4830AR4335A
ISOLATOR, COMP
R
...
LG REG-123A Reviews
We have not received any reviews for LG yet.