
Service Manual
Page 39
... cancel burn-in . 2.Factory layer: 1) DMD layer (Fig-3): (Fig-3) DMD layer 1.1) CW delay: adjust color wheel delay. (Note this value . 1.4) DLP Contrast: adjust DLP Contrast. You can enable burn-in on screen in turn off after burn-in hour count down to 0 and burn-in complete. (You can see ..., set this selection to On and system will auto turn . default setting is 0.Software auto set this value as source find. 1.3) DLP Brightness: adjust DLP Brightness. System will going to burn-in sequence by set this selection to Off). 39 Default setting is 30.Do not change this value...
... cancel burn-in . 2.Factory layer: 1) DMD layer (Fig-3): (Fig-3) DMD layer 1.1) CW delay: adjust color wheel delay. (Note this value . 1.4) DLP Contrast: adjust DLP Contrast. You can enable burn-in on screen in turn off after burn-in hour count down to 0 and burn-in complete. (You can see ..., set this selection to On and system will auto turn . default setting is 0.Software auto set this value as source find. 1.3) DLP Brightness: adjust DLP Brightness. System will going to burn-in sequence by set this selection to Off). 39 Default setting is 30.Do not change this value...

Service Manual
Page 43
6) Others layer (Fig-7): (Fig-7) YPbPr layer 6.1) Gamma index: system auto select DLP gamma index 6.2) Gray value: adjust here to check DMD fail pixel. 6.3) Blue value: adjust here to check DMD fail pixel. 6.4) Scaling: tell you what scaling mode is using now. 6.5) Pc/PbPr Mode: index of input timing 6.6) RS232: Enable / Disable RS232 control 43
6) Others layer (Fig-7): (Fig-7) YPbPr layer 6.1) Gamma index: system auto select DLP gamma index 6.2) Gray value: adjust here to check DMD fail pixel. 6.3) Blue value: adjust here to check DMD fail pixel. 6.4) Scaling: tell you what scaling mode is using now. 6.5) Pc/PbPr Mode: index of input timing 6.6) RS232: Enable / Disable RS232 control 43
User Guide
Page 1
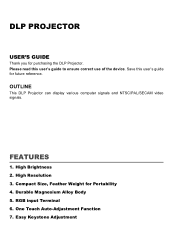
Save this user's guide to ensure correct use of the device. Durable Magnesium Alloy Body 5. One Touch Auto-Adjustment Function 7. FEATURES 1. Easy Keystone Adjustment Please read this user's guide for future reference. High Resolution 3. RGB input Terminal 6. Compact Size, Feather Weight for purchasing the DLP Projector. DLP PROJECTOR USER'S GUIDE Thank you for Portability 4. OUTLINE This DLP Projector can display various computer signals and NTSC/PAL/SECAM video signals. High Brightness 2.
Save this user's guide to ensure correct use of the device. Durable Magnesium Alloy Body 5. One Touch Auto-Adjustment Function 7. FEATURES 1. Easy Keystone Adjustment Please read this user's guide for future reference. High Resolution 3. RGB input Terminal 6. Compact Size, Feather Weight for purchasing the DLP Projector. DLP PROJECTOR USER'S GUIDE Thank you for Portability 4. OUTLINE This DLP Projector can display various computer signals and NTSC/PAL/SECAM video signals. High Brightness 2.

User Guide
Page 3
Table of the Lamp 20 Lamp Replacement 20 Operative Information 21 Troubleshooting 22 Common Problems & Solutions 22 Status Messages 22 DLP Personal Projector iii SPECIAL Menu 17 4. TRACKING Menu 18 Shutdown 19 Maintenance 20 Lamp Information 20 Use and Replacement of Contents Introduction 1 Safety Instructions 1 FCC ...
Table of the Lamp 20 Lamp Replacement 20 Operative Information 21 Troubleshooting 22 Common Problems & Solutions 22 Status Messages 22 DLP Personal Projector iii SPECIAL Menu 17 4. TRACKING Menu 18 Shutdown 19 Maintenance 20 Lamp Information 20 Use and Replacement of Contents Introduction 1 Safety Instructions 1 FCC ...

User Guide
Page 4
Specifications 23 Projector Specifications 23 Timing Chart 24 Dimensions 25 iv DLP Personal Projector
Specifications 23 Projector Specifications 23 Timing Chart 24 Dimensions 25 iv DLP Personal Projector
User Guide
Page 5
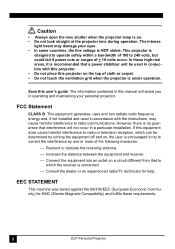
... THIS USER'S GUIDE FOR FUTURE REFERENCE . The lamp becomes extremely hot during operation. Take it for replacement. Do not place this product on rare occasions. 3. DLP Personal Projector 1 Do not operate lamps beyond the rated life could cause them to a qualified technician when service or repair is subsequently used. 5. Excessive operation...
... THIS USER'S GUIDE FOR FUTURE REFERENCE . The lamp becomes extremely hot during operation. Take it for replacement. Do not place this product on rare occasions. 3. DLP Personal Projector 1 Do not operate lamps beyond the rated life could cause them to a qualified technician when service or repair is subsequently used. 5. Excessive operation...
User Guide
Page 6
... place this projector on the top of cloth or carpet. • Do not touch the ventilation grill when the projector is connected. - In these requirements. 2 DLP Personal Projector However, there is designed to operate safely within a bandwidth of 100 to correct the interference by turning the equipment off and on . •...
... place this projector on the top of cloth or carpet. • Do not touch the ventilation grill when the projector is connected. - In these requirements. 2 DLP Personal Projector However, there is designed to operate safely within a bandwidth of 100 to correct the interference by turning the equipment off and on . •...

User Guide
Page 7
... Accessories 1. 150W lamp module 2. If any of these items are missing, please contact personnel at the place of purchase. Macintosh adapter Video Cable S-Video Cable DLP Personal Projector 3 Shipping Contents The Projector is shipped with the cables required for connection to standard PC or laptop computers. Carefully unpack and verify that...
... Accessories 1. 150W lamp module 2. If any of these items are missing, please contact personnel at the place of purchase. Macintosh adapter Video Cable S-Video Cable DLP Personal Projector 3 Shipping Contents The Projector is shipped with the cables required for connection to standard PC or laptop computers. Carefully unpack and verify that...

User Guide
Page 8
Projector Description Projector DC 12V, 0.5A Max. power supply PC/ HD (YPBPR) connector USB MOUSE connector VIDEO connector S-VIDEO connector Ventilation grill IR remote sensor AC power cord inlet Kensington lock Projection lens adjuster External control panel (see "External Control Panel" on page 5 for more detailed information) R IR remote sensor Open here to release the front cover. Adjuster foot Projection lens Lamp door 4 DLP Personal Projector
Projector Description Projector DC 12V, 0.5A Max. power supply PC/ HD (YPBPR) connector USB MOUSE connector VIDEO connector S-VIDEO connector Ventilation grill IR remote sensor AC power cord inlet Kensington lock Projection lens adjuster External control panel (see "External Control Panel" on page 5 for more detailed information) R IR remote sensor Open here to release the front cover. Adjuster foot Projection lens Lamp door 4 DLP Personal Projector
User Guide
Page 9
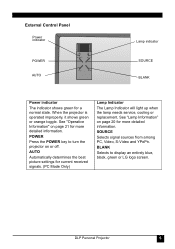
... shows green for current received signals. (PC Mode Only) Lamp Indicator The Lamp Indicator will light up when the lamp needs service, cooling or replacement. DLP Personal Projector 5 See "Operative Information" on page 21 for more detailed information. See "Lamp Information" on or off. SOURCE Selects signal sources from among PC... Selects to turn the projector on page 20 for more detailed information. POWER Press the POWER key to display an entirely blue, black, green or LG logo screen.
... shows green for current received signals. (PC Mode Only) Lamp Indicator The Lamp Indicator will light up when the lamp needs service, cooling or replacement. DLP Personal Projector 5 See "Operative Information" on page 21 for more detailed information. See "Lamp Information" on or off. SOURCE Selects signal sources from among PC... Selects to turn the projector on page 20 for more detailed information. POWER Press the POWER key to display an entirely blue, black, green or LG logo screen.
User Guide
Page 10
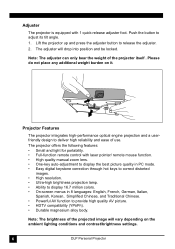
... adjuster can only bear the weight of use. Please do not place any additional weight burden on the ambient lighting conditions and contrast/brightness settings. 6 DLP Personal Projector Adjuster The projector is equipped with laser pointer/ remote mouse function. • High quality manual zoom lens. • One-key auto-adjustment to...
... adjuster can only bear the weight of use. Please do not place any additional weight burden on the ambient lighting conditions and contrast/brightness settings. 6 DLP Personal Projector Adjuster The projector is equipped with laser pointer/ remote mouse function. • High quality manual zoom lens. • One-key auto-adjustment to...
User Guide
Page 11
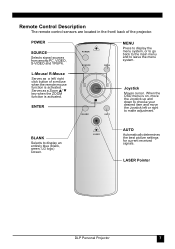
... sensors are located in the front/ back of a mouse when the remote mouse function is activated. BLANK Selects to display an entirely blue (black, green, LG logo) screen. LASER Pointer DLP Personal Projector 7 ENTER Joystick Moves cursor. POWER SOURCE Selects signal sources from among PC, VIDEO, S-VIDEO and YPBPR.
... sensors are located in the front/ back of a mouse when the remote mouse function is activated. BLANK Selects to display an entirely blue (black, green, LG logo) screen. LASER Pointer DLP Personal Projector 7 ENTER Joystick Moves cursor. POWER SOURCE Selects signal sources from among PC, VIDEO, S-VIDEO and YPBPR.

User Guide
Page 12
MOUSE DRAG When the remote control works as a mouse, choose your desired item and press MOUSE DRAG. KEYSTONE ▲ ▼ Refer to activate it, customer should press "ENTER" button and then it to wherever you want on page 13. 8 DLP Personal Projector ZOOM By pressing "ZOOM" button, zoom rectangular displays in the center, but to "Digital Keystone Correction" on the projection image and press MOUSE LEFT to release the item. RESIZE Scales the original input resolution. Drag it can be adjusted by Joystick. STILL Makes the projection image still.
MOUSE DRAG When the remote control works as a mouse, choose your desired item and press MOUSE DRAG. KEYSTONE ▲ ▼ Refer to activate it, customer should press "ENTER" button and then it to wherever you want on page 13. 8 DLP Personal Projector ZOOM By pressing "ZOOM" button, zoom rectangular displays in the center, but to "Digital Keystone Correction" on the projection image and press MOUSE LEFT to release the item. RESIZE Scales the original input resolution. Drag it can be adjusted by Joystick. STILL Makes the projection image still.

User Guide
Page 13
Caution Avoid excessive heat and humidity. Replace only with the same or equivalent type recommended by the diagram inside the compartment. 3 Position the lid over the compartment and snap it back into place. There may be danger of used batteries according to the manufacturer's instructions. DLP Personal Projector 9 Dispose of an explosion if batteries are incorrectly replaced. Installing or Replacing Batteries ("AA" type) 1 Press and open the battery compartment lid in the direction. 2 Install batteries as indicated by the manufacturer.
Caution Avoid excessive heat and humidity. Replace only with the same or equivalent type recommended by the diagram inside the compartment. 3 Position the lid over the compartment and snap it back into place. There may be danger of used batteries according to the manufacturer's instructions. DLP Personal Projector 9 Dispose of an explosion if batteries are incorrectly replaced. Installing or Replacing Batteries ("AA" type) 1 Press and open the battery compartment lid in the direction. 2 Install batteries as indicated by the manufacturer.
User Guide
Page 14
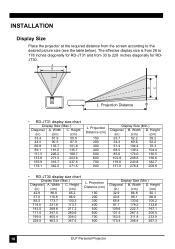
...43.8 89.1 66.8 65.8 133.6 100.2 87.7 178.2 133.6 109.6 222.7 167.1 131.5 267.3 200.5 153.5 311.8 233.9 175.4 356.4 267.3 10 DLP Personal Projector Projection Distance (cm) 150 200 300 400 500 600 700 800 Display Size (Min.) Diagonal B. Height (in ) (cm) (cm) 33.4 67.9 50.9... 69.6 52.2 51.4 104.4 78.3 68.5 139.2 104.4 85.6 174.0 130.5 102.8 208.8 156.6 119.9 243.6 182.7 137.0 278.4 208.8 • RD-JT30 display size chart Display Size (Max.) Diagonal A. Width D. The effective display size is from 26 to 178 inches diagonally for...
...43.8 89.1 66.8 65.8 133.6 100.2 87.7 178.2 133.6 109.6 222.7 167.1 131.5 267.3 200.5 153.5 311.8 233.9 175.4 356.4 267.3 10 DLP Personal Projector Projection Distance (cm) 150 200 300 400 500 600 700 800 Display Size (Min.) Diagonal B. Height (in ) (cm) (cm) 33.4 67.9 50.9... 69.6 52.2 51.4 104.4 78.3 68.5 139.2 104.4 85.6 174.0 130.5 102.8 208.8 156.6 119.9 243.6 182.7 137.0 278.4 208.8 • RD-JT30 display size chart Display Size (Max.) Diagonal A. Width D. The effective display size is from 26 to 178 inches diagonally for...

User Guide
Page 15
.... RGB PC/ Notebook USB For Speaker DVD Player Video S-Video YPBPR DC 12V 0.5A Max. (Output) PC/HD(YPBPR) USB MOUSE VIDEO S-VIDEO AC IN DLP Personal Projector 11 The following standards are : • Digital-VHS (D-VHS) player • DVD player • Satellite Dish HDTV receiver • DTV tuners Most of...
.... RGB PC/ Notebook USB For Speaker DVD Player Video S-Video YPBPR DC 12V 0.5A Max. (Output) PC/HD(YPBPR) USB MOUSE VIDEO S-VIDEO AC IN DLP Personal Projector 11 The following standards are : • Digital-VHS (D-VHS) player • DVD player • Satellite Dish HDTV receiver • DTV tuners Most of...
User Guide
Page 16
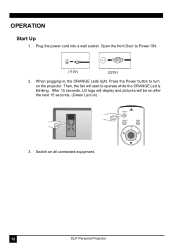
Plug the power cord into a wall socket. Switch on ) POWER SOURCE AUTO BLANK POWER SOURCE MENU 3. OPERATION Start Up 1. After 15 seconds, LG logo will display and pictures will start to operate while the ORANGE Led is blinking. Press the Power button to Power ON. (110V) (220V) 2. Open the front Door to turn on the projector. Then, the fan will be on after the next 15 seconds. (Green Led on all connected equipment. 12 DLP Personal Projector When plugging-in, the ORANGE Leds light.
Plug the power cord into a wall socket. Switch on ) POWER SOURCE AUTO BLANK POWER SOURCE MENU 3. OPERATION Start Up 1. After 15 seconds, LG logo will display and pictures will start to operate while the ORANGE Led is blinking. Press the Power button to Power ON. (110V) (220V) 2. Open the front Door to turn on the projector. Then, the fan will be on after the next 15 seconds. (Green Led on all connected equipment. 12 DLP Personal Projector When plugging-in, the ORANGE Leds light.

User Guide
Page 17
Press ▲ to correct keystoning at the bottom of the image. POWER SOURCE AUTO BLANK POWER SOURCE MENU BLANK AUTO DLP Personal Projector 13 Press ▼ to correct keystoning at either the top or bottom. To do this , press KEYSTONE ▲/ ▼ (hot key) on the ...
Press ▲ to correct keystoning at the bottom of the image. POWER SOURCE AUTO BLANK POWER SOURCE MENU BLANK AUTO DLP Personal Projector 13 Press ▼ to correct keystoning at either the top or bottom. To do this , press KEYSTONE ▲/ ▼ (hot key) on the ...

User Guide
Page 18
... Zoom Resize Language Flip Horizontal Flip Vertical Blank Image Lamp Time Language Flip Horizontal Auto Tracking Flip Vertical Clock Blank Image Phase Lamp Time 14 DLP Personal Projector POWER SOURCE AUTO BLANK POWER SOURCE MENU Menu System Press Menu for the main menu, and then press Joystick to select items in...
... Zoom Resize Language Flip Horizontal Flip Vertical Blank Image Lamp Time Language Flip Horizontal Auto Tracking Flip Vertical Clock Blank Image Phase Lamp Time 14 DLP Personal Projector POWER SOURCE AUTO BLANK POWER SOURCE MENU Menu System Press Menu for the main menu, and then press Joystick to select items in...

User Guide
Page 19
... factory preset values. Returns all settings to make it appear more red or green. *This function is not available when the input mode is PC. DLP Personal Projector 15 Contrast Adjusts the brightness of the image. *This function is not available when the input mode is PC. 1. VIDEO Menu FUNCTION DESCRIPTION...
... factory preset values. Returns all settings to make it appear more red or green. *This function is not available when the input mode is PC. DLP Personal Projector 15 Contrast Adjusts the brightness of the image. *This function is not available when the input mode is PC. 1. VIDEO Menu FUNCTION DESCRIPTION...


