INSTALLATION
Page 1
ENGLISH MVEM1825* MFL06206516 Rev.00_050422 www.lg.com Copyright © 2022 LG Electronics Inc. All Rights Reserved. us_main.book.book Page 1 Wednesday, May 4, 2022 1:09 PM INSTALLATION MANUAL MICROWAVE OVEN Read this installation manual thoroughly before installing the appliance and keep it handy for reference at all times.
ENGLISH MVEM1825* MFL06206516 Rev.00_050422 www.lg.com Copyright © 2022 LG Electronics Inc. All Rights Reserved. us_main.book.book Page 1 Wednesday, May 4, 2022 1:09 PM INSTALLATION MANUAL MICROWAVE OVEN Read this installation manual thoroughly before installing the appliance and keep it handy for reference at all times.
INSTALLATION
Page 2
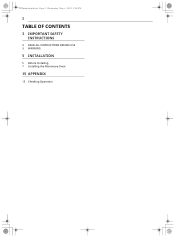
us_main.book.book Page 2 Wednesday, May 4, 2022 1:09 PM 2 TABLE OF CONTENTS 3 IMPORTANT SAFETY INSTRUCTIONS 3 READ ALL INSTRUCTIONS BEFORE USE 3 WARNING 5 INSTALLATION 5 Before Installing 7 Installing the Microwave Oven 15 APPENDIX 15 Checking Operation
us_main.book.book Page 2 Wednesday, May 4, 2022 1:09 PM 2 TABLE OF CONTENTS 3 IMPORTANT SAFETY INSTRUCTIONS 3 READ ALL INSTRUCTIONS BEFORE USE 3 WARNING 5 INSTALLATION 5 Before Installing 7 Installing the Microwave Oven 15 APPENDIX 15 Checking Operation
INSTALLATION
Page 3
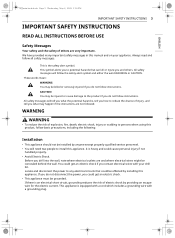
... that could get an electric shock if you contact electrical wires with a grounding plug. It is the safety alert symbol. Locate and disconnect the power to any electrical circuits that can kill or injure you what the potential hazard is equipped with a cord which includes a grounding wire with your appliance. All safety messages will follow instructions. This appliance is , tell...
... that could get an electric shock if you contact electrical wires with a grounding plug. It is the safety alert symbol. Locate and disconnect the power to any electrical circuits that can kill or injure you what the potential hazard is equipped with a cord which includes a grounding wire with your appliance. All safety messages will follow instructions. This appliance is , tell...
INSTALLATION
Page 4
... and grounded outlet • Do not use an extension cord. • Keep the power cord dry and do not use the microwave oven as instructed, you could result in the neutral or grounding circuit. • Improper grounding could be adjusted and repaired by a qualified technician who can check for microwave leakage after repairing the oven. If the door seals, sealing surfaces or glass is bent. -
... and grounded outlet • Do not use an extension cord. • Keep the power cord dry and do not use the microwave oven as instructed, you could result in the neutral or grounding circuit. • Improper grounding could be adjusted and repaired by a qualified technician who can check for microwave leakage after repairing the oven. If the door seals, sealing surfaces or glass is bent. -

INSTALLATION
Page 5
... the countertop or cooktop to an island or peninsula cabinet. • Be sure the upper cabinet and rear wall structures can support 150 lbs., plus the weight of any items you place inside upper cabinet) e Power Supply Cord Hole WARNING • If you do not mount the oven as windows, doors, and strong heating vents. us_main.book.book Page 5 Wednesday, May 4, 2022 1:09 PM ENGLISH INSTALLATION Before Installing Before You Start Be...
... the countertop or cooktop to an island or peninsula cabinet. • Be sure the upper cabinet and rear wall structures can support 150 lbs., plus the weight of any items you place inside upper cabinet) e Power Supply Cord Hole WARNING • If you do not mount the oven as windows, doors, and strong heating vents. us_main.book.book Page 5 Wednesday, May 4, 2022 1:09 PM ENGLISH INSTALLATION Before Installing Before You Start Be...
INSTALLATION
Page 6
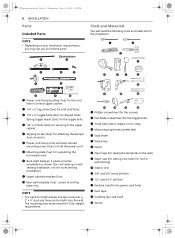
... or wall venting) j Electric drill k 3/8" and 3/4" wood drill bits l 1/2" and 3/16" drill bits m Keyhole saw (for supporting the microwave oven h Back-draft damper: 2 pieces must meet the 150 lb. The mounting area must be assembled as shown. (for roof venting or wall venting installation, not for room venting installation) i Upper cabinet template (1ea) j Rear wall template (1ea): 1 piece mounting plate only NOTE • You need the following tools and materials for the installation: a Power cord clamp...
... or wall venting) j Electric drill k 3/8" and 3/4" wood drill bits l 1/2" and 3/16" drill bits m Keyhole saw (for supporting the microwave oven h Back-draft damper: 2 pieces must meet the 150 lb. The mounting area must be assembled as shown. (for roof venting or wall venting installation, not for room venting installation) i Upper cabinet template (1ea) j Rear wall template (1ea): 1 piece mounting plate only NOTE • You need the following tools and materials for the installation: a Power cord clamp...

INSTALLATION
Page 7
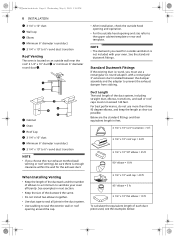
... oven must have brick or masonry walls, you will cut the hole c for the power supply cord later when you prepare the wall and upper cabinet in electric shock or other personal injury. a Cabinet b Oven Wall Venting The oven is located on an outside wall of three ways. a Cabinet b Oven NOTE • Do not use an extension cord. Installing the Microwave Oven Step 1: Prepare the Electrical Connection 1 Locate the grounded electrical outlet b for the installation is located on a circuit...
... oven must have brick or masonry walls, you will cut the hole c for the power supply cord later when you prepare the wall and upper cabinet in electric shock or other personal injury. a Cabinet b Oven Wall Venting The oven is located on an outside wall of three ways. a Cabinet b Oven NOTE • Do not use an extension cord. Installing the Microwave Oven Step 1: Prepare the Electrical Connection 1 Locate the grounded electrical outlet b for the installation is located on a circuit...
INSTALLATION
Page 8
... as short as possible. a Cabinet b Oven c Roof Cap d 3 1/4" x 10" duct e Minimum 6" diameter round duct f 3 1/4" x 10" to 6" round duct transition NOTE • If you choose the rear exhaust method (wall venting or roof venting), be sure there is round, you need for the exhaust duct. • After installation, check the outside hood opening and operation. • For the outside ventilation is located on an outside wall near the roof: 3 1/4" x 10" duct d or minimum 6" diameter...
... as short as possible. a Cabinet b Oven c Roof Cap d 3 1/4" x 10" duct e Minimum 6" diameter round duct f 3 1/4" x 10" to 6" round duct transition NOTE • If you choose the rear exhaust method (wall venting or roof venting), be sure there is round, you need for the exhaust duct. • After installation, check the outside hood opening and operation. • For the outside ventilation is located on an outside wall near the roof: 3 1/4" x 10" duct d or minimum 6" diameter...
INSTALLATION
Page 9
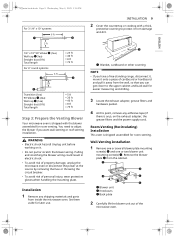
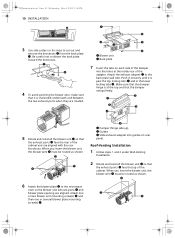
.... 3 Locate the exhaust adapter, grease filters and hardware packet. 4 At this point, remove any adhesive tape (if there is shipped with a thick, protective covering to protect it from the wall, so that you want wall-venting or roof-venting installation. b Blower unit c Knockouts e Back plate 2 Carefully lift the blower unit out of personal injury, wear protective gloves when handling the mounting plate. Remove the blower plate d from inside the microwave oven...
.... 3 Locate the exhaust adapter, grease filters and hardware packet. 4 At this point, remove any adhesive tape (if there is shipped with a thick, protective covering to protect it from the wall, so that you want wall-venting or roof-venting installation. b Blower unit c Knockouts e Back plate 2 Carefully lift the blower unit out of personal injury, wear protective gloves when handling the mounting plate. Remove the blower plate d from inside the microwave oven...
INSTALLATION
Page 10
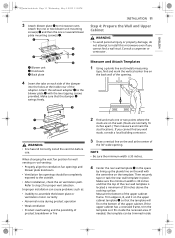
... guides on rear panel. Attach the exhaust adapter a to distort the back plate. b Blower unit e Back plate 7 Insert the tabs on each side of the cabinet. us_main.book.book Page 10 Wednesday, May 4, 2022 1:09 PM 10 INSTALLATION 3 Use side cutters or tin snips to the microwave oven so the blower unit exhaust ports c and blower plate opening are aligned. Attach one or two blower unit mounting screw...
... guides on rear panel. Attach the exhaust adapter a to distort the back plate. b Blower unit e Back plate 7 Insert the tabs on each side of the cabinet. us_main.book.book Page 10 Wednesday, May 4, 2022 1:09 PM 10 INSTALLATION 3 Use side cutters or tin snips to the microwave oven so the blower unit exhaust ports c and blower plate opening are aligned. Attach one or two blower unit mounting screw...
INSTALLATION
Page 11
... cooking surface. Refer to microwave oven. Trim edges A, B, and C on each side of the damper into the holes at the center of the adapter. If the upper cabinet has a recessed frame, trim the template so it fits inside rear of the 30″ wide opening . ENGLISH us_main.book.book Page 11 Wednesday, May 4, 2022 1:09 PM 3 Attach blower plate d to step 2 for wall venting or roof venting...
... cooking surface. Refer to microwave oven. Trim edges A, B, and C on each side of the damper into the holes at the center of the adapter. If the upper cabinet has a recessed frame, trim the template so it fits inside rear of the 30″ wide opening . ENGLISH us_main.book.book Page 11 Wednesday, May 4, 2022 1:09 PM 3 Attach blower plate d to step 2 for wall venting or roof venting...
INSTALLATION
Page 12
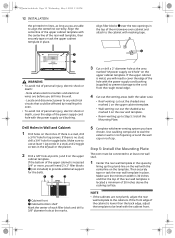
... rear wall template in the space by installing this oven. • To avoid risk of personal injury, electric shock or death, cover the edge of the power supply cord hole with the saber saw) • Roof-venting: cut out the shaded area marked L on the upper cabinet template. • Wall-venting: cut out the shaded area marked F on the template. Make sure to Step 5: Install the Mounting Plate. 5 Complete whichever venting...
... rear wall template in the space by installing this oven. • To avoid risk of personal injury, electric shock or death, cover the edge of the power supply cord hole with the saber saw) • Roof-venting: cut out the shaded area marked L on the upper cabinet template. • Wall-venting: cut out the shaded area marked F on the template. Make sure to Step 5: Install the Mounting Plate. 5 Complete whichever venting...
INSTALLATION
Page 13
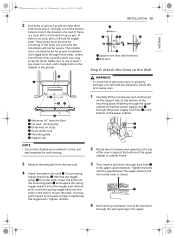
... the vent opening in tightening the toggle bolts. Tighten the bolts until the gap between the upper cabinet and microwave oven is against the bottom of the length past the bolt ends. Use a lag screw for wall-venting. 3 Remove the template from the floor b For wall - If the holes are not used for toggle bolts. A B A B C a Minimum 66" from the rear wall. 4 Attach the plate to install this microwave oven. 1 Carefully...
... the vent opening in tightening the toggle bolts. Tighten the bolts until the gap between the upper cabinet and microwave oven is against the bottom of the length past the bolt ends. Use a lag screw for wall-venting. 3 Remove the template from the floor b For wall - If the holes are not used for toggle bolts. A B A B C a Minimum 66" from the rear wall. 4 Attach the plate to install this microwave oven. 1 Carefully...
INSTALLATION
Page 14
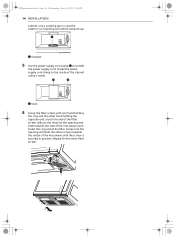
... opening and slide towards the center of the microwave oven. Repeat for the other hand holding the opposite end. us_main.book.book Page 14 Wednesday, May 4, 2022 1:09 PM 14 INSTALLATION cabinet. Install the power supply cord clamp to the inside of the filter screen into the opening around the exhaust cap. Use a caulking gun to bundle the power supply cord. Insert the ring end of the cabinet using a screw...
... opening and slide towards the center of the microwave oven. Repeat for the other hand holding the opposite end. us_main.book.book Page 14 Wednesday, May 4, 2022 1:09 PM 14 INSTALLATION cabinet. Install the power supply cord clamp to the inside of the filter screen into the opening around the exhaust cap. Use a caulking gun to bundle the power supply cord. Insert the ring end of the cabinet using a screw...
INSTALLATION
Page 15
APPENDIX 15 ENGLISH us_main.book.book Page 15 Wednesday, May 4, 2022 1:09 PM APPENDIX Checking Operation Before Using the Oven 1 Plug in the power supply cord. 2 Read your Owner's Manual, and then check the operation of your oven.
APPENDIX 15 ENGLISH us_main.book.book Page 15 Wednesday, May 4, 2022 1:09 PM APPENDIX Checking Operation Before Using the Oven 1 Plug in the power supply cord. 2 Read your Owner's Manual, and then check the operation of your oven.


