User Manual
Page 1
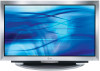
Record model number and serial number of the Monitor and relate this owner's manual thoroughly before operating the Monitor. Retain it for future reference. Model Number : Serial Number : LG Electronics U.S.A., Inc. See the label attached on the back of the Monitor. PLASMA MONITOR OWNER'S MANUAL MODELS : MU-60PZ95V Please read this information to your dealer if you ever require service.
Record model number and serial number of the Monitor and relate this owner's manual thoroughly before operating the Monitor. Retain it for future reference. Model Number : Serial Number : LG Electronics U.S.A., Inc. See the label attached on the back of the Monitor. PLASMA MONITOR OWNER'S MANUAL MODELS : MU-60PZ95V Please read this information to your dealer if you ever require service.

User Manual
Page 2
... the user is : LG Electronics U.S.A., Inc 1000 Sylvan Avenue, Englewood Cliffs, NJ 07632 1-800-243-0000 http://www.lgusa.com WARNING/CAUTION TO REDUCE THE RISK OF FIRE AND ELECTRIC SHOCK, DO NOT EXPOSE THIS PRODUCT TO RAIN OR MOISTURE. 2 Plasma Monitor Warning/Caution Warning/Caution ... to radio communications. The lightning flash with the instructions, may be determined by turning the equipment off and on a circuit different from LG Electronics. REFER TO QUALIFIED SERVICE PERSONNEL. FCC NOTICE • A Class B digital device This equipment has been tested and found to comply...
... the user is : LG Electronics U.S.A., Inc 1000 Sylvan Avenue, Englewood Cliffs, NJ 07632 1-800-243-0000 http://www.lgusa.com WARNING/CAUTION TO REDUCE THE RISK OF FIRE AND ELECTRIC SHOCK, DO NOT EXPOSE THIS PRODUCT TO RAIN OR MOISTURE. 2 Plasma Monitor Warning/Caution Warning/Caution ... to radio communications. The lightning flash with the instructions, may be determined by turning the equipment off and on a circuit different from LG Electronics. REFER TO QUALIFIED SERVICE PERSONNEL. FCC NOTICE • A Class B digital device This equipment has been tested and found to comply...
User Manual
Page 4
... or when unused for long periods of this owner's manual to qualified service personnel. Safety Instructions Safety Instructions continued 13. Do not install the monitor near any way, such as vases, shall be placed upon . Pay particular attention to avoid wire damage. 17. Wet Location Marking : Apparatus...plug is loose. Use a dedicated power cord. Do not over bend the power cord and do not place anything on the apparatus. 4 Plasma Monitor Servicing is required when the apparatus has been damaged in any sharp edge to plugs, wall outlets, and the point where the cord exits ...
... or when unused for long periods of this owner's manual to qualified service personnel. Safety Instructions Safety Instructions continued 13. Do not install the monitor near any way, such as vases, shall be placed upon . Pay particular attention to avoid wire damage. 17. Wet Location Marking : Apparatus...plug is loose. Use a dedicated power cord. Do not over bend the power cord and do not place anything on the apparatus. 4 Plasma Monitor Servicing is required when the apparatus has been damaged in any sharp edge to plugs, wall outlets, and the point where the cord exits ...

User Manual
Page 6
... it for conferencing, games, and internet browsing. Introduction Introduction What is not sufficient cause for the PDP to be exchanged or returned. 6 Plasma Monitor Wide angle range of noise could occur while the fans are produced and fused with cooling fans to cool the... Monitor and improve its reliability. Therefore, a certain level of vision Your flat panel plasma screen offers an exceptionally broad viewing angle -- If voltage is a next generation flat Display using this product...
... it for conferencing, games, and internet browsing. Introduction Introduction What is not sufficient cause for the PDP to be exchanged or returned. 6 Plasma Monitor Wide angle range of noise could occur while the fans are produced and fused with cooling fans to cool the... Monitor and improve its reliability. Therefore, a certain level of vision Your flat panel plasma screen offers an exceptionally broad viewing angle -- If voltage is a next generation flat Display using this product...

User Manual
Page 8
...menu settings. NUMBER buttons DVD Control some video cassette recorders. F / G (Volume button) Increases/decreases sound level. Installing Batteries 8 Plasma Monitor • Open the battery compartment cover on or off . Under certain conditions such as necessary. POWER SLEEP APC ARC PIP/DW ...Exchanges main and sub picture images. (Refer to p.27) MENU Displays on the monitor. - Memorizes menu changes. W WIN.P VCR BUTTONS Control some DVD cassette recorders. POWER Switches the Monitor between ON and STANDBY. WIN.SIZE Adjusts the sub picture size. SUB INPUT Selects...
...menu settings. NUMBER buttons DVD Control some video cassette recorders. F / G (Volume button) Increases/decreases sound level. Installing Batteries 8 Plasma Monitor • Open the battery compartment cover on or off . Under certain conditions such as necessary. POWER SLEEP APC ARC PIP/DW ...Exchanges main and sub picture images. (Refer to p.27) MENU Displays on the monitor. - Memorizes menu changes. W WIN.P VCR BUTTONS Control some DVD cassette recorders. POWER Switches the Monitor between ON and STANDBY. WIN.SIZE Adjusts the sub picture size. SUB INPUT Selects...

User Manual
Page 9
... Owner's Manual 9 ZOOM + Remote Control DVI-D Cable Power Cord D-sub 15 pin Cable Installation Instructions • The Monitor can be installed in various ways such as on a wall, or on a desktop etc. • The plasma display is missing, please contact the dealer where you connect the grounding / earth wire to prevent possible... the product. If an accessory is designed to telephone wires, lightening rods, or gas pipes. GROUNDING Ensure that the following accessories are included with your plasma display.
... Owner's Manual 9 ZOOM + Remote Control DVI-D Cable Power Cord D-sub 15 pin Cable Installation Instructions • The Monitor can be installed in various ways such as on a wall, or on a desktop etc. • The plasma display is missing, please contact the dealer where you connect the grounding / earth wire to prevent possible... the product. If an accessory is designed to telephone wires, lightening rods, or gas pipes. GROUNDING Ensure that the following accessories are included with your plasma display.

User Manual
Page 10
... ventilation, allow a clearance of 4" on each side and the top, 2.36" on the bottom, and 2" from overheating. 10 Plasma Monitor When installing the monitor vertically, you have to change the OSD display mode so that the menus will appear correctly and also to protect the... 4 inches 2.36 inches Wall Mount: Vertical installation Detailed installation instructions are included in the left side position. NOTE: When installing the monitor vertically, the front panel controls must be in the optional Vertical Wall Mounting Bracket Installation and Setup Guide available from your dealer.
... ventilation, allow a clearance of 4" on each side and the top, 2.36" on the bottom, and 2" from overheating. 10 Plasma Monitor When installing the monitor vertically, you have to change the OSD display mode so that the menus will appear correctly and also to protect the... 4 inches 2.36 inches Wall Mount: Vertical installation Detailed installation instructions are included in the left side position. NOTE: When installing the monitor vertically, the front panel controls must be in the optional Vertical Wall Mounting Bracket Installation and Setup Guide available from your dealer.

User Manual
Page 12
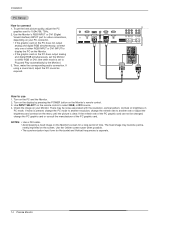
... select the Video external input source.) 3. Select the input source with using the INPUT SELECT but- UT Y PB PR COMPONENT INPUT 1 R L R L/MONO MONITOR OUTPUT A/V INPUT ( )R( ) ( )L( ) EXTERNAL SPEAKER VIDEO AUDIO AUDIO VIDEO S-VIDEO puts to the AUDIO INPUT jacks on the remote control to select Component ... as shown in the AC INPUT figure. Turn on DVD player Y Pb Pr Y B-Y R-Y Y Cb Cr Y PB PR DVD 12 Plasma Monitor Refer to connect 1. Operate the corresponding external equipment. Camcorder R AUDIO L VIDEO Video Game Set DVD Setup How to the DVD player's manual...
... select the Video external input source.) 3. Select the input source with using the INPUT SELECT but- UT Y PB PR COMPONENT INPUT 1 R L R L/MONO MONITOR OUTPUT A/V INPUT ( )R( ) ( )L( ) EXTERNAL SPEAKER VIDEO AUDIO AUDIO VIDEO S-VIDEO puts to the AUDIO INPUT jacks on the remote control to select Component ... as shown in the AC INPUT figure. Turn on DVD player Y Pb Pr Y B-Y R-Y Y Cb Cr Y PB PR DVD 12 Plasma Monitor Refer to connect 1. Operate the corresponding external equipment. Camcorder R AUDIO L VIDEO Video Game Set DVD Setup How to the DVD player's manual...
User Manual
Page 14
...on the screen. The fixed image may be changed, change the refresh rate to Plug and Play automatically by pressing the POWER button on your Monitor. To get the best picture quality, adjust the PC graphics card to select RGB, or DVI source. 4. If the refresh rate of ...• The synchronization input form for Horizontal and Vertical frequencies is clear. Use INPUT SELECT on the menu until the picture is separate. 14 Plasma Monitor Check the image on your PC connector. • If the graphic card on the PC does not output analog and digital RGB simultaneously, connect ...
...on the screen. The fixed image may be changed, change the refresh rate to Plug and Play automatically by pressing the POWER button on your Monitor. To get the best picture quality, adjust the PC graphics card to select RGB, or DVI source. 4. If the refresh rate of ...• The synchronization input form for Horizontal and Vertical frequencies is clear. Use INPUT SELECT on the menu until the picture is separate. 14 Plasma Monitor Check the image on your PC connector. • If the graphic card on the PC does not output analog and digital RGB simultaneously, connect ...

User Manual
Page 16
...; Press the ON/OFF button on . Press the MENU button and then use D / E button to save. 16 Plasma Monitor Operation Operation Turning on the Monitor Turning on the Monitor. Press the ON/OFF button on the Monitor just after installation 1. Connect power cord correctly. 2. Press the OK button to select the SPECIAL menu. 2. At this...
...; Press the ON/OFF button on . Press the MENU button and then use D / E button to save. 16 Plasma Monitor Operation Operation Turning on the Monitor Turning on the Monitor. Press the ON/OFF button on the Monitor just after installation 1. Connect power cord correctly. 2. Press the OK button to select the SPECIAL menu. 2. At this...
User Manual
Page 18
... button to select the PICTURE menu. 2. PICTURE APC ACC Fleshtone Contrast 100 G Brightness 55 Color 55 Sharpness 60 Tint 0 Menu Prev. 18 Plasma Monitor Press the OK button to select the desired picture option (Contrast, Brightness, Color, Sharpness, Tint). 3. Press the OK button to select the ...PICTURE menu. 2. If the Monitor is 0 ~ 3. 4. Press the G button and then use D / E button to save . Press the MENU button and then use F / G...
... button to select the PICTURE menu. 2. PICTURE APC ACC Fleshtone Contrast 100 G Brightness 55 Color 55 Sharpness 60 Tint 0 Menu Prev. 18 Plasma Monitor Press the OK button to select the desired picture option (Contrast, Brightness, Color, Sharpness, Tint). 3. Press the OK button to select the ...PICTURE menu. 2. If the Monitor is 0 ~ 3. 4. Press the G button and then use D / E button to save . Press the MENU button and then use F / G...
User Manual
Page 20
Press the OK button to make appropriate adjustments. 4. SOUND DASP BBE AVL Balance 0G L R Treble 50 Bass 50 Menu Prev. 20 Plasma Monitor Press the G button and then use F / G button to save. Operation Manual Sound Control (DASP set to select the SOUND menu. 2. Press the MENU button and then use D / E button to the levels you prefer. 1. You can adjust sound options Balance, Treble, and Bass to select the desired sound option (Balance, Treble, Bass). 3. Press the G button and then use D / E button to Off option) -
Press the OK button to make appropriate adjustments. 4. SOUND DASP BBE AVL Balance 0G L R Treble 50 Bass 50 Menu Prev. 20 Plasma Monitor Press the G button and then use F / G button to save. Operation Manual Sound Control (DASP set to select the SOUND menu. 2. Press the MENU button and then use D / E button to the levels you prefer. 1. You can adjust sound options Balance, Treble, and Bass to select the desired sound option (Balance, Treble, Bass). 3. Press the G button and then use D / E button to Off option) -

User Manual
Page 22
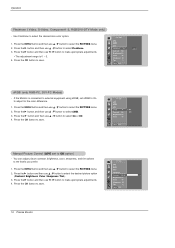
...control. - SPECIAL Language Key lock ISM Method G Low power Set ID Demo OSD Rotate Normal White wash Orbiter Inversion Menu Prev. 22 Plasma Monitor This feature can only be impossible to prevent unauthorized viewing by locking out the front panel controls. - Press the MENU button and then ...; Left → Left → Upside → Upside. • Inversion Inversion will result in a ghost image remaining even when you turn the Monitor off. 1. To avoid a permanent image on the screen. Operation Special Menu Options Key Lock - SPECIAL Language Key lock G On ISM Method Off ...
...control. - SPECIAL Language Key lock ISM Method G Low power Set ID Demo OSD Rotate Normal White wash Orbiter Inversion Menu Prev. 22 Plasma Monitor This feature can only be impossible to prevent unauthorized viewing by locking out the front panel controls. - Press the MENU button and then ...; Left → Left → Upside → Upside. • Inversion Inversion will result in a ghost image remaining even when you turn the Monitor off. 1. To avoid a permanent image on the screen. Operation Special Menu Options Key Lock - SPECIAL Language Key lock G On ISM Method Off ...
User Manual
Page 24
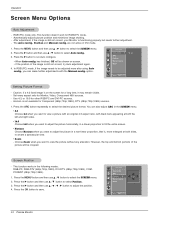
... button and then use D / E button to adjust the position. 4. ARC Position G Manual config Reset D F G E Menu Prev. 24 Plasma Monitor After adjustment, if the image is still not correct, your Monitor is still not correct, try Auto adjustment again. 4. Press the G button and then use D / E / F / G button to select ...the entire screen. • Horizon Choose Horizon when you want to view the picture without any alteration. Set every aspect ratio for Monitor, Video, Component 480i sources. - Press the ARC button repeatedly to run Auto configure. • When Auto config. You can ...
... button and then use D / E button to adjust the position. 4. ARC Position G Manual config Reset D F G E Menu Prev. 24 Plasma Monitor After adjustment, if the image is still not correct, your Monitor is still not correct, try Auto adjustment again. 4. Press the G button and then use D / E / F / G button to select ...the entire screen. • Horizon Choose Horizon when you want to view the picture without any alteration. Set every aspect ratio for Monitor, Video, Component 480i sources. - Press the ARC button repeatedly to run Auto configure. • When Auto config. You can ...

User Manual
Page 26
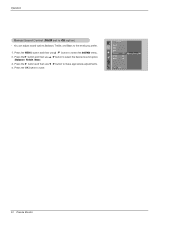
... for double window. - Enlarges the picture in correct proportions. - Reset is enlarged to enlarge. In 2-Split Zoom mode, you wish to fill the screen. 26 Plasma Monitor Section 5 is unique to normal viewing, press the SPLIT ZOOM button again. 9-Split zoom 1 23 4 56 7 89 Example of choosing 5. Split Zoom -
... for double window. - Enlarges the picture in correct proportions. - Reset is enlarged to enlarge. In 2-Split Zoom mode, you wish to fill the screen. 26 Plasma Monitor Section 5 is unique to normal viewing, press the SPLIT ZOOM button again. 9-Split zoom 1 23 4 56 7 89 Example of choosing 5. Split Zoom -

User Manual
Page 28
...Standard RS-232C cable) PC PDP RXD 2 TXD 3 GND 5 DTR 4 DSR 6 RTS 7 CTS 8 3 TXD 2 RXD 5 GND 6 DSR 4 DTR 8 CTS 7 RTS D-Sub 9 D-Sub 9 28 Plasma Monitor 1 5 9 6 3-Wire Configurations (Not standard) PC PDP RXD 2 TXD 3 GND 5 DTR 4 DSR 6 RTS 7 CTS 8 3 TXD 2 RXD 5 GND 4 DTR 6 DSR 7 RTS 8 CTS D-...Sub 9 D-Sub 9 D-Sub 9-Pin Male No. RS-232C connection cables are not supplied with the Monitor. RS-232C Setup REMOTE CONTROL RS-232C INPUT (CONTROL/SERVICE) DVI INPUT AUDIO INPUT RGB INPUT RGB OUTPUT COMPONENT INPUT 2 Y COMPONENT INPUT 1 PB PR VIDEO...
...Standard RS-232C cable) PC PDP RXD 2 TXD 3 GND 5 DTR 4 DSR 6 RTS 7 CTS 8 3 TXD 2 RXD 5 GND 6 DSR 4 DTR 8 CTS 7 RTS D-Sub 9 D-Sub 9 28 Plasma Monitor 1 5 9 6 3-Wire Configurations (Not standard) PC PDP RXD 2 TXD 3 GND 5 DTR 4 DSR 6 RTS 7 CTS 8 3 TXD 2 RXD 5 GND 4 DTR 6 DSR 7 RTS 8 CTS D-...Sub 9 D-Sub 9 D-Sub 9-Pin Male No. RS-232C connection cables are not supplied with the Monitor. RS-232C Setup REMOTE CONTROL RS-232C INPUT (CONTROL/SERVICE) DVI INPUT AUDIO INPUT RGB INPUT RGB OUTPUT COMPONENT INPUT 2 Y COMPONENT INPUT 1 PB PR VIDEO...

User Manual
Page 30
...ID][ ][OK][Data][x] * In a like manner, if other functions transmit 'FF' data based on (Picture off) Acknowledgement [d][ ][Set ID][ ][OK][Data][x] 30 Plasma Monitor 05. Transmission [k][d][ ][Set ID][ ][Data][Cr] Data 0 : Screen mute off . Volume Mute (Command2:e) G To control volume mute on the... 16) 63 : Step 99 (SET ID 99) 64 : Step 100 Input Select (Command2:b) (Main Picture Input) G To select input source for the Monitor. Aspect Ratio (Command2:c) (Main picture format) G To adjust the screen format. You can also adjust the screen format using the ARC (Aspect Ratio Control...
...ID][ ][OK][Data][x] * In a like manner, if other functions transmit 'FF' data based on (Picture off) Acknowledgement [d][ ][Set ID][ ][OK][Data][x] 30 Plasma Monitor 05. Transmission [k][d][ ][Set ID][ ][Data][Cr] Data 0 : Screen mute off . Volume Mute (Command2:e) G To control volume mute on the... 16) 63 : Step 99 (SET ID 99) 64 : Step 100 Input Select (Command2:b) (Main Picture Input) G To select input source for the Monitor. Aspect Ratio (Command2:c) (Main picture format) G To adjust the screen format. You can also adjust the screen format using the ARC (Aspect Ratio Control...

User Manual
Page 32
... [k][s][ ][Set ID][ ][Data][Cr] Data Min: 0 ~ Max: 64 • Refer to 'Real data mapping 1'. Balance (Command2:t) G To adjust balance. Acknowledgement [w][ ][Set ID][ ][OK][Data][x] 32 Plasma Monitor 23. Transmission [k][y][ ][Set ID][ ][Data][Cr] Data 1 : Video 2 : S-video 3 : Component 1 4 : Component 2 5 : RGB 6 : DVI Acknowledgement [y][ ][Set ID][ ][OK][Data][x] 25. You can also adjust balance in...
... [k][s][ ][Set ID][ ][Data][Cr] Data Min: 0 ~ Max: 64 • Refer to 'Real data mapping 1'. Balance (Command2:t) G To adjust balance. Acknowledgement [w][ ][Set ID][ ][OK][Data][x] 32 Plasma Monitor 23. Transmission [k][y][ ][Set ID][ ][Data][Cr] Data 1 : Video 2 : S-video 3 : Component 1 4 : Component 2 5 : RGB 6 : DVI Acknowledgement [y][ ][Set ID][ ][OK][Data][x] 25. You can also adjust balance in...
User Manual
Page 34
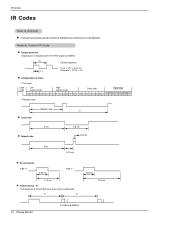
... as long as a key is depressed. IR Codes IR Codes How to Connect G Connect your wired remote control to the Remote Control port on the Monitor. Tf Tf 0.56 ms 2.24 ms 34 Plasma Monitor Tf=108ms @455KHz
... as long as a key is depressed. IR Codes IR Codes How to Connect G Connect your wired remote control to the Remote Control port on the Monitor. Tf Tf 0.56 ms 2.24 ms 34 Plasma Monitor Tf=108ms @455KHz
User Manual
Page 36
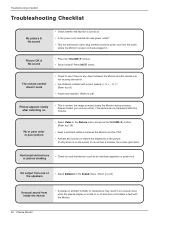
... not indicate a fault with correct polarity (+ to p.18) • Keep a sufficient distance between the Monitor and the VCR. • Activate any object between the Monitor and the remote control causing obstruction. • Are batteries installed with the Monitor. 36 Plasma Monitor Troubleshooting Checklist Troubleshooting Checklist No picture & No sound Picture OK & No sound • Check...
... not indicate a fault with correct polarity (+ to p.18) • Keep a sufficient distance between the Monitor and the VCR. • Activate any object between the Monitor and the remote control causing obstruction. • Are batteries installed with the Monitor. 36 Plasma Monitor Troubleshooting Checklist Troubleshooting Checklist No picture & No sound Picture OK & No sound • Check...


