User Manual
Page 1
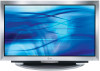
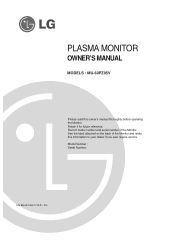
See the label attached on the back of the Monitor. Model Number : Serial Number : LG Electronics U.S.A., Inc. Record model number and serial number of the Monitor and relate this owner's manual thoroughly before operating the Monitor. PLASMA MONITOR OWNER'S MANUAL MODELS : MU-60PZ95V Please read this information to your dealer if you ever require service. Retain it for future reference.
See the label attached on the back of the Monitor. Model Number : Serial Number : LG Electronics U.S.A., Inc. Record model number and serial number of the Monitor and relate this owner's manual thoroughly before operating the Monitor. PLASMA MONITOR OWNER'S MANUAL MODELS : MU-60PZ95V Please read this information to your dealer if you ever require service. Retain it for future reference.

User Manual
Page 2
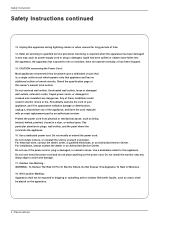
... or television reception, which the receiver is intended to alert the user to the presence of the following measures: - However, there is : LG Electronics U.S.A., Inc 1000 Sylvan Avenue, Englewood Cliffs, NJ 07632 1-800-243-0000 http://www.lgusa.com WARNING/CAUTION TO REDUCE THE RISK OF ...FIRE AND ELECTRIC SHOCK, DO NOT EXPOSE THIS PRODUCT TO RAIN OR MOISTURE. 2 Plasma Monitor NO USER SERVICEABLE PARTS INSIDE. If this product's compliance is no guarantee that may cause harmful interference to persons. Reorient or relocate ...
... or television reception, which the receiver is intended to alert the user to the presence of the following measures: - However, there is : LG Electronics U.S.A., Inc 1000 Sylvan Avenue, Englewood Cliffs, NJ 07632 1-800-243-0000 http://www.lgusa.com WARNING/CAUTION TO REDUCE THE RISK OF ...FIRE AND ELECTRIC SHOCK, DO NOT EXPOSE THIS PRODUCT TO RAIN OR MOISTURE. 2 Plasma Monitor NO USER SERVICEABLE PARTS INSIDE. If this product's compliance is no guarantee that may cause harmful interference to persons. Reorient or relocate ...
User Manual
Page 4
... or fire. Do not modify or extend the power cord. Do not over bend the power cord and do not place anything on the apparatus. 4 Plasma Monitor CAUTION concerning the Power Cord : Most appliances recommend they be placed on the power cord. Do not overload wall outlets. Use a dedicated power cord...
... or fire. Do not modify or extend the power cord. Do not over bend the power cord and do not place anything on the apparatus. 4 Plasma Monitor CAUTION concerning the Power Cord : Most appliances recommend they be placed on the power cord. Do not overload wall outlets. Use a dedicated power cord...

User Manual
Page 6
... the same way that a certain level of locations where conventional TVs would not fit. Therefore, a certain level of vision Your flat panel plasma screen offers an exceptionally broad viewing angle -- Versatile The light weight and thin size makes it for the PDP to install your PC and ... The noise from the cooling fans is acceptable and is normal during the manufacture and operation of this product. A Plasma Display is a Plasma Display Panel (PDP)? A few cell defects are operating and cooling the PDP. If voltage is emitted. Multimedia Connect your viewing experience ...
... the same way that a certain level of locations where conventional TVs would not fit. Therefore, a certain level of vision Your flat panel plasma screen offers an exceptionally broad viewing angle -- Versatile The light weight and thin size makes it for the PDP to install your PC and ... The noise from the cooling fans is acceptable and is normal during the manufacture and operation of this product. A Plasma Display is a Plasma Display Panel (PDP)? A few cell defects are operating and cooling the PDP. If voltage is emitted. Multimedia Connect your viewing experience ...

User Manual
Page 8
... the picture format. (Refer to p.24) PIP/DW Switches the sub picture on or off . NUMBER buttons DVD Control some video cassette recorders. Installing Batteries 8 Plasma Monitor • Open the battery compartment cover on the monitor. - F / G (Volume button) Increases/decreases sound level. When using the remote control, aim it at the...
... the picture format. (Refer to p.24) PIP/DW Switches the sub picture on or off . NUMBER buttons DVD Control some video cassette recorders. Installing Batteries 8 Plasma Monitor • Open the battery compartment cover on the monitor. - F / G (Volume button) Increases/decreases sound level. When using the remote control, aim it at the...

User Manual
Page 9
... shown are not possible, have a qualified electrician install a separate circuit breaker. GROUNDING Ensure that the following accessories are included with your plasma display. Do not try to ground the unit by connecting it to be mounted horizontally or vertically. If grounding methods are optional. Owner...Instructions • The Monitor can be installed in various ways such as on a wall, or on a desktop etc. • The plasma display is missing, please contact the dealer where you connect the grounding / earth wire to prevent possible electric shock. Power Supply Short-circuit ...
... shown are not possible, have a qualified electrician install a separate circuit breaker. GROUNDING Ensure that the following accessories are included with your plasma display. Do not try to ground the unit by connecting it to be mounted horizontally or vertically. If grounding methods are optional. Owner...Instructions • The Monitor can be installed in various ways such as on a wall, or on a desktop etc. • The plasma display is missing, please contact the dealer where you connect the grounding / earth wire to prevent possible electric shock. Power Supply Short-circuit ...

User Manual
Page 10
... Instructions continued Desktop Pedestal Installation For proper ventilation, allow a clearance of 4" on each side and the top, 2.36" on the bottom, and 2" from overheating. 10 Plasma Monitor Detailed installation instructions are included in the optional Desktop Stand Installation and Setup Guide available from your dealer.
... Instructions continued Desktop Pedestal Installation For proper ventilation, allow a clearance of 4" on each side and the top, 2.36" on the bottom, and 2" from overheating. 10 Plasma Monitor Detailed installation instructions are included in the optional Desktop Stand Installation and Setup Guide available from your dealer.

User Manual
Page 12
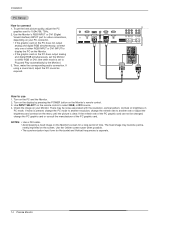
... A/V INPUT ( )R( ) ( )L( ) EXTERNAL SPEAKER VIDEO AUDIO AUDIO VIDEO S-VIDEO puts to the AUDIO INPUT jacks on DVD player Y Pb Pr Y B-Y R-Y Y Cb Cr Y PB PR DVD 12 Plasma Monitor NENT (Y, PB, PR) INPUT jacks on the Monitor and connect the DVD audio outputs to the AUDIO INPUT jacks on the remote control to...
... A/V INPUT ( )R( ) ( )L( ) EXTERNAL SPEAKER VIDEO AUDIO AUDIO VIDEO S-VIDEO puts to the AUDIO INPUT jacks on DVD player Y Pb Pr Y B-Y R-Y Y Cb Cr Y PB PR DVD 12 Plasma Monitor NENT (Y, PB, PR) INPUT jacks on the Monitor and connect the DVD audio outputs to the AUDIO INPUT jacks on the remote control to...
User Manual
Page 14
... the Monitor's RGB INPUT or DVI (Digital Visual Interface) INPUT port for a long period of either RGB or DVI; (the other mode is separate. 14 Plasma Monitor If noise is present, change the PC mode to another resolution, change the PC graphic card or consult the manufacturer of the PC graphic...
... the Monitor's RGB INPUT or DVI (Digital Visual Interface) INPUT port for a long period of either RGB or DVI; (the other mode is separate. 14 Plasma Monitor If noise is present, change the PC mode to another resolution, change the PC graphic card or consult the manufacturer of the PC graphic...

User Manual
Page 16
.... 1. Press the OK button to select Language. 3. From this moment, the Monitor is still connected) 1. Press the G button and then use D / E button to save. 16 Plasma Monitor The menus can be shown in the selected language.
.... 1. Press the OK button to select Language. 3. From this moment, the Monitor is still connected) 1. Press the G button and then use D / E button to save. 16 Plasma Monitor The menus can be shown in the selected language.
User Manual
Page 18
... contrast, brightness, color, sharpness, and tint options to save . PICTURE APC ACC Fleshtone Contrast 100 G Brightness 55 Color 55 Sharpness 60 Tint 0 Menu Prev. 18 Plasma Monitor Operation Fleshtone ( Video, S-Video, Component1-2, RGB/DVI-DTV Mode only) - Press the G button and then use D / E button to adjust for the color difference. 1. PICTURE...
... contrast, brightness, color, sharpness, and tint options to save . PICTURE APC ACC Fleshtone Contrast 100 G Brightness 55 Color 55 Sharpness 60 Tint 0 Menu Prev. 18 Plasma Monitor Operation Fleshtone ( Video, S-Video, Component1-2, RGB/DVI-DTV Mode only) - Press the G button and then use D / E button to adjust for the color difference. 1. PICTURE...
User Manual
Page 20
You can adjust sound options Balance, Treble, and Bass to Off option) - Operation Manual Sound Control (DASP set to the levels you prefer. 1. Press the G button and then use F / G button to select the desired sound option (Balance, Treble, Bass). 3. Press the OK button to select the SOUND menu. 2. SOUND DASP BBE AVL Balance 0G L R Treble 50 Bass 50 Menu Prev. 20 Plasma Monitor Press the G button and then use D / E button to make appropriate adjustments. 4. Press the MENU button and then use D / E button to save.
You can adjust sound options Balance, Treble, and Bass to Off option) - Operation Manual Sound Control (DASP set to the levels you prefer. 1. Press the G button and then use F / G button to select the desired sound option (Balance, Treble, Bass). 3. Press the OK button to select the SOUND menu. 2. SOUND DASP BBE AVL Balance 0G L R Treble 50 Bass 50 Menu Prev. 20 Plasma Monitor Press the G button and then use D / E button to make appropriate adjustments. 4. Press the MENU button and then use D / E button to save.

User Manual
Page 22
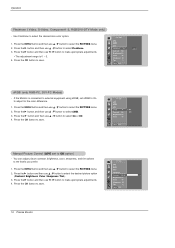
... select the SPECIAL menu. 2. SPECIAL Language Key lock ISM Method G Low power Set ID Demo OSD Rotate Normal White wash Orbiter Inversion Menu Prev. 22 Plasma Monitor Press the MENU button and then use D / E button to remain on the screen, the image will move every 2 minutes: Right → Right → Downside...
... select the SPECIAL menu. 2. SPECIAL Language Key lock ISM Method G Low power Set ID Demo OSD Rotate Normal White wash Orbiter Inversion Menu Prev. 22 Plasma Monitor Press the MENU button and then use D / E button to remain on the screen, the image will move every 2 minutes: Right → Right → Downside...

User Manual
Page 23
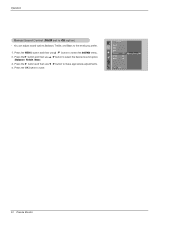
Low power reduces the plasma display power consumption. 1. SPECIAL Language Key lock ISM Method Low power Set ID Demo G OSD Rotate To start Menu Prev. Menu Rotation for Vertical Viewing 1. ...
Low power reduces the plasma display power consumption. 1. SPECIAL Language Key lock ISM Method Low power Set ID Demo G OSD Rotate To start Menu Prev. Menu Rotation for Vertical Viewing 1. ...
User Manual
Page 24
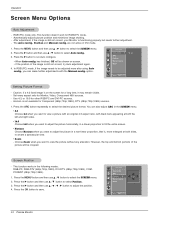
... view. • Zoom - Screen Position - Press the G button and then use D / E button to select the SCREEN menu. 2. ARC Position G Manual config Reset D F G E Menu Prev. 24 Plasma Monitor This function doesn't work for other RGB-PC and DVI-PC sources. - Press the G button and then use D / E button to select the SCREEN menu...
... view. • Zoom - Screen Position - Press the G button and then use D / E button to select the SCREEN menu. 2. ARC Position G Manual config Reset D F G E Menu Prev. 24 Plasma Monitor This function doesn't work for other RGB-PC and DVI-PC sources. - Press the G button and then use D / E button to select the SCREEN menu...

User Manual
Page 26
... then use D / E button to select YNR. 3. SCREEN Screen adj. ARC Cinema YNR Reset G To set Menu Prev. Section 5 is unique to fill the screen. 26 Plasma Monitor Reset is enlarged to each function: Manual config., Position, Split zoom, PIP position and sub picture size for double window. - Use the Reset option...
... then use D / E button to select YNR. 3. SCREEN Screen adj. ARC Cinema YNR Reset G To set Menu Prev. Section 5 is unique to fill the screen. 26 Plasma Monitor Reset is enlarged to each function: Manual config., Position, Split zoom, PIP position and sub picture size for double window. - Use the Reset option...

User Manual
Page 28
... 7-Wire Configurations (Standard RS-232C cable) PC PDP RXD 2 TXD 3 GND 5 DTR 4 DSR 6 RTS 7 CTS 8 3 TXD 2 RXD 5 GND 6 DSR 4 DTR 8 CTS 7 RTS D-Sub 9 D-Sub 9 28 Plasma Monitor 1 5 9 6 3-Wire Configurations (Not standard) PC PDP RXD 2 TXD 3 GND 5 DTR 4 DSR 6 RTS 7 CTS 8 3 TXD 2 RXD 5 GND 4 DTR 6 DSR 7 RTS 8 CTS D-Sub 9 D-Sub 9 RS-232C...
... 7-Wire Configurations (Standard RS-232C cable) PC PDP RXD 2 TXD 3 GND 5 DTR 4 DSR 6 RTS 7 CTS 8 3 TXD 2 RXD 5 GND 6 DSR 4 DTR 8 CTS 7 RTS D-Sub 9 D-Sub 9 28 Plasma Monitor 1 5 9 6 3-Wire Configurations (Not standard) PC PDP RXD 2 TXD 3 GND 5 DTR 4 DSR 6 RTS 7 CTS 8 3 TXD 2 RXD 5 GND 4 DTR 6 DSR 7 RTS 8 CTS D-Sub 9 D-Sub 9 RS-232C...

User Manual
Page 30
...][Data][x] 06. Transmission [k][e][ ][Set ID][ ][Data][Cr] Data 0 : Volume mute on (Volume off) 1 : Volume mute off (Volume on /off ) Acknowledgement [d][ ][Set ID][ ][OK][Data][x] 30 Plasma Monitor 05. You can also adjust contrast in the Picture menu. You can also adjust volume with the volume buttons on this format, Acknowledgement data...
...][Data][x] 06. Transmission [k][e][ ][Set ID][ ][Data][Cr] Data 0 : Volume mute on (Volume off) 1 : Volume mute off (Volume on /off ) Acknowledgement [d][ ][Set ID][ ][OK][Data][x] 30 Plasma Monitor 05. You can also adjust contrast in the Picture menu. You can also adjust volume with the volume buttons on this format, Acknowledgement data...

User Manual
Page 32
... is "read only". Acknowledgement [t][ ][Set ID][ ][OK][Data][x] 20. Red Adjustment (Command2:v) G To adjust red in the Sound menu. Acknowledgement [w][ ][Set ID][ ][OK][Data][x] 32 Plasma Monitor 23. Transmission [k][w][ ][Set ID][ ][Data][Cr] Data Min: 0 ~ Max: 3C • Refer to 'Real data mapping 3' as shown below. Acknowledgement [$][ ][Set ID][ ][OK][Data...
... is "read only". Acknowledgement [t][ ][Set ID][ ][OK][Data][x] 20. Red Adjustment (Command2:v) G To adjust red in the Sound menu. Acknowledgement [w][ ][Set ID][ ][OK][Data][x] 32 Plasma Monitor 23. Transmission [k][w][ ][Set ID][ ][Data][Cr] Data Min: 0 ~ Max: 3C • Refer to 'Real data mapping 3' as shown below. Acknowledgement [$][ ][Set ID][ ][OK][Data...
User Manual
Page 34
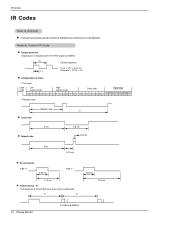
... ms • Bit "1" 1.12 ms G Frame interval : Tf The waveform is transmitted as long as a key is depressed. Tf Tf 0.56 ms 2.24 ms 34 Plasma Monitor Tf=108ms @455KHz
... ms • Bit "1" 1.12 ms G Frame interval : Tf The waveform is transmitted as long as a key is depressed. Tf Tf 0.56 ms 2.24 ms 34 Plasma Monitor Tf=108ms @455KHz


