

User Guide
Page 10
... 1 Product 2 Product 3 Product 4 Note • When multi-connecting in/out cascade format, no loss cables are recommended. Connecting to External Devices Daisy Chain Monitors Use this function when displaying ANALOG RGB inputs of a PC to the RGB IN connector of product 1 and connect the other end to the other product. • To...
... 1 Product 2 Product 3 Product 4 Note • When multi-connecting in/out cascade format, no loss cables are recommended. Connecting to External Devices Daisy Chain Monitors Use this function when displaying ANALOG RGB inputs of a PC to the RGB IN connector of product 1 and connect the other end to the other product. • To...
User Guide
Page 16
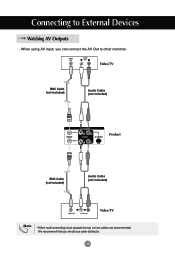
Connecting to other monitors. When using AV input, you should use cable distributor. 15 We recommend that you can connect the AV Out to External Devices Watching AV Outputs - Video/TV BNC Cable (not included) Audio Cable (not included) IN Product OUT BNC Cable (not included) Audio Cable (not included) Video/TV Note • When multi-connecting in/out cascade format, no loss cables are recommended.
Connecting to other monitors. When using AV input, you should use cable distributor. 15 We recommend that you can connect the AV Out to External Devices Watching AV Outputs - Video/TV BNC Cable (not included) Audio Cable (not included) IN Product OUT BNC Cable (not included) Audio Cable (not included) Video/TV Note • When multi-connecting in/out cascade format, no loss cables are recommended.
User Guide
Page 17
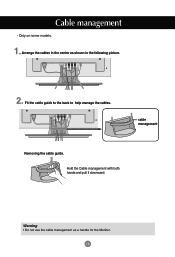
Cable management - Fit the cable guide to the back to help manage the cables. Warning • Do not use the cable management as shown in the center as a handle for the Monitor. 16 cable management Removing the cable guide. Hold the Cable management with both hands and pull it downward. Only on some models. 1. Arrange the cables in the following picture. 2.
Cable management - Fit the cable guide to the back to help manage the cables. Warning • Do not use the cable management as shown in the center as a handle for the Monitor. 16 cable management Removing the cable guide. Hold the Cable management with both hands and pull it downward. Only on some models. 1. Arrange the cables in the following picture. 2.
User Guide
Page 24
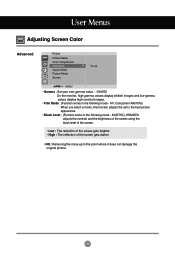
... you watch a movie, this function adjusts the set MENU • Gamma : Set your own gamma value. : -50/0/50 On the monitor, high gamma values display whitish images and low gamma values display high contrast images. • Film Mode : (Function works in the following mode - User Menus Adjusting Screen Color Advanced Picture Picture Mode...
... you watch a movie, this function adjusts the set MENU • Gamma : Set your own gamma value. : -50/0/50 On the monitor, high gamma values display whitish images and low gamma values display high contrast images. • Film Mode : (Function works in the following mode - User Menus Adjusting Screen Color Advanced Picture Picture Mode...

User Guide
Page 28
... Sleep Time menu. 2) Press the button and then use button to set the minutes(00~59). Power On Delay When connecting multiple monitors and turning the power on, the monitors are set to the same time. On/Off Timer The off mode automatically after 10 minutes. 1) Press the MENU button and then...
... Sleep Time menu. 2) Press the button and then use button to set the minutes(00~59). Power On Delay When connecting multiple monitors and turning the power on, the monitors are set to the same time. On/Off Timer The off mode automatically after 10 minutes. 1) Press the MENU button and then...
User Guide
Page 29
... on the screen for prolonged periods could result in a ghost image remaining even when you don't foresee image burn in which the control names are displayed. This helps removes permanent images burned into the screen. A permanent image may be used with white wash. However, it is automatically inverted every 30...function to set the Logo Light on normal if you change the image. The panel color is best not to allow any fixed image to On or Off. The black dots is automatically moved every 5 second. The monitor can be set the power indicator on the front side of the product to...
... on the screen for prolonged periods could result in a ghost image remaining even when you don't foresee image burn in which the control names are displayed. This helps removes permanent images burned into the screen. A permanent image may be used with white wash. However, it is automatically inverted every 30...function to set the Logo Light on normal if you change the image. The panel color is best not to allow any fixed image to On or Off. The black dots is automatically moved every 5 second. The monitor can be set the power indicator on the front side of the product to...

User Guide
Page 41
...protocol is used for communication between the PC and product. RS-232C Cable (not included) PC monitor 1 monitor 2 monitor 3 monitor 4 RS-232C Configurations 7-Wire Configurations (Standard RS-232C cable) PC RXD 2 TXD 3 GND 5 DTR 4 DSR 6 RTS 7 CTS 8 Monitor 3 2 5 6 4 8 7 TXD RXD GND DSR DTR CTS RTS D-Sub 9 (...Female) D-Sub 9 (Female) 3-Wire Configurations (Not Standard) PC RXD 2 TXD 3 GND 5 DTR 4 DSR 6 RTS 7 CTS 8 Monitor 3 2 5 6 4 7 8 TXD RXD GND DTR DSR RTS CTS D-Sub 9 (Female) D-Sub 9 (Female) LLLL LLL Communication Parameter Baud Rate : 9600buadRate (...
...protocol is used for communication between the PC and product. RS-232C Cable (not included) PC monitor 1 monitor 2 monitor 3 monitor 4 RS-232C Configurations 7-Wire Configurations (Standard RS-232C cable) PC RXD 2 TXD 3 GND 5 DTR 4 DSR 6 RTS 7 CTS 8 Monitor 3 2 5 6 4 8 7 TXD RXD GND DSR DTR CTS RTS D-Sub 9 (...Female) D-Sub 9 (Female) 3-Wire Configurations (Not Standard) PC RXD 2 TXD 3 GND 5 DTR 4 DSR 6 RTS 7 CTS 8 Monitor 3 2 5 6 4 7 8 TXD RXD GND DTR DSR RTS CTS D-Sub 9 (Female) D-Sub 9 (Female) LLLL LLL Communication Parameter Baud Rate : 9600buadRate (...
User Guide
Page 51
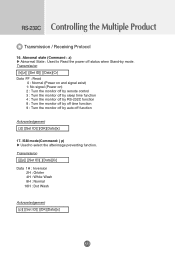
... (Power on and signal exist) 1: No signal (Power on) 2 : Turn the monitor off by remote control 3 : Turn the monitor off by sleep time function 4 : Turn the monitor off by RS-232C function 8 : Turn the monitor off by off time function 9 : Turn the monitor off function Acknowledgement [z][ ][Set ID][ ][OK][Data][x] 17. Transmission [j][p][ ][Set ID][ ][Data...
... (Power on and signal exist) 1: No signal (Power on) 2 : Turn the monitor off by remote control 3 : Turn the monitor off by sleep time function 4 : Turn the monitor off by RS-232C function 8 : Turn the monitor off by off time function 9 : Turn the monitor off function Acknowledgement [z][ ][Set ID][ ][OK][Data][x] 17. Transmission [j][p][ ][Set ID][ ][Data...


