
Owners Manual
Page 1
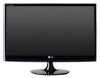
LED LCD MONITOR TV MODELS M2080D M2380DF M2280D M2780DF M2380D M2780D www.lg.com ENGLISH OWNER'S MANUAL LED LCD MONITOR TV Please read this manual carefully before operating your set and retain it for future reference.
LED LCD MONITOR TV MODELS M2080D M2380DF M2280D M2780DF M2380D M2780D www.lg.com ENGLISH OWNER'S MANUAL LED LCD MONITOR TV Please read this manual carefully before operating your set and retain it for future reference.

Owners Manual
Page 2
... FRONT PANEL INFORMATION 4 BACK PANEL INFORMATION 5 STAND INSTALLATION M2080D/M2280D/M2380D/M2780D....... 6 M2380DF/M2780DF 7 DETACHING THE STAND M2080D/M2280D/M2380D/M2780D....... 8 M2380DF/M2780DF 9 DETACHING THE STAND BODY (Only M2080D/ M2280D/M2380D/M2780D 10 WALL MOUNT: HORIZONTAL INSTALLATION.11 SWIVEL STAND(Only... 31 ASPECT RATIO SELECTION 46 PICTURE WIZARD 48 ꕫ ENERGY SAVING 49 PRESET PICTURE SETTINGS(PICTURE MODE)... 50 MANUAL PICTURE ADJUSTMENT-USER MODE......51 PICTURE IMPROVEMENT TECHNOLOGY........ 52 EXPERT PICTURE CONTROL 53 PICTURE RESET 56 SCREEN SETUP FOR...
... FRONT PANEL INFORMATION 4 BACK PANEL INFORMATION 5 STAND INSTALLATION M2080D/M2280D/M2380D/M2780D....... 6 M2380DF/M2780DF 7 DETACHING THE STAND M2080D/M2280D/M2380D/M2780D....... 8 M2380DF/M2780DF 9 DETACHING THE STAND BODY (Only M2080D/ M2280D/M2380D/M2780D 10 WALL MOUNT: HORIZONTAL INSTALLATION.11 SWIVEL STAND(Only... 31 ASPECT RATIO SELECTION 46 PICTURE WIZARD 48 ꕫ ENERGY SAVING 49 PRESET PICTURE SETTINGS(PICTURE MODE)... 50 MANUAL PICTURE ADJUSTMENT-USER MODE......51 PICTURE IMPROVEMENT TECHNOLOGY........ 52 EXPERT PICTURE CONTROL 53 PICTURE RESET 56 SCREEN SETUP FOR...

Owners Manual
Page 3
CONTENTS Surround X 65 AUDIO RESET 66 TV SPEAKERS ON/OFF SETUP 67 STEREO/SAP BROADCAST SETUP 68 TIME SETTING CLOCK SETUP Auto Clock Setup 69 Manual Clock Setup 70 AUTO ON/OFF TIME SETTING 71 SLEEP TIMER SETTING 72 OPTIONAL SETTINGS ON-SCREEN MENUS LANGUAGE SELECTION....73 AUDIO LANGUAGE 74 INPUT ...
CONTENTS Surround X 65 AUDIO RESET 66 TV SPEAKERS ON/OFF SETUP 67 STEREO/SAP BROADCAST SETUP 68 TIME SETTING CLOCK SETUP Auto Clock Setup 69 Manual Clock Setup 70 AUTO ON/OFF TIME SETTING 71 SLEEP TIMER SETTING 72 OPTIONAL SETTINGS ON-SCREEN MENUS LANGUAGE SELECTION....73 AUDIO LANGUAGE 74 INPUT ...

Owners Manual
Page 12
PREPARATION SWIVEL STAND(Only M2780D / M2780DF) ■■ The image shown may be somewhat different from your Monitor set manually to the left or right direction by 179 degrees to suit your Monitor set. After installing the set, you can adjust the set . M2780D M2780DF ... shown may be somewhat different from your viewing position. For proper ventilation, allow a clearance of 10 cm on each side and from the wall. M2080D / M2280D M2380D / M2780D 10 cm 10 cm 10 cm 10 cm M2380DF / M2780DF 12 10 cm 10 cm 10 cm 10 cm
PREPARATION SWIVEL STAND(Only M2780D / M2780DF) ■■ The image shown may be somewhat different from your Monitor set manually to the left or right direction by 179 degrees to suit your Monitor set. After installing the set, you can adjust the set . M2780D M2780DF ... shown may be somewhat different from your viewing position. For proper ventilation, allow a clearance of 10 cm on each side and from the wall. M2080D / M2280D M2380D / M2780D 10 cm 10 cm 10 cm 10 cm M2380DF / M2780DF 12 10 cm 10 cm 10 cm 10 cm

Owners Manual
Page 16
... digital set-top box to the COMPONENT IN AUDIO jacks on the Monitor set. 3 Turn on the digital set-top box. (Refer to the owner's manual for the digital set .
... digital set-top box to the COMPONENT IN AUDIO jacks on the Monitor set. 3 Turn on the digital set-top box. (Refer to the owner's manual for the digital set .

Owners Manual
Page 17
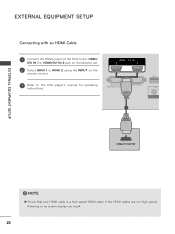
If the HDMI cables are not high speed, flickering or no screen display can result. 17 NOTE ►►Check that your HDMI cable is a high speed HDMI cable. EXTERNAL EQUIPMENT SETUP Connecting a Set-top Box with an HDMI Cable 1 Connect the digital set-top box to the HDMI/DVI IN 1 or HDMI/DVI IN 2 jack on the Monitor set. 2 Turn on the digital set-top box. (Refer to the owner's manual for the digital set-top box.) 3 Select HDMI 1 or HDMI 2 input source using the INPUT button on the remote control. 1 !
If the HDMI cables are not high speed, flickering or no screen display can result. 17 NOTE ►►Check that your HDMI cable is a high speed HDMI cable. EXTERNAL EQUIPMENT SETUP Connecting a Set-top Box with an HDMI Cable 1 Connect the digital set-top box to the HDMI/DVI IN 1 or HDMI/DVI IN 2 jack on the Monitor set. 2 Turn on the digital set-top box. (Refer to the owner's manual for the digital set-top box.) 3 Select HDMI 1 or HDMI 2 input source using the INPUT button on the remote control. 1 !

Owners Manual
Page 18
EXTERNAL EQUIPMENT SETUP EXTERNAL EQUIPMENT SETUP Connecting with an HDMI to DVI Cable 1 Connect the digital set-top box to the HDMI/DVI IN 1 or HDMI/DVI IN 2 jack on the Monitor set. 2 Connect the audio output of the digital set-top box to the AUDIO IN (RGB/DVI) jack on the Monitor set. 3 Turn on the digital set-top box. (Refer to the owner's manual for the digital set-top box.) 4 Select HDMI 1 or HDMI 2 using the INPUT on the remote control. 1 2 18
EXTERNAL EQUIPMENT SETUP EXTERNAL EQUIPMENT SETUP Connecting with an HDMI to DVI Cable 1 Connect the digital set-top box to the HDMI/DVI IN 1 or HDMI/DVI IN 2 jack on the Monitor set. 2 Connect the audio output of the digital set-top box to the AUDIO IN (RGB/DVI) jack on the Monitor set. 3 Turn on the digital set-top box. (Refer to the owner's manual for the digital set-top box.) 4 Select HDMI 1 or HDMI 2 using the INPUT on the remote control. 1 2 18
Owners Manual
Page 19
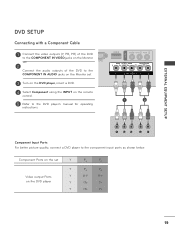
... DVD to the COMPONENT IN AUDIO jacks on the Monitor set Y PB PR Video output Ports on the remote control. 5 Refer to the DVD player's manual for operating instructions. 1 2 Component Input Ports For better picture quality, connect a DVD player to the component input ports as shown below. Component Ports on the...
... DVD to the COMPONENT IN AUDIO jacks on the Monitor set Y PB PR Video output Ports on the remote control. 5 Refer to the DVD player's manual for operating instructions. 1 2 Component Input Ports For better picture quality, connect a DVD player to the component input ports as shown below. Component Ports on the...
Owners Manual
Page 20
EXTERNAL EQUIPMENT SETUP EXTERNAL EQUIPMENT SETUP Connecting with an HDMI Cable 1 Connect the HDMI output of the DVD to the HDMI/ DVI IN 1 or HDMI/DVI IN 2 jack on the Monitor set. 2 Select HDMI 1 or HDMI 2 using the INPUT on the remote control. 3 Refer to the DVD player's manual for operating instructions. 1 ! NOTE ►►Check that your HDMI cable is a high speed HDMI cable. If the HDMI cables are not high speed, flickering or no screen display can result. 20
EXTERNAL EQUIPMENT SETUP EXTERNAL EQUIPMENT SETUP Connecting with an HDMI Cable 1 Connect the HDMI output of the DVD to the HDMI/ DVI IN 1 or HDMI/DVI IN 2 jack on the Monitor set. 2 Select HDMI 1 or HDMI 2 using the INPUT on the remote control. 3 Refer to the DVD player's manual for operating instructions. 1 ! NOTE ►►Check that your HDMI cable is a high speed HDMI cable. If the HDMI cables are not high speed, flickering or no screen display can result. 20

Owners Manual
Page 22
Match the jack colors (Video = yellow, Audio Left = white, and Audio Right = red) 2 Insert a video tape into the VCR and press PLAY. (Refer to the AUDIO L/MONO jack of the set and VCR. EXTERNAL EQUIPMENT SETUP EXTERNAL EQUIPMENT SETUP Connecting with an RCA Cable 1 Connect the AUDIO/VIDEO jacks between set . 22 NOTE ►►If you have a mono VCR, connect the audio cable from the VCR to the VCR owner's manual.) 3 Select AV input source using INPUT on the remote control. !
Match the jack colors (Video = yellow, Audio Left = white, and Audio Right = red) 2 Insert a video tape into the VCR and press PLAY. (Refer to the AUDIO L/MONO jack of the set and VCR. EXTERNAL EQUIPMENT SETUP EXTERNAL EQUIPMENT SETUP Connecting with an RCA Cable 1 Connect the AUDIO/VIDEO jacks between set . 22 NOTE ►►If you have a mono VCR, connect the audio cable from the VCR to the VCR owner's manual.) 3 Select AV input source using INPUT on the remote control. !
Owners Manual
Page 23
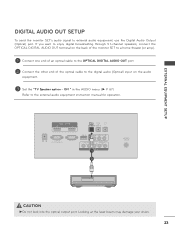
... may damage your vision. 23 EXTERNAL EQUIPMENT SETUP DIGITAL AUDIO OUT SETUP To send the monitor SET's audio signal to the external audio equipment instruction manual for operation. 1 2 CAUTION ►►Do not look into the optical output port. If you want to enjoy digital broadcasting through 5.1-channel speakers, connect the...
... may damage your vision. 23 EXTERNAL EQUIPMENT SETUP DIGITAL AUDIO OUT SETUP To send the monitor SET's audio signal to the external audio equipment instruction manual for operation. 1 2 CAUTION ►►Do not look into the optical output port. If you want to enjoy digital broadcasting through 5.1-channel speakers, connect the...

Owners Manual
Page 36
...only intended for use in the OPTION menu. Welcome Step4. Thank you want. Setting the Mode Mode Setting Selecting the environment. Picture mode" manually while inspecting the TV, but the TV will automatically return to preset instore mode after 5 minutes. ■■ "Store Demo" mode ... Auto Tuning Auto Tuning Before starting, be activated from the user menus. ■■ The default selection is an optimal setting for choosing LG Next 1 Enter Step2. Customers can adjust the "Picture menu - Setting the Time WELCOME WELCOME! To use this TV at home. Previsous ...
...only intended for use in the OPTION menu. Welcome Step4. Thank you want. Setting the Mode Mode Setting Selecting the environment. Picture mode" manually while inspecting the TV, but the TV will automatically return to preset instore mode after 5 minutes. ■■ "Store Demo" mode ... Auto Tuning Auto Tuning Before starting, be activated from the user menus. ■■ The default selection is an optimal setting for choosing LG Next 1 Enter Step2. Customers can adjust the "Picture menu - Setting the Time WELCOME WELCOME! To use this TV at home. Previsous ...

Owners Manual
Page 37
... to TV viewing. • Press BACK to move to the Favorite List. ꕢ Caption: Selects on or off. ꔧ USB Device: Selects "Eject" in this manual. QUICK MENU Your TV's OSD (On-Screen Display) may differ slightly from what is a menu of features users might use frequently. ◄ Aspect Ratio ►...
... to TV viewing. • Press BACK to move to the Favorite List. ꕢ Caption: Selects on or off. ꔧ USB Device: Selects "Eject" in this manual. QUICK MENU Your TV's OSD (On-Screen Display) may differ slightly from what is a menu of features users might use frequently. ◄ Aspect Ratio ►...
Owners Manual
Page 38
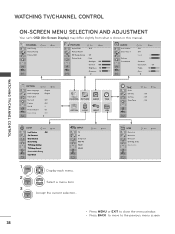
...WATCHING TV/CHANNEL CONTROL ON-SCREEN MENU SELECTION AND ADJUSTMENT Your set's OSD (On-Screen Display) may differ slightly from what is shown in this manual. Select a menu item. Code Deactivation • Press MENU or EXIT to close the menu window. • Press BACK to move to the...On Time Sleep Timer Move Enter : Off : Off : Off USB Move Enter Photo List Music List Movie List DivX Reg. CHANNEL Move Enter Auto Tuning Manual Tuning Channel Edit PICTURE Aspect Ratio Picture Wizard ꕫ Energy Saving Picture Mode Move Enter : 16:9 : Off : Vivid • Backlight 100 • ...
...WATCHING TV/CHANNEL CONTROL ON-SCREEN MENU SELECTION AND ADJUSTMENT Your set's OSD (On-Screen Display) may differ slightly from what is shown in this manual. Select a menu item. Code Deactivation • Press MENU or EXIT to close the menu window. • Press BACK to move to the...On Time Sleep Timer Move Enter : Off : Off : Off USB Move Enter Photo List Music List Movie List DivX Reg. CHANNEL Move Enter Auto Tuning Manual Tuning Channel Edit PICTURE Aspect Ratio Picture Wizard ꕫ Energy Saving Picture Mode Move Enter : 16:9 : Off : Vivid • Backlight 100 • ...
Owners Manual
Page 39
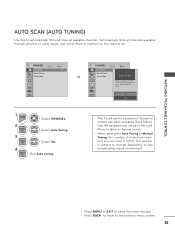
...through antenna or cable inputs, and stores them in the Lock Menu to allow a channel search. • When setting the Auto Tuning or Manual Tuning, the number of maximum channels you set up in memory on the broadcasting signal environment. • Press MENU or EXIT to close .... • Press BACK to move to the previous menu screen. 39 Automatically finds all available channels. CHANNEL Move Enter AAuuttooTTuunniinngg ꔋ Manual Tuning Channel Edit ➩ CHANNEL Move AAuutotoTTuunniningg Manual Tuning Channel Edit Enter ꔋ Check your antenna connection.
...through antenna or cable inputs, and stores them in the Lock Menu to allow a channel search. • When setting the Auto Tuning or Manual Tuning, the number of maximum channels you set up in memory on the broadcasting signal environment. • Press MENU or EXIT to close .... • Press BACK to move to the previous menu screen. 39 Automatically finds all available channels. CHANNEL Move Enter AAuuttooTTuunniinngg ꔋ Manual Tuning Channel Edit ➩ CHANNEL Move AAuutotoTTuunniningg Manual Tuning Channel Edit Enter ꔋ Check your antenna connection.

Owners Manual
Page 40
...close the menu window. • Press BACK to move to add or delete. WATCHING TV/CHANNEL CONTROL WATCHING TV/CHANNEL CONTROL ADD/DELETE CHANNEL (MANUAL TUNING) When selecting DTV or CADTV input signal in the LOCK Menu to allow a channel search. • When setting the Auto tuning or... Manual tuning, the number of the signal being received. CHANNEL Move Enter Auto Tuning MMaannuuaal Tl Tuunniningg ꔋ Channel Edit ➩ CHANNEL Move Auto ...
...close the menu window. • Press BACK to move to add or delete. WATCHING TV/CHANNEL CONTROL WATCHING TV/CHANNEL CONTROL ADD/DELETE CHANNEL (MANUAL TUNING) When selecting DTV or CADTV input signal in the LOCK Menu to allow a channel search. • When setting the Auto tuning or... Manual tuning, the number of the signal being received. CHANNEL Move Enter Auto Tuning MMaannuuaal Tl Tuunniningg ꔋ Channel Edit ➩ CHANNEL Move Auto ...

Owners Manual
Page 41
... it using CH ꕭꕮ button during TV viewing. If you will be unable to the previous menu screen. 41 CHANNEL Move Enter 2-1 Auto Tuning Manual Tuning CChhaannnneel lEEdditit ꔋ ➩ ch. WATCHING TV/CHANNEL CONTROL CHANNEL EDITING The channels in the Channel Edit List are displayed in black and the...
... it using CH ꕭꕮ button during TV viewing. If you will be unable to the previous menu screen. 41 CHANNEL Move Enter 2-1 Auto Tuning Manual Tuning CChhaannnneel lEEdditit ꔋ ➩ ch. WATCHING TV/CHANNEL CONTROL CHANNEL EDITING The channels in the Channel Edit List are displayed in black and the...

Owners Manual
Page 51
... to the previous menu screaen. ! Adjusts the brightness of LCD panel. Adjusts the tint. Adjusts the difference between light and dark levels. Select Picture Mode. MANUAL PICTURE ADJUSTMENT-USER MODE Backlight Contrast Brightness Sharpness Color Tint Adjusts the brightness of the screen. Adjusts the clearness of the screen. NOTE ►►...
... to the previous menu screaen. ! Adjusts the brightness of LCD panel. Adjusts the tint. Adjusts the difference between light and dark levels. Select Picture Mode. MANUAL PICTURE ADJUSTMENT-USER MODE Backlight Contrast Brightness Sharpness Color Tint Adjusts the brightness of the screen. Adjusts the clearness of the screen. NOTE ►►...
Owners Manual
Page 59
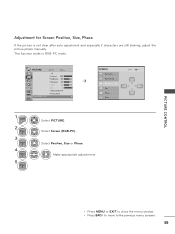
... for Screen Position, Size, Phase If the picture is not clear after auto adjustment and especially if characters are still shaking, adjust the picture phase manually.
... for Screen Position, Size, Phase If the picture is not clear after auto adjustment and especially if characters are still shaking, adjust the picture phase manually.
Owners Manual
Page 69
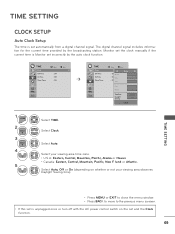
... not your viewing area time zone. • U.S.A: Eastern, Central, Mountain, Pacific, Alaska or Hawaii. • Canada: Eastern, Central, Mountain, Pacific, New F. Monitor set the clock manually if the current time is Monitor set incorrectly by the broadcasting station.
... not your viewing area time zone. • U.S.A: Eastern, Central, Mountain, Pacific, Alaska or Hawaii. • Canada: Eastern, Central, Mountain, Pacific, New F. Monitor set the clock manually if the current time is Monitor set incorrectly by the broadcasting station.


