
User Manual
Page 2
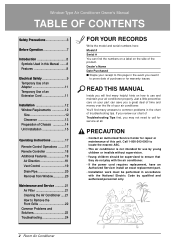
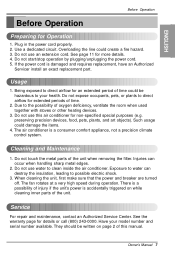
... Safety 9 Temporary Use of an Adapter 11 Temporary Use of an Extension Cord 11 Installation 12 Window Requirements 12 Size 12 Clearance 13 Preparation of Chassis 14 Unit Installation 15 Operating Instructions 17 Remote Control Operations ........17 Remote Controller 18 Additional Features 19 Air... in accordance with the air conditioner. • If the power cord requires replacement, have an Authorized Servicer install an exact replacement part. • Installation work must be supervised to ensure that they do not play with the National Electric Code by qualified and authorized...
... Safety 9 Temporary Use of an Adapter 11 Temporary Use of an Extension Cord 11 Installation 12 Window Requirements 12 Size 12 Clearance 13 Preparation of Chassis 14 Unit Installation 15 Operating Instructions 17 Remote Control Operations ........17 Remote Controller 18 Additional Features 19 Air... in accordance with the air conditioner. • If the power cord requires replacement, have an Authorized Servicer install an exact replacement part. • Installation work must be supervised to ensure that they do not play with the National Electric Code by qualified and authorized...
User Manual
Page 3
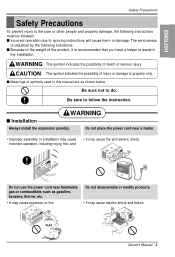
..., and Do not use the power cord near a heater. • Improper assembly or installation may cause • It may cause electric shock and failure. WARNING s Installation Always install the expansion panel(s). s Because of the weight of symbols used in the installation. Gasolin Owner's Manual 3 Be sure to assist in this manual are as gasoline...
..., and Do not use the power cord near a heater. • Improper assembly or installation may cause • It may cause electric shock and failure. WARNING s Installation Always install the expansion panel(s). s Because of the weight of symbols used in the installation. Gasolin Owner's Manual 3 Be sure to assist in this manual are as gasoline...
User Manual
Page 5
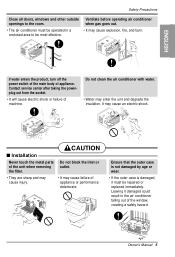
... not block the inlet or outlet. • They are sharp and may cause injury. • It may enter the unit and degrade the insulation. CAUTION s Installation Never touch the metal parts of machine. Ensure that the outer case is not damaged by age or wear. • If the outer case is...
... not block the inlet or outlet. • They are sharp and may cause injury. • It may enter the unit and degrade the insulation. CAUTION s Installation Never touch the metal parts of machine. Ensure that the outer case is not damaged by age or wear. • If the outer case is...
User Manual
Page 6
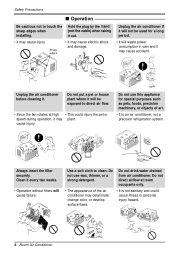
... in vain and it may plant. Clean it every two weeks. • Operation without filters will not be exposed to touch the sharp edges when installing. • It may cause electric shock and damage. Do not use this appliance for a long period. • It will be used for special purposes such...
... in vain and it may plant. Clean it every two weeks. • Operation without filters will not be exposed to touch the sharp edges when installing. • It may cause electric shock and damage. Do not use this appliance for a long period. • It will be used for special purposes such...
User Manual
Page 7
... unit when removing the filter. Being exposed to direct airflow for more details. 4. The air conditioner is damaged and requires replacement, have an Authorized Servicer install an exact replacement part. Injuries can destroy the insulation, leading to your model number and serial number available. Do not use water to clean inside...
... unit when removing the filter. Being exposed to direct airflow for more details. 4. The air conditioner is damaged and requires replacement, have an Authorized Servicer install an exact replacement part. Injuries can destroy the insulation, leading to your model number and serial number available. Do not use water to clean inside...
User Manual
Page 8
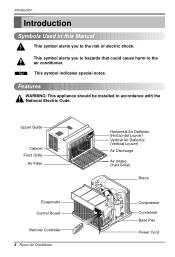
... Compressor Condenser Base Pan Power Cord This symbol indicates special notes. This symbol alerts you to the air conditioner. Features WARNING: This appliance should be installed in this Manual This symbol alerts you to hazards that could cause harm to the risk of electric shock. Tip!
... Compressor Condenser Base Pan Power Cord This symbol indicates special notes. This symbol alerts you to the air conditioner. Features WARNING: This appliance should be installed in this Manual This symbol alerts you to hazards that could cause harm to the risk of electric shock. Tip!
User Manual
Page 9
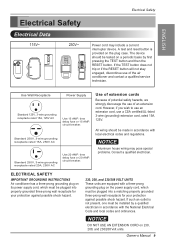
... into a matching properly grounded three-prong wall receptacle for your protection against possible shock hazard. A test and reset button is not present, one must be installed by first pressing the TEST button and then the RESET button.
... into a matching properly grounded three-prong wall receptacle for your protection against possible shock hazard. A test and reset button is not present, one must be installed by first pressing the TEST button and then the RESET button.
User Manual
Page 12
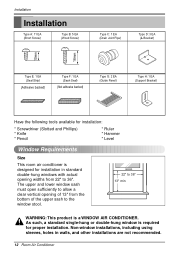
...to allow a clear vertical opening widths from the bottom of the upper sash to the window stool. 22" to 36". Non-window installations, including using sleeves, holes in standard double-hung windows with actual opening of 13" from 22" to 36" 13" min WARNING:... This product is required for installation in walls, and other installations are not recommended. 12 Room Air Conditioner Installation Installation Type A: 11 EA (Short Screw) Type B: 5 EA (Wood Screw) Type C: 1 EA (Drain Joint Pipe) Type ...
...to allow a clear vertical opening widths from the bottom of the upper sash to the window stool. 22" to 36". Non-window installations, including using sleeves, holes in standard double-hung windows with actual opening of 13" from 22" to 36" 13" min WARNING:... This product is required for installation in walls, and other installations are not recommended. 12 Room Air Conditioner Installation Installation Type A: 11 EA (Short Screw) Type B: 5 EA (Wood Screw) Type C: 1 EA (Drain Joint Pipe) Type ...
User Manual
Page 13
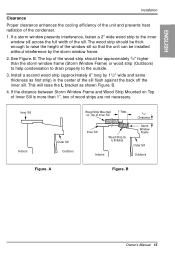
...2" wide wood strip to the inner window sill across the full width of the condenser. 1. Install a second wood strip (approximately 6" long by the storm window frame. 2. B. 4. A Figure. See Figure. The wood strip should be installed without interference by 11/2" wide and same thickness as shown Figure. The top of the wood...Figure. This will raise the L bracket as first strip) in the center of wood strips are not necessary. B Owner's Manual 13 ENGLISH Installation Clearance Proper clearance enhances the cooling efficiency of the unit and prevents heat radiation of the sill.
...2" wide wood strip to the inner window sill across the full width of the condenser. 1. Install a second wood strip (approximately 6" long by the storm window frame. 2. B. 4. A Figure. See Figure. The wood strip should be installed without interference by 11/2" wide and same thickness as shown Figure. The top of the wood...Figure. This will raise the L bracket as first strip) in the center of wood strips are not necessary. B Owner's Manual 13 ENGLISH Installation Clearance Proper clearance enhances the cooling efficiency of the unit and prevents heat radiation of the sill.

User Manual
Page 14
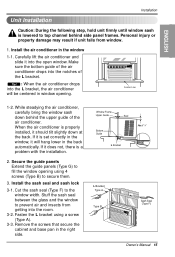
Tip! : Use a long screwdriver and installing the screws will be easier. Type A 2. Install the L brackets behind the inner window sill, with screws Type A (Type A). Be sure to place bracket edge flush against back of Chassis 1. ...Inner Sill Outer Sill Type A Inside Center Line 8" 8" Outside L Bracket 14 Room Air Conditioner Use the 2 screws (Type A) provided. 4-2. Installation Preparation of inner sill. Seal Strip (Type E) 3. Inner Sill Room Side Center Line 4. Insert the guide panels into the guides of the bottom window. Remove...
Tip! : Use a long screwdriver and installing the screws will be easier. Type A 2. Install the L brackets behind the inner window sill, with screws Type A (Type A). Be sure to place bracket edge flush against back of Chassis 1. ...Inner Sill Outer Sill Type A Inside Center Line 8" 8" Outside L Bracket 14 Room Air Conditioner Use the 2 screws (Type A) provided. 4-2. Installation Preparation of inner sill. Seal Strip (Type E) 3. Inner Sill Room Side Center Line 4. Insert the guide panels into the guides of the bottom window. Remove...
User Manual
Page 15
...bracket using 4 screws (Type B) to secure them. 3. Secure the guide panels Extend the guide panels (Type G) to fill the window opening . Install the sash seal and sash lock 3-1. Cut the sash seal (Type F) to the window width. Window Frame Upper Guide Bottom Guide Seal About 1/4"... L Bracket L Bracket Type A Type B Sash Seal (Type F) Owner's Manual 15 ENGLISH Installation Unit Installation Caution: During the following step, hold unit firmly until window sash is lowered to top channel behind the upper guide of the L bracket....
...bracket using 4 screws (Type B) to secure them. 3. Secure the guide panels Extend the guide panels (Type G) to fill the window opening . Install the sash seal and sash lock 3-1. Cut the sash seal (Type F) to the window width. Window Frame Upper Guide Bottom Guide Seal About 1/4"... L Bracket L Bracket Type A Type B Sash Seal (Type F) Owner's Manual 15 ENGLISH Installation Unit Installation Caution: During the following step, hold unit firmly until window sash is lowered to top channel behind the upper guide of the L bracket....
User Manual
Page 16
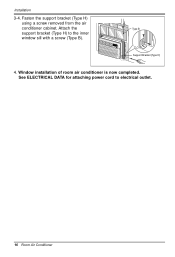
Support Bracket (Type H) 4. Window installation of room air conditioner is now completed. Fasten the support bracket (Type H) using a screw removed from the air conditioner cabinet. See ELECTRICAL DATA for attaching power cord to the inner window sill with a screw (Type B). Attach the Type B support bracket (Type H) to electrical outlet. 16 Room Air Conditioner Installation 3-4.
Support Bracket (Type H) 4. Window installation of room air conditioner is now completed. Fasten the support bracket (Type H) using a screw removed from the air conditioner cabinet. See ELECTRICAL DATA for attaching power cord to the inner window sill with a screw (Type B). Attach the Type B support bracket (Type H) to electrical outlet. 16 Room Air Conditioner Installation 3-4.
User Manual
Page 18
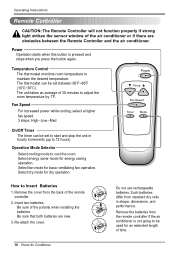
... Operation starts when this button is not going to be used for basic ventilating fan operation. The unit takes an average of the polarity when installing the batteries. Be sure of 30 minutes to 12 hours). Do not use rechargeable batteries. The thermostat can be set to maintain the desired temperature...
... Operation starts when this button is not going to be used for basic ventilating fan operation. The unit takes an average of the polarity when installing the batteries. Be sure of 30 minutes to 12 hours). Do not use rechargeable batteries. The thermostat can be set to maintain the desired temperature...
User Manual
Page 20
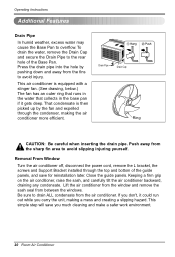
... the air conditioner more efficient. Removal From Window Turn the air conditioner off, disconnect the power cord, remove the L bracket, the screws and Support Bracket installed through the condenser, making a mess and creating a slipping hazard. This simple step will save for reinstallation later. To drain the water, remove the Drain Cap...
... the air conditioner more efficient. Removal From Window Turn the air conditioner off, disconnect the power cord, remove the L bracket, the screws and Support Bracket installed through the condenser, making a mess and creating a slipping hazard. This simple step will save for reinstallation later. To drain the water, remove the Drain Cap...

User Manual
Page 52
...problems that result from the menu, and have product type (Room Air Conditioner), model number, serial number, and ZIP code ready. LG ROOM AIR CONDITIONER LIMITED WARRANTY - THIS WARRANTY IS IN LIEU OF ANY OTHER WARRANTIES, EXPRESS OR IMPLIED, INCLUDING WITHOUT LIMITATION, ANY ...lgappliances.com Patent No. : Us 6, 412, 298 P/No.: 3828A21004G Printed in the Operating Guide, accident, vermin, fire, flood, improper installation, acts of God, unauthorized modification or alteration, incorrect electrical current or voltage, or commercial use, or use during the warranty period set forth...
...problems that result from the menu, and have product type (Room Air Conditioner), model number, serial number, and ZIP code ready. LG ROOM AIR CONDITIONER LIMITED WARRANTY - THIS WARRANTY IS IN LIEU OF ANY OTHER WARRANTIES, EXPRESS OR IMPLIED, INCLUDING WITHOUT LIMITATION, ANY ...lgappliances.com Patent No. : Us 6, 412, 298 P/No.: 3828A21004G Printed in the Operating Guide, accident, vermin, fire, flood, improper installation, acts of God, unauthorized modification or alteration, incorrect electrical current or voltage, or commercial use, or use during the warranty period set forth...


