
User Manual
Page 2
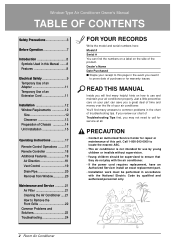
... Window-Type Air Conditioner Owner's Manual TABLE OF CONTENTS Safety Precautions 3 Before Operation 7 Introduction 8 Symbols Used in this Manual ........8 Features 8 Electrical Safety 9 Temporary Use of an Adapter 11 Temporary Use of an Extension Cord 11 Installation 12 Window Requirements 12 Size 12 Clearance 13 Preparation of Chassis 14 Unit Installation 15 Operating Instructions 17 Remote Control Operations ........17 Remote Controller 18 Additional Features 19 Air Direction 19 Vent Control 19 Drain Pipe 20 Removal from Window 20 Maintenance and Service 21 Air Filter...
... Window-Type Air Conditioner Owner's Manual TABLE OF CONTENTS Safety Precautions 3 Before Operation 7 Introduction 8 Symbols Used in this Manual ........8 Features 8 Electrical Safety 9 Temporary Use of an Adapter 11 Temporary Use of an Extension Cord 11 Installation 12 Window Requirements 12 Size 12 Clearance 13 Preparation of Chassis 14 Unit Installation 15 Operating Instructions 17 Remote Control Operations ........17 Remote Controller 18 Additional Features 19 Air Direction 19 Vent Control 19 Drain Pipe 20 Removal from Window 20 Maintenance and Service 21 Air Filter...
User Manual
Page 3
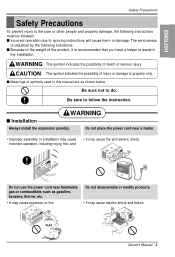
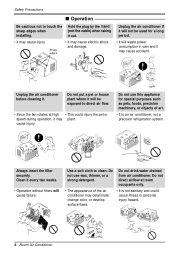
... instruction. WARNING s Installation Always install the expansion panel(s). Do not disassemble or modify products. • It may cause fire and electric shock. CAUTION This symbol indicates the possibility of death or serious injury. incorrect operation, including injury, fire, and Do not use the power cord near a heater. • Improper assembly or installation may cause • It may cause electric shock and failure. Gasolin Owner's Manual...
... instruction. WARNING s Installation Always install the expansion panel(s). Do not disassemble or modify products. • It may cause fire and electric shock. CAUTION This symbol indicates the possibility of death or serious injury. incorrect operation, including injury, fire, and Do not use the power cord near a heater. • Improper assembly or installation may cause • It may cause electric shock and failure. Gasolin Owner's Manual...
User Manual
Page 4
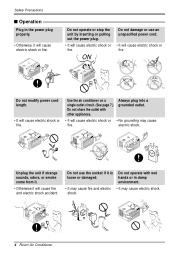
electric shock. Do not operate or stop the unit by inserting or pulling out the power plug. • It will cause electric shock or fire. ON Do not modify power cord length. • It will cause electric shock or fire. Use the air conditioner on a single outlet circuit. (See page 7.) Do not share the outlet with wet hands or in the power plug properly. • Otherwise, it...
electric shock. Do not operate or stop the unit by inserting or pulling out the power plug. • It will cause electric shock or fire. ON Do not modify power cord length. • It will cause electric shock or fire. Use the air conditioner on a single outlet circuit. (See page 7.) Do not share the outlet with wet hands or in the power plug properly. • Otherwise, it...
User Manual
Page 5
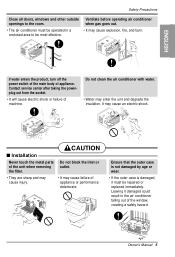
... may cause an electric shock. ENGLISH If water enters the product, turn off the power switch of the main body of machine. It may cause failure of appliance or performance deteriorate. Ventilate before operating air conditioner when gas goes out. • It may enter the unit and degrade the insulation. Owner's Manual 5 CAUTION s Installation Never touch the metal parts of the window, creating a safety hazard...
... may cause an electric shock. ENGLISH If water enters the product, turn off the power switch of the main body of machine. It may cause failure of appliance or performance deteriorate. Ventilate before operating air conditioner when gas goes out. • It may enter the unit and degrade the insulation. Owner's Manual 5 CAUTION s Installation Never touch the metal parts of the window, creating a safety hazard...
User Manual
Page 6
.... Clean it every two weeks. • Operation without filters will not be exposed to direct air flow. • Since the fan rotates at room occupants only. • The appearance of art. • It is not sanitary and could injury the pet or speed during operation, it may cause accident. cause injury. Do not drink water drained from air conditioner. Do not use wax...
.... Clean it every two weeks. • Operation without filters will not be exposed to direct air flow. • Since the fan rotates at room occupants only. • The appearance of art. • It is not sanitary and could injury the pet or speed during operation, it may cause accident. cause injury. Do not drink water drained from air conditioner. Do not use wax...
User Manual
Page 7
... unit when removing the filter. Have your health. Overloading the line could damage the items. 4. Due to your model number and serial number available. The air conditioner is damaged and requires replacement, have an Authorized Servicer install an exact replacement part. Do not touch the metal parts of oxygen deficiency, ventilate the room when used together with stoves or other heating devices. 3. Do not use an extension cord. See the warranty...
... unit when removing the filter. Have your health. Overloading the line could damage the items. 4. Due to your model number and serial number available. The air conditioner is damaged and requires replacement, have an Authorized Servicer install an exact replacement part. Do not touch the metal parts of oxygen deficiency, ventilate the room when used together with stoves or other heating devices. 3. Do not use an extension cord. See the warranty...
User Manual
Page 8
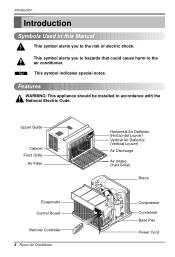
Tip! Upper Guide Cabinet Front Grille Air Filter Evaporator Control Board Remote Controller 8 Room Air Conditioner Horizontal Air Deflector (Horizontal Louver) Vertical Air Deflector (Vertical Louver) Air Discharge Air Intake (Inlet Grille) Brace Compressor Condenser Base Pan Power Cord Introduction Introduction Symbols Used in accordance with the National Electric Code. This symbol indicates special notes. Features WARNING: This appliance should be installed in this Manual This symbol alerts you to hazards that could cause harm to...
Tip! Upper Guide Cabinet Front Grille Air Filter Evaporator Control Board Remote Controller 8 Room Air Conditioner Horizontal Air Deflector (Horizontal Louver) Vertical Air Deflector (Vertical Louver) Air Discharge Air Intake (Inlet Grille) Brace Compressor Condenser Base Pan Power Cord Introduction Introduction Symbols Used in accordance with the National Electric Code. This symbol indicates special notes. Features WARNING: This appliance should be installed in this Manual This symbol alerts you to hazards that could cause harm to...
User Manual
Page 9
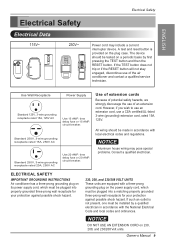
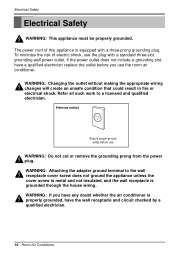
... or if the RESET button will not stay engaged, discontinue use a CSA certified/UL-listed 3-wire (grounding) extension cord, rated 15A, 125V. circuit breaker. Use 20 AMP. circuit breaker. However, if you wish to use an extension cord, use of an extension cord. time delay fuse or 15 AMP. ELECTRICAL SAFETY IMPORTANT GROUNDING INSTRUCTIONS Air conditioner has a three-prong grounding plug on its power supply cord, which must be plugged into properly grounded three-prong wall receptacle for...
... or if the RESET button will not stay engaged, discontinue use a CSA certified/UL-listed 3-wire (grounding) extension cord, rated 15A, 125V. circuit breaker. Use 20 AMP. circuit breaker. However, if you wish to use an extension cord, use of an extension cord. time delay fuse or 15 AMP. ELECTRICAL SAFETY IMPORTANT GROUNDING INSTRUCTIONS Air conditioner has a three-prong grounding plug on its power supply cord, which must be plugged into properly grounded three-prong wall receptacle for...
User Manual
Page 10
... to a licensed and qualified electrician. The power cord of electric shock, use WARNING: Do not cut or remove the grounding prong from the power plug. To minimize the risk of this appliance is properly grounded, have the wall receptacle and circuit checked by a qualified electrician. 10 Room Air Conditioner Refer all such work to the wall receptacle cover screw does not ground the appliance unless...
... to a licensed and qualified electrician. The power cord of electric shock, use WARNING: Do not cut or remove the grounding prong from the power plug. To minimize the risk of this appliance is properly grounded, have the wall receptacle and circuit checked by a qualified electrician. 10 Room Air Conditioner Refer all such work to the wall receptacle cover screw does not ground the appliance unless...
User Manual
Page 12
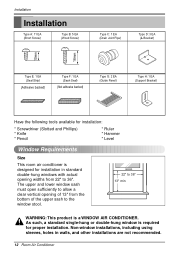
...) Type G: 2 EA (Guide Panel) Type H: 1 EA (Support Bracket) Have the following tools available for installation: * Screwdriver (Slotted and Phillips) * Knife * Pencil * Ruler * Hammer * Level Window Requirements Size This room air conditioner is designed for proper installation. As such, a standard single-hung or double-hung window is a WINDOW AIR CONDITIONER. Non-window installations, including using sleeves, holes in standard double-hung windows with actual opening of 13" from 22" to 36" 13" min WARNING: This product...
...) Type G: 2 EA (Guide Panel) Type H: 1 EA (Support Bracket) Have the following tools available for installation: * Screwdriver (Slotted and Phillips) * Knife * Pencil * Ruler * Hammer * Level Window Requirements Size This room air conditioner is designed for proper installation. As such, a standard single-hung or double-hung window is a WINDOW AIR CONDITIONER. Non-window installations, including using sleeves, holes in standard double-hung windows with actual opening of 13" from 22" to 36" 13" min WARNING: This product...

User Manual
Page 14
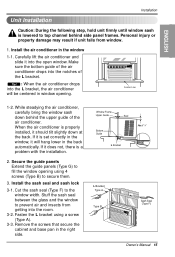
... 4. Be sure to the window width. Inner Sill Outer Sill Type A Inside Center Line 8" 8" Outside L Bracket 14 Room Air Conditioner Tip! : Use a long screwdriver and installing the screws will be easier. Attach L bracket 4-1. Type A 2. Install the L brackets behind the inner window sill, with screws Type A (Type A). Fasten the curtains to the unit with short side of inner sill. Insert the guide panels into the guides of Chassis 1. Use the 2 screws (Type A) provided. 4-2.
... 4. Be sure to the window width. Inner Sill Outer Sill Type A Inside Center Line 8" 8" Outside L Bracket 14 Room Air Conditioner Tip! : Use a long screwdriver and installing the screws will be easier. Attach L bracket 4-1. Type A 2. Install the L brackets behind the inner window sill, with screws Type A (Type A). Fasten the curtains to the unit with short side of inner sill. Insert the guide panels into the guides of Chassis 1. Use the 2 screws (Type A) provided. 4-2.
User Manual
Page 15
... (Type F) to prevent air and insects from window. 1. Window Frame Upper Guide Bottom Guide Seal About 1/4" L Bracket L Bracket Type A Type B Sash Seal (Type F) Owner's Manual 15 Tip! : When the air conditioner drops into the room. 3-2. If it is set correctly in the window, it should tilt slightly down behind side panel frames. Carefully lift the air conditioner and slide it does not, there is a problem with the installation. 2. If it into the notches of the air conditioner...
... (Type F) to prevent air and insects from window. 1. Window Frame Upper Guide Bottom Guide Seal About 1/4" L Bracket L Bracket Type A Type B Sash Seal (Type F) Owner's Manual 15 Tip! : When the air conditioner drops into the room. 3-2. If it is set correctly in the window, it should tilt slightly down behind side panel frames. Carefully lift the air conditioner and slide it does not, there is a problem with the installation. 2. If it into the notches of the air conditioner...
User Manual
Page 16
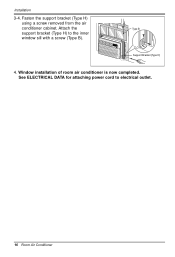
Attach the Type B support bracket (Type H) to electrical outlet. 16 Room Air Conditioner Window installation of room air conditioner is now completed. Support Bracket (Type H) 4. Fasten the support bracket (Type H) using a screw removed from the air conditioner cabinet. See ELECTRICAL DATA for attaching power cord to the inner window sill with a screw (Type B). Installation 3-4.
Attach the Type B support bracket (Type H) to electrical outlet. 16 Room Air Conditioner Window installation of room air conditioner is now completed. Support Bracket (Type H) 4. Fasten the support bracket (Type H) using a screw removed from the air conditioner cabinet. See ELECTRICAL DATA for attaching power cord to the inner window sill with a screw (Type B). Installation 3-4.
User Manual
Page 18
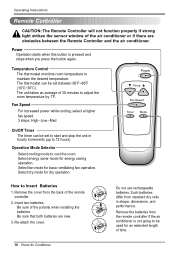
.../Off Timer The timer can be set between the Remote Controller and the air conditioner. Select fan mode for dry operation. Select dry mode for basic ventilating fan operation. Be sure of 30 minutes to adjust the room temperature by 1 F. The thermostat can be set to be used for energy saving operation. Operation Mode Selector Select cooling mode to Insert Batteries 1. Select energy saver mode for an extended length of time. 18 Room Air Conditioner Power Temp Fan Speed Timer Mode Auto Swing How to cool the room. Power Operation starts when this button...
.../Off Timer The timer can be set between the Remote Controller and the air conditioner. Select fan mode for dry operation. Select dry mode for basic ventilating fan operation. Be sure of 30 minutes to adjust the room temperature by 1 F. The thermostat can be set to be used for energy saving operation. Operation Mode Selector Select cooling mode to Insert Batteries 1. Select energy saver mode for an extended length of time. 18 Room Air Conditioner Power Temp Fan Speed Timer Mode Auto Swing How to cool the room. Power Operation starts when this button...
User Manual
Page 19
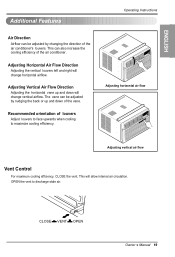
... allow internal air circulation. Operating Instructions Adjusting horizontal air flow Adjusting vertical air flow Vent Control For maximum cooling efficiency, CLOSE the vent. CLOSE VENT OPEN Owner ,s Manual 19 This can be adjusted by changing the direction of the air conditioner's louvers. Recommended orientation of the vane. OPEN the vent to maximize cooling efficiency. This will change horizontal airflow. ENGLISH Additional Features Air Direction Airflow can also increase the cooling efficiency of the air conditioner. The...
... allow internal air circulation. Operating Instructions Adjusting horizontal air flow Adjusting vertical air flow Vent Control For maximum cooling efficiency, CLOSE the vent. CLOSE VENT OPEN Owner ,s Manual 19 This can be adjusted by changing the direction of the air conditioner's louvers. Recommended orientation of the vane. OPEN the vent to maximize cooling efficiency. This will change horizontal airflow. ENGLISH Additional Features Air Direction Airflow can also increase the cooling efficiency of the air conditioner. The...
User Manual
Page 20
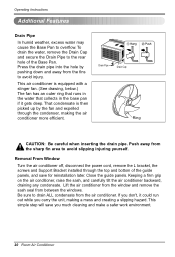
... inserting the drain pipe. Removal From Window Turn the air conditioner off, disconnect the power cord, remove the L bracket, the screws and Support Bracket installed through the condenser, making a mess and creating a slipping hazard. This simple step will save for reinstallation later. Operating Instructions AAddditional Features Drain Pipe In humid weather, excess water may cause the Base Pan to drain ALL condensate from the air conditioner. Press the drain pipe into the hole by the fan and expelled...
... inserting the drain pipe. Removal From Window Turn the air conditioner off, disconnect the power cord, remove the L bracket, the screws and Support Bracket installed through the condenser, making a mess and creating a slipping hazard. This simple step will save for reinstallation later. Operating Instructions AAddditional Features Drain Pipe In humid weather, excess water may cause the Base Pan to drain ALL condensate from the air conditioner. Press the drain pipe into the hole by the fan and expelled...
User Manual
Page 21
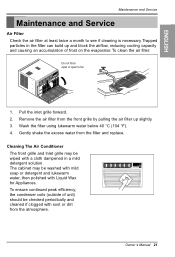
... force open or open to see if cleaning is necessary. Gently shake the excess water from the atmosphere. Cool Energy Saver F F1 LOW F2 MED F3 HIGH Fan Dry Timer TEMP Owner ,s Manual 21 Cleaning The Air Conditioner The front grille and Inlet grille may be washed with mild soap or detergent and lukewarm water, then polished with soot or dirt from the filter and replace. ENGLISH Maintenance and Service Maintenance and Service Air Filter Check the air filter...
... force open or open to see if cleaning is necessary. Gently shake the excess water from the atmosphere. Cool Energy Saver F F1 LOW F2 MED F3 HIGH Fan Dry Timer TEMP Owner ,s Manual 21 Cleaning The Air Conditioner The front grille and Inlet grille may be washed with mild soap or detergent and lukewarm water, then polished with soot or dirt from the filter and replace. ENGLISH Maintenance and Service Maintenance and Service Air Filter Check the air filter...
User Manual
Page 22
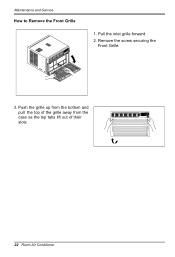
Pull the inlet grille forward 2. Remove the screw securing the Front Grille. 3. Maintenance and Service How to Remove the Front Grille 1. Push the grille up from the bottom and pull the top of the grille away from the case as the top tabs lift out of their slots. Cool Energy Saver F F1 LOW F2 MED F3 HIGH Fan Dry Timer TEMP 22 Room Air Conditioner
Pull the inlet grille forward 2. Remove the screw securing the Front Grille. 3. Maintenance and Service How to Remove the Front Grille 1. Push the grille up from the bottom and pull the top of the grille away from the case as the top tabs lift out of their slots. Cool Energy Saver F F1 LOW F2 MED F3 HIGH Fan Dry Timer TEMP 22 Room Air Conditioner
User Manual
Page 23
... by water being picked up by the compressor cycle starting and stopping. • You see if the air filter is clogged with your dealer. This is plugged into a proper outlet. 2. This is silent. Air does not feel cold enough on rainy days or in the room. This feature is operating normally when: • You hear a pinging noise. Owner's Manual 23 Check the fuse or circuit breaker. 3. Close...
... by water being picked up by the compressor cycle starting and stopping. • You see if the air filter is clogged with your dealer. This is plugged into a proper outlet. 2. This is silent. Air does not feel cold enough on rainy days or in the room. This feature is operating normally when: • You hear a pinging noise. Owner's Manual 23 Check the fuse or circuit breaker. 3. Close...

User Manual
Page 52
... CONNECTION WITH THE PRODUCT. Compressor: 5 Years from the menu, and have product type (Room Air Conditioner), model number, serial number, and ZIP code ready. Territories. THIS LIMITED WARRANTY DOES NOT APPLY TO: 1. Parts: 5 Year from misuse, abuse, operation outside environmental specifications or contrary to deliver, pick up, and/or install the product, instruct, or replace house fuses or correct wiring, or correction of the product. Therefore, the cost of repair or replacement of purchase. Service trips to your...
... CONNECTION WITH THE PRODUCT. Compressor: 5 Years from the menu, and have product type (Room Air Conditioner), model number, serial number, and ZIP code ready. Territories. THIS LIMITED WARRANTY DOES NOT APPLY TO: 1. Parts: 5 Year from misuse, abuse, operation outside environmental specifications or contrary to deliver, pick up, and/or install the product, instruct, or replace house fuses or correct wiring, or correction of the product. Therefore, the cost of repair or replacement of purchase. Service trips to your...


