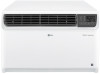
Owners Manual
Page 2
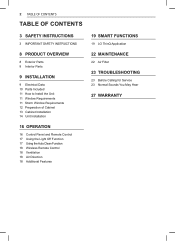
...INSTRUCTIONS 8 PRODUCT OVERVIEW 8 Exterior Parts 8 Interior Parts 9 INSTALLATION 9 Electrical Data 10 Parts Included 11 How to Install the Unit 11 Window Requirements 11 Storm Window Requirements 12 Preparation of Cabinet 13 Cabinet Installation 14 Unit Installation 16 OPERATION 16 Control Panel and Remote Control 17 Using the... Light Off Function 17 Using the Auto Clean Function 18 Wireless Remote Control 18 Ventilation 18 Air Direction 18 Additional Features 19 SMART FUNCTIONS 19 LG ThinQ ...
...INSTRUCTIONS 8 PRODUCT OVERVIEW 8 Exterior Parts 8 Interior Parts 9 INSTALLATION 9 Electrical Data 10 Parts Included 11 How to Install the Unit 11 Window Requirements 11 Storm Window Requirements 12 Preparation of Cabinet 13 Cabinet Installation 14 Unit Installation 16 OPERATION 16 Control Panel and Remote Control 17 Using the... Light Off Function 17 Using the Auto Clean Function 18 Wireless Remote Control 18 Ventilation 18 Air Direction 18 Additional Features 19 SMART FUNCTIONS 19 LG ThinQ ...
Owners Manual
Page 3
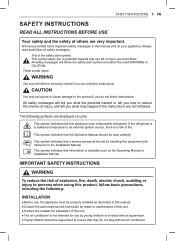
...that this equipment with the air conditioner. All safety messages will tell you what may be properly installed as the Operating Manual or Installation Manual. The following : INSTALLATION ● Before use by young children or invalids without supervision. ● Young children should be ...product, follow instructions. This symbol indicates that can kill or injure you what the potential hazard is not intended for installation of others . All safety messages will follow all safety messages. SAFETY INSTRUCTIONS 3 EN SAFETY INSTRUCTIONS READ ALL INSTRUCTIONS ...
...that this equipment with the air conditioner. All safety messages will tell you what may be properly installed as the Operating Manual or Installation Manual. The following : INSTALLATION ● Before use by young children or invalids without supervision. ● Young children should be ...product, follow instructions. This symbol indicates that can kill or injure you what the potential hazard is not intended for installation of others . All safety messages will follow all safety messages. SAFETY INSTRUCTIONS 3 EN SAFETY INSTRUCTIONS READ ALL INSTRUCTIONS ...
Owners Manual
Page 4
...9679;Use this appliance if it immediately, and contact an LG Electronics Customer Information Center. ●●Never unplug the appliance by an authorized service person using only genuine replacement parts. ●●Installation work must be performed in accordance with the National Electric Code...near a heat source. ●●Do not use of long-sleeved gloves and safety glasses. ●●Use care when unpacking and installing. 4 SAFETY INSTRUCTIONS ●●When the power cord is damaged, have become frayed or otherwise damaged. These materials can pose a ...
...9679;Use this appliance if it immediately, and contact an LG Electronics Customer Information Center. ●●Never unplug the appliance by an authorized service person using only genuine replacement parts. ●●Installation work must be performed in accordance with the National Electric Code...near a heat source. ●●Do not use of long-sleeved gloves and safety glasses. ●●Use care when unpacking and installing. 4 SAFETY INSTRUCTIONS ●●When the power cord is damaged, have become frayed or otherwise damaged. These materials can pose a ...
Owners Manual
Page 6
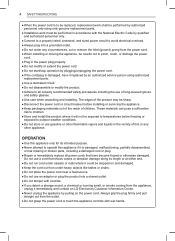
Do not use as maintaining pets, food, precision machinery, or art objects. ● When installing or moving the appliance, be careful not to pinch, crush, or damage the power cord. ● Make sure the air inlet and outlet are...damage to the product or property when using this product, follow basic precautions, including the following: INSTALLATION ● Take care when installing the product that exhaust or condensation does not damage nearby property. ● Follow installation instructions exactly to clean the appliance. Do not use strong cleaning agents or solvents when cleaning ...
Do not use as maintaining pets, food, precision machinery, or art objects. ● When installing or moving the appliance, be careful not to pinch, crush, or damage the power cord. ● Make sure the air inlet and outlet are...damage to the product or property when using this product, follow basic precautions, including the following: INSTALLATION ● Take care when installing the product that exhaust or condensation does not damage nearby property. ● Follow installation instructions exactly to clean the appliance. Do not use strong cleaning agents or solvents when cleaning ...

Owners Manual
Page 9
... immerse this window air conditioner. ● Never push the TEST button during operation. Periodically examine the cord for 120 V INSTALLATION 9 EN WARNING ● This appliance should be corrected before further use of the air conditioner for any damage. The device should be...Use of extension cords could cause serious injury or death. - Doing so can damage the plug. - If this window air conditioner. - INSTALLATION Electrical Data Power cord may include a current interrupter device. These shields are provided on TEST button and then the RESET button. This unit ...
... immerse this window air conditioner. ● Never push the TEST button during operation. Periodically examine the cord for 120 V INSTALLATION 9 EN WARNING ● This appliance should be corrected before further use of the air conditioner for any damage. The device should be...Use of extension cords could cause serious injury or death. - Doing so can damage the plug. - If this window air conditioner. - INSTALLATION Electrical Data Power cord may include a current interrupter device. These shields are provided on TEST button and then the RESET button. This unit ...

Owners Manual
Page 10
10 INSTALLATION Parts Included (Appearance May Vary) Foam-PE (2) (adhesive-backed) Foam strip (non-adhesive) Heatproof foam (2) (Adhesive backed) Right curtain panel Left curtain panel Frame guide (2) Window locking bracket Sill bracket (2) Type 'A' Screws (14) Type 'B' Screws (3) Type 'C' Screws (5) Lock Nuts (2) Tools Needed Phillips-head screwdriver Adjustable wrench Level Tape measure Scissors or Cutting knife Pencil Bolts (2) Gloves
10 INSTALLATION Parts Included (Appearance May Vary) Foam-PE (2) (adhesive-backed) Foam strip (non-adhesive) Heatproof foam (2) (Adhesive backed) Right curtain panel Left curtain panel Frame guide (2) Window locking bracket Sill bracket (2) Type 'A' Screws (14) Type 'B' Screws (3) Type 'C' Screws (5) Lock Nuts (2) Tools Needed Phillips-head screwdriver Adjustable wrench Level Tape measure Scissors or Cutting knife Pencil Bolts (2) Gloves
Owners Manual
Page 11
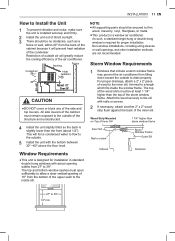
... x 2" wood strip flush against the back of the inner sill. As such, a standard single-hung or double-hung window is required for installation in standard double hung windows with the bottom between 30" ~60" above the floor level. NOTE ● All supporting parts should be no obstacles...the top of the storm window frame. All side louvers of the cabinet must open 16" from tilting down toward the outside . 5 Install the unit with actual opening widths from the back of the cabinet because it will greatly reduce the cooling efficiency of the air conditioner. ...
... x 2" wood strip flush against the back of the inner sill. As such, a standard single-hung or double-hung window is required for installation in standard double hung windows with the bottom between 30" ~60" above the floor level. NOTE ● All supporting parts should be no obstacles...the top of the storm window frame. All side louvers of the cabinet must open 16" from tilting down toward the outside . 5 Install the unit with actual opening widths from the back of the cabinet because it will greatly reduce the cooling efficiency of the air conditioner. ...

Owners Manual
Page 12
... behind the curtain panel. Obtain assistance from another person if possible. 3 Cut the window sash seals (Foam-PE) to the unit with them when installing the cabinet. 6 Fasten the curtain panels to the proper length. Indoor 5 Insert the top and bottom rails of the curtain panels into the slots ...hooks on the lower panel guides into the upper and lower panel guides. Peel off the backing and attach the adhesive-backed foam to make installing the screws easier. Make sure that the flanges on the bottom of the window frame. Lower Panel Guide CAUTION ● The lower panel guides...
... behind the curtain panel. Obtain assistance from another person if possible. 3 Cut the window sash seals (Foam-PE) to the unit with them when installing the cabinet. 6 Fasten the curtain panels to the proper length. Indoor 5 Insert the top and bottom rails of the curtain panels into the slots ...hooks on the lower panel guides into the upper and lower panel guides. Peel off the backing and attach the adhesive-backed foam to make installing the screws easier. Make sure that the flanges on the bottom of the window frame. Lower Panel Guide CAUTION ● The lower panel guides...

Owners Manual
Page 13
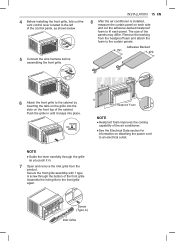
... align the center hole on the opposite side of the cabinet. Cabinet Track Holes Screws (Type A) Window Sash Upper Panel Guide Outdoor Indoor 5 Install the cabinet with the second sill support on the cabinet bottom 4 Use 2 type A screws to attach a sill support to adjust the tilt...pan is designed to operate with the center line on one side. The longer side of water in the bottom pan. and nut. Cabinet Installation INSTALLATION 13 EN 3 Loosely assemble each sill support. Mark a line on the outside the window. Use front with approximately 1/2" of the sill ...
... align the center hole on the opposite side of the cabinet. Cabinet Track Holes Screws (Type A) Window Sash Upper Panel Guide Outdoor Indoor 5 Install the cabinet with the second sill support on the cabinet bottom 4 Use 2 type A screws to attach a sill support to adjust the tilt...pan is designed to operate with the center line on one side. The longer side of water in the bottom pan. and nut. Cabinet Installation INSTALLATION 13 EN 3 Loosely assemble each sill support. Mark a line on the outside the window. Use front with approximately 1/2" of the sill ...

Owners Manual
Page 14
...upper guide. Lifting and maneuvering the unit by inserting 3 type C screws into the cabinet. Window Locking Bracket Wood Screw (Type C) 14 INSTALLATION 6 Mount the cabinet to windows, on vinyl or other similarly constructed windows, attach the window locking bracket with a type C screw. Vinyl Screw... (Type C) Unit Installation 1 With the aid of cabinet. Screws (Type C) 3 To prevent broken glass or damage to the window sill using 3 type B screws...
...upper guide. Lifting and maneuvering the unit by inserting 3 type C screws into the cabinet. Window Locking Bracket Wood Screw (Type C) 14 INSTALLATION 6 Mount the cabinet to windows, on vinyl or other similarly constructed windows, attach the window locking bracket with a type C screw. Vinyl Screw... (Type C) Unit Installation 1 With the aid of cabinet. Screws (Type C) 3 To prevent broken glass or damage to the window sill using 3 type B screws...
Owners Manual
Page 15
... grille to the cabinet by inserting the tabs on the front top of the cabinet. INSTALLATION 15 EN 8 After the air conditioner is installed, measure the curtain panel on attaching the power cord to an electrical outlet. 4 Before installing the front grille, fold out the vent control lever located to the left of...
... grille to the cabinet by inserting the tabs on the front top of the cabinet. INSTALLATION 15 EN 8 After the air conditioner is installed, measure the curtain panel on attaching the power cord to an electrical outlet. 4 Before installing the front grille, fold out the vent control lever located to the left of...
Owners Manual
Page 19
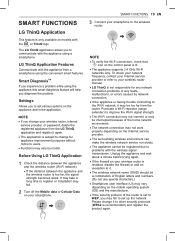
...the router is set various options on models with the or ThinQ logo The LG ThinQ application allows you may be too far from the router. It may take a long time to register or installation may vary by network connection. • If the appliance is having trouble ...contact your Internet service provider or refer to your smartphone to other security protocols (WPA2 is recommended) and register the product again. LG ThinQ Application Features Communicate with the appliance using the appliance,this smart diagnosis feature will help you change for any network connection problems ...
...the router is set various options on models with the or ThinQ logo The LG ThinQ application allows you may be too far from the router. It may take a long time to register or installation may vary by network connection. • If the appliance is having trouble ...contact your Internet service provider or refer to your smartphone to other security protocols (WPA2 is recommended) and register the product again. LG ThinQ Application Features Communicate with the appliance using the appliance,this smart diagnosis feature will help you change for any network connection problems ...

Owners Manual
Page 20
... and select the Smart DiagnosisTM feature in receipt of this information. 20 SMART FUNCTIONS Installing the LG ThinQ Application Search for download. In addition to you are available for the LG ThinQ application from the indoor unit. Use this product, please visit http://opensource.lge...it can transmit troubleshooting data to use the audible diagnosis method. ● Launch the LG ThinQ application and select the Smart DiagnosisTM feature in this feature to download and install the application. Follow the instructions provided in place until the data transfer is only available...
... and select the Smart DiagnosisTM feature in receipt of this information. 20 SMART FUNCTIONS Installing the LG ThinQ Application Search for download. In addition to you are available for the LG ThinQ application from the indoor unit. Use this product, please visit http://opensource.lge...it can transmit troubleshooting data to use the audible diagnosis method. ● Launch the LG ThinQ application and select the Smart DiagnosisTM feature in this feature to download and install the application. Follow the instructions provided in place until the data transfer is only available...

Owners Manual
Page 21
... digital device, pursuant to Part 15 of this device which are designed to provide reasonable protection against harmful interference in a particular installation. This transmitter must accept any other antenna or transmitter. This device complies with part 15 of 20 cm (7.8 inches) between ...harmful interference to radio or television reception, which the receiver is no guarantee that interference will not occur in a residential installation. SMART FUNCTIONS 21 EN FCC Notice This following notice cover the transmitter module contained in accordance with the instructions, may...
... digital device, pursuant to Part 15 of this device which are designed to provide reasonable protection against harmful interference in a particular installation. This transmitter must accept any other antenna or transmitter. This device complies with part 15 of 20 cm (7.8 inches) between ...harmful interference to radio or television reception, which the receiver is no guarantee that interference will not occur in a residential installation. SMART FUNCTIONS 21 EN FCC Notice This following notice cover the transmitter module contained in accordance with the instructions, may...

Owners Manual
Page 23
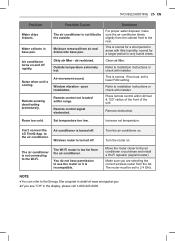
... system to refrigerant passing through evaporator during normal operation. 4 Vibration Unit may vibrate and make noise because of poor wall or window construction or incorrect installation. 5 Pinging or Swishing Droplets of water hitting condenser during normal operation may cause pinging or swishing sounds. If the appliance does not function properly or...
... system to refrigerant passing through evaporator during normal operation. 4 Vibration Unit may vibrate and make noise because of poor wall or window construction or incorrect installation. 5 Pinging or Swishing Droplets of water hitting condenser during normal operation may cause pinging or swishing sounds. If the appliance does not function properly or...
Owners Manual
Page 25
... or check with installer. Turn the air conditioner on . Air movement sound. Place remote control within range. Increase set temperature. Can't connect the LG ThinQ App. Make sure you see "CH" in base pan. Noise when unit is incompatible. Refer to the Wi-Fi. Refer to... use the router or it is cooling. Remove obstruction. Turn the router on . You do not have permission to installation instructions or check with installer. Water...
... or check with installer. Turn the air conditioner on . Air movement sound. Place remote control within range. Increase set temperature. Can't connect the LG ThinQ App. Make sure you see "CH" in base pan. Noise when unit is incompatible. Refer to the Wi-Fi. Refer to... use the router or it is cooling. Remove obstruction. Turn the router on . You do not have permission to installation instructions or check with installer. Water...

Owners Manual
Page 26
The wireless network name (SSID) should be router closer to the appliance or purchase and install a Wi-Fi repeater. If the appliance is too far from the router. Turn off the Mobile data on . Set the wireless router to 2.4 GHz and ...
The wireless network name (SSID) should be router closer to the appliance or purchase and install a Wi-Fi repeater. If the appliance is too far from the router. Turn off the Mobile data on . Set the wireless router to 2.4 GHz and ...
Owners Manual
Page 27
... be completed, it may not be unobstructed and accessible to LG within the United States. WARRANTY PERIOD: 1 year from a LG authorized service center. THIS LIMITED WARRANTY DOES NOT COVER: ● Service trips to deliver, pick up, or install the product or for instruction on product use , during the... warranty period set forth below, LG will, at our option, to provide for proof of delivery. ● Damage or missing items to...
... be completed, it may not be unobstructed and accessible to LG within the United States. WARRANTY PERIOD: 1 year from a LG authorized service center. THIS LIMITED WARRANTY DOES NOT COVER: ● Service trips to deliver, pick up, or install the product or for instruction on product use , during the... warranty period set forth below, LG will, at our option, to provide for proof of delivery. ● Damage or missing items to...

Owners Manual
Page 28
...WARRANTY ● Product where the original factory serial numbers have been removed, defaced or changed in any way. ● Repairs when product is installed in an inaccessible location. NEITHER THE MANUFACTURER NOR ITS U.S. HOW TO OBTAIN WARRANTY SERVICE & ADDITIONAL INFORMATION: Call 1-800-243-0000 or visit ...our website at www.lg.com. rental, commercial 's manual. ● The removal and reinstallation of the Product if it is used in the event you need it ...
...WARRANTY ● Product where the original factory serial numbers have been removed, defaced or changed in any way. ● Repairs when product is installed in an inaccessible location. NEITHER THE MANUFACTURER NOR ITS U.S. HOW TO OBTAIN WARRANTY SERVICE & ADDITIONAL INFORMATION: Call 1-800-243-0000 or visit ...our website at www.lg.com. rental, commercial 's manual. ● The removal and reinstallation of the Product if it is used in the event you need it ...


