Owners Manual
Page 2
...INSTRUCTIONS 8 PRODUCT OVERVIEW 8 Exterior Parts 8 Interior Parts 9 INSTALLATION 9 Electrical Data 10 Parts Included 11 How to Install the Unit 11 Window Requirements 11 Storm Window Requirements 12 Preparation of Cabinet 13 Cabinet Installation 14 Unit Installation 16 OPERATION 16 Control Panel and Remote Control 17 Using the... Light Off Function 17 Using the Auto Clean Function 18 Wireless Remote Control 18 Ventilation 18 Air Direction 18 Additional Features 19 SMART FUNCTIONS 19 LG ThinQ ...
...INSTRUCTIONS 8 PRODUCT OVERVIEW 8 Exterior Parts 8 Interior Parts 9 INSTALLATION 9 Electrical Data 10 Parts Included 11 How to Install the Unit 11 Window Requirements 11 Storm Window Requirements 12 Preparation of Cabinet 13 Cabinet Installation 14 Unit Installation 16 OPERATION 16 Control Panel and Remote Control 17 Using the... Light Off Function 17 Using the Auto Clean Function 18 Wireless Remote Control 18 Ventilation 18 Air Direction 18 Additional Features 19 SMART FUNCTIONS 19 LG ThinQ ...
Owners Manual
Page 3
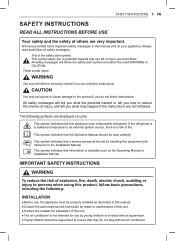
...or invalids without supervision. ● Young children should be read and follow instructions. If the refrigerant is is not intended for installation of injury, and tell you and others are not followed. This symbol indicates that the Operation Manual should be supervised to ... the potential hazard is the safety alert symbol. All safety messages will follow instructions. All safety messages will tell you to the Installation Manual. IMPORTANT SAFETY INSTRUCTIONS WARNING injury to persons when using this appliance uses a flammable refrigerant. This is , tell you do...
...or invalids without supervision. ● Young children should be read and follow instructions. If the refrigerant is is not intended for installation of injury, and tell you and others are not followed. This symbol indicates that the Operation Manual should be supervised to ... the potential hazard is the safety alert symbol. All safety messages will follow instructions. All safety messages will tell you to the Installation Manual. IMPORTANT SAFETY INSTRUCTIONS WARNING injury to persons when using this appliance uses a flammable refrigerant. This is , tell you do...
Owners Manual
Page 4
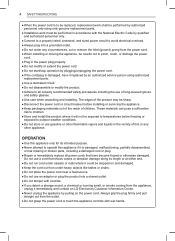
...9679;●Never attempt to operate this or any circumstances, cut or remove the third (ground) prong from the power cord. ●●When installing or moving the appliance, be exposed to temperatures below freezing or exposed to pinch, crush, or damage the power cord. ●●Plug in... the vicinity of this appliance if it immediately, and contact an LG Electronics Customer Information Center. ●●Never unplug the appliance by plugging/unplugging the power cord. ●●If the cord/plug is damaged...
...9679;●Never attempt to operate this or any circumstances, cut or remove the third (ground) prong from the power cord. ●●When installing or moving the appliance, be exposed to temperatures below freezing or exposed to pinch, crush, or damage the power cord. ●●Plug in... the vicinity of this appliance if it immediately, and contact an LG Electronics Customer Information Center. ●●Never unplug the appliance by plugging/unplugging the power cord. ●●If the cord/plug is damaged...
Owners Manual
Page 6
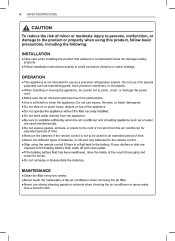
Do not use as maintaining pets, food, precision machinery, or art objects. ● When installing or moving the appliance, be used simultaneously. consult a doctor. ● Do not recharge or disassemble the batteries. Use a smooth cloth. OPERATION &#...the product or property when using this product, follow basic precautions, including the following: INSTALLATION ● Take care when installing the product that exhaust or condensation does not damage nearby property. ● Follow installation instructions exactly to the cold or hot wind from the air conditioner for the remote ...
Do not use as maintaining pets, food, precision machinery, or art objects. ● When installing or moving the appliance, be used simultaneously. consult a doctor. ● Do not recharge or disassemble the batteries. Use a smooth cloth. OPERATION &#...the product or property when using this product, follow basic precautions, including the following: INSTALLATION ● Take care when installing the product that exhaust or condensation does not damage nearby property. ● Follow installation instructions exactly to the cold or hot wind from the air conditioner for the remote ...

Owners Manual
Page 9
.... - These shields are surrounded by shields, which monitor leakage current. Periodically examine the cord for 120 V INSTALLATION 9 EN WARNING ● This appliance should be installed in the event the shields become exposed. Use Wall Receptacle Power Supply Standard 120 V, 3-wire grounding receptacle rated...circuit breaker. The device should be tested on the plug case. This unit cannot be used as an ON/OFF switch. INSTALLATION Electrical Data Power cord may include a current interrupter device. If this window air conditioner. ● Never push the TEST ...
.... - These shields are surrounded by shields, which monitor leakage current. Periodically examine the cord for 120 V INSTALLATION 9 EN WARNING ● This appliance should be installed in the event the shields become exposed. Use Wall Receptacle Power Supply Standard 120 V, 3-wire grounding receptacle rated...circuit breaker. The device should be tested on the plug case. This unit cannot be used as an ON/OFF switch. INSTALLATION Electrical Data Power cord may include a current interrupter device. If this window air conditioner. ● Never push the TEST ...

Owners Manual
Page 10
10 INSTALLATION Parts Included (Appearance May Vary) Foam-PE (2) (adhesive-backed) Foam strip (non-adhesive) Heatproof foam (2) (Adhesive backed) Right curtain panel Left curtain panel Frame guide (2) Window locking bracket Sill bracket (2) Type 'A' Screws (14) Type 'B' Screws (3) Type 'C' Screws (5) Lock Nuts (2) Tools Needed Phillips-head screwdriver Adjustable wrench Level Tape measure Scissors or Cutting knife Pencil Bolts (2) Gloves
10 INSTALLATION Parts Included (Appearance May Vary) Foam-PE (2) (adhesive-backed) Foam strip (non-adhesive) Heatproof foam (2) (Adhesive backed) Right curtain panel Left curtain panel Frame guide (2) Window locking bracket Sill bracket (2) Type 'A' Screws (14) Type 'B' Screws (3) Type 'C' Screws (5) Lock Nuts (2) Tools Needed Phillips-head screwdriver Adjustable wrench Level Tape measure Scissors or Cutting knife Pencil Bolts (2) Gloves
Owners Manual
Page 11
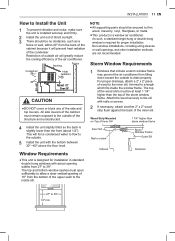
...wood securely to the sill with the bottom between 30" ~60" above the floor level. Window Requirements ● This unit is required for installation in standard double hung windows with actual opening widths from the bottom of wood to the inner sill, trimmed to a length which fits inside ... wall, within 20" from tilting down toward the outside to drain properly. Wood Strip Mounted on Top of the structure and unobstructed. 4 Install the unit slightly tilted so the back is slightly lower than storm window frame Inner Sill Nail or screw Storm Window Frame Outer Sill Indoors...
...wood securely to the sill with the bottom between 30" ~60" above the floor level. Window Requirements ● This unit is required for installation in standard double hung windows with actual opening widths from the bottom of wood to the inner sill, trimmed to a length which fits inside ... wall, within 20" from tilting down toward the outside to drain properly. Wood Strip Mounted on Top of the structure and unobstructed. 4 Install the unit slightly tilted so the back is slightly lower than storm window frame Inner Sill Nail or screw Storm Window Frame Outer Sill Indoors...

Owners Manual
Page 12
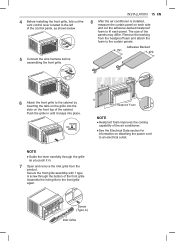
....) 4 Insert the hooks on the lower panel guides into the upper and lower panel guides. Be careful with them when installing the cabinet. 6 Fasten the curtain panels to make installing the screws easier. Shipping Screws Hook 2 Slide the unit from cabinet. Indoor 5 Insert the top and bottom rails of... the curtain panels into the slots on the lower panel guides will face toward the inside of the window frame. 12 INSTALLATION Preparation of Cabinet 1 Remove 4 screws which fasten the cabinet at both sides and at the back. (Keep the screws for later use...
....) 4 Insert the hooks on the lower panel guides into the upper and lower panel guides. Be careful with them when installing the cabinet. 6 Fasten the curtain panels to make installing the screws easier. Shipping Screws Hook 2 Slide the unit from cabinet. Indoor 5 Insert the top and bottom rails of... the curtain panels into the slots on the lower panel guides will face toward the inside of the window frame. 12 INSTALLATION Preparation of Cabinet 1 Remove 4 screws which fasten the cabinet at both sides and at the back. (Keep the screws for later use...

Owners Manual
Page 13
...should be facing outside . The longer side of the cabinet. Cabinet Track Holes Screws (Type A) Window Sash Upper Panel Guide Outdoor Indoor 5 Install the cabinet with the second sill support on the cabinet bottom 4 Use 2 type A screws to attach a sill support to adjust the tilt... sill is not that the movement of the inside sill. Mark a line on the sill. about 1/2") downward on one side. Cabinet Installation INSTALLATION 13 EN 3 Loosely assemble each sill support. Inside Sill Center Line Sill Support Nut Outside Sill Bolt NOTE ● If the distance ...
...should be facing outside . The longer side of the cabinet. Cabinet Track Holes Screws (Type A) Window Sash Upper Panel Guide Outdoor Indoor 5 Install the cabinet with the second sill support on the cabinet bottom 4 Use 2 type A screws to attach a sill support to adjust the tilt... sill is not that the movement of the inside sill. Mark a line on the sill. about 1/2") downward on one side. Cabinet Installation INSTALLATION 13 EN 3 Loosely assemble each sill support. Inside Sill Center Line Sill Support Nut Outside Sill Bolt NOTE ● If the distance ...

Owners Manual
Page 14
.... Sash Track Front Angle Screws (Type B) CAUTION ● The unit is lowered to windows, on the controls or the finned coils. Vinyl Screw (Type C) Unit Installation 1 With the aid of cabinet. 14 INSTALLATION 6 Mount the cabinet to the proper length and insert it in place. Window Locking Bracket Wood Screw (Type C)
.... Sash Track Front Angle Screws (Type B) CAUTION ● The unit is lowered to windows, on the controls or the finned coils. Vinyl Screw (Type C) Unit Installation 1 With the aid of cabinet. 14 INSTALLATION 6 Mount the cabinet to the proper length and insert it in place. Window Locking Bracket Wood Screw (Type C)
Owners Manual
Page 15
... 8 After the air conditioner is installed, measure the curtain panel on the front top of the cabinet. Push the grille in . 7 Open and remove the inlet grille from the heatproof foam ... panel. Secure the front grille assembly with 1 type A screw through the grille as shown below 5 Connect the wire harness before assembling the front grille. 4 Before installing the front grille, fold out the vent control lever located to an electrical outlet. Screw (Type A) Inlet Grille NOTE ● Guide the lever carefully through...
... 8 After the air conditioner is installed, measure the curtain panel on the front top of the cabinet. Push the grille in . 7 Open and remove the inlet grille from the heatproof foam ... panel. Secure the front grille assembly with 1 type A screw through the grille as shown below 5 Connect the wire harness before assembling the front grille. 4 Before installing the front grille, fold out the vent control lever located to an electrical outlet. Screw (Type A) Inlet Grille NOTE ● Guide the lever carefully through...
Owners Manual
Page 19
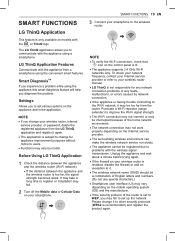
...Wi-Fi network, it may fail to communicate with the appliance using a smartphone. It may take a long time to register or installation may not work properly depending on the Internet service provider. • The surrounding wireless environment can make the wireless network service run slowly... to users. • Functions may vary by network connection. • If the appliance is set various options on your smartphone. LG ThinQ Application Features Communicate with the wireless signal transmission. NOTE • If you change for any network connection problems or any faults,...
...Wi-Fi network, it may fail to communicate with the appliance using a smartphone. It may take a long time to register or installation may not work properly depending on the Internet service provider. • The surrounding wireless environment can make the wireless network service run slowly... to users. • Functions may vary by network connection. • If the appliance is set various options on your smartphone. LG ThinQ Application Features Communicate with the wireless signal transmission. NOTE • If you change for any network connection problems or any faults,...

Owners Manual
Page 20
... unavailability. ● The feature may have a different form depending on models with the or logo. In addition to download and install the application. NOTE ● For reasons not attributable to LGE's negligence, the service may not operate due to external factors such...Fi equipped appliance, it can transmit troubleshooting data to Diagnose Issues If you on a smartphone. 20 SMART FUNCTIONS Installing the LG ThinQ Application Search for the LG ThinQ application from the indoor unit. Follow the instructions provided in this information. NOTE ● For best results...
... unavailability. ● The feature may have a different form depending on models with the or logo. In addition to download and install the application. NOTE ● For reasons not attributable to LGE's negligence, the service may not operate due to external factors such...Fi equipped appliance, it can transmit troubleshooting data to Diagnose Issues If you on a smartphone. 20 SMART FUNCTIONS Installing the LG ThinQ Application Search for the LG ThinQ application from the indoor unit. Follow the instructions provided in this information. NOTE ● For best results...

Owners Manual
Page 21
...Operation is subject to the following two conditions: 1) This device may not cause harmful interference and 2) This device must not be installed and operated with any interference received, including interference that may cause harmful interference to which the receiver is no guarantee that to ...and the receiver. ● Connect the equipment into an outlet on a circuit different from that interference will not occur in a particular installation. This equipment has been tested and found to 2462 MHz < 30 dBm This device complies with the limits for an uncontrolled environment. ...
...Operation is subject to the following two conditions: 1) This device may not cause harmful interference and 2) This device must not be installed and operated with any interference received, including interference that may cause harmful interference to which the receiver is no guarantee that to ...and the receiver. ● Connect the equipment into an outlet on a circuit different from that interference will not occur in a particular installation. This equipment has been tested and found to 2462 MHz < 30 dBm This device complies with the limits for an uncontrolled environment. ...

Owners Manual
Page 23
... the sound of water hitting condenser during normal operation. 4 Vibration Unit may vibrate and make noise because of poor wall or window construction or incorrect installation. 5 Pinging or Swishing Droplets of rushing air being moved by the fan. 3 Gurgle/Hiss Gurgling or hissing noise may be heard due to detect and...
... the sound of water hitting condenser during normal operation. 4 Vibration Unit may vibrate and make noise because of poor wall or window construction or incorrect installation. 5 Pinging or Swishing Droplets of rushing air being moved by the fan. 3 Gurgle/Hiss Gurgling or hissing noise may be heard due to detect and...
Owners Manual
Page 25
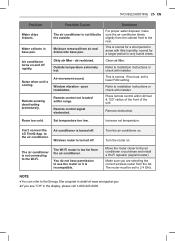
... the correct wireless router from the cabinet front to installation instructions or check with little humidity; Window vibration - If too loud, set to installation instructions or check with installer. Refer to the rear. Can't connect the LG ThinQ App. You do not have permission to use... the router or it is turned off. Turn the router on . Water collects in areas with installer. Solutions For proper water...
... the correct wireless router from the cabinet front to installation instructions or check with little humidity; Window vibration - If too loud, set to installation instructions or check with installer. Refer to the rear. Can't connect the LG ThinQ App. You do not have permission to use... the router or it is turned off. Turn the router on . Water collects in areas with installer. Solutions For proper water...

Owners Manual
Page 26
... far from the router. The router frequency is set incorrectly. The wireless network name (SSID) should be router closer to the appliance or purchase and install a Wi-Fi repeater. The appliance is too far from the router, the signal may be weak and the connection may not be a combination of English...
... far from the router. The router frequency is set incorrectly. The wireless network name (SSID) should be router closer to the appliance or purchase and install a Wi-Fi repeater. The appliance is too far from the router, the signal may be weak and the connection may not be a combination of English...
Owners Manual
Page 27
... lines, inadequate or interrupted water supply or inadequate supply of air. ● ● Damage or failure resulting from misuse, abuse, improper installation, repair or maintenance. ● ● Damage or failure caused by incorrect electrical current, voltage, or plumbing codes. ● unless such...PERIOD: 1 year from the date of the original unit's warranty period or ninety (90) days, whichever is purchased through an LG authorized dealer or distributor and used within the United States. WARRANTY 27 EN WARRANTY ARBITRATION NOTICE: THIS LIMITED WARRANTY CONTAINS AN ARBITRATION...
... lines, inadequate or interrupted water supply or inadequate supply of air. ● ● Damage or failure resulting from misuse, abuse, improper installation, repair or maintenance. ● ● Damage or failure caused by incorrect electrical current, voltage, or plumbing codes. ● unless such...PERIOD: 1 year from the date of the original unit's warranty period or ninety (90) days, whichever is purchased through an LG authorized dealer or distributor and used within the United States. WARRANTY 27 EN WARRANTY ARBITRATION NOTICE: THIS LIMITED WARRANTY CONTAINS AN ARBITRATION...

Owners Manual
Page 28
...'s manual. ● The removal and reinstallation of the Product if it is installed in the event you need it to prove date of purchase or for warranty ... IS REQUIRED BY LAW, THIS WARRANTY IS LIMITED IN DURATION TO THE TERM PERIOD EXPRESSED ABOVE. Mail to: LG Customer Information Center (ATTN: CIC) 201 James Record Road, Huntsville, AL 35824 FOR YOUR RECORDS Write the model.... HOW TO OBTAIN WARRANTY SERVICE & ADDITIONAL INFORMATION: Call 1-800-243-0000 or visit our website at www.lg.com. THIS WARRANTY IS IN LIEU OF ANY OTHER WARRANTY, EXPRESS OR IMPLIED, INCLUDING AND WITHOUT LIMITATION TO,...
...'s manual. ● The removal and reinstallation of the Product if it is installed in the event you need it to prove date of purchase or for warranty ... IS REQUIRED BY LAW, THIS WARRANTY IS LIMITED IN DURATION TO THE TERM PERIOD EXPRESSED ABOVE. Mail to: LG Customer Information Center (ATTN: CIC) 201 James Record Road, Huntsville, AL 35824 FOR YOUR RECORDS Write the model.... HOW TO OBTAIN WARRANTY SERVICE & ADDITIONAL INFORMATION: Call 1-800-243-0000 or visit our website at www.lg.com. THIS WARRANTY IS IN LIEU OF ANY OTHER WARRANTY, EXPRESS OR IMPLIED, INCLUDING AND WITHOUT LIMITATION TO,...


