
Owners Manual
Page 2
Safety Precautions Before Operation 7 Introduction Electrical Safety Installation Operating Instructions 16 Maintenance and Service 20
Safety Precautions Before Operation 7 Introduction Electrical Safety Installation Operating Instructions 16 Maintenance and Service 20

Owners Manual
Page 5
Hold the plug by the head čnot the cableĎwhen taking it out. For inner cleaning, contact an Authorized Service Center or a dealer. Install the product so the exhaust and noise Follow installation instructions exactly. Do not use harsh detergent that causes corrosion or damage on the unit. are not aimed directly at the neighbors. Harsh detergent may also cause failure of the unit when removing operating the unit. Be considerate. When gas leaks, open the Never touch the metal parts window for ventilation before of product, fire, or electric shock. the filter.
Hold the plug by the head čnot the cableĎwhen taking it out. For inner cleaning, contact an Authorized Service Center or a dealer. Install the product so the exhaust and noise Follow installation instructions exactly. Do not use harsh detergent that causes corrosion or damage on the unit. are not aimed directly at the neighbors. Harsh detergent may also cause failure of the unit when removing operating the unit. Be considerate. When gas leaks, open the Never touch the metal parts window for ventilation before of product, fire, or electric shock. the filter.

Owners Manual
Page 8
... Evaporator Introduction Introduction Symbols Used in accordance with the National Electric Code. This symbol alerts you to the air conditioner. Features This appliance should be installed in this Manual This symbol alerts you to hazards that could cause harm to the risk of electric shock. NOTICE This symbol indicates special notes.
... Evaporator Introduction Introduction Symbols Used in accordance with the National Electric Code. This symbol alerts you to the air conditioner. Features This appliance should be installed in this Manual This symbol alerts you to hazards that could cause harm to the risk of electric shock. NOTICE This symbol indicates special notes.

Owners Manual
Page 11
blade screwdriver 11 Installation Foam strip (Plain-Back) Foam-PE (Adhesive-Backed) Left frame curtain Drain joint pipe Frame guide(2) Window locking bracket Sill bracket(2) Support bracket(2) Right frame curtain Type A (11) Type B (7) Type C (5) Type D (2) Carriage Bolt (2) Lock Nut (4) Phillips head screwdriver Scissors or knife Adjustable Wrench Flat -
blade screwdriver 11 Installation Foam strip (Plain-Back) Foam-PE (Adhesive-Backed) Left frame curtain Drain joint pipe Frame guide(2) Window locking bracket Sill bracket(2) Support bracket(2) Right frame curtain Type A (11) Type B (7) Type C (5) Type D (2) Carriage Bolt (2) Lock Nut (4) Phillips head screwdriver Scissors or knife Adjustable Wrench Flat -

Owners Manual
Page 12
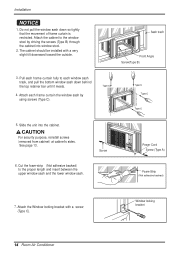
Installation Window Requirements NOTICE All supporting parts should be less than 1 1/4". The top and bottom window sashes must be secured to 41". This unit is designed ... Conditioner čAdhesive backedĎ Preparation Of Chassis 1. Remove 4 screws which fasten the cabinet at both sides and at the back. (Keep the screws for installation in standard double hung windows with actual opening of 18" from 29" to firm wood, masonry, or metal. 1. pan 3. čadhesive backed Ď...
Installation Window Requirements NOTICE All supporting parts should be less than 1 1/4". The top and bottom window sashes must be secured to 41". This unit is designed ... Conditioner čAdhesive backedĎ Preparation Of Chassis 1. Remove 4 screws which fasten the cabinet at both sides and at the back. (Keep the screws for installation in standard double hung windows with actual opening of 18" from 29" to firm wood, masonry, or metal. 1. pan 3. čadhesive backed Ď...
Owners Manual
Page 14
...-strip čNot adhesive backed to the window stool by using screws (Type C). Window locking bracket 14 Room Air Conditioner The cabinet should be installed with a screw (Type C). Attach the Window locking bracket with a very slight tilt downward toward the outside. 3. Do not pull the window ...sash down behind the top retainer bar until it meets. 4. Installation NOTICE 1. Attach the cabinet to the proper length and insert between the upper window sash and the lower window sash. Sash track Front Angle ...
...-strip čNot adhesive backed to the window stool by using screws (Type C). Window locking bracket 14 Room Air Conditioner The cabinet should be installed with a screw (Type C). Attach the Window locking bracket with a very slight tilt downward toward the outside. 3. Do not pull the window ...sash down behind the top retainer bar until it meets. 4. Installation NOTICE 1. Attach the cabinet to the proper length and insert between the upper window sash and the lower window sash. Sash track Front Angle ...
Owners Manual
Page 15
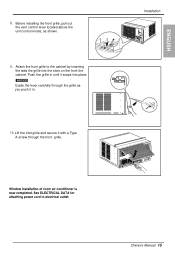
Guide the lever carefully through the front grille. 15 Push the grille in . 10. Attach the front grille to the cabinet by inserting the tabs the grille into place. Lift the inlet grille and secure it snaps into the slots on the front the cabinet. 8. Before installing the front grille, pull out the vent control lever located above the unit control knobs, as you push it in until it with a Type A screw through the grille as shown. 9.
Guide the lever carefully through the front grille. 15 Push the grille in . 10. Attach the front grille to the cabinet by inserting the tabs the grille into place. Lift the inlet grille and secure it snaps into the slots on the front the cabinet. 8. Before installing the front grille, pull out the vent control lever located above the unit control knobs, as you push it in until it with a Type A screw through the grille as shown. 9.

Owners Manual
Page 21
... make noise because of water hitting condenser during normal operation. voltage and amperage. Pinging or Swishing Droplets of poor wall or window construction or incorrect installation. call 1-800-243-0000. an outlet of the proper Water drip from the rear of the unit Normal Sound High pitched Chatter Today's high efficiency...
... make noise because of water hitting condenser during normal operation. voltage and amperage. Pinging or Swishing Droplets of poor wall or window construction or incorrect installation. call 1-800-243-0000. an outlet of the proper Water drip from the rear of the unit Normal Sound High pitched Chatter Today's high efficiency...
Owners Manual
Page 22
...fuse is blown/circuit breaker is cooling. The current interrupter device is dirty. If power failure occurs, turn the mode control to installation instructions or check with in very humid areas. If the RESET button will not stay engaged, discontinue use of the air conditioner.... case front to bring air through cooling coils more frequently. air restricted. Set FAN speed to a faster setting to the rear. poor installation. This is restricted. Remote Sensing Deactivating Prematurely. Remove obstruction. Room too cold. Set temperature too low lncrease set correctly. Power failure....
...fuse is blown/circuit breaker is cooling. The current interrupter device is dirty. If power failure occurs, turn the mode control to installation instructions or check with in very humid areas. If the RESET button will not stay engaged, discontinue use of the air conditioner.... case front to bring air through cooling coils more frequently. air restricted. Set FAN speed to a faster setting to the rear. poor installation. This is restricted. Remote Sensing Deactivating Prematurely. Remove obstruction. Room too cold. Set temperature too low lncrease set correctly. Power failure....

Owners Manual
Page 46
... AIR CONDITIONER LIMITED WARRANTY - USA WHAT THIS WARRANTY COVERS: LG Electronics U.S.A., Inc. ("LG") warrants your LG Room Air Conditioner ("product") against defect in an inaccessible location. WARRANTY PERIOD: 1 year from a LG authorized service center. Service trips to deliver, pick up, or install the product or for transportation of warranty (you may not be required to...
... AIR CONDITIONER LIMITED WARRANTY - USA WHAT THIS WARRANTY COVERS: LG Electronics U.S.A., Inc. ("LG") warrants your LG Room Air Conditioner ("product") against defect in an inaccessible location. WARRANTY PERIOD: 1 year from a LG authorized service center. Service trips to deliver, pick up, or install the product or for transportation of warranty (you may not be required to...


