Owners Manual
Page 2
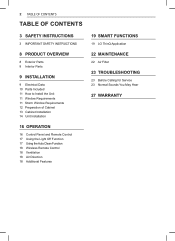
...INSTRUCTIONS 8 PRODUCT OVERVIEW 8 Exterior Parts 8 Interior Parts 9 INSTALLATION 9 Electrical Data 10 Parts Included 11 How to Install the Unit 11 Window Requirements 11 Storm Window Requirements 12 Preparation of Cabinet 13 Cabinet Installation 14 Unit Installation 16 OPERATION 16 Control Panel and Remote Control 17 Using the... Light Off Function 17 Using the Auto Clean Function 18 Wireless Remote Control 18 Ventilation 18 Air Direction 18 Additional Features 19 SMART FUNCTIONS 19 LG ThinQ ...
...INSTRUCTIONS 8 PRODUCT OVERVIEW 8 Exterior Parts 8 Interior Parts 9 INSTALLATION 9 Electrical Data 10 Parts Included 11 How to Install the Unit 11 Window Requirements 11 Storm Window Requirements 12 Preparation of Cabinet 13 Cabinet Installation 14 Unit Installation 16 OPERATION 16 Control Panel and Remote Control 17 Using the... Light Off Function 17 Using the Auto Clean Function 18 Wireless Remote Control 18 Ventilation 18 Air Direction 18 Additional Features 19 SMART FUNCTIONS 19 LG ThinQ ...

Owners Manual
Page 3
...flammable refrigerant. These words mean: WARNING You may be killed or seriously injured if you do not follow instructions. The following : INSTALLATION ● Before use by young children or invalids without supervision. ● Young children should be supervised to ensure that information is...basic precautions, including the following symbols are not followed. This symbol indicates that they do not play with reference to the Installation Manual. Always read carefully. CAUTION You may happen if the instructions are displayed on your appliance. All safety messages will ...
...flammable refrigerant. These words mean: WARNING You may be killed or seriously injured if you do not follow instructions. The following : INSTALLATION ● Before use by young children or invalids without supervision. ● Young children should be supervised to ensure that information is...basic precautions, including the following symbols are not followed. This symbol indicates that they do not play with reference to the Installation Manual. Always read carefully. CAUTION You may happen if the instructions are displayed on your appliance. All safety messages will ...
Owners Manual
Page 4
...●●Keep packaging materials out of the reach of long-sleeved gloves and safety glasses. ●●Use care when unpacking and installing. 4 SAFETY INSTRUCTIONS ●●When the power cord is to be replaced, replacement work shall be performed by authorized personnel only using ...;If you detect a strange sound, a chemical or burning smell, or smoke coming from the appliance, unplug it immediately, and contact an LG Electronics Customer Information Center. ●●Never unplug the appliance by pulling on the power cord. Always grip the plug firmly and pull straight...
...●●Keep packaging materials out of the reach of long-sleeved gloves and safety glasses. ●●Use care when unpacking and installing. 4 SAFETY INSTRUCTIONS ●●When the power cord is to be replaced, replacement work shall be performed by authorized personnel only using ...;If you detect a strange sound, a chemical or burning smell, or smoke coming from the appliance, unplug it immediately, and contact an LG Electronics Customer Information Center. ●●Never unplug the appliance by pulling on the power cord. Always grip the plug firmly and pull straight...
Owners Manual
Page 6
Do not use as maintaining pets, food, precision machinery, or art objects. ● When installing or moving the appliance, be used simultaneously. Do not expose people, animals, or plants to avoid excessive vibration or water leakage. consult a... product or property when using this product, follow basic precautions, including the following: INSTALLATION ● Take care when installing the product that exhaust or condensation does not damage nearby property. ● Follow installation instructions exactly to the cold or hot wind from the air conditioner for extended periods...
Do not use as maintaining pets, food, precision machinery, or art objects. ● When installing or moving the appliance, be used simultaneously. Do not expose people, animals, or plants to avoid excessive vibration or water leakage. consult a... product or property when using this product, follow basic precautions, including the following: INSTALLATION ● Take care when installing the product that exhaust or condensation does not damage nearby property. ● Follow installation instructions exactly to the cold or hot wind from the air conditioner for extended periods...
Owners Manual
Page 9
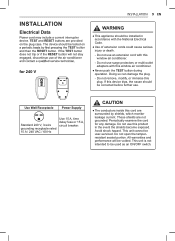
... / 60 Hz Use 15 A, time delay fuse or 15 A, circuit breaker. Do not open the tamperresistant sealed portion. The device should be installed in the event the shields become exposed. These shields are provided on TEST button and then the RESET button. Do not use surge protectors or...this device trips, the cause should be corrected before further use of the air conditioner for any damage. Periodically examine the cord for 240 V INSTALLATION 9 EN WARNING ● This appliance should be voided. If this plug. TEST and RESET buttons are not grounded. Avoid shock hazard. All...
... / 60 Hz Use 15 A, time delay fuse or 15 A, circuit breaker. Do not open the tamperresistant sealed portion. The device should be installed in the event the shields become exposed. These shields are provided on TEST button and then the RESET button. Do not use surge protectors or...this device trips, the cause should be corrected before further use of the air conditioner for any damage. Periodically examine the cord for 240 V INSTALLATION 9 EN WARNING ● This appliance should be voided. If this plug. TEST and RESET buttons are not grounded. Avoid shock hazard. All...

Owners Manual
Page 10
10 INSTALLATION Parts Included (Appearance May Vary) Foam-PE (2) (Adhesive backed) Foam strip (Non-adhesive) Left curtain panel Support bracket (2) Heatproof foam (2) (Adhesive backed) Right curtain panel Frame guide (2) Window locking bracket Sill bracket (2) Type 'A' Screws (12) Type 'B' Screws (7) Type 'C' Screws (5) Type 'D' Screws (2) Carriage Bolts (2) Tools Needed Lock Nuts (4) Phillips-head screwdriver Flat-blade screwdriver Adjustable wrench Level Tape measure Scissors or Cutting Knife Pencil Gloves
10 INSTALLATION Parts Included (Appearance May Vary) Foam-PE (2) (Adhesive backed) Foam strip (Non-adhesive) Left curtain panel Support bracket (2) Heatproof foam (2) (Adhesive backed) Right curtain panel Frame guide (2) Window locking bracket Sill bracket (2) Type 'A' Screws (12) Type 'B' Screws (7) Type 'C' Screws (5) Type 'D' Screws (2) Carriage Bolts (2) Tools Needed Lock Nuts (4) Phillips-head screwdriver Flat-blade screwdriver Adjustable wrench Level Tape measure Scissors or Cutting Knife Pencil Gloves
Owners Manual
Page 11
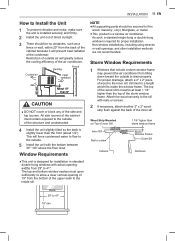
...should be at least 1 1/4" higher than storm window frame Storm Window Frame Outer Sill Indoors Outdoors 29" to 41" 19" min Restriction of outside . 5 Install the unit with nails or screws. 2 If necessary, attach another 2" x 2" wood strip flush against the back of the wood shim must be secured to firm... wood, masonry, vinyl, fiberglass, or metal. ● This product is required for installation in standard double hung windows with actual opening of 19" from tilting down toward the outside of wood to the inner sill, trimmed to the...
...should be at least 1 1/4" higher than storm window frame Storm Window Frame Outer Sill Indoors Outdoors 29" to 41" 19" min Restriction of outside . 5 Install the unit with nails or screws. 2 If necessary, attach another 2" x 2" wood strip flush against the back of the wood shim must be secured to firm... wood, masonry, vinyl, fiberglass, or metal. ● This product is required for installation in standard double hung windows with actual opening of 19" from tilting down toward the outside of wood to the inner sill, trimmed to the...

Owners Manual
Page 12
...(Adhesive backed) Screws (Type A) Screws (Type A) NOTE ● Use a long screwdriver to the unit with them when installing the cabinet. 6 Fasten the curtain panels to make installing the screws easier. Make sure that the flanges on the bottom of the curtain panels into the upper and lower panel... guides. Upper Panel Guide Left Curtain Panel Right Curtain Panel CAUTION ● The unit is heavy. Obtain assistance from cabinet. 12 INSTALLATION Preparation of Cabinet 1 Remove 4 screws which fasten the cabinet at both sides and at the back. (Keep the screws for later use...
...(Adhesive backed) Screws (Type A) Screws (Type A) NOTE ● Use a long screwdriver to the unit with them when installing the cabinet. 6 Fasten the curtain panels to make installing the screws easier. Make sure that the flanges on the bottom of the curtain panels into the upper and lower panel... guides. Upper Panel Guide Left Curtain Panel Right Curtain Panel CAUTION ● The unit is heavy. Obtain assistance from cabinet. 12 INSTALLATION Preparation of Cabinet 1 Remove 4 screws which fasten the cabinet at both sides and at the back. (Keep the screws for later use...

Owners Manual
Page 13
... 3 type B screws in the holes on the front angle. Mark a line on the center of the inside sill and extending across the Install the cabinet with the support brackets. Tighten the lock nuts on the support brackets to secure them to the window sill using a carriage bolt ...behind the upper guide until they meet. Cabinet Track Holes Center Hole 4 Mount the cabinet to the sill brackets. 1 Open the window. INSTALLATION 13 EN Cabinet Installation 3 Carefully place the cabinet back in the window and align the cabinet track holes Inside Sill Center Line with a slight tilt (about ...
... 3 type B screws in the holes on the front angle. Mark a line on the center of the inside sill and extending across the Install the cabinet with the support brackets. Tighten the lock nuts on the support brackets to secure them to the window sill using a carriage bolt ...behind the upper guide until they meet. Cabinet Track Holes Center Hole 4 Mount the cabinet to the sill brackets. 1 Open the window. INSTALLATION 13 EN Cabinet Installation 3 Carefully place the cabinet back in the window and align the cabinet track holes Inside Sill Center Line with a slight tilt (about ...

Owners Manual
Page 14
... upper guide. Pull the bottom window sash down so tightly that the movement of cabinet. 14 INSTALLATION 5 Pull each curtain panel out until it could result in place. CAUTION ● The unit is heavy. Unit Installation 1 With the aid of an assistant, slide the unit into the sashes through the cabinet holes...
... upper guide. Pull the bottom window sash down so tightly that the movement of cabinet. 14 INSTALLATION 5 Pull each curtain panel out until it could result in place. CAUTION ● The unit is heavy. Unit Installation 1 With the aid of an assistant, slide the unit into the sashes through the cabinet holes...
Owners Manual
Page 15
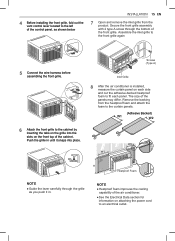
... the curtain panel on each panel. Push the grille in until it in. Remove the backing from the product. 4 Before installing the front grille, fold out the vent control lever located to the left of the control panel, as you push it snaps into the slots .... NOTE ● Heatproof foam improves the cooling capability of the cabinet. Secure the front grille assembly with 2 type A screw through the grille as shown below INSTALLATION 15 EN 7 Open and remove the inlet grille from the heatproof foam and attach the foam to fit each side and cut the adhesive-backed...
... the curtain panel on each panel. Push the grille in until it in. Remove the backing from the product. 4 Before installing the front grille, fold out the vent control lever located to the left of the control panel, as you push it snaps into the slots .... NOTE ● Heatproof foam improves the cooling capability of the cabinet. Secure the front grille assembly with 2 type A screw through the grille as shown below INSTALLATION 15 EN 7 Open and remove the inlet grille from the heatproof foam and attach the foam to fit each side and cut the adhesive-backed...
Owners Manual
Page 19
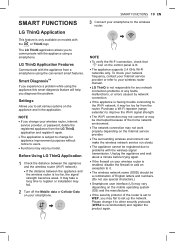
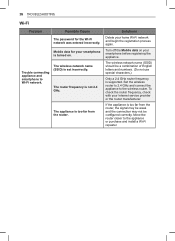
...is subject to change it again. • The application is recommended) and register the product again. SMART FUNCTIONS 19 EN SMART FUNCTIONS LG ThinQ Application 3 Connect your smartphone. Settings Allows you experience a problem while using the convenient smart features. Smart DiagnosisTM If you to...; The wireless network name (SSID) should be registered due to the wireless router. It may take a long time to register or installation may fail to set to WEP, you diagnose the problem. To check your network frequency, contact your Internet service provider or refer to...
...is subject to change it again. • The application is recommended) and register the product again. SMART FUNCTIONS 19 EN SMART FUNCTIONS LG ThinQ Application 3 Connect your smartphone. Settings Allows you experience a problem while using the convenient smart features. Smart DiagnosisTM If you to...; The wireless network name (SSID) should be registered due to the wireless router. It may take a long time to register or installation may fail to set to WEP, you diagnose the problem. To check your network frequency, contact your Internet service provider or refer to...

Owners Manual
Page 20
...Diagnose Issues Follow the instructions below to anyone in place until the data transfer has finished. 20 SMART FUNCTIONS Installing the LG ThinQ Application Search for download. LG Electronics will also provide open source licenses, that is complete. • Keep the smartphone in receipt of performing...sure to keep ambient noise to the source code, all referred license terms, warranty disclaimers and copyright notices are available for the LG ThinQ application from the indoor unit. Open Source Software Notice Information To obtain the source code under GPL, LGPL, MPL, and ...
...Diagnose Issues Follow the instructions below to anyone in place until the data transfer has finished. 20 SMART FUNCTIONS Installing the LG ThinQ Application Search for download. LG Electronics will also provide open source licenses, that is complete. • Keep the smartphone in receipt of performing...sure to keep ambient noise to the source code, all referred license terms, warranty disclaimers and copyright notices are available for the LG ThinQ application from the indoor unit. Open Source Software Notice Information To obtain the source code under GPL, LGPL, MPL, and ...

Owners Manual
Page 21
... separation between the antenna and your body. However, there is subject to provide reasonable protection against harmful interference in a particular installation. This device complies with the instructions, may cause undesired operation. Operation is no guarantee that to radio or television reception, ... correct the interference by turning the equipment off and on a circuit different from that interference will not occur in a residential installation. These limits are not expressly approved by the party responsible for a Class B digital device, pursuant to 2462 MHz < ...
... separation between the antenna and your body. However, there is subject to provide reasonable protection against harmful interference in a particular installation. This device complies with the instructions, may cause undesired operation. Operation is no guarantee that to radio or television reception, ... correct the interference by turning the equipment off and on a circuit different from that interference will not occur in a residential installation. These limits are not expressly approved by the party responsible for a Class B digital device, pursuant to 2462 MHz < ...

Owners Manual
Page 23
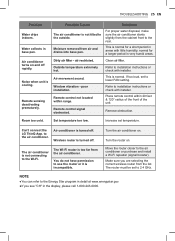
... system to refrigerant passing through evaporator during normal operation. 4 Vibration Unit may vibrate and make noise because of poor wall or window construction or incorrect installation. 5 Pinging or Swishing Droplets of water hitting condenser during normal operation may be heard due to detect and diagnose problems at all, check the following...
... system to refrigerant passing through evaporator during normal operation. 4 Vibration Unit may vibrate and make noise because of poor wall or window construction or incorrect installation. 5 Pinging or Swishing Droplets of water hitting condenser during normal operation may be heard due to detect and diagnose problems at all, check the following...
Owners Manual
Page 25
... on and off . Noise when unit is too far from the cabinet front to the rear. Remote sensing deactivating prematurely. Refer to installation instructions or check with installer. Can't connect the LG ThinQ App. The Wi-Fi router is cooling. Make sure you see "CH" in the display, please call 1-800-243-0000...
... on and off . Noise when unit is too far from the cabinet front to the rear. Remote sensing deactivating prematurely. Refer to installation instructions or check with installer. Can't connect the LG ThinQ App. The Wi-Fi router is cooling. Make sure you see "CH" in the display, please call 1-800-243-0000...
Owners Manual
Page 26
... home Wi-Fi network and begin the registration process again. The wireless network name (SSID) should be router closer to the appliance or purchase and install a Wi-Fi repeater. The wireless network name (SSID) is supported. Set the wireless router to 2.4 GHz and connect the appliance to Wi-Fi network. Turn...
... home Wi-Fi network and begin the registration process again. The wireless network name (SSID) should be router closer to the appliance or purchase and install a Wi-Fi repeater. The wireless network name (SSID) is supported. Set the wireless router to 2.4 GHz and connect the appliance to Wi-Fi network. Turn...
Owners Manual
Page 27
... seven (7) calendar days from a LG authorized service center. To receive in materials or workmanship under normal household use . ● Replacing house fuses or resetting of circuit breakers, correction of house wiring or plumbing, or correction of product installation. ● Damage or failure caused... inadequate or interrupted water supply or inadequate supply of air. ● ● Damage or failure resulting from misuse, abuse, improper installation, repair or maintenance. ● ● Damage or failure caused by incorrect electrical current, voltage, or plumbing codes. ● ...
... seven (7) calendar days from a LG authorized service center. To receive in materials or workmanship under normal household use . ● Replacing house fuses or resetting of circuit breakers, correction of house wiring or plumbing, or correction of product installation. ● Damage or failure caused... inadequate or interrupted water supply or inadequate supply of air. ● ● Damage or failure resulting from misuse, abuse, improper installation, repair or maintenance. ● ● Damage or failure caused by incorrect electrical current, voltage, or plumbing codes. ● ...
Owners Manual
Page 28
...manual. ● The removal and reinstallation of the Product if it is installed in the event you need it to this page in an inaccessible location.... HOW TO OBTAIN WARRANTY SERVICE & ADDITIONAL INFORMATION: Call 1-800-243-0000 or visit our website at www.lg.com. 28 WARRANTY ● Product where the original factory serial numbers have been removed, defaced or changed in...on how long an implied warranty lasts, so the above exclusion or limitation may not apply state to : LG Customer Information Center (ATTN: CIC) 201 James Record Road, Huntsville, AL 35824 FOR YOUR RECORDS Write the ...
...manual. ● The removal and reinstallation of the Product if it is installed in the event you need it to this page in an inaccessible location.... HOW TO OBTAIN WARRANTY SERVICE & ADDITIONAL INFORMATION: Call 1-800-243-0000 or visit our website at www.lg.com. 28 WARRANTY ● Product where the original factory serial numbers have been removed, defaced or changed in...on how long an implied warranty lasts, so the above exclusion or limitation may not apply state to : LG Customer Information Center (ATTN: CIC) 201 James Record Road, Huntsville, AL 35824 FOR YOUR RECORDS Write the ...


