Owners Manual
Page 1
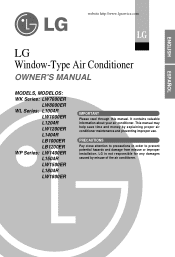
... improper installation. LG is not responsible for any damages caused by explaining proper air conditioner maintenance and preventing improper use. website http://www.lgservice.com ENGLISH ESPAÑOL LG LG Window-Type Air Conditioner OWNER'S MANUAL MODELS, MODELOS: WK Series: LW7000ER LW8000ER WL Series: L1004R LW1000ER L1204R LW1200ER L1404R LB1000ER LB1200ER WP Series: LW1400ER L1504R LW1500ER L1804R LW1800ER IMPORTANT Please read through this manual. This manual may help save...
... improper installation. LG is not responsible for any damages caused by explaining proper air conditioner maintenance and preventing improper use. website http://www.lgservice.com ENGLISH ESPAÑOL LG LG Window-Type Air Conditioner OWNER'S MANUAL MODELS, MODELOS: WK Series: LW7000ER LW8000ER WL Series: L1004R LW1000ER L1204R LW1200ER L1404R LB1000ER LB1200ER WP Series: LW1400ER L1504R LW1500ER L1804R LW1800ER IMPORTANT Please read through this manual. This manual may help save...
Owners Manual
Page 2
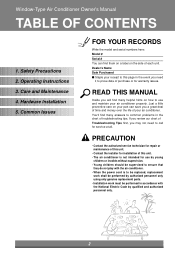
... to this page in the event you may not need it to be replaced, replacement work shall be performed by authorized personnel only using only genuine replacement parts. • Installation work must be performed in the chart of Troubleshooting Tips first, you need to common problems in accordance with the National Electric Code by qualified and authorized personnel only. 2 Window-Type Air Conditioner Owner's Manual TABLE OF CONTENTS 1. Safety Precautions 2. Operating Instructions 3.
... to this page in the event you may not need it to be replaced, replacement work shall be performed by authorized personnel only using only genuine replacement parts. • Installation work must be performed in the chart of Troubleshooting Tips first, you need to common problems in accordance with the National Electric Code by qualified and authorized personnel only. 2 Window-Type Air Conditioner Owner's Manual TABLE OF CONTENTS 1. Safety Precautions 2. Operating Instructions 3.
Owners Manual
Page 5
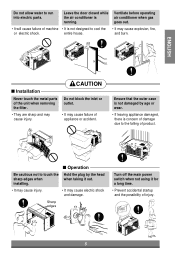
... product. s Operation Be cautious not to run into electric parts. Sharp edges Turn off the main power switch when not using it out. • It may cause injury. • It may cause failure of the unit when removing the filter. Do not allow water to touch the sharp edges when installing. Leave the door closed while the air conditioner is concern of damage due to cool...
... product. s Operation Be cautious not to run into electric parts. Sharp edges Turn off the main power switch when not using it out. • It may cause injury. • It may cause failure of the unit when removing the filter. Do not allow water to touch the sharp edges when installing. Leave the door closed while the air conditioner is concern of damage due to cool...
Owners Manual
Page 6
... fire or electric shock. Do not drink water drained from the socket. Do not use wax, thinner, or a strong detergent. Clean it may deteriorate, change color, or develop surface flaws. • It contains containments and will make you sick. / This could injure the pet or plant. Contact service center after taking the power-plug out from air conditioner. / Do not direct airflow...
... fire or electric shock. Do not drink water drained from the socket. Do not use wax, thinner, or a strong detergent. Clean it may deteriorate, change color, or develop surface flaws. • It contains containments and will make you sick. / This could injure the pet or plant. Contact service center after taking the power-plug out from air conditioner. / Do not direct airflow...
Owners Manual
Page 7
... water can occur when handling sharp metal edges. 2 Do not use an extension cord. 5 Do not start/stop operation by plugging/unplugging the power cord. 6 If cord/plug is accidentally triggered on while cleaning inner parts of the unit when removing the filter. The fan rotates at a very high speed during operation. There is a possibility of injury if the unit's power is damaged, replace only with other heating devices. 3 Do not use this air conditioner...
... water can occur when handling sharp metal edges. 2 Do not use an extension cord. 5 Do not start/stop operation by plugging/unplugging the power cord. 6 If cord/plug is accidentally triggered on while cleaning inner parts of the unit when removing the filter. The fan rotates at a very high speed during operation. There is a possibility of injury if the unit's power is damaged, replace only with other heating devices. 3 Do not use this air conditioner...
Owners Manual
Page 8
Operating Instructions Remote Control Operations The remote control and control panel will look like those represented in the following pictures. 6 COOL FAN DRY FAN INDOOR DESIRED ENERGY SAVER AIR PURIFIER CLEAN FILTER AIR PURIFIER Air Purifier Power 7 1 Temp 2 Fan Speed TIMER FAN SPEED MODE AIR PURIFIER TEMP POWER 4 Sleep Mode 8 3 54 3 7 2 1 Auto Timer Swing 5 Cool Energy Saver Fan Dry Timer F1 LOW F2 MED F3 HIGH TEMP 3 5 4 ˚F 6 2 5 1 Power 1 Temp 2 Fan Speed 4 Timer Mode 3 8
Operating Instructions Remote Control Operations The remote control and control panel will look like those represented in the following pictures. 6 COOL FAN DRY FAN INDOOR DESIRED ENERGY SAVER AIR PURIFIER CLEAN FILTER AIR PURIFIER Air Purifier Power 7 1 Temp 2 Fan Speed TIMER FAN SPEED MODE AIR PURIFIER TEMP POWER 4 Sleep Mode 8 3 54 3 7 2 1 Auto Timer Swing 5 Cool Energy Saver Fan Dry Timer F1 LOW F2 MED F3 HIGH TEMP 3 5 4 ˚F 6 2 5 1 Power 1 Temp 2 Fan Speed 4 Timer Mode 3 8
Owners Manual
Page 9
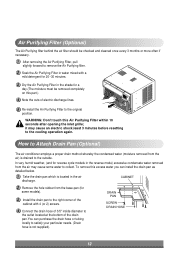
... ¡ ...) NOTICE : CLEAN FILTER You can be mounted on the back of electric power, the unit runs as previous setting operation. Select fan mode for energy saving operation. AUTO RESTART In failure of the remote control with the remote control. To maintain optimal operation of time Keep the remote control away from the remote control if the air conditioner is not going to 12 hours). 6 REMOTE CONTROL SENSOR 7 AIR PURIFIER • Press the Air Purifier button. Select dry mode for an extended...
... ¡ ...) NOTICE : CLEAN FILTER You can be mounted on the back of electric power, the unit runs as previous setting operation. Select fan mode for energy saving operation. AUTO RESTART In failure of the remote control with the remote control. To maintain optimal operation of time Keep the remote control away from the remote control if the air conditioner is not going to 12 hours). 6 REMOTE CONTROL SENSOR 7 AIR PURIFIER • Press the Air Purifier button. Select dry mode for an extended...
Owners Manual
Page 10
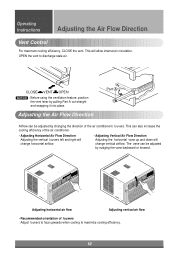
... and down will allow internal air circulation. This can also increase the cooling efficiency of louvers Adjust louvers to face upwards when cooling to discharge stale air. OPEN the vent to maximize cooling efficiency. 10 Operating Instructions Adjusting the Air Flow Direction Vent Control For maximum cooling efficiency, CLOSE the vent. Adjusting the Air Flow Direction Part A Airflow can be adjusted by pulling Part A out straight and snapping it...
... and down will allow internal air circulation. This can also increase the cooling efficiency of louvers Adjust louvers to face upwards when cooling to discharge stale air. OPEN the vent to maximize cooling efficiency. 10 Operating Instructions Adjusting the Air Flow Direction Vent Control For maximum cooling efficiency, CLOSE the vent. Adjusting the Air Flow Direction Part A Airflow can be adjusted by pulling Part A out straight and snapping it...
Owners Manual
Page 11
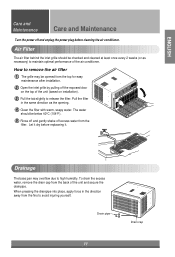
... performance of the unit (based on installation). 3 Pull the tab slightly to avoid injuring yourself. Pull the filter in the direction away from the top for easy maintenance after installation. 2 Open the inlet grille by pulling off the exposed door on the top of the air conditioner. To drain the excess water, remove the drain cap from the filter. Drain pipe 11 Drain cap The water should be below...
... performance of the unit (based on installation). 3 Pull the tab slightly to avoid injuring yourself. Pull the filter in the direction away from the top for easy maintenance after installation. 2 Open the inlet grille by pulling off the exposed door on the top of the air conditioner. To drain the excess water, remove the drain cap from the filter. Drain pipe 11 Drain cap The water should be below...
Owners Manual
Page 12
DRAIN PAN SCREW DRAIN HOSE 12 CABINET 2 Remove the hole rubber from the base-pan (for some water to collect. RHeomwototeACttoancthroDl rOapinerPaatinon(Osptional) The air conditioner employs a proper drain method whereby the condensed water (moisture removed from the air may cause an electric shock.least 3 minutes before resetting to the cooling operation again. To remove this excess water you can purchase the drain hose or tubing locally to satisfy your particular needs. (Drain hose is...
DRAIN PAN SCREW DRAIN HOSE 12 CABINET 2 Remove the hole rubber from the base-pan (for some water to collect. RHeomwototeACttoancthroDl rOapinerPaatinon(Osptional) The air conditioner employs a proper drain method whereby the condensed water (moisture removed from the air may cause an electric shock.least 3 minutes before resetting to the cooling operation again. To remove this excess water you can purchase the drain hose or tubing locally to satisfy your particular needs. (Drain hose is...
Owners Manual
Page 13
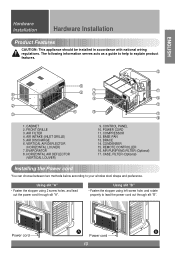
.... AIR DISCHARGE 6. CASE, FILTER (Optional) Installing the Power cord You can choose between two methods below according to explain product features. 13 6 5 8 1 2 4 3 1. AIR INTAKE (INLET GRILLE) 5. POWER CORD 11. VERTICAL AIR DEFLECTOR (HORIZONTAL LOUVER) 7. CONTROL PANEL 10. Using slit "A" • Fasten the stopper using left screw hole, and rotate properly to lead the power cord out through slit "A". CABINET 2. The following information serves acts as a guide to help to your window...
.... AIR DISCHARGE 6. CASE, FILTER (Optional) Installing the Power cord You can choose between two methods below according to explain product features. 13 6 5 8 1 2 4 3 1. AIR INTAKE (INLET GRILLE) 5. POWER CORD 11. VERTICAL AIR DEFLECTOR (HORIZONTAL LOUVER) 7. CONTROL PANEL 10. Using slit "A" • Fasten the stopper using left screw hole, and rotate properly to lead the power cord out through slit "A". CABINET 2. The following information serves acts as a guide to help to your window...
Owners Manual
Page 14
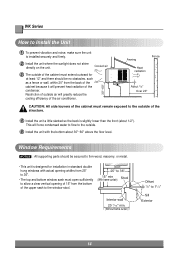
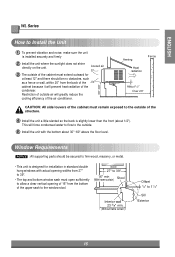
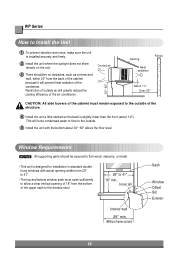
.... Window Requirements NOTICE : All supporting parts should be secured to firm wood, masonry, or metal. • This unit is designed for at least 12" and there should be no obstacles, such as a fence or wall, within 20" from the back of the cabinet because it will prevent heat radiation of the air conditioner. This will greatly reduce the cooling...
.... Window Requirements NOTICE : All supporting parts should be secured to firm wood, masonry, or metal. • This unit is designed for at least 12" and there should be no obstacles, such as a fence or wall, within 20" from the back of the cabinet because it will prevent heat radiation of the air conditioner. This will greatly reduce the cooling...
Owners Manual
Page 15
... force condensed water to flow to the outside of the cabinet must open sufficiently to the outside air will greatly reduce the cooling efficiency of the structure. 4 Install the unit a little slanted so the back is installed securely and firmly 2 Install the unit where the sunlight does not shine directly on the unit. Restriction of outside of the air conditioner. Window Requirements NOTICE : All supporting parts should...
... force condensed water to flow to the outside of the cabinet must open sufficiently to the outside air will greatly reduce the cooling efficiency of the structure. 4 Install the unit a little slanted so the back is installed securely and firmly 2 Install the unit where the sunlight does not shine directly on the unit. Restriction of outside of the air conditioner. Window Requirements NOTICE : All supporting parts should...
Owners Manual
Page 16
... sill Interior wall 29" min. (Without frame curtain) Sash Window Offset Sill Exterior 16 Restriction of outside . 5 Install the unit with actual opening widths from the bottom of the upper sash to the window stool. 29" to the outside air will force condensed water to flow to 41" 18" min. This will greatly reduce the cooling efficiency of the air conditioner. WP Series...
... sill Interior wall 29" min. (Without frame curtain) Sash Window Offset Sill Exterior 16 Restriction of outside . 5 Install the unit with actual opening widths from the bottom of the upper sash to the window stool. 29" to the outside air will force condensed water to flow to 41" 18" min. This will greatly reduce the cooling efficiency of the air conditioner. WP Series...

Owners Manual
Page 20
Window locking bracket 12 Fig. 9 Fig. 10 Fig. 11 20 See ELECTRICAL DATA for attaching power cord to the cabinet by inserting the tabs on the grille into place. (See Fig. 10) 14 Pull down the inlet grille and secure it with a Type C screw . (See Fig. 9) 13 Attach the front grille to electrical outlet. Push the grille in until it snaps into the tabs on the front of room air conditioner is now completed. 12 Attach the Window Locking Bracket with a Type A screw through the front grille. (See Fig. 11) 15 Window installation of the cabinet.
Window locking bracket 12 Fig. 9 Fig. 10 Fig. 11 20 See ELECTRICAL DATA for attaching power cord to the cabinet by inserting the tabs on the grille into place. (See Fig. 10) 14 Pull down the inlet grille and secure it with a Type C screw . (See Fig. 9) 13 Attach the front grille to electrical outlet. Push the grille in until it snaps into the tabs on the front of room air conditioner is now completed. 12 Attach the Window Locking Bracket with a Type A screw through the front grille. (See Fig. 11) 15 Window installation of the cabinet.

Owners Manual
Page 22
... water in the bottom pan. The cabinet should be installed with the center line marked window stool. The unit is restricted. CAUTION: Do not drill a hole in bottom pan. NOTICE :1. Window sash Upper Guide Foam -Seal 11 Cabinet Frame curtain Foam-PE 14 Fig. 15 22 Sill Bracket 3 Carriage Bolt 9 Support Bracket 2 Lock nut 4 Fig. 12 2 Attach the sill bracket to the support bracket using...
... water in the bottom pan. The cabinet should be installed with the center line marked window stool. The unit is restricted. CAUTION: Do not drill a hole in bottom pan. NOTICE :1. Window sash Upper Guide Foam -Seal 11 Cabinet Frame curtain Foam-PE 14 Fig. 15 22 Sill Bracket 3 Carriage Bolt 9 Support Bracket 2 Lock nut 4 Fig. 12 2 Attach the sill bracket to the support bracket using...
Owners Manual
Page 24
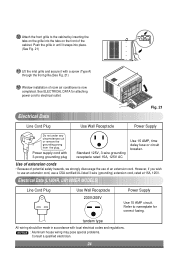
... fusing. Electrical Data Line Cord Plug Use Wall Receptacle Fig. 21 Power Supply Do not under any circumstances cut or remove the grounding prong from the plug. Electrical Data (L1804R, LW1800ER MODELS) Line Cord Plug Use Wall Receptacle 230V/208V Power Supply Use 15 AMP circuit. NOTICE : Aluminum house wiring may pose special problems. Consult a qualified electrician. 24 10 Attach the front grille to use an extension cord, use of an extension cord. Power supply cord with local electrical codes...
... fusing. Electrical Data Line Cord Plug Use Wall Receptacle Fig. 21 Power Supply Do not under any circumstances cut or remove the grounding prong from the plug. Electrical Data (L1804R, LW1800ER MODELS) Line Cord Plug Use Wall Receptacle 230V/208V Power Supply Use 15 AMP circuit. NOTICE : Aluminum house wiring may pose special problems. Consult a qualified electrician. 24 10 Attach the front grille to use an extension cord, use of an extension cord. Power supply cord with local electrical codes...

Owners Manual
Page 25
... exists before use a CSA certified/UL-listed 3-wire (grounding) extension cord, rated at 15A, 125V. DO NOT USE the appliance with a broken adapter plug. CAUTION: Attaching the adapter ground terminal to the wall receptacle cover screw does not ground the appliance unless the cover screw is metal, and not insulated, and the wall receptacle is properly grounded. The customer should have the circuit checked by...
... exists before use a CSA certified/UL-listed 3-wire (grounding) extension cord, rated at 15A, 125V. DO NOT USE the appliance with a broken adapter plug. CAUTION: Attaching the adapter ground terminal to the wall receptacle cover screw does not ground the appliance unless the cover screw is metal, and not insulated, and the wall receptacle is properly grounded. The customer should have the circuit checked by...
Owners Manual
Page 27
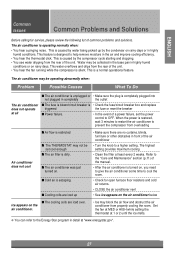
... air conditioner is caused by the condenser on rainy days or in highly humid conditions. Water may block the air flow and obstruct the air conditioner from overloading Air conditioner does not cool s Air flow is restricted s The THERMOSTAT may be set cool enough s The air filter is • Check the fuse/circuit breaker box and replace triggered the fuse or reset the breaker s Power failure. • In the event of a power failure, set the power control to the Energy Star...
... air conditioner is caused by the condenser on rainy days or in highly humid conditions. Water may block the air flow and obstruct the air conditioner from overloading Air conditioner does not cool s Air flow is restricted s The THERMOSTAT may be set cool enough s The air filter is • Check the fuse/circuit breaker box and replace triggered the fuse or reset the breaker s Power failure. • In the event of a power failure, set the power control to the Energy Star...
Owners Manual
Page 28
... when used in the Operating Guide, accident, vermin, fire, flood, improper installation, acts of God, unauthorized modification or alteration, incorrect electrical current or voltage, or commercial use, or use during the warranty period set forth below, effective from the Date of your product type (AIR CONDITIONER),and ZIP/postal code ready. Press the appropriate option, and please have product type (Room Air Conditioner), model number, serial number, and ZIP/postal code ready. This limited warranty is...
... when used in the Operating Guide, accident, vermin, fire, flood, improper installation, acts of God, unauthorized modification or alteration, incorrect electrical current or voltage, or commercial use, or use during the warranty period set forth below, effective from the Date of your product type (AIR CONDITIONER),and ZIP/postal code ready. Press the appropriate option, and please have product type (Room Air Conditioner), model number, serial number, and ZIP/postal code ready. This limited warranty is...


