
Owners Manual
Page 2
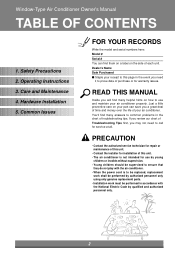
Window-Type Air Conditioner Owner's Manual TABLE OF CONTENTS 1. Just a little preventive care on your part can find them on a label on how to call for warranty issues. Common Issues FOR YOUR RECORDS Write the model and serial numbers here:... to common problems in the event you need it to be replaced, replacement work shall be performed by authorized personnel only using only genuine replacement parts. • Installation work must be performed in accordance with the National Electric Code by qualified and authorized personnel only. 2 Care and Maintenance 4. Hardware ...
Window-Type Air Conditioner Owner's Manual TABLE OF CONTENTS 1. Just a little preventive care on your part can find them on a label on how to call for warranty issues. Common Issues FOR YOUR RECORDS Write the model and serial numbers here:... to common problems in the event you need it to be replaced, replacement work shall be performed by authorized personnel only using only genuine replacement parts. • Installation work must be performed in accordance with the National Electric Code by qualified and authorized personnel only. 2 Care and Maintenance 4. Hardware ...
Owners Manual
Page 5
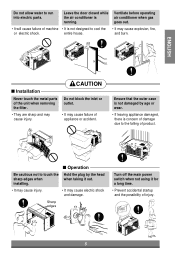
Ensure that the outer case is not designed to run into electric parts. and burn. Do not block the inlet or outlet. • They are sharp and may cause injury. • It may cause failure of the unit ... injury. • It may cause electric shock and damage. s Operation Be cautious not to the falling of product. ENGLISH s Installation CAUTION Never touch the metal parts of appliance or accident. Ventilate before operating air conditioner when gas goes out. • It will cause failure of machine • It is not damaged...
Ensure that the outer case is not designed to run into electric parts. and burn. Do not block the inlet or outlet. • They are sharp and may cause injury. • It may cause failure of the unit ... injury. • It may cause electric shock and damage. s Operation Be cautious not to the falling of product. ENGLISH s Installation CAUTION Never touch the metal parts of appliance or accident. Ventilate before operating air conditioner when gas goes out. • It will cause failure of machine • It is not damaged...
Owners Manual
Page 7
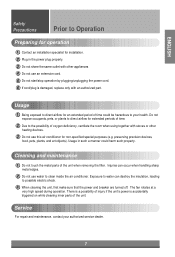
...precision devices, food, pets, plants, and art objects). Usage in the power plug properly. 3 Do not share the same outlet with an authorized part. Exposure to water can occur when handling sharp metal edges. 2 Do not use this air conditioner for extended periods of time. 2 Due to ...possibility of time could harm such property. Service For repair and maintenance, contact your health. Cleaning and maintenance 1 Do not touch the metal parts of the unit. The fan rotates at a very high speed during operation. Usage 1 Being exposed to direct airflow for an extended period ...
...precision devices, food, pets, plants, and art objects). Usage in the power plug properly. 3 Do not share the same outlet with an authorized part. Exposure to water can occur when handling sharp metal edges. 2 Do not use this air conditioner for extended periods of time. 2 Due to ...possibility of time could harm such property. Service For repair and maintenance, contact your health. Cleaning and maintenance 1 Do not touch the metal parts of the unit. The fan rotates at a very high speed during operation. Usage 1 Being exposed to direct airflow for an extended period ...
Owners Manual
Page 10
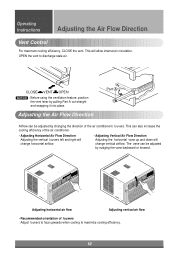
.... 10 Operating Instructions Adjusting the Air Flow Direction Vent Control For maximum cooling efficiency, CLOSE the vent. Adjusting the Air Flow Direction Part A Airflow can be adjusted by pulling Part A out straight and snapping it into place. This will change horizontal airflow. • Adjusting Vertical Air Flow Direction Adjusting the horizontal vane...
.... 10 Operating Instructions Adjusting the Air Flow Direction Vent Control For maximum cooling efficiency, CLOSE the vent. Adjusting the Air Flow Direction Part A Airflow can be adjusted by pulling Part A out straight and snapping it into place. This will change horizontal airflow. • Adjusting Vertical Air Flow Direction Adjusting the horizontal vane...
Owners Manual
Page 12
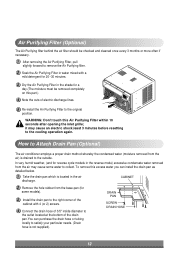
... water (moisture removed from the air) is not supplied). RAeirmPoutreifyCionngtrFoiltOerp(eOraptionsal) The Air Purifying filter behind the air filter should be removed completely on this part.) 4 Note the cuts of the drain pan.You can install the drain pan as detailed below. 1 Take the drain pan which is located in the...
... water (moisture removed from the air) is not supplied). RAeirmPoutreifyCionngtrFoiltOerp(eOraptionsal) The Air Purifying filter behind the air filter should be removed completely on this part.) 4 Note the cuts of the drain pan.You can install the drain pan as detailed below. 1 Take the drain pan which is located in the...
Owners Manual
Page 14
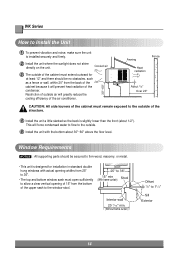
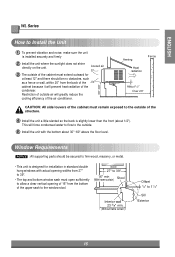
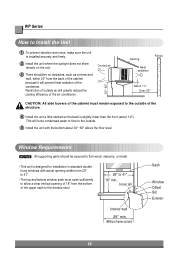
..." CAUTION: All side louvers of the air conditioner. This will force condensed water to flow to 11/4" Sill Exterior 14 Window Requirements NOTICE : All supporting parts should be secured to firm wood, masonry, or metal. • This unit is installed securely and firmly. 2 Install the unit where the sunlight does not...
..." CAUTION: All side louvers of the air conditioner. This will force condensed water to flow to 11/4" Sill Exterior 14 Window Requirements NOTICE : All supporting parts should be secured to firm wood, masonry, or metal. • This unit is installed securely and firmly. 2 Install the unit where the sunlight does not...
Owners Manual
Page 15
...; This unit is installed securely and firmly 2 Install the unit where the sunlight does not shine directly on the unit. Window Requirements NOTICE : All supporting parts should be secured to 11/4" Sill Exterior 15 Restriction of outside of the cabinet must open sufficiently to allow a clear vertical opening widths from 27...
...; This unit is installed securely and firmly 2 Install the unit where the sunlight does not shine directly on the unit. Window Requirements NOTICE : All supporting parts should be secured to 11/4" Sill Exterior 15 Restriction of outside of the cabinet must open sufficiently to allow a clear vertical opening widths from 27...
Owners Manual
Page 16
...; This unit is installed securely and firmly. 2 Install the unit where the sunlight does not shine directly on the unit. Window Requirements NOTICE : All supporting parts should be secured to the outside air will prevent heat radiation of the air conditioner. Inner sill Interior wall 29" min. (Without frame curtain) Sash...
...; This unit is installed securely and firmly. 2 Install the unit where the sunlight does not shine directly on the unit. Window Requirements NOTICE : All supporting parts should be secured to the outside air will prevent heat radiation of the air conditioner. Inner sill Interior wall 29" min. (Without frame curtain) Sash...
Owners Manual
Page 17
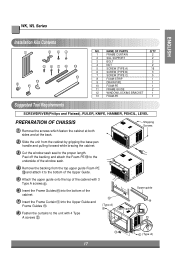
... Guide and Frame Guides . 8 Fasten the curtains to the proper length. WK, WL Series ENGLISH Installation Kits Contents 1 2 3 4 5 6 7 8 13 10 12 9 11 NO. NAME OF PARTS Q'TY 1 FRAME CURTAIN 2 2 SILL SUPPORT 2 3 BOLT 2 4 NUT 2 5 SCREW (TYPE A) 16 6 SCREW (TYPE B) 3 7 SCREW (TYPE C) 5 8 FOAM-STRIP 1 9 DRAIN PIPE 1 10 FOAM-PE 1 11 FRAME GUIDE 2 12...
... Guide and Frame Guides . 8 Fasten the curtains to the proper length. WK, WL Series ENGLISH Installation Kits Contents 1 2 3 4 5 6 7 8 13 10 12 9 11 NO. NAME OF PARTS Q'TY 1 FRAME CURTAIN 2 2 SILL SUPPORT 2 3 BOLT 2 4 NUT 2 5 SCREW (TYPE A) 16 6 SCREW (TYPE B) 3 7 SCREW (TYPE C) 5 8 FOAM-STRIP 1 9 DRAIN PIPE 1 10 FOAM-PE 1 11 FRAME GUIDE 2 12...
Owners Manual
Page 18
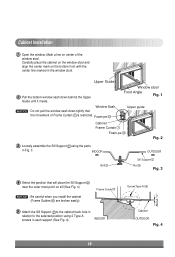
... marked in the window stool. Frame Guide 11 5 Attach the Sill Support to the cabinet track hole in relation to the selected position using the parts in each support (See Fig. 4). Carefully place the cabinet on the window stool and align the center mark on sill (See Fig. 4) NOTICE : Be careful...
... marked in the window stool. Frame Guide 11 5 Attach the Sill Support to the cabinet track hole in relation to the selected position using the parts in each support (See Fig. 4). Carefully place the cabinet on the window stool and align the center mark on sill (See Fig. 4) NOTICE : Be careful...

Owners Manual
Page 21
NAME OF PARTS 1 FRAME CURTAIN 2 SUPPORT BRACKET 3 SILL BRACKET 4 LOCK NUT 5 SCREW (TYPE A) 6 SCREW (TYPE B) 7 SCREW (TYPE C) 8 SCREW (TYPE D) 9 CARRIAGE BOLT 10 FOAM STRIP 11 FOAM SEAL 12 ...
NAME OF PARTS 1 FRAME CURTAIN 2 SUPPORT BRACKET 3 SILL BRACKET 4 LOCK NUT 5 SCREW (TYPE A) 6 SCREW (TYPE B) 7 SCREW (TYPE C) 8 SCREW (TYPE D) 9 CARRIAGE BOLT 10 FOAM STRIP 11 FOAM SEAL 12 ...
Owners Manual
Page 28
...repairs; The warranted labor covers the cost of Purchase. P/No.: 3828A20437A Printed in the United States including Alaska, Hawaii, and U.S. LG WILL NOT BE LIABLE FOR ANY CONSEQUENTIAL, INDIRECT, OR INCIDENTAL DAMAGES OF ANY KIND, INCLUDING LOST REVENUES OR PROFITS, IN CONNECTION WITH...Warranty Coverage Retain your home to the requirements or precautions in material or workmanship under normal use for other than intended purpose. 3. Parts: 2 Years from the Date of Purchase. THIS WARRANTY IS IN LIEU OF ANY OTHER WARRANTIES, EXPRESS OR IMPLIED, INCLUDING WITHOUT ...
...repairs; The warranted labor covers the cost of Purchase. P/No.: 3828A20437A Printed in the United States including Alaska, Hawaii, and U.S. LG WILL NOT BE LIABLE FOR ANY CONSEQUENTIAL, INDIRECT, OR INCIDENTAL DAMAGES OF ANY KIND, INCLUDING LOST REVENUES OR PROFITS, IN CONNECTION WITH...Warranty Coverage Retain your home to the requirements or precautions in material or workmanship under normal use for other than intended purpose. 3. Parts: 2 Years from the Date of Purchase. THIS WARRANTY IS IN LIEU OF ANY OTHER WARRANTIES, EXPRESS OR IMPLIED, INCLUDING WITHOUT ...


