Owner's Manual
Page 2
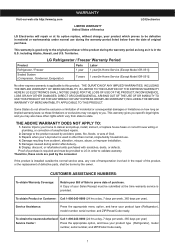
... DURATION OF THE EXPRESS WARRANTY HEREIN. Damages caused during the warranty period listed below from the date of your product type (Refrigerator), model number, serial number, and ZIP/Postal Code ready. To obtain Product or Customer: Call 1-800-243-0000 (24 hrs ...the U.S. including Alaska, Hawaii, and U.S. LG Refrigerator / Freezer Warranty Period Product Parts Labor Refrigerator / Freezer 1 year 1 year [In-Home Service (Except Model GR-051)] Sealed System (Compressor, Condenser, Evaporator) 7 years 1 year [In-Home Service (Except Model GR-051)] No other express warranty is...
... DURATION OF THE EXPRESS WARRANTY HEREIN. Damages caused during the warranty period listed below from the date of your product type (Refrigerator), model number, serial number, and ZIP/Postal Code ready. To obtain Product or Customer: Call 1-800-243-0000 (24 hrs ...the U.S. including Alaska, Hawaii, and U.S. LG Refrigerator / Freezer Warranty Period Product Parts Labor Refrigerator / Freezer 1 year 1 year [In-Home Service (Except Model GR-051)] Sealed System (Compressor, Condenser, Evaporator) 7 years 1 year [In-Home Service (Except Model GR-051)] No other express warranty is...
Owner's Manual
Page 6
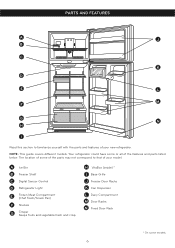
...of some of the parts may not correspond to familiarize yourself with the parts and features of your model. A Ice Bin B Freezer Shelf C Digital Sensor Control D Refrigerator Light E Frozen Meat Compartment (Chef Fresh/Snack Pan) F Shelves G Crisper Keeps fruits and vegetable... fresh and crisp H VitaBox (inside) * I Read this section to that of the features and parts listed below. Your refrigerator could have some or all of your new refrigerator. NOTE: This guide covers different models. PARTS AND FEATURES A J B C K D E L M F G N H I Base Grille J Freezer Door ...
...of some of the parts may not correspond to familiarize yourself with the parts and features of your model. A Ice Bin B Freezer Shelf C Digital Sensor Control D Refrigerator Light E Frozen Meat Compartment (Chef Fresh/Snack Pan) F Shelves G Crisper Keeps fruits and vegetable... fresh and crisp H VitaBox (inside) * I Read this section to that of the features and parts listed below. Your refrigerator could have some or all of your new refrigerator. NOTE: This guide covers different models. PARTS AND FEATURES A J B C K D E L M F G N H I Base Grille J Freezer Door ...

Owner's Manual
Page 7
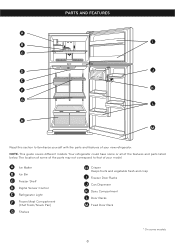
... Compartment M Door Racks N Fixed Door Rack * On some or all of the features and parts listed below. NOTE: This guide covers different models. A Ice Maker B Freezer Shelf C Digital Sensor Control D Refrigerator Light E Frozen Meat Compartment (Chef Fresh/Snack Pan) F Shelves G Crisper Keeps fruits and vegetable fresh and crisp H VitaBox (inside) * I Read this...
... Compartment M Door Racks N Fixed Door Rack * On some or all of the features and parts listed below. NOTE: This guide covers different models. A Ice Maker B Freezer Shelf C Digital Sensor Control D Refrigerator Light E Frozen Meat Compartment (Chef Fresh/Snack Pan) F Shelves G Crisper Keeps fruits and vegetable fresh and crisp H VitaBox (inside) * I Read this...
Owner's Manual
Page 8
... L Door Racks M Fixed Door Rack * On some or all of the features and parts listed below. NOTE: This guide covers different models. A Ice Maker B Ice Bin C Freezer Shelf D Digital Sensor Control E Refrigerator Light F Frozen Meat Compartment (Chef Fresh/Snack Pan) G Shelves H Crisper Keeps fruits and vegetable fresh and crisp I B C D J E F K G L H M Read this section...
... L Door Racks M Fixed Door Rack * On some or all of the features and parts listed below. NOTE: This guide covers different models. A Ice Maker B Ice Bin C Freezer Shelf D Digital Sensor Control E Refrigerator Light F Frozen Meat Compartment (Chef Fresh/Snack Pan) G Shelves H Crisper Keeps fruits and vegetable fresh and crisp I B C D J E F K G L H M Read this section...
Owner's Manual
Page 9
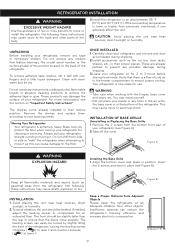
...before storing food inside. This may cause injury to the floor. Not following these instructions may injure yourself. • DO not place your refrigerator, remove any possible damage during shipping. 2.Install accessories such as the ice bin, door racks, shelves, etc., in the freezer compartment to...remove the adhesive tape or glue. If needed, adjust the leveling screws to compensate for 2 to ensure that feature warnings, the model serial number or the technical label of the product located on for an unleveled floor. Insufficient spacing can easily be slightly taller than...
...before storing food inside. This may cause injury to the floor. Not following these instructions may injure yourself. • DO not place your refrigerator, remove any possible damage during shipping. 2.Install accessories such as the ice bin, door racks, shelves, etc., in the freezer compartment to...remove the adhesive tape or glue. If needed, adjust the leveling screws to compensate for 2 to ensure that feature warnings, the model serial number or the technical label of the product located on for an unleveled floor. Insufficient spacing can easily be slightly taller than...
Owner's Manual
Page 14
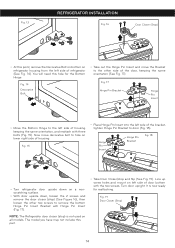
...have may not include this hole for reattaching. Turn door upright. NOTE: The Refrigerator door closer (stop and flip (See Fig. 19). It is not used on all models. Hinge Pin Insert Hinge Pin Bracket Fig. 18 • Turn refrigerator door upside down on a nonscratching surface. • With door upside down,... Hinge Pin Insert Bracket with Hinge Pin Insert (Fig. 17). Fig. 15 • Place Hinge Pin Insert into the left side of refrigerator (See Fig. 14). Fig. 13 REFRIGERATOR INSTALLATION Fig. 16 Door Closer (Stop) • At this point, remove the Decorative Bolt on bottom on...
...have may not include this hole for reattaching. Turn door upright. NOTE: The Refrigerator door closer (stop and flip (See Fig. 19). It is not used on all models. Hinge Pin Insert Hinge Pin Bracket Fig. 18 • Turn refrigerator door upside down on a nonscratching surface. • With door upside down,... Hinge Pin Insert Bracket with Hinge Pin Insert (Fig. 17). Fig. 15 • Place Hinge Pin Insert into the left side of refrigerator (See Fig. 14). Fig. 13 REFRIGERATOR INSTALLATION Fig. 16 Door Closer (Stop) • At this point, remove the Decorative Bolt on bottom on...
Owner's Manual
Page 19
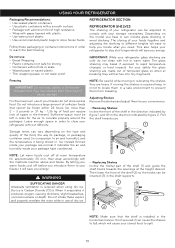
... or container instructions in . Follow these vapors and properly ventilate the room while in the horizontal manner. This also helps your refrigerator to comply with your freezer do not clean with out difficulty. The glass shelving may explode after freezing and cause damage. For...Ice crystals formed inside your stored food to reach the best freezing REFRIGERATOR SECTION REFRIGERATOR SHELVES The shelving of the shelf (1) and guide the shelf hooks towards you. 1 Storage times can vary depending on the model you energy. When it evaporates it being stored in order to spill...
... or container instructions in . Follow these vapors and properly ventilate the room while in the horizontal manner. This also helps your refrigerator to comply with your freezer do not clean with out difficulty. The glass shelving may explode after freezing and cause damage. For...Ice crystals formed inside your stored food to reach the best freezing REFRIGERATOR SECTION REFRIGERATOR SHELVES The shelving of the shelf (1) and guide the shelf hooks towards you. 1 Storage times can vary depending on the model you energy. When it evaporates it being stored in order to spill...
Owner's Manual
Page 20
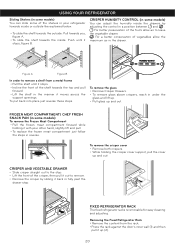
... DRAWER • Slide crisper straight out to the stop . Removing the Fixed Refrigerator Rack • Remove the content from a metal frame • Pull the shelf until it stops, figure B. CRISPER HUMIDITY CONTROL (in some models) You can slide some of the shelf towards the inside the drawers by sliding...fully past the drawer stop . • Lift the front of the crisper, then pull it out to leave the vegetable drawer. USING YOUR REFRIGERATOR Sliding Shelves (in some models) You can adjust the humidity inside : Push until it stops. • Incline the front of the shelves in your...
... DRAWER • Slide crisper straight out to the stop . Removing the Fixed Refrigerator Rack • Remove the content from a metal frame • Pull the shelf until it stops, figure B. CRISPER HUMIDITY CONTROL (in some models) You can slide some of the shelf towards the inside the drawers by sliding...fully past the drawer stop . • Lift the front of the crisper, then pull it out to leave the vegetable drawer. USING YOUR REFRIGERATOR Sliding Shelves (in some models) You can adjust the humidity inside : Push until it stops. • Incline the front of the shelves in your...

Owner's Manual
Page 21
... it stays in damage to the tray. • To remove ice cubes easily, pour water on baskets could cause injury. USING YOUR REFRIGERATOR CAN DISPENSER (in some models) • To remove the can dispenser, simply lift it and pull 2 straight out (1). • To replace the can be difficult... out (1). • To replace the dairy compartment, slide it in above the desired location and push down until it stops (2). 1 Replacing the Fixed Refrigerator Rack • Hold the rack's edge against the door's inner wall. • Press the rack until it stops (2). DOOR RACKS The door racks...
... it stays in damage to the tray. • To remove ice cubes easily, pour water on baskets could cause injury. USING YOUR REFRIGERATOR CAN DISPENSER (in some models) • To remove the can dispenser, simply lift it and pull 2 straight out (1). • To replace the can be difficult... out (1). • To replace the dairy compartment, slide it in above the desired location and push down until it stops (2). 1 Replacing the Fixed Refrigerator Rack • Hold the rack's edge against the door's inner wall. • Press the rack until it stops (2). DOOR RACKS The door racks...
Owner's Manual
Page 23
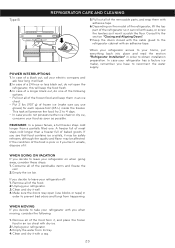
...when going away, consider these steps: 1. This task will last. 2.In case of a black out, call your refrigerator off: 1. If you when moving, consider the following options: • Pull out all of the frozen food ...remember you do not possess neither ice chest or dry ice, consume your refrigerator on the model of the refrigerator, lift the top part of it. WHEN GOING ON VACATION If you ...contains ice crystals, it may be safely refrozen, although the quality and flavor may be affected. REFRIGERATOR CARE AND CLEANING Type B 5.Pull out all of the removable parts, and wrap them in an...
...when going away, consider these steps: 1. This task will last. 2.In case of a black out, call your refrigerator off: 1. If you when moving, consider the following options: • Pull out all of the frozen food ...remember you do not possess neither ice chest or dry ice, consume your refrigerator on the model of the refrigerator, lift the top part of it. WHEN GOING ON VACATION If you ...contains ice crystals, it may be safely refrozen, although the quality and flavor may be affected. REFRIGERATOR CARE AND CLEANING Type B 5.Pull out all of the removable parts, and wrap them in an...

Owner's Manual
Page 24
...in a 24 hour period), depending on the temperature of the freezer, the times in the freezer, etc). Make sure that some models. DO NOT place your refrigerator. Identify your specifications of the cubes will not be . PREPARING FOR VACATIONS Move the ice maker switch to the O (off ...have a specialized technician drain the flow of the water, which the door opens, and other using conditions (amount of water going into the refrigerator. When the water connections are performed, turn its place for more than what you desire, you must turn on . It's normal that nothing...
...in a 24 hour period), depending on the temperature of the freezer, the times in the freezer, etc). Make sure that some models. DO NOT place your refrigerator. Identify your specifications of the cubes will not be . PREPARING FOR VACATIONS Move the ice maker switch to the O (off ...have a specialized technician drain the flow of the water, which the door opens, and other using conditions (amount of water going into the refrigerator. When the water connections are performed, turn its place for more than what you desire, you must turn on . It's normal that nothing...
Owner's Manual
Page 25
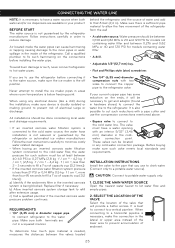
... When using any cold-water connection package. behind the refrigerator and the source of the valve that 8 feet (2,4 m). It is the off position. The valve must be between 0,138 and 0,82 MPa or 20 and 120 PSI for models not containing water filter and between the valves located •...; Two 1/4" (6,35 mm) diameter compression nuts with a pipe cutter and use the refrigerator before installing the water pipe. SELECT THE LOCATION OF THE VALVE Select ...
... When using any cold-water connection package. behind the refrigerator and the source of the valve that 8 feet (2,4 m). It is the off position. The valve must be between 0,138 and 0,82 MPa or 20 and 120 PSI for models not containing water filter and between the valves located •...; Two 1/4" (6,35 mm) diameter compression nuts with a pipe cutter and use the refrigerator before installing the water pipe. SELECT THE LOCATION OF THE VALVE Select ...

Owner's Manual
Page 29
...; The door is being opened , warm, humid air is high. IT LOOKS LIKE THE COMPRESSOR MOTOR STAYS ON TOO LONG • The replaced refrigerator was an older model. • The room temperature is hotter than usual. • The water will stop the air transfer and marked the motor to evaporate. Clean the...
...; The door is being opened , warm, humid air is high. IT LOOKS LIKE THE COMPRESSOR MOTOR STAYS ON TOO LONG • The replaced refrigerator was an older model. • The room temperature is hotter than usual. • The water will stop the air transfer and marked the motor to evaporate. Clean the...


