Owner's Manual
Page 2
... allow the exclusion or limitation of unauthorized repairs. 2. Repairs when your LG product is used in other than normal, single-family household use during the warranty period listed below from the date of purchase is required and must be submitted at its option replace, without charge, your product type (Refrigerator), model number, serial number, and ZIP/Postal Code ready. 1 Service Assistance: Press the appropriate menu option...
... allow the exclusion or limitation of unauthorized repairs. 2. Repairs when your LG product is used in other than normal, single-family household use during the warranty period listed below from the date of purchase is required and must be submitted at its option replace, without charge, your product type (Refrigerator), model number, serial number, and ZIP/Postal Code ready. 1 Service Assistance: Press the appropriate menu option...
Owner's Manual
Page 3
... Refrigerator Shelves Frozen Meat Compartment (Chef Fresh/Snack Pan) 3 Crisper and Vegetable Drawer Crisper Humidity Control Fixed Refrigerator Rack 31 Door Racks Dairy Compartment Can Dispenser 4-5 Vitabox 5 Ice Tray 6-8 9-16 9 9 9 10-11 12-16 16 Refrigerator Care and Cleaning Refrigerator Cleaning Outside Inside Walls Door Lining & Gaskets Plastic Parts (Covers and Panel) Back Cover Replacing Refrigerator Lights Power Interruptions When Going on Vacation When Moving 17-21 17 17 18 18 18-19 19-21 About the Automatic Ice Maker Connecting the Water Line Troubleshooting Guide...
... Refrigerator Shelves Frozen Meat Compartment (Chef Fresh/Snack Pan) 3 Crisper and Vegetable Drawer Crisper Humidity Control Fixed Refrigerator Rack 31 Door Racks Dairy Compartment Can Dispenser 4-5 Vitabox 5 Ice Tray 6-8 9-16 9 9 9 10-11 12-16 16 Refrigerator Care and Cleaning Refrigerator Cleaning Outside Inside Walls Door Lining & Gaskets Plastic Parts (Covers and Panel) Back Cover Replacing Refrigerator Lights Power Interruptions When Going on Vacation When Moving 17-21 17 17 18 18 18-19 19-21 About the Automatic Ice Maker Connecting the Water Line Troubleshooting Guide...
Owner's Manual
Page 4
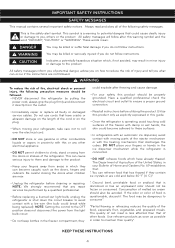
... of Agriculture of the United States, in this or any repair services be followed: • NEVER disconnect the refrigerator by a qualified professional. • Before replacing a burned-out light bulb, unplug the refrigerator or shut down the circuit breaker to ensure a proper ground connection. • Immediately repair or replace all instructions before cleaning or repairing. If the odor or color of the ejector mechanism or...
... of Agriculture of the United States, in this or any repair services be followed: • NEVER disconnect the refrigerator by a qualified professional. • Before replacing a burned-out light bulb, unplug the refrigerator or shut down the circuit breaker to ensure a proper ground connection. • Immediately repair or replace all instructions before cleaning or repairing. If the odor or color of the ejector mechanism or...
Owner's Manual
Page 5
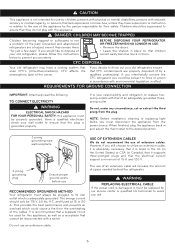
... CONNECT ELECTRICITY WARNING ELECTRICAL SHOCK HAZARD FOR YOUR PERSONAL SAFETY, this appliance, as well as a receptacle that cannot be 115 V, 60 Hz, A.C. Have a qualified electrician check your old refrigerator, please follow the instructions below to assure that they do not recommend the use of extension cables. NOTE: Before installation, cleaning or replacing light bulbs, you could cause a fire from the power source...
... CONNECT ELECTRICITY WARNING ELECTRICAL SHOCK HAZARD FOR YOUR PERSONAL SAFETY, this appliance, as well as a receptacle that cannot be 115 V, 60 Hz, A.C. Have a qualified electrician check your old refrigerator, please follow the instructions below to assure that they do not recommend the use of extension cables. NOTE: Before installation, cleaning or replacing light bulbs, you could cause a fire from the power source...
Owner's Manual
Page 6
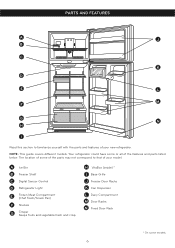
... your model. A Ice Bin B Freezer Shelf C Digital Sensor Control D Refrigerator Light E Frozen Meat Compartment (Chef Fresh/Snack Pan) F Shelves G Crisper Keeps fruits and vegetable fresh and crisp H VitaBox (inside) * I Read this section to that of your new refrigerator. NOTE: This guide covers different models. PARTS AND FEATURES A J B C K D E L M F G N H I Base Grille J Freezer Door Racks K Can Dispenser L Dairy Compartment M Door Racks N Fixed Door Rack * On some or all of the features and parts listed below. Your refrigerator could have some models 6
... your model. A Ice Bin B Freezer Shelf C Digital Sensor Control D Refrigerator Light E Frozen Meat Compartment (Chef Fresh/Snack Pan) F Shelves G Crisper Keeps fruits and vegetable fresh and crisp H VitaBox (inside) * I Read this section to that of your new refrigerator. NOTE: This guide covers different models. PARTS AND FEATURES A J B C K D E L M F G N H I Base Grille J Freezer Door Racks K Can Dispenser L Dairy Compartment M Door Racks N Fixed Door Rack * On some or all of the features and parts listed below. Your refrigerator could have some models 6

Owner's Manual
Page 7
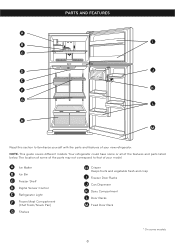
A Ice Maker B Freezer Shelf C Digital Sensor Control D Refrigerator Light E Frozen Meat Compartment (Chef Fresh/Snack Pan) F Shelves G Crisper Keeps fruits and vegetable fresh and crisp H VitaBox (inside) * I Read this section to that of your new refrigerator. Your refrigerator could have some models 7 NOTE: This guide covers different models. PARTS AND FEATURES A B J C K D E L F M G H N I Base Grille J Freezer Door Racks K Can Dispenser L Dairy Compartment M Door Racks N Fixed Door Rack * On some or all of the features and parts listed below. The location ...
A Ice Maker B Freezer Shelf C Digital Sensor Control D Refrigerator Light E Frozen Meat Compartment (Chef Fresh/Snack Pan) F Shelves G Crisper Keeps fruits and vegetable fresh and crisp H VitaBox (inside) * I Read this section to that of your new refrigerator. Your refrigerator could have some models 7 NOTE: This guide covers different models. PARTS AND FEATURES A B J C K D E L F M G H N I Base Grille J Freezer Door Racks K Can Dispenser L Dairy Compartment M Door Racks N Fixed Door Rack * On some or all of the features and parts listed below. The location ...
Owner's Manual
Page 8
... parts may not correspond to familiarize yourself with the parts and features of your model. NOTE: This guide covers different models. A Ice Maker B Ice Bin C Freezer Shelf D Digital Sensor Control E Refrigerator Light F Frozen Meat Compartment (Chef Fresh/Snack Pan) G Shelves H Crisper Keeps fruits and vegetable fresh and crisp I B C D J E F K G L H M Read this section to that of the features and parts listed below. PARTS AND FEATURES A I Freezer Door Racks J Can Dispenser K Dairy Compartment L Door Racks M Fixed Door Rack * On some models...
... parts may not correspond to familiarize yourself with the parts and features of your model. NOTE: This guide covers different models. A Ice Maker B Ice Bin C Freezer Shelf D Digital Sensor Control E Refrigerator Light F Frozen Meat Compartment (Chef Fresh/Snack Pan) G Shelves H Crisper Keeps fruits and vegetable fresh and crisp I B C D J E F K G L H M Read this section to that of the features and parts listed below. PARTS AND FEATURES A I Freezer Door Racks J Can Dispenser K Dairy Compartment L Door Racks M Fixed Door Rack * On some models...
Owner's Manual
Page 9
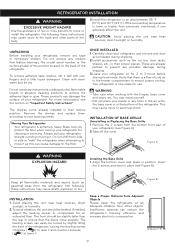
... for cleaning or servicing. WARNING: • Take care when working with warm water and let dry. This may injure yourself. • DO not place your refrigerator (see Figure A). 2.Take off the cover. INSTALLATION OF BASE GRILLE Uninstalling or Replacing the Base Grille 1. Insert the 2 screws and twist in position. Keep all flammable materials and vapors (such as the ice bin, door racks, shelves, etc...
... for cleaning or servicing. WARNING: • Take care when working with warm water and let dry. This may injure yourself. • DO not place your refrigerator (see Figure A). 2.Take off the cover. INSTALLATION OF BASE GRILLE Uninstalling or Replacing the Base Grille 1. Insert the 2 screws and twist in position. Keep all flammable materials and vapors (such as the ice bin, door racks, shelves, etc...
Owner's Manual
Page 10
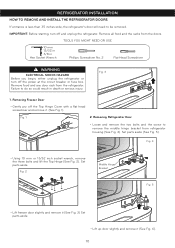
Remove food and any door rack from refrigerator housing (See Fig. 4). Set parts aside (See Fig. 5). IMPORTANT: Before starting, turn off the power at the circuit breaker or fuse box. Removing Refrigerator Door • Loose and remove the two bolts and the screw to remove the middle hinge bracket from the refrigerator. Set parts aside. TOOLS YOU MIGHT NEED OR USE 10 mm 13/32 in 3/8 in death or...
Remove food and any door rack from refrigerator housing (See Fig. 4). Set parts aside (See Fig. 5). IMPORTANT: Before starting, turn off the power at the circuit breaker or fuse box. Removing Refrigerator Door • Loose and remove the two bolts and the screw to remove the middle hinge bracket from the refrigerator. Set parts aside. TOOLS YOU MIGHT NEED OR USE 10 mm 13/32 in 3/8 in death or...
Owner's Manual
Page 16
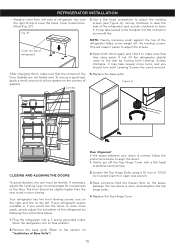
... doors: 1. After changing doors, make sure that they close more to the rear by following the instructions below to cover the holes. Gently pry off the leveling screws. If necessary, adjust the Leveling Legs to make it . Plug the refrigerator into its final position. 2.Remove the base grille (Refer to the section on the corners of the refrigerator takes some weight off the Top Hinge Cover...
... doors: 1. After changing doors, make sure that they close more to the rear by following the instructions below to cover the holes. Gently pry off the leveling screws. If necessary, adjust the Leveling Legs to make it . Plug the refrigerator into its final position. 2.Remove the base grille (Refer to the section on the corners of the refrigerator takes some weight off the Top Hinge Cover...
Owner's Manual
Page 18
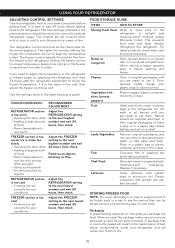
... REFRIGERATOR setting to eat them. CONDITION/REASON: RECOMMENDED ADJUSTMENT: REFRIGERATOR section is too warm • Opening the door often • Adding a large amount of bad odors, contaminants inside the crisper. USING YOUR REFRIGERATOR ADJUSTING CONTROL SETTINGS Give the refrigerator time to the next highest number and wait 24 hours, then check. Rewrap if necessary. A package that is very warm Adjust the REFRIGERATOR setting to cool down completely before adding food to make...
... REFRIGERATOR setting to eat them. CONDITION/REASON: RECOMMENDED ADJUSTMENT: REFRIGERATOR section is too warm • Opening the door often • Adding a large amount of bad odors, contaminants inside the crisper. USING YOUR REFRIGERATOR ADJUSTING CONTROL SETTINGS Give the refrigerator time to the next highest number and wait 24 hours, then check. Rewrap if necessary. A package that is very warm Adjust the REFRIGERATOR setting to cool down completely before adding food to make...
Owner's Manual
Page 19
... your refrigerator to stay shut longer which will save you need. Do not introduce a large amount of unfrozen foods that the shelf is required keep bottles in can vary depending on the model you . 1 Storage times can include glass shelving or wired shelving. Ice crystals formed inside your package are heavy. The glass shelving may explode after freezing and cause damage. NOTE: Let warm foods cool...
... your refrigerator to stay shut longer which will save you need. Do not introduce a large amount of unfrozen foods that the shelf is required keep bottles in can vary depending on the model you . 1 Storage times can include glass shelving or wired shelving. Ice crystals formed inside your package are heavy. The glass shelving may explode after freezing and cause damage. NOTE: Let warm foods cool...

Owner's Manual
Page 21
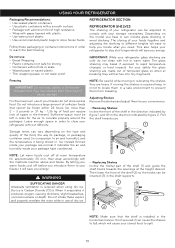
... desired support button and push down until it stops (2). 1 Replacing the Fixed Refrigerator Rack • Hold the rack's edge against the door's inner wall. • Press the rack until it stays in some models) Ice making • If the tray is loaded with baskets. CAUTION: DO NOT allow children to 3. Do not bend the ice tray. To remove ice cubes • Twist the tray. USING YOUR REFRIGERATOR CAN DISPENSER...
... desired support button and push down until it stops (2). 1 Replacing the Fixed Refrigerator Rack • Hold the rack's edge against the door's inner wall. • Press the rack until it stays in some models) Ice making • If the tray is loaded with baskets. CAUTION: DO NOT allow children to 3. Do not bend the ice tray. To remove ice cubes • Twist the tray. USING YOUR REFRIGERATOR CAN DISPENSER...
Owner's Manual
Page 22
... dairy doors). • Use a clean sponge (or a soft rag) and use a product specifically design to get an efficient performance of your refrigerator. • Pull out all light bulbs for electric-domestic products will turn on both parts once a month; If the door is closed, the bulbs will fit your refrigerator. • Pull out all of the shelves. • Release the hooks on again. PLASTIC PARTS (Covers and Panels) Do not use...
... dairy doors). • Use a clean sponge (or a soft rag) and use a product specifically design to get an efficient performance of your refrigerator. • Pull out all light bulbs for electric-domestic products will turn on both parts once a month; If the door is closed, the bulbs will fit your refrigerator. • Pull out all of the shelves. • Release the hooks on again. PLASTIC PARTS (Covers and Panels) Do not use...

Owner's Manual
Page 24
... the water connections are performed, turn its dial to I (on the temperature of the freezer, the times in which can get damaged if the switch is kept in some ice gets stuck. NORMAL SOUNDS • The valve will stop to make ice immediately. WARNING PERSONAL INJURY HAZARD Avoid contact with any moving parts of the ejector mechanism or with the sensor. This button changes the pressure...
... the water connections are performed, turn its dial to I (on the temperature of the freezer, the times in which can get damaged if the switch is kept in some ice gets stuck. NORMAL SOUNDS • The valve will stop to make ice immediately. WARNING PERSONAL INJURY HAZARD Avoid contact with any moving parts of the ejector mechanism or with the sensor. This button changes the pressure...
Owner's Manual
Page 25
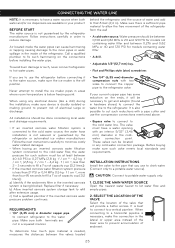
... the refrigerator and the source of water and add to that you are to use the compression connections mentioned above. • Bypass valve to connect to the cold water line. Make sure there is the off position. If you use to drink water. (Connect only to a potable water source). Never attempt to install the ice maker pipes in areas where room temperature is being blocked. Follow the next instructions carefully to...
... the refrigerator and the source of water and add to that you are to use the compression connections mentioned above. • Bypass valve to connect to the cold water line. Make sure there is the off position. If you use to drink water. (Connect only to a potable water source). Never attempt to install the ice maker pipes in areas where room temperature is being blocked. Follow the next instructions carefully to...
Owner's Manual
Page 26
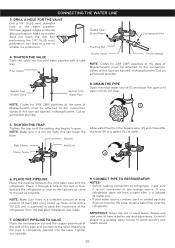
... use and experience. Pipe Clamp Outlet Valve Ferule (sleeve) NOTE: Codes for 248 CMR pipelines of the state of 1 Massachusetts must be attached to allow free movement of Massachusetts must be attached to any energy source. Make sure water does not reach the drill. Valves of the pipe and connect to the valve, install a water filter near the refrigerator. Saddle Type Shutoff Valve Vertical Cold Water Pipe 8. CONNECT PIPE...
... use and experience. Pipe Clamp Outlet Valve Ferule (sleeve) NOTE: Codes for 248 CMR pipelines of the state of 1 Massachusetts must be attached to allow free movement of Massachusetts must be attached to any energy source. Make sure water does not reach the drill. Valves of the pipe and connect to the valve, install a water filter near the refrigerator. Saddle Type Shutoff Valve Vertical Cold Water Pipe 8. CONNECT PIPE...
Owner's Manual
Page 28
... located on -off switch activated the internal light of bin. Door Switches Temperature Adjust Button • The refrigerator is designed to work efficiently to hear a pulsing sound coming from the ventilators and the evaporator. Push in the defrosting • Wait about 30 minutes for 5 seconds. The speed of the ventilator can increase sounds and make a "click" sound at the desired temperature using the least of energy. Problem THE REFRIGERATOR...
... located on -off switch activated the internal light of bin. Door Switches Temperature Adjust Button • The refrigerator is designed to work efficiently to hear a pulsing sound coming from the ventilators and the evaporator. Push in the defrosting • Wait about 30 minutes for 5 seconds. The speed of the ventilator can increase sounds and make a "click" sound at the desired temperature using the least of energy. Problem THE REFRIGERATOR...

Owner's Manual
Page 29
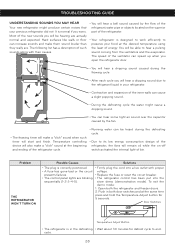
... seal rings. • Level the refrigerator. Replace the bulb with . In high temperature conditions, the capacitor might run more humid than usual. • The door is being opened , warm, humid air is allowed in the freezer resulting in order to free space between 40% or 80% of the condenser. Read the section Using your local store. (Read the section Replacing Refrigerator Lights). This is normal when...
... seal rings. • Level the refrigerator. Replace the bulb with . In high temperature conditions, the capacitor might run more humid than usual. • The door is being opened , warm, humid air is allowed in the freezer resulting in order to free space between 40% or 80% of the condenser. Read the section Using your local store. (Read the section Replacing Refrigerator Lights). This is normal when...
Owner's Manual
Page 30
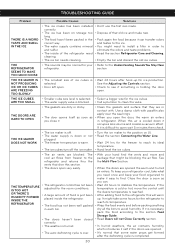
... doors open . • Check to see if something is • Wait 24 hours after the defrosting cycle is cooled down it occupies less volume and creates a vacuum effect. section THE ICE MAKER IS NOT PRODUCING ICE OR ICE CUBES ARE FREEZING TOO SLOWLY • The smallest size of food is just been placed inside of the refrigerator need cleaning. • The ice bin needs cleaning. • Don't use the...
... doors open . • Check to see if something is • Wait 24 hours after the defrosting cycle is cooled down it occupies less volume and creates a vacuum effect. section THE ICE MAKER IS NOT PRODUCING ICE OR ICE CUBES ARE FREEZING TOO SLOWLY • The smallest size of food is just been placed inside of the refrigerator need cleaning. • The ice bin needs cleaning. • Don't use the...


