

Owner's Manual
Page 1
... improper use. website http://www.lgappliances.com ENGLISH ESPAÑOL ENERGY STAR LG (LT0810CR,LT081CER) LG ROOM AIR CONDITIONER OWNER'S MANUAL Please read through this manual. It contains valuable information about your room air conditioner. MODELS, MODELOS: LT0810CR LT1010CR LT1210CR LT081CER LT101CNR LT121CNR IMPORTANT Please read the operating instructions and safety precautions carefully and thoroughly...
... improper use. website http://www.lgappliances.com ENGLISH ESPAÑOL ENERGY STAR LG (LT0810CR,LT081CER) LG ROOM AIR CONDITIONER OWNER'S MANUAL Please read through this manual. It contains valuable information about your room air conditioner. MODELS, MODELOS: LT0810CR LT1010CR LT1210CR LT081CER LT101CNR LT121CNR IMPORTANT Please read the operating instructions and safety precautions carefully and thoroughly...

Owner's Manual
Page 2
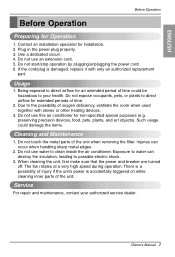
...installer for warranty issues. Just a little preventive care on your part can find many helpful hints on the side of each unit. READ THIS MANUAL Inside you will find many answers to call for use and maintain your air conditioner. Window-Type Air Conditioner Owner...'s Manual TABLE OF CONTENTS Safety Precautions 3 Before Operation 7 Introduction 8 Electrical Safety 9 Installation 11 Operating Instructions 18 Maintenance and Service 21 FOR YOUR RECORDS Write ...
...installer for warranty issues. Just a little preventive care on your part can find many helpful hints on the side of each unit. READ THIS MANUAL Inside you will find many answers to call for use and maintain your air conditioner. Window-Type Air Conditioner Owner...'s Manual TABLE OF CONTENTS Safety Precautions 3 Before Operation 7 Introduction 8 Electrical Safety 9 Installation 11 Operating Instructions 18 Maintenance and Service 21 FOR YOUR RECORDS Write ...
Owner's Manual
Page 3
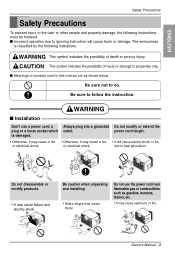
WARNING I Meanings of symbols used in this manual are as gasoline, benzene, thinner, etc. • It may cause injury. is classified by the following instructions must be followed. or electrical shock. CAUTION This ...symbol indicates the possibility of death or serious injury. Be sure to heat generation. power cord length. Gasolin Owner's Manual 3 ENGLISH Safety Precautions Safety Precautions To prevent injury to the user or other people and property damage, the following indications. Be caution when unpacking and...
WARNING I Meanings of symbols used in this manual are as gasoline, benzene, thinner, etc. • It may cause injury. is classified by the following instructions must be followed. or electrical shock. CAUTION This ...symbol indicates the possibility of death or serious injury. Be sure to heat generation. power cord length. Gasolin Owner's Manual 3 ENGLISH Safety Precautions Safety Precautions To prevent injury to the user or other people and property damage, the following indications. Be caution when unpacking and...

Owner's Manual
Page 5
... the metal parts of the unit when removing the filter. • They are sharp and may cause injury. Do not operate with the neighbors. Owner's Manual 5 When gas leaks, open the window for ventilation before operating the unit. • Otherwise, it may cause vibration or water leakage. ENGLISH Safety Precautions Do...
... the metal parts of the unit when removing the filter. • They are sharp and may cause injury. Do not operate with the neighbors. Owner's Manual 5 When gas leaks, open the window for ventilation before operating the unit. • Otherwise, it may cause vibration or water leakage. ENGLISH Safety Precautions Do...
Owner's Manual
Page 7
... metal edges. 2. Such usage could be hazardous to possible electric shock. 3. Do not touch the metal parts of the unit when removing the filter. Owner's Manual 7 Do not use water to direct airflow for extended periods of time. 2. Exposure to the possibility of oxygen deficiency, ventilate the room when used together...
... metal edges. 2. Such usage could be hazardous to possible electric shock. 3. Do not touch the metal parts of the unit when removing the filter. Owner's Manual 7 Do not use water to direct airflow for extended periods of time. 2. Exposure to the possibility of oxygen deficiency, ventilate the room when used together...
Owner's Manual
Page 8
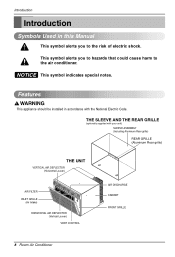
Features This appliance should be installed in this Manual This symbol alerts you to hazards that could cause harm to the risk of electric shock. THE SLEEVE AND THE REAR GRILLE (optionally supplied with ...
Features This appliance should be installed in this Manual This symbol alerts you to hazards that could cause harm to the risk of electric shock. THE SLEEVE AND THE REAR GRILLE (optionally supplied with ...

Owner's Manual
Page 9
... RESET button. Periodically examine the cord for use of the unit voids all warranties and performance claims. This unit not intended for any damage. Owner's Manual 9 If the TEST button does not trip or if the RESET button will not stay engaged, discontinue use as an on a periodic basis by shields...
... RESET button. Periodically examine the cord for use of the unit voids all warranties and performance claims. This unit not intended for any damage. Owner's Manual 9 If the TEST button does not trip or if the RESET button will not stay engaged, discontinue use as an on a periodic basis by shields...

Owner's Manual
Page 11
...sleeve(optionally supplied with care. The power supply available must be installed. To avoid risk of this OWNER'S MANUAL for future reference. Be sure it will be in this manual pose an excessive weight hazard. REQUIRED TOOLS: • Tight Fitting gloves • Standard screwdriver • ...or adjustable wrench • 1/4-inch hex socket and ratchet • Tape measure • Electric drill • 1/4-inch drill bit Owner's Manual 11 Two or more people are equipped with a 3-prong service plug to achieve the best performance. Do not change plug in use proper ...
...sleeve(optionally supplied with care. The power supply available must be installed. To avoid risk of this OWNER'S MANUAL for future reference. Be sure it will be in this manual pose an excessive weight hazard. REQUIRED TOOLS: • Tight Fitting gloves • Standard screwdriver • ...or adjustable wrench • 1/4-inch hex socket and ratchet • Tape measure • Electric drill • 1/4-inch drill bit Owner's Manual 11 Two or more people are equipped with a 3-prong service plug to achieve the best performance. Do not change plug in use proper ...
Owner's Manual
Page 13
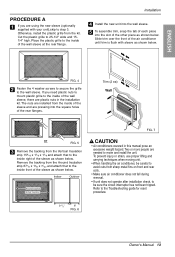
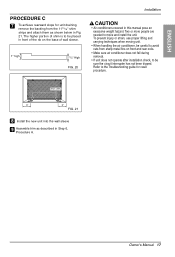
...FIG. 7 • Air conditioners covered in the installation kit. Cut the plastic grille to the Troubleshooting guide for reset procedure. 9 1/2" 6" FIG. 6 Owner's Manual 13 ENGLISH FIG. 4 2 Fasten the 4 washer screws to secure the grille to step 3. To prevent injury or strain, use proper lifting and carrying techniques when...rear flange. Slide trim over the front of the other piece as shown below . Two or more people are plastic nuts in this manual pose an excessive weight hazard. The nuts are pressing into the slot of the air conditioner until trim is flush with your unit),...
...FIG. 7 • Air conditioners covered in the installation kit. Cut the plastic grille to the Troubleshooting guide for reset procedure. 9 1/2" 6" FIG. 6 Owner's Manual 13 ENGLISH FIG. 4 2 Fasten the 4 washer screws to secure the grille to step 3. To prevent injury or strain, use proper lifting and carrying techniques when...rear flange. Slide trim over the front of the other piece as shown below . Two or more people are plastic nuts in this manual pose an excessive weight hazard. The nuts are pressing into the slot of the air conditioner until trim is flush with your unit),...
Owner's Manual
Page 15
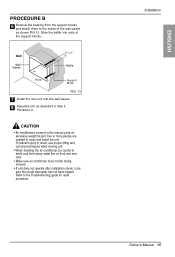
Two or more people are needed to the Troubleshooting guide for reset procedure. Installation Owner's Manual 15 Refer to move and install the unit. To prevent injury or strain, use proper lifting and carrying techniques when moving unit. • When ...5, Procedure A. Wall Wall Sleeve (7 3/32") Baffle Front Support Block FIG. 13 7 Install the new unit into slots of the wall sleeve as described in this manual pose an excessive weight hazard. Slide the baffle into the wall sleeve. 8 Assemble trim as shown FIG 13. ENGLISH PROCEDURE B 6 Remove the backing from sharp...
Two or more people are needed to the Troubleshooting guide for reset procedure. Installation Owner's Manual 15 Refer to move and install the unit. To prevent injury or strain, use proper lifting and carrying techniques when moving unit. • When ...5, Procedure A. Wall Wall Sleeve (7 3/32") Baffle Front Support Block FIG. 13 7 Install the new unit into slots of the wall sleeve as described in this manual pose an excessive weight hazard. Slide the baffle into the wall sleeve. 8 Assemble trim as shown FIG 13. ENGLISH PROCEDURE B 6 Remove the backing from sharp...
Owner's Manual
Page 17
...; Air conditioners covered in Fig. 21. Shim (2EA) 6" 6" FIG. 21 8 Install the new unit into the wall sleeve 9 Assemble trim as shown below in this manual pose an excessive weight hazard. The higher portion of shim is to be placed in front of the rib on front and rear coils. •..., use proper lifting and carrying techniques when moving unit. • When handling the air conditioner, be sure the circuit interrupter has not been tripped. Owner's Manual 17
...; Air conditioners covered in Fig. 21. Shim (2EA) 6" 6" FIG. 21 8 Install the new unit into the wall sleeve 9 Assemble trim as shown below in this manual pose an excessive weight hazard. The higher portion of shim is to be placed in front of the rib on front and rear coils. •..., use proper lifting and carrying techniques when moving unit. • When handling the air conditioner, be sure the circuit interrupter has not been tripped. Owner's Manual 17
Owner's Manual
Page 19
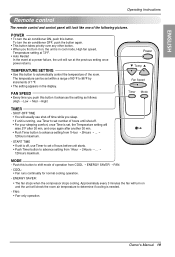
... unit is off, use Timer to set number of hours until shut-off time while you sleep. • If unit is in the display. Owner's Manual 19 FAN SPEED • Every time you first turn on , the unit is running, use Timer to set of hours before unit starts. • Push...
... unit is off, use Timer to set number of hours until shut-off time while you sleep. • If unit is in the display. Owner's Manual 19 FAN SPEED • Every time you first turn on , the unit is running, use Timer to set of hours before unit starts. • Push...
Owner's Manual
Page 21
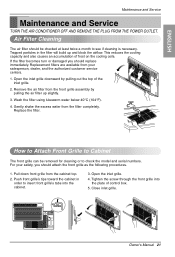
... the excess water from the cabinet top. 2. Cool Energy Saver Fan Timer F1 LOW F2 MED F3 HIGH TEMP MODE TIMER FAN SPEED 'F POWER Owner's Manual 21 How to Attach Front Grille to Cabinet The front grille can be checked at least twice a month to see if cleaning is necessary. Pull...
... the excess water from the cabinet top. 2. Cool Energy Saver Fan Timer F1 LOW F2 MED F3 HIGH TEMP MODE TIMER FAN SPEED 'F POWER Owner's Manual 21 How to Attach Front Grille to Cabinet The front grille can be checked at least twice a month to see if cleaning is necessary. Pull...


