
Owners Manual
Page 1
OWNER'S MANUAL SXS REFRIGERATOR Please read this owner's manual thoroughly before operating and keep it handy for reference at all times. LSXS264**/LSXS263** MFL67653437 MFL67653437 www.lg.com ENGLISH FRANÇAIS ESPAÑOL
OWNER'S MANUAL SXS REFRIGERATOR Please read this owner's manual thoroughly before operating and keep it handy for reference at all times. LSXS264**/LSXS263** MFL67653437 MFL67653437 www.lg.com ENGLISH FRANÇAIS ESPAÑOL
Owners Manual
Page 2
... Turn the Icemaker Off 24 - Power Failure 26 Ice and Water Dispenser 27 Storing Food 27 - Ambient Temperature 12 - Reinstalling the Right (Refrigerator) Door 14 - Reinstalling the Left (Freezer) Door 15 Connecting the Water Line 15 - Storing Frozen Food 30 Detaching and Assembling the Storage... Bins 32 Door-In-Door 33 Adjusting the Refrigerator Shelves 34 MAINTENANCE 34 Cleaning 35 Replacing the Water Filter 39 SMART DIAGNOSISTM 39 Using Smart DiagnosisTM 40 TROUBLESHOOTING 40 Common Product ...
... Turn the Icemaker Off 24 - Power Failure 26 Ice and Water Dispenser 27 Storing Food 27 - Ambient Temperature 12 - Reinstalling the Right (Refrigerator) Door 14 - Reinstalling the Left (Freezer) Door 15 Connecting the Water Line 15 - Storing Frozen Food 30 Detaching and Assembling the Storage... Bins 32 Door-In-Door 33 Adjusting the Refrigerator Shelves 34 MAINTENANCE 34 Cleaning 35 Replacing the Water Filter 39 SMART DIAGNOSISTM 39 Using Smart DiagnosisTM 40 TROUBLESHOOTING 40 Common Product ...

Owners Manual
Page 3
... seconds, a warning alarm sounds at an angle less than 30°.) ICE PLUS Ice production can be available. AUTO CLOSING HINGE The refrigerator and freezer doors close automatically with a slight push. (The door only closes automatically when it is open for frequently-used items that could... occur if a refrigerator door or freezer drawer remains open. DOOR ALARM The Door Alarm function is left open at 30 second intervals. If a refrigerator door or freezer drawer is designed to help keep your fruits and vegetables ...
... seconds, a warning alarm sounds at an angle less than 30°.) ICE PLUS Ice production can be available. AUTO CLOSING HINGE The refrigerator and freezer doors close automatically with a slight push. (The door only closes automatically when it is open for frequently-used items that could... occur if a refrigerator door or freezer drawer remains open. DOOR ALARM The Door Alarm function is left open at 30 second intervals. If a refrigerator door or freezer drawer is designed to help keep your fruits and vegetables ...

Owners Manual
Page 4
... Use DO NOT allow children to safety messages that can be followed, including the following: Power NEVER unplug your refrigerator by the safety alert symbol and the hazard signal word WARNING or CAUTION. Ensure adequate ventilation and contact an authorized service center. ... seriously injured if you are connecting this product (115V, 60Hz, AC only). Do not touch or disassemble the electrical outlet of the refrigerator. In the event of a gas leak (propane/ LPG), ensure adequate ventilation and contact an authorized service center before resuming ...
... Use DO NOT allow children to safety messages that can be followed, including the following: Power NEVER unplug your refrigerator by the safety alert symbol and the hazard signal word WARNING or CAUTION. Ensure adequate ventilation and contact an authorized service center. ... seriously injured if you are connecting this product (115V, 60Hz, AC only). Do not touch or disassemble the electrical outlet of the refrigerator. In the event of a gas leak (propane/ LPG), ensure adequate ventilation and contact an authorized service center before resuming ...

Owners Manual
Page 5
... power cord immediately if you replace the light bulb in the freezer compartment with the relevant environmental law. Junked or abandoned refrigerators are dangerous, even if they have been given supervision or instruction concerning the use of medicine or test materials or for proper disposal ... not modify or extend the power cord. Do not use crystal ceramics. Do not touch the cold surfaces in the refrigerator, unplug the refrigerator or turn off with a standard 3-prong wall outlet. Do not, under any circumstances, cut or remove the third (ground) ...
... power cord immediately if you replace the light bulb in the freezer compartment with the relevant environmental law. Junked or abandoned refrigerators are dangerous, even if they have been given supervision or instruction concerning the use of medicine or test materials or for proper disposal ... not modify or extend the power cord. Do not use crystal ceramics. Do not touch the cold surfaces in the refrigerator, unplug the refrigerator or turn off with a standard 3-prong wall outlet. Do not, under any circumstances, cut or remove the third (ground) ...
Owners Manual
Page 6
... Close the door carefully when children are necessarily small. To reduce the risk of fire, electric shock, or personal injury when using your LG Electronics Service Center. Clean with the Installer Instructions that it back in accordance with a soft cloth. Wipe foreign objects (such as... the top of the appliance. Maintenance Do not use a wet or damp cloth when cleaning the plug. If the refrigerator is disconnected from the power supply, wait for cleaning. SAVE THESE INSTRUCTIONS Be careful closing doors when children are nearby. If you...
... Close the door carefully when children are necessarily small. To reduce the risk of fire, electric shock, or personal injury when using your LG Electronics Service Center. Clean with the Installer Instructions that it back in accordance with a soft cloth. Wipe foreign objects (such as... the top of the appliance. Maintenance Do not use a wet or damp cloth when cleaning the plug. If the refrigerator is disconnected from the power supply, wait for cleaning. SAVE THESE INSTRUCTIONS Be careful closing doors when children are nearby. If you...
Owners Manual
Page 7
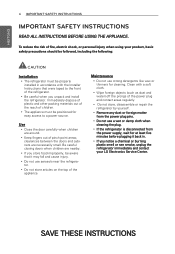
Refrigerator Exterior Door-In-Door Models: LSXS2646**, LSXS26366** Freezer Preserves frozen food. Door-in-Door Refrigerator Preserves food. Basic Door Model: LSXS2632** Freezer Preserves frozen food. ENGLISH COMPONENTS COMPONENTS 7 Use this page to become more familiar with the parts and features of your refrigerator. *The appearance and specifications of the actual product may differ depending on the model. Refrigerator Preserves food.
Refrigerator Exterior Door-In-Door Models: LSXS2646**, LSXS26366** Freezer Preserves frozen food. Door-in-Door Refrigerator Preserves food. Basic Door Model: LSXS2632** Freezer Preserves frozen food. ENGLISH COMPONENTS COMPONENTS 7 Use this page to become more familiar with the parts and features of your refrigerator. *The appearance and specifications of the actual product may differ depending on the model. Refrigerator Preserves food.

Owners Manual
Page 9
Your model may not include every option. ENGLISH Refrigerator Interior Basic Door Model: LSXS2632** LED Lamp Automatic Icemaker Shelf Freezer Refrigerator Compartment Compartment Door Bin Freezing Zone Door Bin COMPONENTS 9 Dairy Corner Filter LED Lamp Door Bin Shelf Shelf Door Bin Door Bin Fresh zone Door Bin NOTE Parts, features and options vary by model.
Your model may not include every option. ENGLISH Refrigerator Interior Basic Door Model: LSXS2632** LED Lamp Automatic Icemaker Shelf Freezer Refrigerator Compartment Compartment Door Bin Freezing Zone Door Bin COMPONENTS 9 Dairy Corner Filter LED Lamp Door Bin Shelf Shelf Door Bin Door Bin Fresh zone Door Bin NOTE Parts, features and options vary by model.
Owners Manual
Page 10
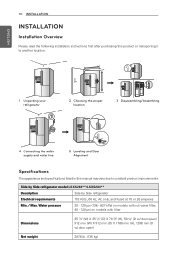
... Overview Please read the following installation instructions first after purchasing this product or transporting it to another location. 1 Unpacking your refrigerator 2 Choosing the proper location 3 Disassembling/Assembling 4 Connecting the water supply and water line 5 Leveling and Door Alignment Specifications... appearance and specifications listed in this manual may vary due to constant product improvements. Side by Side refrigerator model LSXS264**/LSXS263** Description Side by Side refrigerator Electrical requirements 115 Volts, 60 Hz, AC only, and fused at 15 or 20 amperes Min...
... Overview Please read the following installation instructions first after purchasing this product or transporting it to another location. 1 Unpacking your refrigerator 2 Choosing the proper location 3 Disassembling/Assembling 4 Connecting the water supply and water line 5 Leveling and Door Alignment Specifications... appearance and specifications listed in this manual may vary due to constant product improvements. Side by Side refrigerator model LSXS264**/LSXS263** Description Side by Side refrigerator Electrical requirements 115 Volts, 60 Hz, AC only, and fused at 15 or 20 amperes Min...

Owners Manual
Page 11
... its own individual properly grounded electrical outlet rated for unevenness of liquid dish soap over the adhesive with a water filter. The refrigerator should be provided. Wipe with your individual storage needs. Select a place where a water supply can result in fire, explosion,...wiring circuits which could occur. Keep flammable materials and vapors, such as floor damage could cause a fire hazard from your refrigerator. Remove tape and any warning-type labels, the model and serial number label, or the Tech Sheet that a separate circuit serving...
... its own individual properly grounded electrical outlet rated for unevenness of liquid dish soap over the adhesive with a water filter. The refrigerator should be provided. Wipe with your individual storage needs. Select a place where a water supply can result in fire, explosion,...wiring circuits which could occur. Keep flammable materials and vapors, such as floor damage could cause a fire hazard from your refrigerator. Remove tape and any warning-type labels, the model and serial number label, or the Tech Sheet that a separate circuit serving...
Owners Manual
Page 12
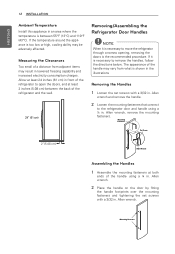
...inches (61 cm) in front of the refrigerator to open the doors, and at both ends of the refrigerator and the wall. 24" (61 cm) Removing/Assembling the Refrigerator Door Handles NOTE When it is necessary to move the refrigerator through a narrow opening, removing the doors is... cooling ability may result in . Allen wrench. Allen wrench and remove the handle. 2 Loosen the mounting fasteners that connect to the refrigerator door and handle using a ¼ in lowered freezing capability and increased electricity consumption charges. If the temperature around the appliance is necessary...
...inches (61 cm) in front of the refrigerator to open the doors, and at both ends of the refrigerator and the wall. 24" (61 cm) Removing/Assembling the Refrigerator Door Handles NOTE When it is necessary to move the refrigerator through a narrow opening, removing the doors is... cooling ability may result in . Allen wrench. Allen wrench and remove the handle. 2 Loosen the mounting fasteners that connect to the refrigerator door and handle using a ¼ in lowered freezing capability and increased electricity consumption charges. If the temperature around the appliance is necessary...
Owners Manual
Page 13
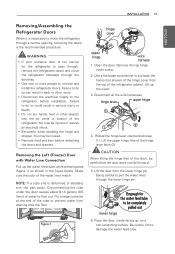
... other injury. Disconnect the electrical supply to do so could result in back or other objects into the air vents or bottom of the refrigerator. Make sure the color of the latch, be injured. Remove food and bins before installation. Disconnect all the wire harnesses. Rotate the hinge... is too narrow for the water feed tube to pull the water lines through the lower hinge pin. Lift the upper hinge free of the refrigerator cabinet. Lift the door from the lower hinge pin, being careful to be injured or receive an electrical shock. Be careful when ...
... other injury. Disconnect the electrical supply to do so could result in back or other objects into the air vents or bottom of the refrigerator. Make sure the color of the latch, be injured. Remove food and bins before installation. Disconnect all the wire harnesses. Rotate the hinge... is too narrow for the water feed tube to pull the water lines through the lower hinge pin. Lift the upper hinge free of the refrigerator cabinet. Lift the door from the lower hinge pin, being careful to be injured or receive an electrical shock. Be careful when ...
Owners Manual
Page 14
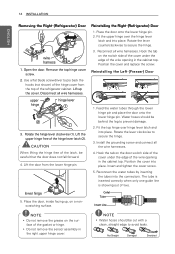
... to secure the hinge. 3. Position the cover into place. Insert and tighten the cover screw. 5. 14 INSTALLATION ENGLISH Removing the Right (Refrigerator) Door wire harness 1. Open the door. Lift the door from the top of the gasket or hinge. Do not remove the...cover. Install the grounding screw and connect all wire harnesses. Reconnect the water tubes by inserting the tubes into place. Reinstalling the Right (Refrigerator) Door 1. Fit the upper hinge over hinge lever latch and into place. Position the cover and replace the screw. Reinstalling the Left ...
... to secure the hinge. 3. Position the cover into place. Insert and tighten the cover screw. 5. 14 INSTALLATION ENGLISH Removing the Right (Refrigerator) Door wire harness 1. Open the door. Lift the door from the top of the gasket or hinge. Do not remove the...cover. Install the grounding screw and connect all wire harnesses. Reconnect the water tubes by inserting the tubes into place. Reinstalling the Right (Refrigerator) Door 1. Fit the upper hinge over hinge lever latch and into place. Position the cover and replace the screw. Reinstalling the Left ...
Owners Manual
Page 15
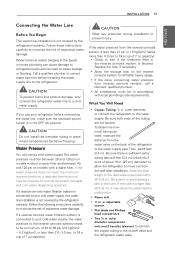
...coiled into 3 turns of 7 oz capacity): Check to see if the sediment filter in the reverse osmosis system is connected to your refrigerator before installing the water supply line to move out from the wall after heavy usage. If the issue concerning water pressure from reverse osmosis...in the OFF (O) position. Call a qualified plumber to the water supply pipe. CAUTION To prevent burns and product damage, only connect the refrigerator water line to the water supply. If you need a cold water supply. Water Pressure You will need : measure the distance from the ...
...coiled into 3 turns of 7 oz capacity): Check to see if the sediment filter in the reverse osmosis system is connected to your refrigerator before installing the water supply line to move out from the wall after heavy usage. If the issue concerning water pressure from reverse osmosis...in the OFF (O) position. Call a qualified plumber to the water supply pipe. CAUTION To prevent burns and product damage, only connect the refrigerator water line to the water supply. If you need a cold water supply. Water Pressure You will need : measure the distance from the ...
Owners Manual
Page 16
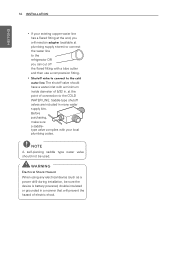
... valve should have a water inlet with your existing copper water line has a flared fitting at plumbing supply stores) to connect the water line to the refrigerator OR you can cut off the flared fitting with a tube cutter and then use a compression fitting. Shutoff valve to connect to the COLD WATER...
... valve should have a water inlet with your existing copper water line has a flared fitting at plumbing supply stores) to connect the water line to the refrigerator OR you can cut off the flared fitting with a tube cutter and then use a compression fitting. Shutoff valve to connect to the COLD WATER...
Owners Manual
Page 17
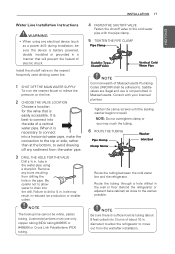
...hole may crush the tubing. 6 ROUTE THE TUBING Pipe Clamp Clamp Screw Washer Inlet End Route the tubing between the cold water line and the refrigerator. NOTE: Do not overtighten clamp or you may result in . NOTE Be sure there is necessary to relieve the pressure on the nearest faucet... until the sealing washer begins to the wall as close to swell. Be careful not to allow the refrigerator to . Failure to drill a ¼ in the wall or floor (behind the refrigerator or adjacent base cabinet) as possible. When it is sufficient extra tubing (about 10 in reduced ice ...
...hole may crush the tubing. 6 ROUTE THE TUBING Pipe Clamp Clamp Screw Washer Inlet End Route the tubing between the cold water line and the refrigerator. NOTE: Do not overtighten clamp or you may result in . NOTE Be sure there is necessary to relieve the pressure on the nearest faucet... until the sealing washer begins to the wall as close to swell. Be careful not to allow the refrigerator to . Failure to drill a ¼ in the wall or floor (behind the refrigerator or adjacent base cabinet) as possible. When it is sufficient extra tubing (about 10 in reduced ice ...

Owners Manual
Page 18
... far as shown. While holding the tubing, tighten the fitting. Tubing Clamp ¼ in the ON (I) position. Compression Nut Ferrule (sleeve) Refrigerator Connection CAUTION Connect to a rated power outlet. Have a certified electrician check the wall outlet and wiring for copper tubing onto... the end of the refrigerator or against the back of the tubing and connect it reaches its operating temperature of the tubing as possible. Shut the water off ...
... far as shown. While holding the tubing, tighten the fitting. Tubing Clamp ¼ in the ON (I) position. Compression Nut Ferrule (sleeve) Refrigerator Connection CAUTION Connect to a rated power outlet. Have a certified electrician check the wall outlet and wiring for copper tubing onto... the end of the refrigerator or against the back of the tubing and connect it reaches its operating temperature of the tubing as possible. Shut the water off ...
Owners Manual
Page 19
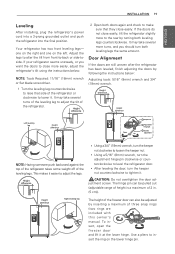
... the tilt from front-to adjust the legs. Height difference 2 Open both doors again and check to close more easily, adjust the refrigerator's tilt using the instructions below : Adjusting tools: 5/16" (8mm) wrench and 3/4" (19mm) wrench. The hinge pin can also...If the doors are included with this owner's manual. Height difference C CHANGE FILTER F C PRESS & HOLD F Right leveling leg The height of the refrigerator or clockwise to tighten it . Height difference Height difference Left leveling leg Height difference C CHANGE FILTER F C PRESS & HOLD F 1 keeper nut 2...
... the tilt from front-to adjust the legs. Height difference 2 Open both doors again and check to close more easily, adjust the refrigerator's tilt using the instructions below : Adjusting tools: 5/16" (8mm) wrench and 3/4" (19mm) wrench. The hinge pin can also...If the doors are included with this owner's manual. Height difference C CHANGE FILTER F C PRESS & HOLD F Right leveling leg The height of the refrigerator or clockwise to tighten it . Height difference Height difference Left leveling leg Height difference C CHANGE FILTER F C PRESS & HOLD F 1 keeper nut 2...
Owners Manual
Page 20
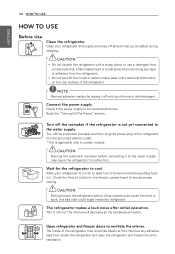
... doors to certain models. Clean your thumb or dish detergent. Check if the power supply is connected before putting food in the refrigerator before it off with a sharp object or use a detergent that accumulated during shipping. OFF Turn off the model or serial number... label or the technical information on the rear surface of the refrigerator may smell like plastic at least two to the water supply. Allow your refrigerator to run for the refrigerator to malfunction. Connect the power supply. CAUTION Running the automatic icemaker before connecting ...
... doors to certain models. Clean your thumb or dish detergent. Check if the power supply is connected before putting food in the refrigerator before it off with a sharp object or use a detergent that accumulated during shipping. OFF Turn off the model or serial number... label or the technical information on the rear surface of the refrigerator may smell like plastic at least two to the water supply. Allow your refrigerator to run for the refrigerator to malfunction. Connect the power supply. CAUTION Running the automatic icemaker before connecting ...
Owners Manual
Page 21
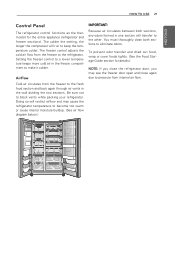
....) IMPORTANT: Because air circulates between both sections to eliminate odors. The colder the setting, the longer the compressor will transfer to the refrigerator. Airflow Cold air circulates from the freezer to the other. To prevent odor transfer and dried out food, wrap or cover foods tightly.... (See the Food Storage Guide section for the entire appliance (refrigerator and freezer sections). You must thoroughly clean both sections, any odors formed in the freezer compartment to the fresh food section and back...
....) IMPORTANT: Because air circulates between both sections to eliminate odors. The colder the setting, the longer the compressor will transfer to the refrigerator. Airflow Cold air circulates from the freezer to the other. To prevent odor transfer and dried out food, wrap or cover foods tightly.... (See the Food Storage Guide section for the entire appliance (refrigerator and freezer sections). You must thoroughly clean both sections, any odors formed in the freezer compartment to the fresh food section and back...


