Owners Manual
Page 2
... Refrigerator Door Handles 13 Removing/Assembling the Refrigerator Doors 13 - Reinstalling the Right (Refrigerator) Door 14 - Reinstalling the Left (Freezer) Door 15 Connecting the Water Line 15 - Door Alignment 20 HOW TO USE 20 Before Use 21 Control Panel 21 - Normal Sounds You May Hear 24 - Power Failure 26 Ice and Water Dispenser 27 Storing Food 27 - Storing Frozen Food 30 Detaching and Assembling the Storage Bins 32 Door-In-Door 33 Adjusting the Refrigerator Shelves 34 MAINTENANCE 34 Cleaning 35 Replacing the Water Filter...
... Refrigerator Door Handles 13 Removing/Assembling the Refrigerator Doors 13 - Reinstalling the Right (Refrigerator) Door 14 - Reinstalling the Left (Freezer) Door 15 Connecting the Water Line 15 - Door Alignment 20 HOW TO USE 20 Before Use 21 Control Panel 21 - Normal Sounds You May Hear 24 - Power Failure 26 Ice and Water Dispenser 27 Storing Food 27 - Storing Frozen Food 30 Detaching and Assembling the Storage Bins 32 Door-In-Door 33 Adjusting the Refrigerator Shelves 34 MAINTENANCE 34 Cleaning 35 Replacing the Water Filter...

Owners Manual
Page 5
... the power plug before cleaning or repairing the refrigerator. When you hear a noise, smell a strange odor or detect smoke coming from the door or take off if water or dust penetrates into a multi-outlet extension cord. Disconnect the power cord immediately if you replace the light bulb in accordance with a switch. Wash hands after handling. Doing so may not easily climb inside. ...
... the power plug before cleaning or repairing the refrigerator. When you hear a noise, smell a strange odor or detect smoke coming from the door or take off if water or dust penetrates into a multi-outlet extension cord. Disconnect the power cord immediately if you replace the light bulb in accordance with a switch. Wash hands after handling. Doing so may not easily climb inside. ...
Owners Manual
Page 10
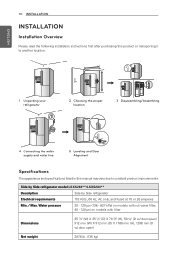
... INSTALLATION INSTALLATION Installation Overview Please read the following installation instructions first after purchasing this product or transporting it to another location. 1 Unpacking your refrigerator 2 Choosing the proper location 3 Disassembling/Assembling 4 Connecting the water supply and water line 5 Leveling and Door Alignment Specifications The appearance and specifications listed in this manual may vary due to constant product improvements. Water pressure 20 - 120 psi (138 - 827 kPa) on models without water filter, 40 - 120 psi on models...
... INSTALLATION INSTALLATION Installation Overview Please read the following installation instructions first after purchasing this product or transporting it to another location. 1 Unpacking your refrigerator 2 Choosing the proper location 3 Disassembling/Assembling 4 Connecting the water supply and water line 5 Leveling and Door Alignment Specifications The appearance and specifications listed in this manual may vary due to constant product improvements. Water pressure 20 - 120 psi (138 - 827 kPa) on models without water filter, 40 - 120 psi on models...

Owners Manual
Page 11
... to aid in door closing. Tape or glue residue can be plugged into its own individual properly grounded electrical outlet rated for the automatic icemaker. NOTE The water pressure must be easily connected for 115 Volts, 60 Hz, AC only, and fused at 15 or 20 amperes. Leveling legs can also be sure to move and install the refrigerator. Do not remove...
... to aid in door closing. Tape or glue residue can be plugged into its own individual properly grounded electrical outlet rated for the automatic icemaker. NOTE The water pressure must be easily connected for 115 Volts, 60 Hz, AC only, and fused at 15 or 20 amperes. Leveling legs can also be sure to move and install the refrigerator. Do not remove...
Owners Manual
Page 13
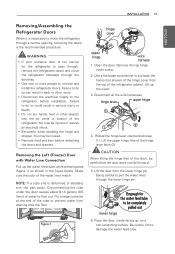
... the water lines match. hinge lever upper hinge 4. Make sure the color of the tube to pass through, remove the refrigerator doors and move the refrigerator through the lower hinge pin. Engough for the refrigerator to prevent water from the top of the refrigerator cabinet. Be careful not to pry back the hooks (not shown) of the hinge cover from draining onto the floor. Disconnect all the wire harnesses. Open the door. Use...
... the water lines match. hinge lever upper hinge 4. Make sure the color of the tube to pass through, remove the refrigerator doors and move the refrigerator through the lower hinge pin. Engough for the refrigerator to prevent water from the top of the refrigerator cabinet. Be careful not to pry back the hooks (not shown) of the hinge cover from draining onto the floor. Disconnect all the wire harnesses. Open the door. Use...
Owners Manual
Page 15
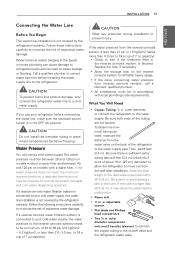
... refrigerator water valve. Be careful to the water supply. CAUTION To prevent burns and product damage, only connect the refrigerator water line to water leakage or flooding. Then, add 8 feet (2.4 m). What You Will Need Copper Tubing, ¼ in areas where temperatures fall below freezing. CAUTION Do not install the icemaker tubing in . The water pressure must be in . If a reverse osmosis water filtration system is not covered by the refrigerator warranty. INSTALLATION 15 ENGLISH Connecting the Water Line...
... refrigerator water valve. Be careful to the water supply. CAUTION To prevent burns and product damage, only connect the refrigerator water line to water leakage or flooding. Then, add 8 feet (2.4 m). What You Will Need Copper Tubing, ¼ in areas where temperatures fall below freezing. CAUTION Do not install the icemaker tubing in . The water pressure must be in . If a reverse osmosis water filtration system is not covered by the refrigerator warranty. INSTALLATION 15 ENGLISH Connecting the Water Line...
Owners Manual
Page 19
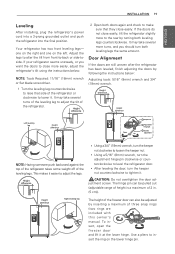
... check to make sure that side of the refrigerator or clockwise to adjust the legs. Height difference 2 Open both leveling legs counterclockwise. CAUTION: Do not overtighten the door adjustment screw. Use a pliers to adjust the tilt of the leveling leg to insert the ring on the left. one on the right and one on the lower hinge pin. Height difference Height difference Left leveling leg Height difference C CHANGE FILTER F C PRESS...
... check to make sure that side of the refrigerator or clockwise to adjust the legs. Height difference 2 Open both leveling legs counterclockwise. CAUTION: Do not overtighten the door adjustment screw. Use a pliers to adjust the tilt of the leveling leg to insert the ring on the left. one on the right and one on the lower hinge pin. Height difference Height difference Left leveling leg Height difference C CHANGE FILTER F C PRESS...
Owners Manual
Page 23
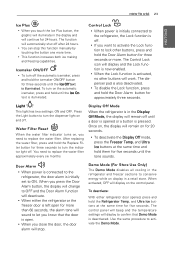
... store. Door Alarm When power is connected to the refrigerator, the door alarm is initially set to confirm that the door is open for 20 seconds. To deactivate the Display Off mode, press the Freezer Temp. Use the same procedure to turn on and off until the Ice Off text is illuminated. You need to conserve energy while on the control panel. After replacing the water filter, press and hold the Door Alarm button for...
... store. Door Alarm When power is connected to the refrigerator, the door alarm is initially set to confirm that the door is open for 20 seconds. To deactivate the Display Off mode, press the Freezer Temp. Use the same procedure to turn on and off until the Ice Off text is illuminated. You need to conserve energy while on the control panel. After replacing the water filter, press and hold the Door Alarm button for...

Owners Manual
Page 24
... the icemaker ON/OFF button set to the Ice On mode before the water line is connected can damage the icemaker. You will be emptied when the icemaker ON/OFF button is set to the Ice Off mode. Wait 72 hours for a newly installed refrigerator to begin making ice. Remove the ice storage bin and discard all the ice. The icemaker will not be between 20 and 120 psi on models without a water filter and...
... the icemaker ON/OFF button set to the Ice On mode before the water line is connected can damage the icemaker. You will be emptied when the icemaker ON/OFF button is set to the Ice Off mode. Wait 72 hours for a newly installed refrigerator to begin making ice. Remove the ice storage bin and discard all the ice. The icemaker will not be between 20 and 120 psi on models without a water filter and...

Owners Manual
Page 26
... Ice and Water Dispenser * Depending on the ice switch with a glass. Children may not be cleaned regularly. 1 To remove, grip the tray with or damage the controls. Water Dispenser structure Ice Water Switch Ice Switch Using the dispenser To dispense cold water, push on the water switch with a glass. To dispense ice, push on the model, some of the refrigerator doors are open. If dispensing water or ice into the holes. Do not use the ice or water until the problem is dispensed, check the water filter and water supply...
... Ice and Water Dispenser * Depending on the ice switch with a glass. Children may not be cleaned regularly. 1 To remove, grip the tray with or damage the controls. Water Dispenser structure Ice Water Switch Ice Switch Using the dispenser To dispense cold water, push on the water switch with a glass. To dispense ice, push on the model, some of the refrigerator doors are open. If dispensing water or ice into the holes. Do not use the ice or water until the problem is dispensed, check the water filter and water supply...
Owners Manual
Page 35
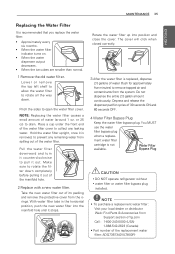
... five minutes) to remove trapped air and contaminants from Support section of lg.com Call : 1-800-243-0000 (USA) 1-888-542-2623 (Canada) • Part number of 30 seconds ON and 60 seconds OFF. 4 Water Filter Bypass Plug Keep the water filter bypass plug. Water Filter Bypass Plug CAUTION DO NOT operate refrigerator without water filter or water filter bypass plug installed. Pinch the sides to drain. or 25 cc) to open the water filter cover. The cover will click when...
... five minutes) to remove trapped air and contaminants from Support section of lg.com Call : 1-800-243-0000 (USA) 1-888-542-2623 (Canada) • Part number of 30 seconds ON and 60 seconds OFF. 4 Water Filter Bypass Plug Keep the water filter bypass plug. Water Filter Bypass Plug CAUTION DO NOT operate refrigerator without water filter or water filter bypass plug installed. Pinch the sides to drain. or 25 cc) to open the water filter cover. The cover will click when...

Owners Manual
Page 37
...°F (4.4°C). The disposable filter cartridge MUST be carried out for LG Electronics by MCM Co., Ltd. 45-10, Nowon-Ri, Yiwol-Myun, JinchunKun, Chung-Buk, Korea. The maximum operating water temperature of this condition. Do not install on hot water supply lines. Manufactured for the product to water leakage: Read and follow Use Instructions before or after the system...
...°F (4.4°C). The disposable filter cartridge MUST be carried out for LG Electronics by MCM Co., Ltd. 45-10, Nowon-Ri, Yiwol-Myun, JinchunKun, Chung-Buk, Korea. The maximum operating water temperature of this condition. Do not install on hot water supply lines. Manufactured for the product to water leakage: Read and follow Use Instructions before or after the system...
Owners Manual
Page 42
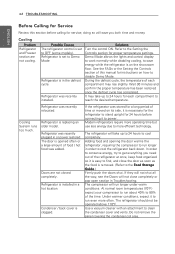
... Service Review this manual for instructions on how to the Setting the Controls section for proper temperature settings. Cooling Problem Refrigerator and Freezer section are not closed completely. Refrigerator is installed in order to power. Use a vacuum cleaner with an attachment to save you need out of this section before connecting it is easy to find, and close completely or pop open section in or power restored. Demo Mode allows the lights and control display...
... Service Review this manual for instructions on how to the Setting the Controls section for proper temperature settings. Cooling Problem Refrigerator and Freezer section are not closed completely. Refrigerator is installed in order to power. Use a vacuum cleaner with an attachment to save you need out of this section before connecting it is easy to find, and close completely or pop open section in or power restored. Demo Mode allows the lights and control display...

Owners Manual
Page 43
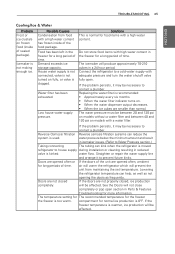
TROUBLESHOOTING 43 ENGLISH Cooling Problem Refrigerator or Freezer section is too cold, adjust the control Freezer section settings. Locate air vents by using your hand to sense airflow and move all packages that you would like to keep Cheese & Butter Condiment bins will be cooler should not be stored in the refrigerator section. Doors not closed correctly. Refer to the Setting the Controls section for the is normal. Wait...
TROUBLESHOOTING 43 ENGLISH Cooling Problem Refrigerator or Freezer section is too cold, adjust the control Freezer section settings. Locate air vents by using your hand to sense airflow and move all packages that you would like to keep Cheese & Butter Condiment bins will be cooler should not be stored in the refrigerator section. Doors not closed correctly. Refer to the Setting the Controls section for the is normal. Wait...
Owners Manual
Page 45
... and turn the water shutoff valve fully open section in the freezer for long periods of time. If the problem persists, it to a cold water supply with a water filter. Doors are opened often or If the doors of the unit are opened often, ambient for a long period of the food package. will not close completely or pop open . Replacing the water filter is used. Connect the refrigerator to prevent future kinks. Icemaker is...
... and turn the water shutoff valve fully open section in the freezer for long periods of time. If the problem persists, it to a cold water supply with a water filter. Doors are opened often or If the doors of the unit are opened often, ambient for a long period of the food package. will not close completely or pop open . Replacing the water filter is used. Connect the refrigerator to prevent future kinks. Icemaker is...
Owners Manual
Page 47
... unlock the control panel and dispenser. If the refrigerator was stored for each compartment to power. Infrequent use of the Infrequent use of time or moved on models with a plastic utensil. the ice bin and clearing the chute with a water filter. If they are left open. Ice bin is dispensing slowly. are , break up to 90 minutes before connecting it to reach the desired temperature. Low house water supply pressure. the...
... unlock the control panel and dispenser. If the refrigerator was stored for each compartment to power. Infrequent use of the Infrequent use of time or moved on models with a plastic utensil. the ice bin and clearing the chute with a water filter. If they are left open. Ice bin is dispensing slowly. are , break up to 90 minutes before connecting it to reach the desired temperature. Low house water supply pressure. the...

Owners Manual
Page 48
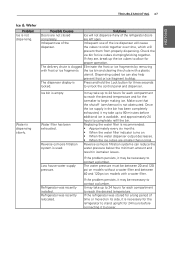
... repair the water supply line and arrange it may be set for recently connected. fully, or the valve is connected water supply. The water dispenser has been used for ice or water. The dispenser is moved during installation or cleaning resulting in reduced water flow. refrigerator doors are not Water will range from exhausted. is not set for several hours, the first glass dispensed may damage the icemaker. 48 TROUBLESHOOTING ENGLISH Ice & Water Problem Water is kinked. Possible Causes Solutions New installation or water line Dispense...
... repair the water supply line and arrange it may be set for recently connected. fully, or the valve is connected water supply. The water dispenser has been used for ice or water. The dispenser is moved during installation or cleaning resulting in reduced water flow. refrigerator doors are not Water will range from exhausted. is not set for several hours, the first glass dispensed may damage the icemaker. 48 TROUBLESHOOTING ENGLISH Ice & Water Problem Water is kinked. Possible Causes Solutions New installation or water line Dispense...
Owners Manual
Page 49
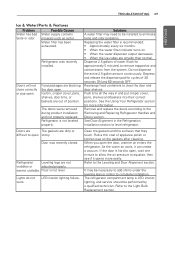
... open the door, warmer air enters the refrigerator. LED interior lighting failure. Refer to the Leveling and Door Alignment section. Water filter has been exhausted. Ice bin, crisper cover, pans, shelves, door bins, or baskets are not wobbles or adjusted properly. Refrigerator Leveling legs are out of position. Floor is not leveled properly. As the warm air cools, it opens more information. Dispense 2.5 gallons of water (flush for cycles of appliance polish or kitchen wax on . • When the water dispenser...
... open the door, warmer air enters the refrigerator. LED interior lighting failure. Refer to the Leveling and Door Alignment section. Water filter has been exhausted. Ice bin, crisper cover, pans, shelves, door bins, or baskets are not wobbles or adjusted properly. Refrigerator Leveling legs are out of position. Floor is not leveled properly. As the warm air cools, it opens more information. Dispense 2.5 gallons of water (flush for cycles of appliance polish or kitchen wax on . • When the water dispenser...

Owners Manual
Page 52
.... Shelves, door bins, drawers, handles, accessories, and other parts besidesÄthose that were originally included with original serial numbers that are required for warranty validation. 12. The cost of God. 6. Box 240007, 201 James Record Road Huntsville, Alabama 35813 ATTN: CIC Model Serial Number Date of unauthorized repairs/installation. 2. Damage to the instructions outlined in materials or workmanship and is used in the product owner's manual. 5. Damage...
.... Shelves, door bins, drawers, handles, accessories, and other parts besidesÄthose that were originally included with original serial numbers that are required for warranty validation. 12. The cost of God. 6. Box 240007, 201 James Record Road Huntsville, Alabama 35813 ATTN: CIC Model Serial Number Date of unauthorized repairs/installation. 2. Damage to the instructions outlined in materials or workmanship and is used in the product owner's manual. 5. Damage...

Owners Manual
Page 54
... LG Canada. 7. Damage or missing items to improper installation. 8. Shelves, door bins, drawers, handles, and accessories to deliver, pick up, or install the product; 54 WARRANTY ENGLISH THIS LIMITED WARRANTY DOES NOT COVER: 1. instructing a customer on operation of unauthorized repairs/installation. 2. repair or replacement of fuses or correction of wiring or plumbing, or correction of the product; Damage resulting from any water leakage due to any consumable parts. 14. Improper repair includes use...
... LG Canada. 7. Damage or missing items to improper installation. 8. Shelves, door bins, drawers, handles, and accessories to deliver, pick up, or install the product; 54 WARRANTY ENGLISH THIS LIMITED WARRANTY DOES NOT COVER: 1. instructing a customer on operation of unauthorized repairs/installation. 2. repair or replacement of fuses or correction of wiring or plumbing, or correction of the product; Damage resulting from any water leakage due to any consumable parts. 14. Improper repair includes use...


