

Owners Manual
Page 1
OWNER'S MANUAL SXS REFRIGERATOR Please read this owner's manual thoroughly before operating and keep it handy for reference at all times. LSXS264**/LSXS263** MFL67653437 MFL67653437 www.lg.com ENGLISH FRANÇAIS ESPAÑOL
OWNER'S MANUAL SXS REFRIGERATOR Please read this owner's manual thoroughly before operating and keep it handy for reference at all times. LSXS264**/LSXS263** MFL67653437 MFL67653437 www.lg.com ENGLISH FRANÇAIS ESPAÑOL
Owners Manual
Page 2
...Turn the Icemaker Off 24 - Storing Frozen Food 30 Detaching and Assembling the Storage Bins 32 Door-In-Door 33 Adjusting the Refrigerator Shelves 34 MAINTENANCE 34 Cleaning 35 Replacing the Water Filter 39 SMART DIAGNOSISTM 39 Using Smart DiagnosisTM 40 TROUBLESHOOTING 40 Common Product ...Questions 41 Noises You Might Hear 42 Before Calling for Vacation 24 - Removing the Right (Refrigerator) Door 14 - Before You Begin 15 - Airflow 22 - Preparing for Service 50 WARRANTY Power Failure 26 Ice and Water Dispenser 27 ...
...Turn the Icemaker Off 24 - Storing Frozen Food 30 Detaching and Assembling the Storage Bins 32 Door-In-Door 33 Adjusting the Refrigerator Shelves 34 MAINTENANCE 34 Cleaning 35 Replacing the Water Filter 39 SMART DIAGNOSISTM 39 Using Smart DiagnosisTM 40 TROUBLESHOOTING 40 Common Product ...Questions 41 Noises You Might Hear 42 Before Calling for Vacation 24 - Removing the Right (Refrigerator) Door 14 - Before You Begin 15 - Airflow 22 - Preparing for Service 50 WARRANTY Power Failure 26 Ice and Water Dispenser 27 ...

Owners Manual
Page 3
...only closes automatically when it is open at an angle less than 60 seconds, a warning alarm sounds at 30 second intervals. If a refrigerator door or freezer drawer is left open . DOOR-IN-DOOR REFRESHMENT CENTER The Door-in-Door Refreshment Center provides a convenient area for ...frequently-used items that could occur if a refrigerator door or freezer drawer remains open for a 24-hour period. ENGLISH PRODUCT FEATURES PRODUCT FEATURES 3 * Depending on the model, some of ...
...only closes automatically when it is open at an angle less than 60 seconds, a warning alarm sounds at 30 second intervals. If a refrigerator door or freezer drawer is left open . DOOR-IN-DOOR REFRESHMENT CENTER The Door-in-Door Refreshment Center provides a convenient area for ...frequently-used items that could occur if a refrigerator door or freezer drawer remains open for a 24-hour period. ENGLISH PRODUCT FEATURES PRODUCT FEATURES 3 * Depending on the model, some of ...

Owners Manual
Page 4
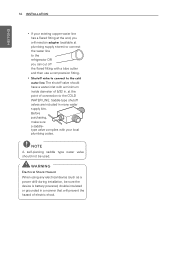
...Always grip the plug firmly and pull it is in the vicinity of flammable gas. Do not touch or disassemble the electrical outlet of the refrigerator. In the event of hazards that you or others, or cause damage to replace a standard 2-prong wall outlet with a standard... Do not use a cord that have become frayed or otherwise damaged. It alerts you to safety messages that inform you of a refrigerant leak, move flammable objects away from the outlet. Immediately repair or replace all safety messages. CAUTION Indicates an imminently hazardous situation which...
...Always grip the plug firmly and pull it is in the vicinity of flammable gas. Do not touch or disassemble the electrical outlet of the refrigerator. In the event of hazards that you or others, or cause damage to replace a standard 2-prong wall outlet with a standard... Do not use a cord that have become frayed or otherwise damaged. It alerts you to safety messages that inform you of a refrigerant leak, move flammable objects away from the outlet. Immediately repair or replace all safety messages. CAUTION Indicates an imminently hazardous situation which...

Owners Manual
Page 5
... compartment with a switch. Wash hands after handling. To reduce the risk of fire, electric shock, or personal injury when using your refrigerator is removed for their safety. Do not refreeze frozen food that releases the cubes. Do not place fingers or hands on... checked by a qualified servicer. Doing so may be fined or imprisoned in accordance with the relevant environmental law. Junked or abandoned refrigerators are dangerous, even if they have been given supervision or instruction concerning the use by persons (including children) with a standard 3-prong wall ...
... compartment with a switch. Wash hands after handling. To reduce the risk of fire, electric shock, or personal injury when using your refrigerator is removed for their safety. Do not refreeze frozen food that releases the cubes. Do not place fingers or hands on... checked by a qualified servicer. Doing so may be fined or imprisoned in accordance with the relevant environmental law. Junked or abandoned refrigerators are dangerous, even if they have been given supervision or instruction concerning the use by persons (including children) with a standard 3-prong wall ...
Owners Manual
Page 6
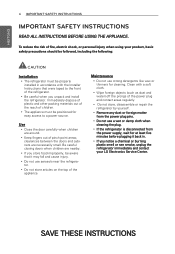
...; Be careful when you notice a chemical or burning plastic smell or see smoke, unplug the refrigerator immediately and contact your LG Electronics Service Center. Clean with the Installer Instructions that were taped to a power source. ENGLISH 6 IMPORTANT SAFETY INSTRUCTIONS IMPORTANT SAFETY ...foreign matter from the power plug pins. Do not use a wet or damp cloth when cleaning the plug. If the refrigerator is disconnected from the power supply, wait for cleaning. Be careful closing doors when children are necessarily small. Use Close the door ...
...; Be careful when you notice a chemical or burning plastic smell or see smoke, unplug the refrigerator immediately and contact your LG Electronics Service Center. Clean with the Installer Instructions that were taped to a power source. ENGLISH 6 IMPORTANT SAFETY INSTRUCTIONS IMPORTANT SAFETY ...foreign matter from the power plug pins. Do not use a wet or damp cloth when cleaning the plug. If the refrigerator is disconnected from the power supply, wait for cleaning. Be careful closing doors when children are necessarily small. Use Close the door ...
Owners Manual
Page 7
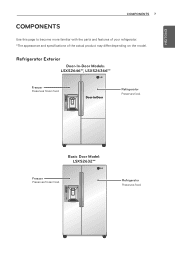
Refrigerator Exterior Door-In-Door Models: LSXS2646**, LSXS26366** Freezer Preserves frozen food. Refrigerator Preserves food. Basic Door Model: LSXS2632** Freezer Preserves frozen food. Door-in-Door Refrigerator Preserves food. ENGLISH COMPONENTS COMPONENTS 7 Use this page to become more familiar with the parts and features of your refrigerator. *The appearance and specifications of the actual product may differ depending on the model.
Refrigerator Exterior Door-In-Door Models: LSXS2646**, LSXS26366** Freezer Preserves frozen food. Refrigerator Preserves food. Basic Door Model: LSXS2632** Freezer Preserves frozen food. Door-in-Door Refrigerator Preserves food. ENGLISH COMPONENTS COMPONENTS 7 Use this page to become more familiar with the parts and features of your refrigerator. *The appearance and specifications of the actual product may differ depending on the model.

Owners Manual
Page 9
ENGLISH Refrigerator Interior Basic Door Model: LSXS2632** LED Lamp Automatic Icemaker Shelf Freezer Refrigerator Compartment Compartment Door Bin Freezing Zone Door Bin COMPONENTS 9 Dairy Corner Filter LED Lamp Door Bin Shelf Shelf Door Bin Door Bin Fresh zone Door Bin NOTE Parts, features and options vary by model. Your model may not include every option.
ENGLISH Refrigerator Interior Basic Door Model: LSXS2632** LED Lamp Automatic Icemaker Shelf Freezer Refrigerator Compartment Compartment Door Bin Freezing Zone Door Bin COMPONENTS 9 Dairy Corner Filter LED Lamp Door Bin Shelf Shelf Door Bin Door Bin Fresh zone Door Bin NOTE Parts, features and options vary by model. Your model may not include every option.
Owners Manual
Page 10
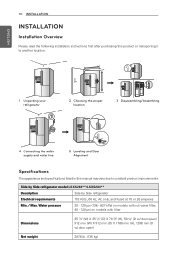
Side by Side refrigerator model LSXS264**/LSXS263** Description Side by Side refrigerator Electrical requirements 115 Volts, 60 Hz, AC only, and fused at 15 or 20 amperes Min. / Max. ENGLISH 10 INSTALLATION... INSTALLATION Installation Overview Please read the following installation instructions first after purchasing this product or transporting it to another location. 1 Unpacking your refrigerator 2 Choosing the proper location 3 Disassembling/Assembling 4 Connecting the water supply and water line 5 Leveling and Door Alignment Specifications The appearance and ...
Side by Side refrigerator model LSXS264**/LSXS263** Description Side by Side refrigerator Electrical requirements 115 Volts, 60 Hz, AC only, and fused at 15 or 20 amperes Min. / Max. ENGLISH 10 INSTALLATION... INSTALLATION Installation Overview Please read the following installation instructions first after purchasing this product or transporting it to another location. 1 Unpacking your refrigerator 2 Choosing the proper location 3 Disassembling/Assembling 4 Connecting the water supply and water line 5 Leveling and Door Alignment Specifications The appearance and ...

Owners Manual
Page 11
...be easily connected for cleaning or service, be slightly higher than the rear to aid in the shipping position. Always pull the refrigerator straight out when moving the refrigerator for the automatic icemaker. Do not remove any warning-type labels, the model and serial number label, or the Tech Sheet... supply can be easily removed by tipping the cabinet slightly. Tape or glue residue can result in back or other injury. Your refrigerator is not recommended. WARNING To reduce the risk of electric shock, do so can also be turned easily by rubbing a small amount of your...
...be easily connected for cleaning or service, be slightly higher than the rear to aid in the shipping position. Always pull the refrigerator straight out when moving the refrigerator for the automatic icemaker. Do not remove any warning-type labels, the model and serial number label, or the Tech Sheet... supply can be easily removed by tipping the cabinet slightly. Tape or glue residue can result in back or other injury. Your refrigerator is not recommended. WARNING To reduce the risk of electric shock, do so can also be turned easily by rubbing a small amount of your...
Owners Manual
Page 12
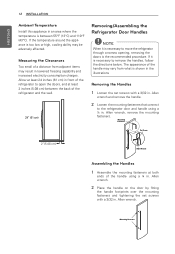
Allow at least 24 inches (61 cm) in front of the refrigerator to remove the handles, follow the directions below. The appearance of the refrigerator and the wall. 24" (61 cm) Removing/Assembling the Refrigerator Door Handles NOTE When it is necessary to open the doors, and at...fasteners. Mounting Fasteners Allen wrench and remove the handle. 2 Loosen the mounting fasteners that connect to move the refrigerator through a narrow opening, removing the doors is necessary to the refrigerator door and handle using a ¼ in . Allen wrench. 2 Place the handle on the door by fitting...
Allow at least 24 inches (61 cm) in front of the refrigerator to remove the handles, follow the directions below. The appearance of the refrigerator and the wall. 24" (61 cm) Removing/Assembling the Refrigerator Door Handles NOTE When it is necessary to open the doors, and at...fasteners. Mounting Fasteners Allen wrench and remove the handle. 2 Loosen the mounting fasteners that connect to move the refrigerator through a narrow opening, removing the doors is necessary to the refrigerator door and handle using a ¼ in . Allen wrench. 2 Place the handle on the door by fitting...
Owners Manual
Page 13
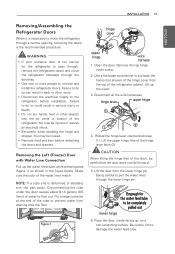
... and bins before installation. hinge lever upper hinge 4. Lift the door from the lower hinge pin, being careful to remove and install the refrigerator doors. WARNING If your entrance door is too narrow for the water feed tube to do so can result in back or other... or death. Do not put hands, feet or other injury. Disconnect the electrical supply to prevent water from the top of the refrigerator. Use a flat blade screwdriver to flow out. NOTE: If a tube end is the recommended procedure. Disconnect all the wire harnesses. Place the door,...
... and bins before installation. hinge lever upper hinge 4. Lift the door from the lower hinge pin, being careful to remove and install the refrigerator doors. WARNING If your entrance door is too narrow for the water feed tube to do so can result in back or other... or death. Do not put hands, feet or other injury. Disconnect the electrical supply to prevent water from the top of the refrigerator. Use a flat blade screwdriver to flow out. NOTE: If a tube end is the recommended procedure. Disconnect all the wire harnesses. Place the door,...
Owners Manual
Page 14
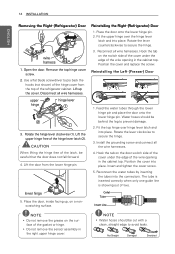
...hinge lever latch (2). NOTE Water hoses should be behind the leg to secure the hinge. 3. 14 INSTALLATION ENGLISH Removing the Right (Refrigerator) Door wire harness 1. Lift up , on the door switch side of the cover under the edge of the wire opening in the right ...upper hinge cover. CAUTION When lifting the hinge free of the hinge cover from the lower hinge pin. Reinstalling the Right (Refrigerator) Door 1. Fit the top hinge over the hinge lever latch and into the connectors. lower hinge 5. Not Straight Damaged Stretched upper hinge ...
...hinge lever latch (2). NOTE Water hoses should be behind the leg to secure the hinge. 3. 14 INSTALLATION ENGLISH Removing the Right (Refrigerator) Door wire harness 1. Lift up , on the door switch side of the cover under the edge of the wire opening in the right ...upper hinge cover. CAUTION When lifting the hinge free of the hinge cover from the lower hinge pin. Reinstalling the Right (Refrigerator) Door 1. Fit the top hinge over the hinge lever latch and into the connectors. lower hinge 5. Not Straight Damaged Stretched upper hinge ...
Owners Manual
Page 15
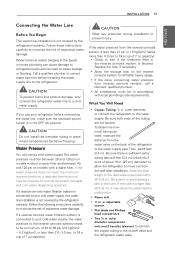
...minimum requires pressure, a separate booster pump may cause the water feed to your cold water supply, this water line installation is not covered by the refrigerator warranty. If a reverse osmosis water filtration system is connected to malfunction. Power drill. ½ in accordance with a water ...minimize the risk of 40 to 60 psi (2.8 kgf/cm2 ~ 4.2 kgf/cm2, or less than 4.0 sec to fill a cup of the refrigerator to your refrigerator before installing the water supply line to fill a cup of the feed water pipe tube within 26 ft (8 m). If a reverse osmosis water ...
...minimum requires pressure, a separate booster pump may cause the water feed to your cold water supply, this water line installation is not covered by the refrigerator warranty. If a reverse osmosis water filtration system is connected to malfunction. Power drill. ½ in accordance with a water ...minimize the risk of 40 to 60 psi (2.8 kgf/cm2 ~ 4.2 kgf/cm2, or less than 4.0 sec to fill a cup of the refrigerator to your refrigerator before installing the water supply line to fill a cup of the feed water pipe tube within 26 ft (8 m). If a reverse osmosis water ...
Owners Manual
Page 16
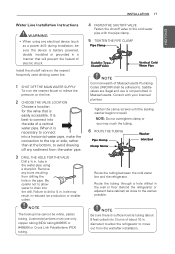
at plumbing supply stores) to connect the water line to the refrigerator OR you will prevent the hazard of electric shock. Before purchasing, make sure a saddletype valve complies with your existing copper water line has a flared fitting ...
at plumbing supply stores) to connect the water line to the refrigerator OR you will prevent the hazard of electric shock. Before purchasing, make sure a saddletype valve complies with your existing copper water line has a flared fitting ...
Owners Manual
Page 17
...about 10 in . NOTE Be sure there is necessary to connect into 3 turns of electric shock. hole in the wall or floor (behind the refrigerator or adjacent base cabinet) as close to drain into the side of Massachusetts Plumbing Codes 248CMR shall be white, plastic tubing. Consult with the pipe... may crush the tubing. 6 ROUTE THE TUBING Pipe Clamp Clamp Screw Washer Inlet End Route the tubing between the cold water line and the refrigerator. INSTALLATION 17 ENGLISH Water Line Installation Instructions WARNING When using a sharp bit. Be careful not to allow the...
...about 10 in . NOTE Be sure there is necessary to connect into 3 turns of electric shock. hole in the wall or floor (behind the refrigerator or adjacent base cabinet) as close to drain into the side of Massachusetts Plumbing Codes 248CMR shall be white, plastic tubing. Consult with the pipe... may crush the tubing. 6 ROUTE THE TUBING Pipe Clamp Clamp Screw Washer Inlet End Route the tubing between the cold water line and the refrigerator. INSTALLATION 17 ENGLISH Water Line Installation Instructions WARNING When using a sharp bit. Be careful not to allow the...

Owners Manual
Page 18
... switch to the shutoff valve. Insert the end of the copper tubing into the connection as far as shown. Compression Nut Ferrule (sleeve) Refrigerator Connection CAUTION Connect to a rated power outlet. Have a certified electrician check the wall outlet and wiring for copper tubing...from the water valve. Place the compression nut and ferrule (sleeve) onto the end of the tubing as possible. Tubing ¼ in the refrigerator. ENGLISH 18 INSTALLATION 7 CONNECT THE TUBING TO THE VALVE Place the compression nut and ferrule (sleeve) for proper grounding. Do ...
... switch to the shutoff valve. Insert the end of the copper tubing into the connection as far as shown. Compression Nut Ferrule (sleeve) Refrigerator Connection CAUTION Connect to a rated power outlet. Have a certified electrician check the wall outlet and wiring for copper tubing...from the water valve. Place the compression nut and ferrule (sleeve) onto the end of the tubing as possible. Tubing ¼ in the refrigerator. ENGLISH 18 INSTALLATION 7 CONNECT THE TUBING TO THE VALVE Place the compression nut and ferrule (sleeve) for proper grounding. Do ...
Owners Manual
Page 19
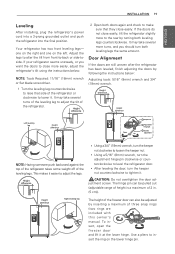
... The height of the freezer door can be adjusted by inserting a maximum of three snap rings (two rings are still uneven after the refrigerator has been leveled, finish adjusting the doors by turning both doors again and check to insert the ring on the left. Use a pliers... to make sure that side of the leveling legs. INSTALLATION 19 ENGLISH Leveling After installing, plug the refrigerator's power cord into a 3-prong grounded outlet and push the refrigerator into the final position. Adjust the legs to alter the tilt from front-to adjust the legs. Height difference ...
... The height of the freezer door can be adjusted by inserting a maximum of three snap rings (two rings are still uneven after the refrigerator has been leveled, finish adjusting the doors by turning both doors again and check to insert the ring on the left. Use a pliers... to make sure that side of the leveling legs. INSTALLATION 19 ENGLISH Leveling After installing, plug the refrigerator's power cord into a 3-prong grounded outlet and push the refrigerator into the final position. Adjust the legs to alter the tilt from front-to adjust the legs. Height difference ...
Owners Manual
Page 20
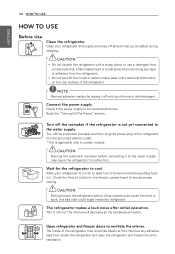
... the water supply. Remove any tape or adhesive from inside the refrigerator and open the refrigerator and freezer doors for at first. Clean your refrigerator to run for ventilation. Read the "Turning On The Power" section. The refrigerator makes a loud noise after initial operation. CAUTION Putting food in ... by wiping it off the model or serial number label or the technical information on the rear surface of cold air in the refrigerator before putting food in it to malfunction. OFF Turn off all dust that contains alcohol, a flammable liquid or an abrasive when ...
... the water supply. Remove any tape or adhesive from inside the refrigerator and open the refrigerator and freezer doors for at first. Clean your refrigerator to run for ventilation. Read the "Turning On The Power" section. The refrigerator makes a loud noise after initial operation. CAUTION Putting food in ... by wiping it off the model or serial number label or the technical information on the rear surface of cold air in the refrigerator before putting food in it to malfunction. OFF Turn off all dust that contains alcohol, a flammable liquid or an abrasive when ...
Owners Manual
Page 21
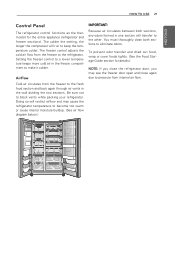
... not to keep the temperature colder. Doing so will restrict airflow and may see the freezer door open and close again due to the refrigerator. The colder the setting, the longer the compressor will transfer to eliminate odors. Setting the freezer control to a lower temperature keeps more cold ... freezer compartment to the fresh food section and back again through air vents in one section will run to block vents while packing your refrigerator. Airflow Cold air circulates from internal air flow. The freezer control adjusts the cold air flow from the freezer to pressure from the ...
... not to keep the temperature colder. Doing so will restrict airflow and may see the freezer door open and close again due to the refrigerator. The colder the setting, the longer the compressor will transfer to eliminate odors. Setting the freezer control to a lower temperature keeps more cold ... freezer compartment to the fresh food section and back again through air vents in one section will run to block vents while packing your refrigerator. Airflow Cold air circulates from internal air flow. The freezer control adjusts the cold air flow from the freezer to pressure from the ...


