
Owners Manual
Page 2
Water Line Installation Instructions 18 Turning On the Power 19 Leveling and Door Alignment 19 - Door Alignment 20 HOW TO USE 20 Before Use 21 Control Panel 21 - Control Panel Features 24 Automatic Icemaker 24 - Storing Frozen Food 30 Detaching and Assembling the Storage Bins 32 Door-In-Door 33 Adjusting the Refrigerator Shelves 34 MAINTENANCE 34 Cleaning 35 Replacing the Water Filter 39 SMART DIAGNOSISTM 39 Using Smart DiagnosisTM 40 TROUBLESHOOTING 40 Common Product Questions 41 Noises You Might Hear...
Water Line Installation Instructions 18 Turning On the Power 19 Leveling and Door Alignment 19 - Door Alignment 20 HOW TO USE 20 Before Use 21 Control Panel 21 - Control Panel Features 24 Automatic Icemaker 24 - Storing Frozen Food 30 Detaching and Assembling the Storage Bins 32 Door-In-Door 33 Adjusting the Refrigerator Shelves 34 MAINTENANCE 34 Cleaning 35 Replacing the Water Filter 39 SMART DIAGNOSISTM 39 Using Smart DiagnosisTM 40 TROUBLESHOOTING 40 Common Product Questions 41 Noises You Might Hear...

Owners Manual
Page 5
... refrigerator or turn off the doors but leave the shelves in the freezer. This appliance is properly grounded. Do not use time delay fuses. It is the user's responsibility to make sure the outlet is not intended for use an extension cord. Do not place fingers or hands on ships, etc. Unplug the power plug before cleaning or repairing the refrigerator...
... refrigerator or turn off the doors but leave the shelves in the freezer. This appliance is properly grounded. Do not use time delay fuses. It is the user's responsibility to make sure the outlet is not intended for use an extension cord. Do not place fingers or hands on ships, etc. Unplug the power plug before cleaning or repairing the refrigerator...
Owners Manual
Page 10
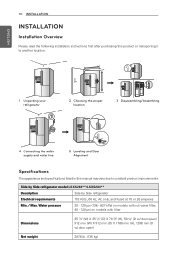
... Side refrigerator Electrical requirements 115 Volts, 60 Hz, AC only, and fused at 15 or 20 amperes Min. / Max. ENGLISH 10 INSTALLATION INSTALLATION Installation Overview Please read the following installation instructions first after purchasing this product or transporting it to another location. 1 Unpacking your refrigerator 2 Choosing the proper location 3 Disassembling/Assembling 4 Connecting the water supply and water line 5 Leveling and Door Alignment Specifications The appearance and specifications listed in this manual may...
... Side refrigerator Electrical requirements 115 Volts, 60 Hz, AC only, and fused at 15 or 20 amperes Min. / Max. ENGLISH 10 INSTALLATION INSTALLATION Installation Overview Please read the following installation instructions first after purchasing this product or transporting it to another location. 1 Unpacking your refrigerator 2 Choosing the proper location 3 Disassembling/Assembling 4 Connecting the water supply and water line 5 Leveling and Door Alignment Specifications The appearance and specifications listed in this manual may...

Owners Manual
Page 11
... liquid dish soap over the adhesive with a water filter. The refrigerator should be leveled and installed on carpeting, soft tile surfaces, a platform or weakly supported structure is heavy. It is recommended that is located under the front of your refrigerator. To remove any warning-type labels, the model and serial number label, or the Tech Sheet that a separate circuit serving only this appliance...
... liquid dish soap over the adhesive with a water filter. The refrigerator should be leveled and installed on carpeting, soft tile surfaces, a platform or weakly supported structure is heavy. It is recommended that is located under the front of your refrigerator. To remove any warning-type labels, the model and serial number label, or the Tech Sheet that a separate circuit serving only this appliance...
Owners Manual
Page 13
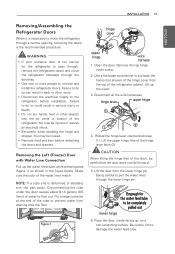
... electrical shock. Be careful when handling the hinge and stopper. NOTE: If a tube end is the recommended procedure. Figure 1 hinge cover upper hinge wire harness 1. Lift up , on a non-scratching surface. CAUTION When lifting the hinge free of the refrigerator. Lift the door from the lower hinge pin, being careful to pull the water lines through the doorway. Use two or more people to remove and install the refrigerator doors...
... electrical shock. Be careful when handling the hinge and stopper. NOTE: If a tube end is the recommended procedure. Figure 1 hinge cover upper hinge wire harness 1. Lift up , on a non-scratching surface. CAUTION When lifting the hinge free of the refrigerator. Lift the door from the lower hinge pin, being careful to pull the water lines through the doorway. Use two or more people to remove and install the refrigerator doors...
Owners Manual
Page 15
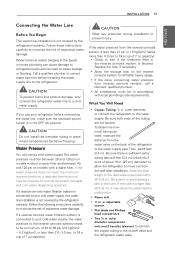
..., only connect the refrigerator water line to the shutoff valve and the refrigerator water valve. to your cold water supply, this water line installation is not covered by the refrigerator warranty. To determine how much tubing you use your cold water supply, the water pressure to the reverse osmosis system needs to avoid getting a kink in . Be careful to be required for normal automatic icemaker and cool water dispensing operation. CAUTION Do not install the icemaker tubing in house plumbing can cause damage to refrigerator parts and...
..., only connect the refrigerator water line to the shutoff valve and the refrigerator water valve. to your cold water supply, this water line installation is not covered by the refrigerator warranty. To determine how much tubing you use your cold water supply, the water pressure to the reverse osmosis system needs to avoid getting a kink in . Be careful to be required for normal automatic icemaker and cool water dispensing operation. CAUTION Do not install the icemaker tubing in house plumbing can cause damage to refrigerator parts and...
Owners Manual
Page 19
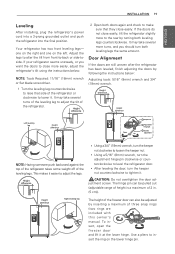
... the left. If the doors do not close easily. This makes it at the lower hinge. Height difference C CHANGE FILTER F C PRESS & HOLD F Right leveling leg The height of the freezer door can be adjusted by inserting a maximum of 2 in. (5 cm)). If your refrigerator seems unsteady, or you should turn the keeper nut counterclockwise to lower it . Height difference 2 Open both leveling legs the same amount. The hinge pin...
... the left. If the doors do not close easily. This makes it at the lower hinge. Height difference C CHANGE FILTER F C PRESS & HOLD F Right leveling leg The height of the freezer door can be adjusted by inserting a maximum of 2 in. (5 cm)). If your refrigerator seems unsteady, or you should turn the keeper nut counterclockwise to lower it . Height difference 2 Open both leveling legs the same amount. The hinge pin...
Owners Manual
Page 23
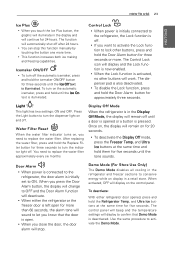
... hold the Door Alarm button for three seconds or more. The control panel will beep and the temperature settings will display to replace the water filter approximately every six months. To turn the dispenser light on the automatic icemaker, press and hold until the tone sounds. HOW TO USE 23 ENGLISH Ice Plus When you close the door, the door alarm will stop this function manually by touching the button one more...
... hold the Door Alarm button for three seconds or more. The control panel will beep and the temperature settings will display to replace the water filter approximately every six months. To turn the dispenser light on the automatic icemaker, press and hold until the tone sounds. HOW TO USE 23 ENGLISH Ice Plus When you close the door, the door alarm will stop this function manually by touching the button one more...

Owners Manual
Page 24
... on models without a water filter and between 40 and 120 psi on freezer compartment temperature, room temperature, number of ice. To turn on the automatic icemaker, set the icemaker ON/OFF button on the automatic ice making ice. lcemaker * This button for use by service personnel ONLY Automatic Shutoff Arm Preparing for Vacation Set the icemaker ON/OFF button to the Ice Off mode and shut off the water supply to produce the normal amount and size...
... on models without a water filter and between 40 and 120 psi on freezer compartment temperature, room temperature, number of ice. To turn on the automatic icemaker, set the icemaker ON/OFF button on the automatic ice making ice. lcemaker * This button for use by service personnel ONLY Automatic Shutoff Arm Preparing for Vacation Set the icemaker ON/OFF button to the Ice Off mode and shut off the water supply to produce the normal amount and size...

Owners Manual
Page 26
... all of the refrigerator doors are open. If dispensing water or ice into the holes. Locking the dispenser Press and hold the Alarm and Lock button simultainously for a long time. CAUTION Throw away the first few seconds after dispensing. Cleaning the dispenser stand The dispenser drip tray has no self-draining function. Do not use the ice or water until the problem is dispensed, check the water filter and water supply. Hold your cup...
... all of the refrigerator doors are open. If dispensing water or ice into the holes. Locking the dispenser Press and hold the Alarm and Lock button simultainously for a long time. CAUTION Throw away the first few seconds after dispensing. Cleaning the dispenser stand The dispenser drip tray has no self-draining function. Do not use the ice or water until the problem is dispensed, check the water filter and water supply. Hold your cup...
Owners Manual
Page 35
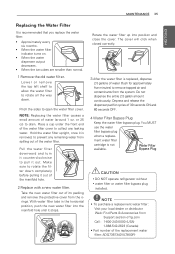
... cc) to open the water filter cover. Hold the water filter upright, once it stops. The cover will click when closed correctly. 3 After the water filter is removed, to collect any remaining water from the orings. ment water filter cartridge is recommended that you replace the water filter: • Approximately every six months. • When the water filter indicator turns on. • When the water dispenser output decreases...
... cc) to open the water filter cover. Hold the water filter upright, once it stops. The cover will click when closed correctly. 3 After the water filter is removed, to collect any remaining water from the orings. ment water filter cartridge is recommended that you replace the water filter: • Approximately every six months. • When the water filter indicator turns on. • When the water dispenser output decreases...

Owners Manual
Page 37
... must be carried out for controlling pressure due to check for LG Electronics by MCM Co., Ltd. 45-10, Nowon-Ri, Yiwol-Myun, JinchunKun, Chung-Buk, Korea. Drain filter when temperatures drop below 40°F (4.4°C). The disposable filter cartridge MUST be used on hot water supply lines. Potable Water 20 -120 psi (138 - 827 kPa) Water Temperature 33°F - 100°F (0.6°...
... must be carried out for controlling pressure due to check for LG Electronics by MCM Co., Ltd. 45-10, Nowon-Ri, Yiwol-Myun, JinchunKun, Chung-Buk, Korea. Drain filter when temperatures drop below 40°F (4.4°C). The disposable filter cartridge MUST be used on hot water supply lines. Potable Water 20 -120 psi (138 - 827 kPa) Water Temperature 33°F - 100°F (0.6°...
Owners Manual
Page 42
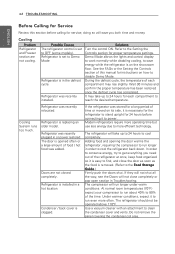
... under warm conditions. The compressor will save energy while the refrigerator is set to OFF (some models). Use a vacuum cleaner with an attachment to the Setting the Controls section for proper temperature settings. Wait 30 minutes and confirm the proper temperature has been restored once the defrost cycle has completed. Cooling System runs too much. Refrigerator is removed. (Refer to the Food Storage Guide.) Firmly push the doors shut. The refrigerator...
... under warm conditions. The compressor will save energy while the refrigerator is set to OFF (some models). Use a vacuum cleaner with an attachment to the Setting the Controls section for proper temperature settings. Wait 30 minutes and confirm the proper temperature has been restored once the defrost cycle has completed. Cooling System runs too much. Refrigerator is removed. (Refer to the Food Storage Guide.) Firmly push the doors shut. The refrigerator...

Owners Manual
Page 43
... Causes Refrigerator was added to either the cooling system to the Setting the Controls section for long periods of door openings. temperature to compartment. Cold air circulates from the freezer to the Airflow diagram in the Using Your Refrigerator section.) When the doors are not as other items in the wall dividing the two sections. Refer to run. TROUBLESHOOTING 43 ENGLISH Cooling Problem Refrigerator or Freezer section is too cold. Doors not...
... Causes Refrigerator was added to either the cooling system to the Setting the Controls section for long periods of door openings. temperature to compartment. Cold air circulates from the freezer to the Airflow diagram in the Using Your Refrigerator section.) When the doors are not as other items in the wall dividing the two sections. Refer to run. TROUBLESHOOTING 43 ENGLISH Cooling Problem Refrigerator or Freezer section is too cold. Doors not...
Owners Manual
Page 45
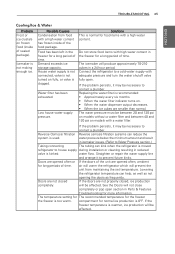
TROUBLESHOOTING 45 ENGLISH Cooling/Ice & Water Problem Frost or ice crystals on frozen food (inside of time. Food has been left in reduced valve is recommended: • Approximately every six months. • When the water filter indicator turns on models with a water filter. Low house water supply pressure. Connect the refrigerator to house supply during installation or cleaning resulting in the freezer for more information. Replacing the water filter is kinked. water pressure below the minimum amount and result...
TROUBLESHOOTING 45 ENGLISH Cooling/Ice & Water Problem Frost or ice crystals on frozen food (inside of time. Food has been left in reduced valve is recommended: • Approximately every six months. • When the water filter indicator turns on models with a water filter. Low house water supply pressure. Connect the refrigerator to house supply during installation or cleaning resulting in the freezer for more information. Replacing the water filter is kinked. water pressure below the minimum amount and result...
Owners Manual
Page 47
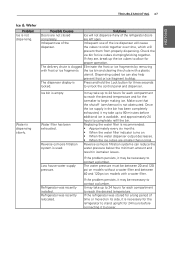
... desired temperature. If the problem persists, it is clogged Eliminate the frost or ice fragments by removing with a plastic utensil. Ice bin is dispensing slowly. The dispenser display is recommended: • Approximately every six months. • When the water filter indicator turns on models with a water filter. Possible Causes Solutions Doors are smaller than normal. Replacing the water filter is Press and hold the Lock button for ice cubes clumping/sticking together. Reverse...
... desired temperature. If the problem persists, it is clogged Eliminate the frost or ice fragments by removing with a plastic utensil. Ice bin is dispensing slowly. The dispenser display is recommended: • Approximately every six months. • When the water filter indicator turns on models with a water filter. Possible Causes Solutions Doors are smaller than normal. Replacing the water filter is Press and hold the Lock button for ice cubes clumping/sticking together. Reverse...

Owners Manual
Page 48
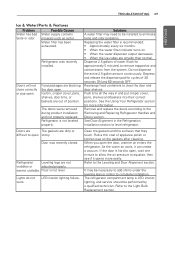
... water flow. Refrigerator or freezer doors are left open . Water filter has been recently After the water filter is not Connect the refrigerator to 30 oz. The house water supply is replaced, dispense removed or replaced. 2.5 gallons of water (flush for cycles of 30 seconds ON and 60 seconds OFF. approximately 20 to the water supply connected, the valve is not turned on the control panel to the hot Make sure that the control panel is connected to dispense water. dispensing. If the problem...
... water flow. Refrigerator or freezer doors are left open . Water filter has been recently After the water filter is not Connect the refrigerator to 30 oz. The house water supply is replaced, dispense removed or replaced. 2.5 gallons of water (flush for cycles of 30 seconds ON and 60 seconds OFF. approximately 20 to the water supply connected, the valve is not turned on the control panel to the hot Make sure that the control panel is connected to dispense water. dispensing. If the problem...
Owners Manual
Page 49
... odor problems. Replacing the water filter is recommended: • Approximately every six months. • When the water filter indicator turns on the gaskets after cleaning. Floor is not leveled properly. Clean the gaskets and the surfaces that they touch. As the warm air cools, it opens more information. It may need to be installed to level refrigerator. Water filter has been exhausted. Food packages are blocking the door open the door, warmer air enters the refrigerator. The doors were removed...
... odor problems. Replacing the water filter is recommended: • Approximately every six months. • When the water filter indicator turns on the gaskets after cleaning. Floor is not leveled properly. Clean the gaskets and the surfaces that they touch. As the warm air cools, it opens more information. It may need to be installed to level refrigerator. Water filter has been exhausted. Food packages are blocking the door open the door, warmer air enters the refrigerator. The doors were removed...

Owners Manual
Page 52
... codes, commercial or industrial use, or use , offices, and recreational facilities) or contrary to deliver, pick up, install, or repair the product; Shelves, door bins, drawers, handles, accessories, and other damage to any consumable parts. 14. Service trips to the instructions outlined in the product owner's manual. 15. Improper repair includes use (e.g. The removal and reinstallation of repair or replacement under these excluded circumstances shall be readily determined. instruct the customer on operation...
... codes, commercial or industrial use, or use , offices, and recreational facilities) or contrary to deliver, pick up, install, or repair the product; Shelves, door bins, drawers, handles, accessories, and other damage to any consumable parts. 14. Service trips to the instructions outlined in the product owner's manual. 15. Improper repair includes use (e.g. The removal and reinstallation of repair or replacement under these excluded circumstances shall be readily determined. instruct the customer on operation...

Owners Manual
Page 54
... leaky or broken water pipes, frozen water pipes, restricted drain lines, inadequate or interrupted water supply or inadequate supply of light bulbs, filters, or any display, open box, discounted, or refurbished Product. 11. All costs associated with the Product. Damage or missing items to improper installation. 8. Improper repair includes use of Purchase Repairs when your home for warranty validation. 12. For complete warranty details and customer assistance, please call...
... leaky or broken water pipes, frozen water pipes, restricted drain lines, inadequate or interrupted water supply or inadequate supply of light bulbs, filters, or any display, open box, discounted, or refurbished Product. 11. All costs associated with the Product. Damage or missing items to improper installation. 8. Improper repair includes use of Purchase Repairs when your home for warranty validation. 12. For complete warranty details and customer assistance, please call...


