User Guide
Page 2
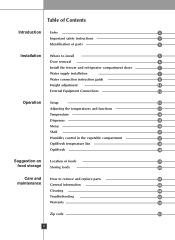
Table of Contents Introduction Entry 3 Important safety instructions 3 Identification of parts 4 Installation Where to install 5 Door removal 6 Install the freezer and refrigerator compartment doors 7 Water supply installation 7 Water connection instruction guide 8 Height adjustment 11 External Equipment Connections 12 Operation Setup 13 Adjusting the temperatures and functions 13 ...
Table of Contents Introduction Entry 3 Important safety instructions 3 Identification of parts 4 Installation Where to install 5 Door removal 6 Install the freezer and refrigerator compartment doors 7 Water supply installation 7 Water connection instruction guide 8 Height adjustment 11 External Equipment Connections 12 Operation Setup 13 Adjusting the temperatures and functions 13 ...
User Guide
Page 3
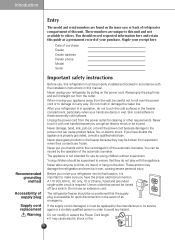
... should record requested information here and retain this unit and not available to damage it is in the freezer compartment, particularly when your refrigerator is important to make sure you can cause product failure, fire, or electric shock. After your hands are damp or wet. Never...only, 15 or 20 amp, fused and grounded single-outlet circuit is properly grounded, consult a qualified electrician. It may damage the refrigerator and even tip it with the installation instructions in accordance with wet hands because you have doubts the appliance is required. Never unplug your...
... should record requested information here and retain this unit and not available to damage it is in the freezer compartment, particularly when your refrigerator is important to make sure you can cause product failure, fire, or electric shock. After your hands are damp or wet. Never...only, 15 or 20 amp, fused and grounded single-outlet circuit is properly grounded, consult a qualified electrician. It may damage the refrigerator and even tip it with the installation instructions in accordance with wet hands because you have doubts the appliance is required. Never unplug your...
User Guide
Page 4
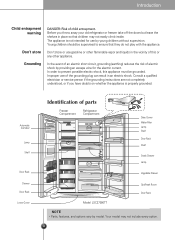
... a qualified electrician or service person if the grounding instructions are not completely understood, or if you throw away your old refrigerator or freezer take off the doors but leave the shelves in the vicinity of electric shock by model. Improper use by young...Child entrapment warning Don't store Grounding DANGER: Risk of parts Freezer Compartment Refrigerator Compartment Dairy Corner Water Filter Lamp Shelf Door Rack Shelf Snack Drawer Lamp Vegetable Drawer OptiFresh Room Door Rack Model LSC27990TT NOTE • Parts, features, and options vary by providing an escape...
... a qualified electrician or service person if the grounding instructions are not completely understood, or if you throw away your old refrigerator or freezer take off the doors but leave the shelves in the vicinity of electric shock by model. Improper use by young...Child entrapment warning Don't store Grounding DANGER: Risk of parts Freezer Compartment Refrigerator Compartment Dairy Corner Water Filter Lamp Shelf Door Rack Shelf Snack Drawer Lamp Vegetable Drawer OptiFresh Room Door Rack Model LSC27990TT NOTE • Parts, features, and options vary by providing an escape...
User Guide
Page 5
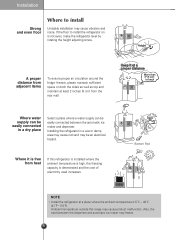
... electrical hazard. Installation Strong and even floor Where to back Bottom Pad NOTE • Install the refrigerator at least 2 inches (5 cm) from the rear wall. Ambient temperature outside this refrigerator is installed where the ambient temperature is high, the freezing capacity is 5˚C ~ 43˚...;C (41˚F~110˚F). If the floor to install the refrigerator on is not even, make the refrigerator level by rotating the height adjusting screw. 0AECDJ A proper distance from heat If this range may cause vibration and noise...
... electrical hazard. Installation Strong and even floor Where to back Bottom Pad NOTE • Install the refrigerator at least 2 inches (5 cm) from the rear wall. Ambient temperature outside this refrigerator is installed where the ambient temperature is high, the freezing capacity is 5˚C ~ 43˚...;C (41˚F~110˚F). If the floor to install the refrigerator on is not even, make the refrigerator level by rotating the height adjusting screw. 0AECDJ A proper distance from heat If this range may cause vibration and noise...
User Guide
Page 6
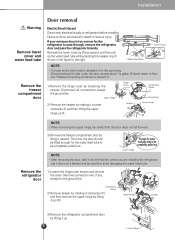
...be completely pulled out. Remove the lower cover by lifting it up . Lay it into the kitchen where you are installing the refrigerator. Installation Warning Remove lower cover and water feed tube Remove the freezer compartment door Door removal Electric Shock Hazard Disconnect electrical supply to... flow out. Remove the refrigerator door 1) Loosen the hinge cover screws and remove the cover. This time, the door should be lifted enough for the ground line...
...be completely pulled out. Remove the lower cover by lifting it up . Lay it into the kitchen where you are installing the refrigerator. Installation Warning Remove lower cover and water feed tube Remove the freezer compartment door Door removal Electric Shock Hazard Disconnect electrical supply to... flow out. Remove the refrigerator door 1) Loosen the hinge cover screws and remove the cover. This time, the door should be lifted enough for the ground line...
User Guide
Page 7
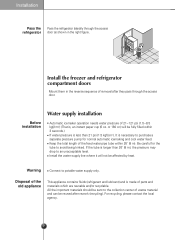
... be sent to purchase a separate pressure pump for the tube to potable water supply only. Max 5 4 3 2 1 Min 1 2 TFERMZP 3 4 TREEMFP 5 Max Install the freezer and refrigerator compartment doors Mount them in the right figure. or 180 cc) will not be fully filled within 26' (8 m). Keep the total length of 21~121... careful for normal automatic icemaking and cool water feed. Install the water supply line where it will be affected by heat. Installation Pass the refrigerator Pass the refrigerator laterally through the access door. Warning Connect to avoid being kinked.
... be sent to purchase a separate pressure pump for the tube to potable water supply only. Max 5 4 3 2 1 Min 1 2 TFERMZP 3 4 TREEMFP 5 Max Install the freezer and refrigerator compartment doors Mount them in the right figure. or 180 cc) will not be fully filled within 26' (8 m). Keep the total length of 21~121... careful for normal automatic icemaking and cool water feed. Install the water supply line where it will be affected by heat. Installation Pass the refrigerator Pass the refrigerator laterally through the access door. Warning Connect to avoid being kinked.
User Guide
Page 8
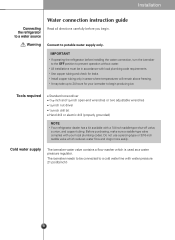
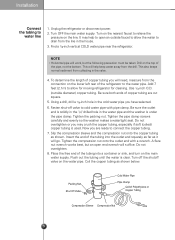
...supply The icemaker water valve contains a flow washer which reduces water flow and clogs more easily. IMPORTANT • If operating the refrigerator before you begin producing ice. Tools required Standard screwdriver 7/16-inch and 1/2-inch open-end wrenches or two adjustable wrenches 1/4-inch nut... will remain above freezing. • It may take up to 24 hours for your local plumbing codes. Installation Connecting the refrigerator to a water source Warning Water connection instruction guide Read all directions carefully before installing the water connection, turn the icemaker to...
...supply The icemaker water valve contains a flow washer which reduces water flow and clogs more easily. IMPORTANT • If operating the refrigerator before you begin producing ice. Tools required Standard screwdriver 7/16-inch and 1/2-inch open-end wrenches or two adjustable wrenches 1/4-inch nut... will remain above freezing. • It may take up to 24 hours for your local plumbing codes. Installation Connecting the refrigerator to a water source Warning Water connection instruction guide Read all directions carefully before installing the water connection, turn the icemaker to...
User Guide
Page 9
... not overtighten. 8. It may crush the copper tubing, especially if soft (coiled) copper tubing is clear. Find a 1/2-inch vertical COLD water pipe near the refrigerator. NOTE • Horizontal pipe will help to open end wrench will need, measure from collecting in the water pipe and the washer is solidly in... the 1/4" drilled hole in the valve. 4. Use 1/4-inch O.D. (outside faucet to allow the water to allow for moving refrigerator for cleaning. Be sure the outlet end is under the pipe clamp. Flush out the tubing until the water is used. Packing Nut Shut Off...
... not overtighten. 8. It may crush the copper tubing, especially if soft (coiled) copper tubing is clear. Find a 1/2-inch vertical COLD water pipe near the refrigerator. NOTE • Horizontal pipe will help to open end wrench will need, measure from collecting in the water pipe and the washer is solidly in... the 1/4" drilled hole in the valve. 4. Use 1/4-inch O.D. (outside faucet to allow the water to allow for moving refrigerator for cleaning. Be sure the outlet end is under the pipe clamp. Flush out the tubing until the water is used. Packing Nut Shut Off...
User Guide
Page 10
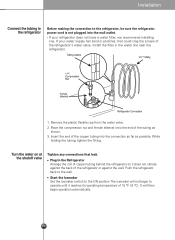
... installing one. It will not begin operation automatically. 10 Tubing Clamp 1/4" Tubing 1/4" Compression Nut Ferrule (sleeve) Refrigerator Connection 1. Insert the end of the refrigerator or against the wall. Start the lcemaker Set the icemaker switch to the ON position The icemaker will then begin...; If your water supply has sand or particles, that leak. Installation Connect the tubing to the refrigerator Before making the connection to the refrigerator, be sure the refrigerator power cord is not plugged into the connection as far as shown. 3. Install the filter in ...
... installing one. It will not begin operation automatically. 10 Tubing Clamp 1/4" Tubing 1/4" Compression Nut Ferrule (sleeve) Refrigerator Connection 1. Insert the end of the refrigerator or against the wall. Start the lcemaker Set the icemaker switch to the ON position The icemaker will then begin...; If your water supply has sand or particles, that leak. Installation Connect the tubing to the refrigerator Before making the connection to the refrigerator, be sure the refrigerator power cord is not plugged into the connection as far as shown. 3. Install the filter in ...
User Guide
Page 11
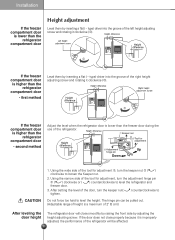
...height adjusting screw. The hinge pin can be affected. 11 Using the wide side of 2" (5 cm)) After leveling the door height The refrigerator door will be pulled out. (Adjustable range of height is a maximum of the tool for adjustment ➂, turn the adjustment hinge pin &#... the front side by inserting a flat ( - If the freezer compartment door is higher than the refrigerator compartment door - If the freezer compartment door is higher than the refrigerator compartment door - type) driver into the groove of the left height adjusting screw and rotating it clockwise...
...height adjusting screw. The hinge pin can be affected. 11 Using the wide side of 2" (5 cm)) After leveling the door height The refrigerator door will be pulled out. (Adjustable range of height is a maximum of the tool for adjustment ➂, turn the adjustment hinge pin &#... the front side by inserting a flat ( - If the freezer compartment door is higher than the refrigerator compartment door - If the freezer compartment door is higher than the refrigerator compartment door - type) driver into the groove of the left height adjusting screw and rotating it clockwise...
User Guide
Page 12
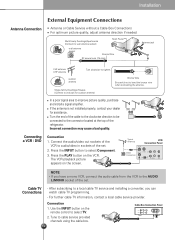
... wall antenna socket Bronze Wire RF coaxial wire (75 ohm) Antenna jack VHF antenna UHF antenna Turn clockwise to the AUDIO L/MONO socket of the refrigerator.
... wall antenna socket Bronze Wire RF coaxial wire (75 ohm) Antenna jack VHF antenna UHF antenna Turn clockwise to the AUDIO L/MONO socket of the refrigerator.
User Guide
Page 13
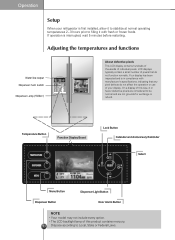
... Button Dispenser Button Dispenser Light Button Door Alarm Button NOTE • Your model may not include every option. • The LCD backlight lamp of your refrigerator is first installed, allow it to stabilize at normal operating temperatures 2~3 hours prior to filling it with manufacturer's specifications, indicating that do not affect the...
... Button Dispenser Button Dispenser Light Button Door Alarm Button NOTE • Your model may not include every option. • The LCD backlight lamp of your refrigerator is first installed, allow it to stabilize at normal operating temperatures 2~3 hours prior to filling it with manufacturer's specifications, indicating that do not affect the...
User Guide
Page 14
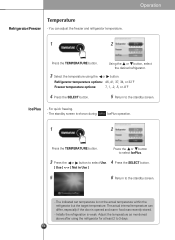
...the or button, select the desired refrigerator. 3 Select the temperature using the refrigerator for at least 2 to 3 days. 14 The actual internal temperature can adjust the freezer and refrigerator temperature. 1 2 Operation Press the TEMPERATURE button. Refrigerator temperature options: 46, 41, 37...in Use ] 5 6 Return to the standby screen. The standby screen is weak. Initially the refrigeration is shown during IcePlus operation. 1 2 Press the TEMPERATURE button. Refrigerator/Freezer Temperature - Adjust the temperature as mentioned above after using the or button.
...the or button, select the desired refrigerator. 3 Select the temperature using the refrigerator for at least 2 to 3 days. 14 The actual internal temperature can adjust the freezer and refrigerator temperature. 1 2 Operation Press the TEMPERATURE button. Refrigerator temperature options: 46, 41, 37...in Use ] 5 6 Return to the standby screen. The standby screen is weak. Initially the refrigeration is shown during IcePlus operation. 1 2 Press the TEMPERATURE button. Refrigerator/Freezer Temperature - Adjust the temperature as mentioned above after using the or button.
User Guide
Page 16
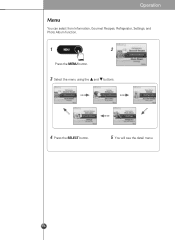
Operation Menu You can select from Information, Gourmet Recipes, Refrigerator, Settings, and Photo Album function. 1 2 Press the MENU button. 3 Select the menu using the and buttons. 4 Press the SELECT button. 5 You will see the detail menu. 16
Operation Menu You can select from Information, Gourmet Recipes, Refrigerator, Settings, and Photo Album function. 1 2 Press the MENU button. 3 Select the menu using the and buttons. 4 Press the SELECT button. 5 You will see the detail menu. 16
User Guide
Page 17
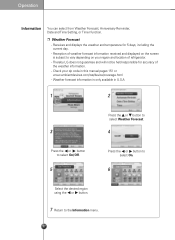
Thereby LG does not guarantee and will not be held responsible for 5 days, including the current day. - Reception of weather forecast information received and displayed on your ... On. 6 Select the desired region using the or button. 7 Return to the Information menu. 17 Receives and displays the weather and temperature for accuracy of refrigerator. - Weather forecast information is subject to vary depending on the screen is only available in this manual pages 151 or www.ambientdevices.com/cat/device...
Thereby LG does not guarantee and will not be held responsible for 5 days, including the current day. - Reception of weather forecast information received and displayed on your ... On. 6 Select the desired region using the or button. 7 Return to the Information menu. 17 Receives and displays the weather and temperature for accuracy of refrigerator. - Weather forecast information is subject to vary depending on the screen is only available in this manual pages 151 or www.ambientdevices.com/cat/device...
User Guide
Page 22
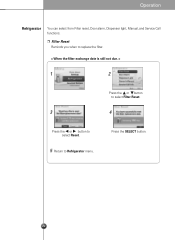
Operation Refrigerator You can select from Filter reset, Door alarm, Dispenser light, Manual, and Service Call functions. ❐ Filter Reset Reminds you when to replace the filter. < When the filter exchange date is still not due. > 1 2 Press the or button to select Filter Reset. 3 4 Press the or button to select Reset. 5 Return to Refrigerator menu. Press the SELECT button. 22
Operation Refrigerator You can select from Filter reset, Door alarm, Dispenser light, Manual, and Service Call functions. ❐ Filter Reset Reminds you when to replace the filter. < When the filter exchange date is still not due. > 1 2 Press the or button to select Filter Reset. 3 4 Press the or button to select Reset. 5 Return to Refrigerator menu. Press the SELECT button. 22
User Guide
Page 23
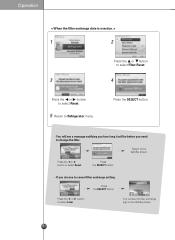
... date is overdue. > 1 2 Press the or button to select Filter Reset. 3 4 Press the or button to select Reset. 5 Return to the standby screen. Return to Refrigerator menu. Press the SELECT button. Press the SELECT button. - Press the SELECT button. - You will see a message notifying you how long it will see the...
... date is overdue. > 1 2 Press the or button to select Filter Reset. 3 4 Press the or button to select Reset. 5 Return to the standby screen. Return to Refrigerator menu. Press the SELECT button. Press the SELECT button. - Press the SELECT button. - You will see a message notifying you how long it will see the...
User Guide
Page 24
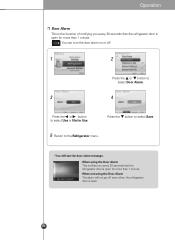
... Alarm The alarm will see the door alarm message. - Operation ❐ Door Alarm This is the function of notifying you every 30 seconds that the refrigerator door is open for more than 1 minute. - Press the button to select Save. 5 Return to select Use or Not in Use. When not using the... Door Alarm This notifies you every 30 seconds that the refrigerator door is open for more than 1 minute. - You will not go off . 1 2 Press the or button to select Door Alarm. 3 4 Press the or button to...
... Alarm The alarm will see the door alarm message. - Operation ❐ Door Alarm This is the function of notifying you every 30 seconds that the refrigerator door is open for more than 1 minute. - Press the button to select Save. 5 Return to select Use or Not in Use. When not using the... Door Alarm This notifies you every 30 seconds that the refrigerator door is open for more than 1 minute. - You will not go off . 1 2 Press the or button to select Door Alarm. 3 4 Press the or button to...
User Guide
Page 25
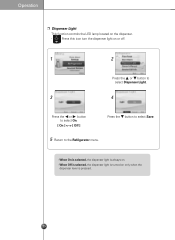
When Off is selected, the dispenser light is turned on only when the dispenser lever is always on. - Press this icon turn the dispenser light on the dispenser. - When On is selected, the dispenser light is pressed. 25 Operation ❐ Dispenser Light This function controls the LED lamp located on or off. 1 2 Press the or button to select Dispenser Light. 3 4 Press the or button to select On. [ On ] [ Off ] Press the button to select Save. 5 Return to the Refrigerator menu. -
When Off is selected, the dispenser light is turned on only when the dispenser lever is always on. - Press this icon turn the dispenser light on the dispenser. - When On is selected, the dispenser light is pressed. 25 Operation ❐ Dispenser Light This function controls the LED lamp located on or off. 1 2 Press the or button to select Dispenser Light. 3 4 Press the or button to select On. [ On ] [ Off ] Press the button to select Save. 5 Return to the Refrigerator menu. -
User Guide
Page 26
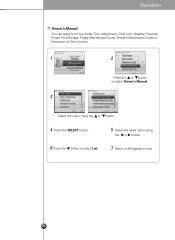
Adjustment, Child Lock, Weather Forecast, Proper Food Storage, Fridge Maintenance Guide, Freezer Maintenance Guide or Elimination of Odor function. 1 2 Press the or button to select Owner's Manual . 3 Select the menu using the or button. 4 Press the SELECT button. 5 Select the detail menu using the or button. 6 Press the button to select List. 7 Return to Refrigerator menu. 26 Operation ❐ Owner's Manual You can select from Key Guide, Tem.
Adjustment, Child Lock, Weather Forecast, Proper Food Storage, Fridge Maintenance Guide, Freezer Maintenance Guide or Elimination of Odor function. 1 2 Press the or button to select Owner's Manual . 3 Select the menu using the or button. 4 Press the SELECT button. 5 Select the detail menu using the or button. 6 Press the button to select List. 7 Return to Refrigerator menu. 26 Operation ❐ Owner's Manual You can select from Key Guide, Tem.


