User Guide
Page 2
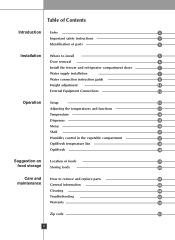
...and refrigerator compartment doors 7 Water supply installation 7 Water connection instruction guide 8 Height adjustment 11 External Equipment Connections 12 Operation Setup 13 Adjusting the temperatures and functions 13 Temperature 14 Dispenser 15 Menu 16 Shelf 37 Humidity control in the vegetable compartment 37 OptiFresh temperature bin 38 OptiFresh 38 Suggestion on Location of foods 39 food storage Storing foods 40 Care and How to remove and replace parts 41 maintenance General information 44 Cleaning 44 Troubleshooting 45 Warranty 50 Zip code 151...
...and refrigerator compartment doors 7 Water supply installation 7 Water connection instruction guide 8 Height adjustment 11 External Equipment Connections 12 Operation Setup 13 Adjusting the temperatures and functions 13 Temperature 14 Dispenser 15 Menu 16 Shelf 37 Humidity control in the vegetable compartment 37 OptiFresh temperature bin 38 OptiFresh 38 Suggestion on Location of foods 39 food storage Storing foods 40 Care and How to remove and replace parts 41 maintenance General information 44 Cleaning 44 Troubleshooting 45 Warranty 50 Zip code 151...
User Guide
Page 3
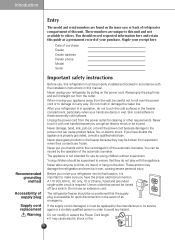
... the door. Never place glass products in this unit. The refrigerator-freezer should be properly installed and located in accordance with the installation instructions in the freezer because they do not touch the cold surfaces in the event of an emergency. Date of purchase Dealer Dealer address Dealer phone Model Serial Recommended grounding method Accessibility of supply plug Supply cord replacement Warning Important safety instructions Before use, this refrigerator...
... the door. Never place glass products in this unit. The refrigerator-freezer should be properly installed and located in accordance with the installation instructions in the freezer because they do not touch the cold surfaces in the event of an emergency. Date of purchase Dealer Dealer address Dealer phone Model Serial Recommended grounding method Accessibility of supply plug Supply cord replacement Warning Important safety instructions Before use, this refrigerator...
User Guide
Page 4
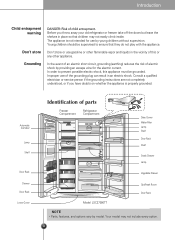
... with the appliance. Improper use by young children without supervision. Automatic Icemaker Lamp Shelf Door Rack Drawer Door Rack Lower Cover Identification of parts Freezer Compartment Refrigerator Compartment Dairy Corner Water Filter Lamp Shelf Door Rack Shelf Snack Drawer Lamp Vegetable Drawer OptiFresh Room Door Rack Model LSC27990TT NOTE • Parts, features, and options vary by providing an escape wire for use of electric shock by model. Your model may not easily climb inside. Before you have...
... with the appliance. Improper use by young children without supervision. Automatic Icemaker Lamp Shelf Door Rack Drawer Door Rack Lower Cover Identification of parts Freezer Compartment Refrigerator Compartment Dairy Corner Water Filter Lamp Shelf Door Rack Shelf Snack Drawer Lamp Vegetable Drawer OptiFresh Room Door Rack Model LSC27990TT NOTE • Parts, features, and options vary by providing an escape wire for use of electric shock by model. Your model may not easily climb inside. Before you have...
User Guide
Page 5
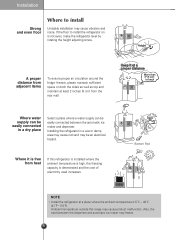
...;F). Where water supply can be easily connected in a wet or damp area may cause rust and may cause vibration and noise. Installing the refrigerator in a dry place Select a place where a water supply can be an electrical hazard. Also, the tube between the automatic ice maker and dispenser. Installation Strong and even floor Where to install Unstable installation may be easily connected between the dispenser and automatic ice maker may cause...
...;F). Where water supply can be easily connected in a wet or damp area may cause rust and may cause vibration and noise. Installing the refrigerator in a dry place Select a place where a water supply can be an electrical hazard. Also, the tube between the automatic ice maker and dispenser. Installation Strong and even floor Where to install Unstable installation may be easily connected between the dispenser and automatic ice maker may cause...
User Guide
Page 6
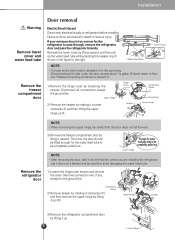
... hinge cover screws and remove the cover. Installation Warning Remove lower cover and water feed tube Remove the freezer compartment door Door removal Electric Shock Hazard Disconnect electrical supply to pass through, remove the refrigerator door and pass the refrigerator laterally. Water Feed Tube Lower Cover NOTE • If a tube end is too narrow for the refrigerator to refrigerator before installing. Upper Hinge 2) Remove the keeper by lifting it upward. This time, the door should be lifted enough for the ground line. Remove connection wire...
... hinge cover screws and remove the cover. Installation Warning Remove lower cover and water feed tube Remove the freezer compartment door Door removal Electric Shock Hazard Disconnect electrical supply to pass through, remove the refrigerator door and pass the refrigerator laterally. Water Feed Tube Lower Cover NOTE • If a tube end is too narrow for the refrigerator to refrigerator before installing. Upper Hinge 2) Remove the keeper by lifting it upward. This time, the door should be lifted enough for the ground line. Remove connection wire...
User Guide
Page 7
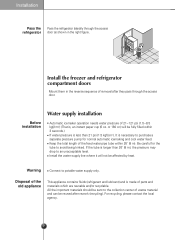
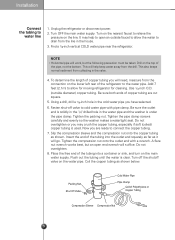
... for the tube to potable water supply only. Water supply installation Before installation Automatic icemaker operation needs water pressure of parts and materials which are reusable and/or recyclable. Warning Connect to avoid being kinked. Be careful for normal automatic icemaking and cool water feed. For recycling, please contact the local agency. 7 Installation Pass the refrigerator Pass the refrigerator laterally through the access door as shown in the reverse sequence of removal after...
... for the tube to potable water supply only. Water supply installation Before installation Automatic icemaker operation needs water pressure of parts and materials which are reusable and/or recyclable. Warning Connect to avoid being kinked. Be careful for normal automatic icemaking and cool water feed. For recycling, please contact the local agency. 7 Installation Pass the refrigerator Pass the refrigerator laterally through the access door as shown in the reverse sequence of removal after...
User Guide
Page 8
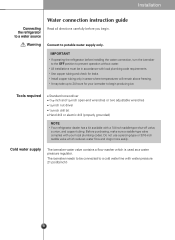
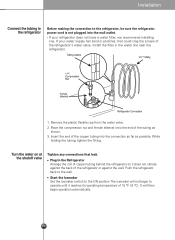
.../inch2) 8 The icemaker needs to be connected to prevent operation without water. • All installations must be in areas where temperatures will remain above freezing. • It may take up to 24 hours for your local plumbing codes. Connect to a water source Warning Water connection instruction guide Read all directions carefully before installing the water connection, turn the icemaker to the OFF position to a cold water line with a 1/4-inch saddle-type shut-off valve, a union, and copper tubing.
.../inch2) 8 The icemaker needs to be connected to prevent operation without water. • All installations must be in areas where temperatures will remain above freezing. • It may take up to 24 hours for your local plumbing codes. Connect to a water source Warning Water connection instruction guide Read all directions carefully before installing the water connection, turn the icemaker to the OFF position to a cold water line with a 1/4-inch saddle-type shut-off valve, a union, and copper tubing.
User Guide
Page 9
... allow for moving refrigerator for cleaning. Using a drill, drill a 1/4-inch hole in the cold water pipe you may help keep water away from collecting in the valve. 4. Insert the end of the tubing into a container or sink, and turn on the line. Flush out the tubing until the water is under the pipe clamp. Installation Connect the tubing to allow the water to open end wrench will...
... allow for moving refrigerator for cleaning. Using a drill, drill a 1/4-inch hole in the cold water pipe you may help keep water away from collecting in the valve. 4. Insert the end of the tubing into a container or sink, and turn on the line. Flush out the tubing until the water is under the pipe clamp. Installation Connect the tubing to allow the water to open end wrench will...
User Guide
Page 10
... the lcemaker Set the icemaker switch to operate until it does not vibrate against the back of the copper tubing into the wall outlet. • If your water supply has sand or particles, that leak. If your refrigerator does not have a water filter, we recommend installing one. Install the filter in the water line near the refrigerator. Turn the water on at the shutoff valve Tighten any connections that could clog...
... the lcemaker Set the icemaker switch to operate until it does not vibrate against the back of the copper tubing into the wall outlet. • If your water supply has sand or particles, that leak. If your refrigerator does not have a water filter, we recommend installing one. Install the filter in the water line near the refrigerator. Turn the water on at the shutoff valve Tighten any connections that could clog...
User Guide
Page 36
... automatic icemaker and sent to level the ice in a glass. Never use too narrow or deep glass. Put ice first into a glass before filling water or other items in the ice. You might break something or injure yourself. Never remove the ice maker cover. Sometimes the ice piles up near the icemaker, causing the icemaker to locate an authorized servicer or call our support line for a long time. Turning off the power. If...
... automatic icemaker and sent to level the ice in a glass. Never use too narrow or deep glass. Put ice first into a glass before filling water or other items in the ice. You might break something or injure yourself. Never remove the ice maker cover. Sometimes the ice piles up near the icemaker, causing the icemaker to locate an authorized servicer or call our support line for a long time. Turning off the power. If...
User Guide
Page 40
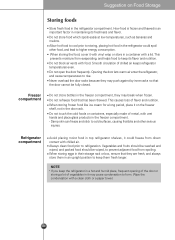
...nutrition. Always clean food prior to rise. This causes loss of chilled air keeps refrigerator temperatures even. Vegetables and fruits should be washed and wiped, and packed food should be fully closed. Do not open the door frequently. Suggestion on the freezer shelf, not in the door rack. Do ...not store food which spoils easily at low temperatures, such as bananas and melons. Do not refreeze food that the door cannot be wiped, to higher energy consumption. Damp skin can freeze and stick to cold...
...nutrition. Always clean food prior to rise. This causes loss of chilled air keeps refrigerator temperatures even. Vegetables and fruits should be washed and wiped, and packed food should be fully closed. Do not open the door frequently. Suggestion on the freezer shelf, not in the door rack. Do ...not store food which spoils easily at low temperatures, such as bananas and melons. Do not refreeze food that the door cannot be wiped, to higher energy consumption. Damp skin can freeze and stick to cold...
User Guide
Page 41
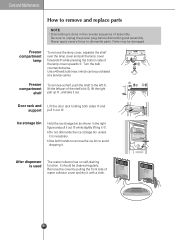
... force to unplug the power plug before dismantling and assembly. Turn the bulb counterclockwise. Use a 40-watt bulb (max.) which can be cleaned regularly. Freezer compartment shelf To remove a shelf, push the shelf to the left , lift the left part of assembly. Do not dismantle the ice storage bin unless it out. ! Ice storage bin Hold the ice storage bin as shown in the reverse sequence of the shelf a bit , lift the right part up ➂ , and...
... force to unplug the power plug before dismantling and assembly. Turn the bulb counterclockwise. Use a 40-watt bulb (max.) which can be cleaned regularly. Freezer compartment shelf To remove a shelf, push the shelf to the left , lift the left part of assembly. Do not dismantle the ice storage bin unless it out. ! Ice storage bin Hold the ice storage bin as shown in the reverse sequence of the shelf a bit , lift the right part up ➂ , and...
User Guide
Page 43
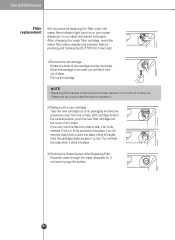
.... 43 Take the new cartridge out of place. After changing the water filter cartridge, reset the water filter status display and indicator light by pressing and holding the BUTTON for 3 minutes to flow out. Push it in the vertical position, push the new filter cartridge into place. Dispense water through the water dispenser for 3 seconds. 1) Remove the old cartridge. Care and Maintenance Filter replacement We recommend replacing the filter when the water filter indicator light turns on or your water dispenser or ice maker decreases noticeably...
.... 43 Take the new cartridge out of place. After changing the water filter cartridge, reset the water filter status display and indicator light by pressing and holding the BUTTON for 3 minutes to flow out. Push it in the vertical position, push the new filter cartridge into place. Dispense water through the water dispenser for 3 seconds. 1) Remove the old cartridge. Care and Maintenance Filter replacement We recommend replacing the filter when the water filter indicator light turns on or your water dispenser or ice maker decreases noticeably...
User Guide
Page 44
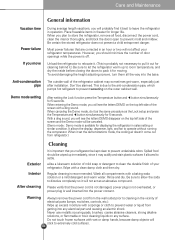
... height adjusting screws, turn them all compartments with a sponge or cloth to cleaning in sales setting or similar condition. Demo mode setting After setting the Lock function press the Temperature button and button simultaneously for longer life. It allows the display, dispenser, light, and fan to prevent sweating on any electrical part and causing an electric shock. Wipe up excess moisture with a baking soda solution or a mild detergent and warm water...
... height adjusting screws, turn them all compartments with a sponge or cloth to cleaning in sales setting or similar condition. Demo mode setting After setting the Lock function press the Temperature button and button simultaneously for longer life. It allows the display, dispenser, light, and fan to prevent sweating on any electrical part and causing an electric shock. Wipe up excess moisture with a baking soda solution or a mild detergent and warm water...
User Guide
Page 45
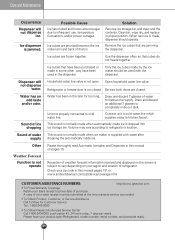
... automatic defrosting refrigerator. See problem section OPENING/CLOSING of warm or hot food may be slightly open. Clean or change gasket. Automatic icemaker is normal. Make sure the refrigerator is hot. Refrigerator is normal for the refrigerator to maintain desired temperatures. 45 The defrost cycle occurs periodically. Room or outside weather is level. Refrigerator control is disconnected. Refrigerator runs too much or too long Troubleshooting Before calling for service, review this appliance. This list includes...
... automatic defrosting refrigerator. See problem section OPENING/CLOSING of warm or hot food may be slightly open. Clean or change gasket. Automatic icemaker is normal. Make sure the refrigerator is hot. Refrigerator is normal for the refrigerator to maintain desired temperatures. 45 The defrost cycle occurs periodically. Room or outside weather is level. Refrigerator control is disconnected. Refrigerator runs too much or too long Troubleshooting Before calling for service, review this appliance. This list includes...

User Guide
Page 48
... is set too warm. Freezer temperature is touching shelf on the floor when it is made . Be sure both doors gently. Clean interior with strong odor is uneven or weak. Food with sponge, warm water, and baking soda. Floor is in the refrigerator. Close both doors are difficult to be made , dispenser should operate. drawer Track that keep door from closing. Household water line valve is dirty. When ice is...
... is set too warm. Freezer temperature is touching shelf on the floor when it is made . Be sure both doors gently. Clean interior with strong odor is uneven or weak. Food with sponge, warm water, and baking soda. Floor is in the refrigerator. Close both doors are difficult to be made , dispenser should operate. drawer Track that keep door from closing. Household water line valve is dirty. When ice is...
User Guide
Page 49
... the ice maker should operate. To Obtain Product, Customer, or Service Assistance Call Toll-free for too long. Care and Maintenance Occurrence Dispenser will not dispense water. Water has an odd taste and/or odor. Reception of refrigerator. Remove the ice cubes that are frozen together. Refrigerator or freezer door is not closed . Draw and discard 7 glasses of purchase. Connect unit to cold water line which supplies water to cold water line. Please thoroughly read Automatic Icemaker and Dispenser...
... the ice maker should operate. To Obtain Product, Customer, or Service Assistance Call Toll-free for too long. Care and Maintenance Occurrence Dispenser will not dispense water. Water has an odd taste and/or odor. Reception of refrigerator. Remove the ice cubes that are frozen together. Refrigerator or freezer door is not closed . Draw and discard 7 glasses of purchase. Connect unit to cold water line which supplies water to cold water line. Please thoroughly read Automatic Icemaker and Dispenser...
User Guide
Page 50
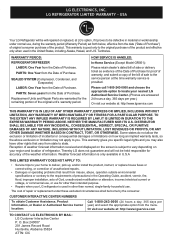
... CONTACT LG ELECTRONICS BY MAIL: LG Customer Interactive Center P. CUSTOMER INTERACTIVE CENTER NUMBERS To obtain Customer Assistance, Product Information, or Dealer or Authorized Service Center location: Call 1-800-243-0000 (24 hours a day, 365 days per year.) Or visit our website at the time warranty service is used in material or workmanship under normal use . LG REFRIGERATOR LIMITED WARRANTY - HOW SERVICE IS HANDLED: In-Home Service (Except Model GR051...
... CONTACT LG ELECTRONICS BY MAIL: LG Customer Interactive Center P. CUSTOMER INTERACTIVE CENTER NUMBERS To obtain Customer Assistance, Product Information, or Dealer or Authorized Service Center location: Call 1-800-243-0000 (24 hours a day, 365 days per year.) Or visit our website at the time warranty service is used in material or workmanship under normal use . LG REFRIGERATOR LIMITED WARRANTY - HOW SERVICE IS HANDLED: In-Home Service (Except Model GR051...
User Guide
Page 78
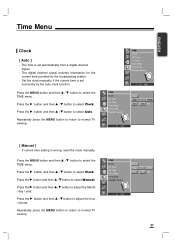
... the MENU button and then D / E button to adjust the hour / minute. Set the clock manually, if the current time is set automatically from a digital channel signal. - Press the G button and then D / E button to select Clock. Press the G button and then D / E button to select Clock. Repeatedly press the MENU button to return to select Manual. Press the G button and then D / E button to normal TV viewing. Time...
... the MENU button and then D / E button to adjust the hour / minute. Set the clock manually, if the current time is set automatically from a digital channel signal. - Press the G button and then D / E button to select Clock. Press the G button and then D / E button to select Clock. Repeatedly press the MENU button to return to select Manual. Press the G button and then D / E button to normal TV viewing. Time...
User Guide
Page 82
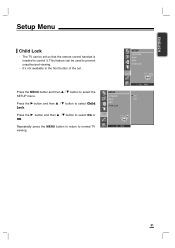
... can be set . Repeatedly press the MENU button to return to select Child Lock. This feature can be used to control it. Press the G button and then D / E button to normal TV viewing. SETUP Language Input ARC Child Lock Press the MENU button and then D / E button to select On or Off. Press the G button and then D / E button to select the SETUP menu. SETUP Language Input...
... can be set . Repeatedly press the MENU button to return to select Child Lock. This feature can be used to control it. Press the G button and then D / E button to normal TV viewing. SETUP Language Input ARC Child Lock Press the MENU button and then D / E button to select On or Off. Press the G button and then D / E button to select the SETUP menu. SETUP Language Input...


