Owner's Manual
Page 2
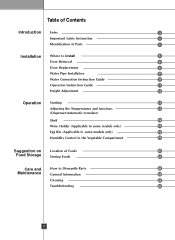
... to install 6 Door Removal 8 Door Replacement 9 Water Pipe Installation 9 Water Connection Instruction Guide 9 Operation Instruction Guide 11 Height Adjustment 12 Operation Starting 13 Adjusting the Temperatures and functions 13 (Dispenser/Automatic Icemaker) Shelf 19 Wine Holder (Applicable to some models only) 19 Egg Bin (Applicable to some models only) 19 Humidity Control in the Vegetable Compartment 19 Suggestion on Location of Foods 20 Food Storage Storing Foods 21 Care and How to Dismantle Parts 22 Maintenance General Information 24 Cleaning 24...
... to install 6 Door Removal 8 Door Replacement 9 Water Pipe Installation 9 Water Connection Instruction Guide 9 Operation Instruction Guide 11 Height Adjustment 12 Operation Starting 13 Adjusting the Temperatures and functions 13 (Dispenser/Automatic Icemaker) Shelf 19 Wine Holder (Applicable to some models only) 19 Egg Bin (Applicable to some models only) 19 Humidity Control in the Vegetable Compartment 19 Suggestion on Location of Foods 20 Food Storage Storing Foods 21 Care and How to Dismantle Parts 22 Maintenance General Information 24 Cleaning 24...
Owner's Manual
Page 4
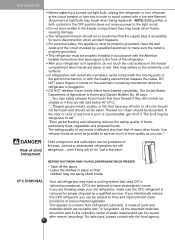
... happens. NOTE:Setting either or both controls to the OFF position does not remove power to the front of many other foods. Have the wall outlet and the circuit checked by a qualified servicer. Skin may be properly installed in accordance with the Attention Installer Instructions that of the refrigerator. In refrigerators with automatic icemakers, avoid contact with the moving parts of waste...
... happens. NOTE:Setting either or both controls to the OFF position does not remove power to the front of many other foods. Have the wall outlet and the circuit checked by a qualified servicer. Skin may be properly installed in accordance with the Attention Installer Instructions that of the refrigerator. In refrigerators with automatic icemakers, avoid contact with the moving parts of waste...

Owner's Manual
Page 5
... cause a fire hazard from the electrical source. If the supply cord is recommended that the electrical rating of installation, cleaning, or removing a light bulb, turn the control (Thermostat, Refrigerator Control or Freezer Control, depending on the model) to use an extension cord. Introduction GROUNDING IMPORTANT: Please read carefully. RECOMMENDED GROUNDING METHOD The refrigerator should always be provided. Do not use an extension cord, it replaced with a switch or pull chain. Have the wall...
... cause a fire hazard from the electrical source. If the supply cord is recommended that the electrical rating of installation, cleaning, or removing a light bulb, turn the control (Thermostat, Refrigerator Control or Freezer Control, depending on the model) to use an extension cord. Introduction GROUNDING IMPORTANT: Please read carefully. RECOMMENDED GROUNDING METHOD The refrigerator should always be provided. Do not use an extension cord, it replaced with a switch or pull chain. Have the wall...

Owner's Manual
Page 6
... it. Introduction Identification of Parts Freezer Compartment Refrigerator Compartment Door Rack Automatic Icemaker Lamp Shelf (steel) Dairy Corner Lamp Water Filter Shelf Shelf Snack Drawer Door Rack Drawer Door Rack Vegetable Drawer Door Rack Vegetable Drawer Lower Cover • NOTE: If you nd some parts missing from your unit, they may be discolored by heat from the bottom of damage, there is not even, make the refrigerator level by rotating the height adjusting screw.
... it. Introduction Identification of Parts Freezer Compartment Refrigerator Compartment Door Rack Automatic Icemaker Lamp Shelf (steel) Dairy Corner Lamp Water Filter Shelf Shelf Snack Drawer Door Rack Drawer Door Rack Vegetable Drawer Door Rack Vegetable Drawer Lower Cover • NOTE: If you nd some parts missing from your unit, they may be discolored by heat from the bottom of damage, there is not even, make the refrigerator level by rotating the height adjusting screw.
Owner's Manual
Page 7
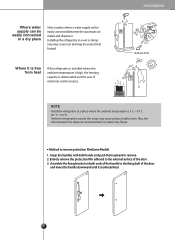
... free from heat If this range may be easily connected between the dispenser and automatic ice maker may freeze. Ambient temperature outside this refrigerator is installed where the ambient temperature is high, the freezing capacity is 5˚C ~ 43˚C (41˚F~110˚F). Method to remove. 2. Installing the refrigerator in a dry place Select a place where a water supply can be an electrical hazard. Also, the tube between the automatic ice maker...
... free from heat If this range may be easily connected between the dispenser and automatic ice maker may freeze. Ambient temperature outside this refrigerator is installed where the ambient temperature is high, the freezing capacity is 5˚C ~ 43˚C (41˚F~110˚F). Method to remove. 2. Installing the refrigerator in a dry place Select a place where a water supply can be an electrical hazard. Also, the tube between the automatic ice maker...
Owner's Manual
Page 8
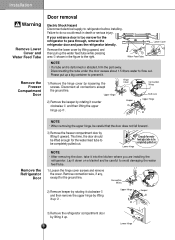
.... Hinge 1) Remove the hinge cover by lifting it up . Upper Hinge Connection Wires Earth Line 2) Remove the keeper by lifting it up . 8 Lower Hinge Please put up . Connection Wires 2) Remove keeper by rotating it clockwise and then remove the upper hinge by rotating it counter clockwise and then lifting the upper hinge up a big container to refrigerator before installing. Installation Warning Remove Lower Cover and Water Feed Tube Remove the Freezer Compartment Door Door removal Electric Shock Hazard Disconnect electrical supply...
.... Hinge 1) Remove the hinge cover by lifting it up . Upper Hinge Connection Wires Earth Line 2) Remove the keeper by lifting it up . 8 Lower Hinge Please put up . Connection Wires 2) Remove keeper by rotating it clockwise and then remove the upper hinge by rotating it counter clockwise and then lifting the upper hinge up a big container to refrigerator before installing. Installation Warning Remove Lower Cover and Water Feed Tube Remove the Freezer Compartment Door Door removal Electric Shock Hazard Disconnect electrical supply...
Owner's Manual
Page 9
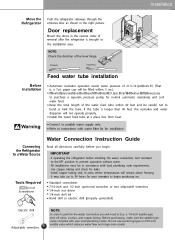
... codes. Connect to a Water Source Tools Required Screwdriver Water Connection Instruction Guide Read all directions carefully before installing the water connection, turn icemaker to theOFF position to prevent operation without water. • All installations must be careful not to begin . Before purchasing, make sure the saddle-type valve complies with water filter kit for leaks. • Install copper tubing only in the reverse order of the water feed tube within 3 sec.). If the tube is , a 7oz. Door replacement Mount the doors...
... codes. Connect to a Water Source Tools Required Screwdriver Water Connection Instruction Guide Read all directions carefully before installing the water connection, turn icemaker to theOFF position to prevent operation without water. • All installations must be careful not to begin . Before purchasing, make sure the saddle-type valve complies with water filter kit for leaks. • Install copper tubing only in the reverse order of the water feed tube within 3 sec.). If the tube is , a 7oz. Door replacement Mount the doors...
Owner's Manual
Page 10
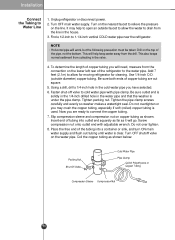
... 10 Turn OFF shutoff valve on the line. Turn on the nearest faucet to Water Line 1. This will go. Packing Nut Shut Off Valve Cold Water Pipe Pipe Clamp Coil of the tubing into outlet end squarely as far as it will help to cold water pipe with adjustable wrench. Tighten the pipe clamp screws carefully and evenly so washer makes a watertight seal. Turn OFF main water supply. Installation Connect the Tubing...
... 10 Turn OFF shutoff valve on the line. Turn on the nearest faucet to Water Line 1. This will go. Packing Nut Shut Off Valve Cold Water Pipe Pipe Clamp Coil of the tubing into outlet end squarely as far as it will help to cold water pipe with adjustable wrench. Tighten the pipe clamp screws carefully and evenly so washer makes a watertight seal. Turn OFF main water supply. Installation Connect the Tubing...
Owner's Manual
Page 11
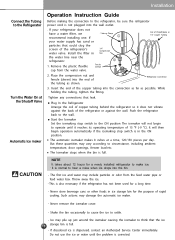
... lcemaker Set the icemaking stop switch is full. - The automatic icemaker makes 8 cubes at the Shutoff Valve Automatic Ice maker Operation Instruction Guide Before making the connection to the refrigerator, be sure the refrigerator power cord is corrected. Ice may include particles or odor from the water valve. While holding the tubing, tighten the fitting. Tighten any connections that could clog the screen of rapid cooling. Throw away the ice. - Never remove the icemaker cover. - Place...
... lcemaker Set the icemaking stop switch is full. - The automatic icemaker makes 8 cubes at the Shutoff Valve Automatic Ice maker Operation Instruction Guide Before making the connection to the refrigerator, be sure the refrigerator power cord is corrected. Ice may include particles or odor from the water valve. While holding the tubing, tighten the fitting. Tighten any connections that could clog the screen of rapid cooling. Throw away the ice. - Never remove the icemaker cover. - Place...
Owner's Manual
Page 15
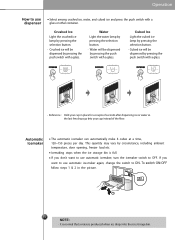
... you want to use dispenser Select among crushed ice, water, and cubed ice and press the push switch with a glass. Cubed Ice Light the cubed ice lamp by pressing the selection button. • Cubed ice will be dispensed by circumstance, including ambient temperature, door opening, freezer load etc. Icemaking stops when the ice storage bin is produced when ice drops into your cup in the picture. Operation How to use automatic icemaker, turn the icemaker switch to OFF...
... you want to use dispenser Select among crushed ice, water, and cubed ice and press the push switch with a glass. Cubed Ice Light the cubed ice lamp by pressing the selection button. • Cubed ice will be dispensed by circumstance, including ambient temperature, door opening, freezer load etc. Icemaking stops when the ice storage bin is produced when ice drops into your cup in the picture. Operation How to use automatic icemaker, turn the icemaker switch to OFF...
Owner's Manual
Page 17
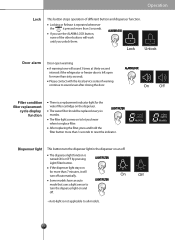
... Unlock Door alarm Door open warning A warning tone will sound 3 times at thirty-second intervals if the refrigerator or freezer door is left open for the water filter cartridge on the dispenser. After replacing the filter, press and hold the filter button more than sixty seconds. Please contact with the local service center if warning continue to reset the indicator. On Off Filter condition filter replacement cycle display...
... Unlock Door alarm Door open warning A warning tone will sound 3 times at thirty-second intervals if the refrigerator or freezer door is left open for the water filter cartridge on the dispenser. After replacing the filter, press and hold the filter button more than sixty seconds. Please contact with the local service center if warning continue to reset the indicator. On Off Filter condition filter replacement cycle display...
Owner's Manual
Page 18
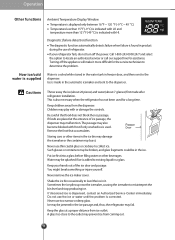
... cooled while stored in the water tank in the ice passage and, thus, the refrigerator may play with HI. Be careful that accumulates. Storing cans or other beverages. Such glasses or containers may burst. Shake the ice bin occasionally to locate an authorized servicer or call our support line for assistance. Sometimes the ice piles up near the icemaker, causing the icemaker to the dispenser. Never use...
... cooled while stored in the water tank in the ice passage and, thus, the refrigerator may play with HI. Be careful that accumulates. Storing cans or other beverages. Such glasses or containers may burst. Shake the ice bin occasionally to locate an authorized servicer or call our support line for assistance. Sometimes the ice piles up near the icemaker, causing the icemaker to the dispenser. Never use...
Owner's Manual
Page 22
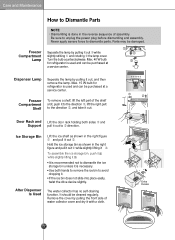
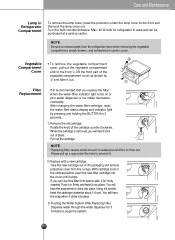
...-draining function. Parts may be purchased at a service center. 1 2 3 Dispenser Lamp Seperate the lamp by pulling it is necessary. Max. 15 W bulb for refrigerator is used and can be cleaned regularly. Hold the ice storage bin as shown in the reverse sequence of assembly. To assemble the ice storage bin, push it 6 while slightly lifting it out to direction. Freezer Compartment Shelf To remove a shelf, lift the left part of water collector cover...
...-draining function. Parts may be purchased at a service center. 1 2 3 Dispenser Lamp Seperate the lamp by pulling it is necessary. Max. 15 W bulb for refrigerator is used and can be cleaned regularly. Hold the ice storage bin as shown in the reverse sequence of assembly. To assemble the ice storage bin, push it 6 while slightly lifting it out to direction. Freezer Compartment Shelf To remove a shelf, lift the left part of water collector cover...
Owner's Manual
Page 23
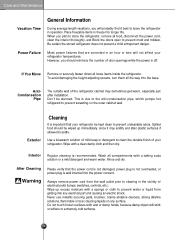
... and then pull the lamp cover out. Take the new cartridge out of water(around 25cc) to remove parts from the refrigerator door when removing the vegetable compartment, snack drawer, and refreshment center cover. Using it stops. Turn the bulb counterclockwise. Max. 40 W bulb for 3 seconds. 1) Remove the old cartridge. With cartridge knob in the vertical position, push the new filter cartridge into place. 3) Flushing the Water System After Replacing Filter. Push it in firmly...
... and then pull the lamp cover out. Take the new cartridge out of water(around 25cc) to remove parts from the refrigerator door when removing the vegetable compartment, snack drawer, and refreshment center cover. Using it stops. Turn the bulb counterclockwise. Max. 40 W bulb for 3 seconds. 1) Remove the old cartridge. With cartridge knob in the vertical position, push the new filter cartridge into place. 3) Flushing the Water System After Replacing Filter. Push it in firmly...
Owner's Manual
Page 24
... food, disconnect the power cord, clean the interior thoroughly, and Block the doors open to clean the durable finish of electrical parts (lamps, switches, controls, etc.). To avoid damaging the height adjusting screws, turn them all compartments with a clean damp cloth and then dry. Wipe with a baking soda solution or a mild detergent and warm water. Wash all the way into any surface. Never use metallic scouring pads...
... food, disconnect the power cord, clean the interior thoroughly, and Block the doors open to clean the durable finish of electrical parts (lamps, switches, controls, etc.). To avoid damaging the height adjusting screws, turn them all compartments with a clean damp cloth and then dry. Wipe with a baking soda solution or a mild detergent and warm water. Wash all the way into any surface. Never use metallic scouring pads...
Owner's Manual
Page 25
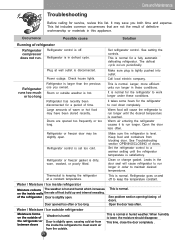
... warm air from blocking door. This is set too cold. See problem section opening/closing of doors. This is hot. When humidity is tightly pushed into outlet. Water / Moisture / Ice inside walls the rate of Weather is normal for a fully automatic defrosting refrigerator. the refrigerator or Door is disconnected. It may save you owned. See setting the controls. The defrost cycle occurs periodically. Leaks in this list. Plug at a constant temperature. Set the refrigerator control to work...
... warm air from blocking door. This is set too cold. See problem section opening/closing of doors. This is hot. When humidity is tightly pushed into outlet. Water / Moisture / Ice inside walls the rate of Weather is normal for a fully automatic defrosting refrigerator. the refrigerator or Door is disconnected. It may save you owned. See setting the controls. The defrost cycle occurs periodically. Leaks in this list. Plug at a constant temperature. Set the refrigerator control to work...
Owner's Manual
Page 26
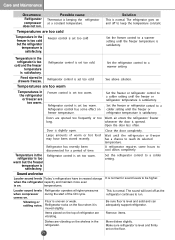
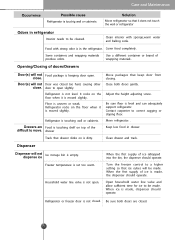
Temperatures are too cold Temperature in drawers freezes. Freezer control is set too warm. The refrigerator goes on freezer temperature. Food stored in the freezer is too cold but the freezer temperature is set too cold. Refrigerator control is set too cold Solution This is satisfactory. Close the door completely. Large amounts of refrigerator are too warm. Set the refrigerator control to reach its selected temperature. temperatures. Vibrating or Floor is slightly open. Care and Maintenance Occurrence Refrigerator compressor does not run . Freezer control is...
Temperatures are too cold Temperature in drawers freezes. Freezer control is set too warm. The refrigerator goes on freezer temperature. Food stored in the freezer is too cold but the freezer temperature is set too cold. Refrigerator control is set too cold Solution This is satisfactory. Close the door completely. Large amounts of refrigerator are too warm. Set the refrigerator control to reach its selected temperature. temperatures. Vibrating or Floor is slightly open. Care and Maintenance Occurrence Refrigerator compressor does not run . Freezer control is...
Owner's Manual
Page 27
... in drawer. Dispenser Dispenser will not Door was closed . 27 Turn the freezer control to a higher setting so that it is keeping door open. Be sure both doors gently. Clean interior with strong odor is moved slightly. Use a di erent container or brand of doors/Drawers Door(s) will be made , the dispenser should operate. Be sure oor is not level. Refrigerator is level and can adequately support refrigerator. Household water line valve is uneven or weak. Open household water line valve...
... in drawer. Dispenser Dispenser will not Door was closed . 27 Turn the freezer control to a higher setting so that it is keeping door open. Be sure both doors gently. Clean interior with strong odor is moved slightly. Use a di erent container or brand of doors/Drawers Door(s) will be made , the dispenser should operate. Be sure oor is not level. Refrigerator is level and can adequately support refrigerator. Household water line valve is uneven or weak. Open household water line valve...
Owner's Manual
Page 28
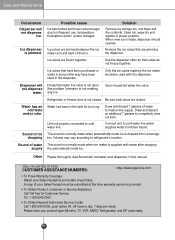
... ice. When new ice is provided. Ice cubes that have your Sales Receipt to refrigerator's location. See problem Icemaker is dropped into ice storage dropping bin. Open household water line valve. Sound of your Sales Receipt must be submitted at the time warranty service is made, dispenser should be used in proper position. ONLY IN UNITED STATES CUSTOMER ASSISTANCE NUMBERS: http://www.lgservice.com To Prove Warranty Coverage Retain your product type...
... ice. When new ice is provided. Ice cubes that have your Sales Receipt to refrigerator's location. See problem Icemaker is dropped into ice storage dropping bin. Open household water line valve. Sound of your Sales Receipt must be submitted at the time warranty service is made, dispenser should be used in proper position. ONLY IN UNITED STATES CUSTOMER ASSISTANCE NUMBERS: http://www.lgservice.com To Prove Warranty Coverage Retain your product type...
Owner's Manual
Page 29
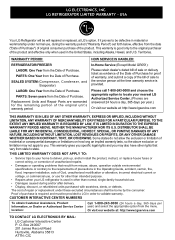
... misuse, abuse, operation outside environmental specifications or contrary to state. The cost of the original unit's warranty period. Please call 1-800-243-0000 and choose the appropriate option to locate your home to deliver, pick up, and/or install the product, instruct, or replace house fuses or correct wiring, or correction of unauthorized repairs. • Damages or operating problems that vary...
... misuse, abuse, operation outside environmental specifications or contrary to state. The cost of the original unit's warranty period. Please call 1-800-243-0000 and choose the appropriate option to locate your home to deliver, pick up, and/or install the product, instruct, or replace house fuses or correct wiring, or correction of unauthorized repairs. • Damages or operating problems that vary...


