

Owner's Manual
Page 2
.... Control panel features 15 OPERATION 16-27 - Options 17-18 • Setting convection auto conversion feature • Thermostat adjustment • Setting preheating alarm light on /off • Setting beeper volume • Setting temperature unit ("F" or "C") - Setting oven lockout feature 26 - We also suggest that you for service 35-38 WARRANTY 39 Français -2- Operating the warming zone 11 - About smoothtop surface 12 - Before using oven racks 20 - Removing and replacing the warming drawer .......30 - Setting the clock 16 - Recommended broiling guide 23...
.... Control panel features 15 OPERATION 16-27 - Options 17-18 • Setting convection auto conversion feature • Thermostat adjustment • Setting preheating alarm light on /off • Setting beeper volume • Setting temperature unit ("F" or "C") - Setting oven lockout feature 26 - We also suggest that you for service 35-38 WARRANTY 39 Français -2- Operating the warming zone 11 - About smoothtop surface 12 - Before using oven racks 20 - Removing and replacing the warming drawer .......30 - Setting the clock 16 - Recommended broiling guide 23...

Owner's Manual
Page 3
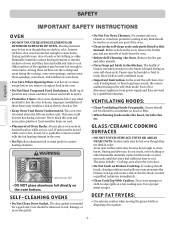
... is fully inserted into the anti-tip bracket. • Refer to the installation manual for cleaning, service, or any part of the appliance unless specifically recommended in the manual. • All other servicing should be referred to a qualified technician. • Always disconnect power to the sudden change in ignition of the heating element to hazards or unsafe practices which control pads operate each surface unit. CAUTION This symbol will...
... is fully inserted into the anti-tip bracket. • Refer to the installation manual for cleaning, service, or any part of the appliance unless specifically recommended in the manual. • All other servicing should be referred to a qualified technician. • Always disconnect power to the sudden change in ignition of the heating element to hazards or unsafe practices which control pads operate each surface unit. CAUTION This symbol will...
Owner's Manual
Page 4
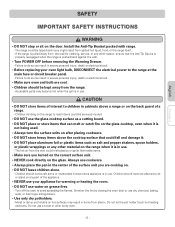
... part of foods from power supply and have serviced by a qualified technician. Before self-clean the oven, remove the broiler pan and any other utensils. • Never keep pet birds in injury. • Protective Liners. VENTILATING HOODS: • Clean Ventilating Hoods Frequently. Let hot air or steam escape before you remove or replace food in the self clean mode. Remove broiler pan and other material to cause burns. In the event the self clean error code F is displayed...
... part of foods from power supply and have serviced by a qualified technician. Before self-clean the oven, remove the broiler pan and any other utensils. • Never keep pet birds in injury. • Protective Liners. VENTILATING HOODS: • Clean Ventilating Hoods Frequently. Let hot air or steam escape before you remove or replace food in the self clean mode. Remove broiler pan and other material to cause burns. In the event the self clean error code F is displayed...
Owner's Manual
Page 5
... for warming or heating the room. • DO NOT use dry chemical, baking soda, or foam-type extinguishers. • Use only dry potholders. - Failure to avoid spreading the flames. Install the Anti-Tip Bracket packed with range. - Children should not be allowed to do so can melt or catch fire on the glass cooktop, even when it is not being used. • Always turn the surface...
... for warming or heating the room. • DO NOT use dry chemical, baking soda, or foam-type extinguishers. • Use only dry potholders. - Failure to avoid spreading the flames. Install the Anti-Tip Bracket packed with range. - Children should not be allowed to do so can melt or catch fire on the glass cooktop, even when it is not being used. • Always turn the surface...

Owner's Manual
Page 7
... baking soda on the fire or use cookware with the TIMED BAKE or DELAYED TIMED BAKE features. Doing so will destroy heat distribution, produce poor baking results and cause permanent damage to escape. Use care when opening the door to allow hot air or steam to the oven interior (aluminum foil will SCRATCH the surface. • DO NOT use scrub pads or abrasive cleaning pads. - It will melt to clean the oven door glass...
... baking soda on the fire or use cookware with the TIMED BAKE or DELAYED TIMED BAKE features. Doing so will destroy heat distribution, produce poor baking results and cause permanent damage to escape. Use care when opening the door to allow hot air or steam to the oven interior (aluminum foil will SCRATCH the surface. • DO NOT use scrub pads or abrasive cleaning pads. - It will melt to clean the oven door glass...

Owner's Manual
Page 11
... desired power setting. (Adjustable at the warming zone control position. Note: • Each time a pad is pressed a beep will appear when the unit is hot to cover foods. - Use the ( )/( ) pad to clean. • Food should be hot. • When warming foods do not use plastic wrap to touch. SURFACE CONTROLS COOKING OPERATING THE WARMING ZONE To set the warming zone control 1. Press ON/OFF pad at any time while the element is...
... desired power setting. (Adjustable at the warming zone control position. Note: • Each time a pad is pressed a beep will appear when the unit is hot to cover foods. - Use the ( )/( ) pad to clean. • Food should be hot. • When warming foods do not use plastic wrap to touch. SURFACE CONTROLS COOKING OPERATING THE WARMING ZONE To set the warming zone control 1. Press ON/OFF pad at any time while the element is...
Owner's Manual
Page 14
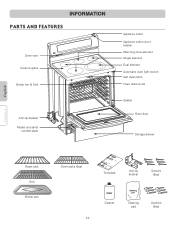
INFORMATION PARTS AND FEATURES Oven vent Ceramic glass Broiler fan & Grid Anti-tip bracket Model and serial number plate Appliance outlet Appliance outlet circuit breaker Warming zone element Single element Dual element Automatic oven light switch Self clean latch Oven racks (2 ea) Gasket Oven door Storage drawer English Français Roast rack Grid Broiler pan Oven racks (2ea) Template Anti-tip bracket Screws (6ea) - 14 - Cleaner Cleaning pad Anchors (6ea)
INFORMATION PARTS AND FEATURES Oven vent Ceramic glass Broiler fan & Grid Anti-tip bracket Model and serial number plate Appliance outlet Appliance outlet circuit breaker Warming zone element Single element Dual element Automatic oven light switch Self clean latch Oven racks (2 ea) Gasket Oven door Storage drawer English Français Roast rack Grid Broiler pan Oven racks (2ea) Template Anti-tip bracket Screws (6ea) - 14 - Cleaner Cleaning pad Anchors (6ea)
Owner's Manual
Page 15
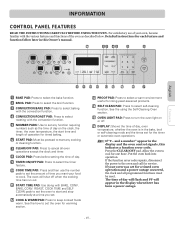
... indicates a function error code. COOK & WARM PAD: Press to select self-cleaning function. SELF CLEAN PAD: Press to keep cooked foods warm. OVEN LIGHT PAD: Press to select baking with BAKE, CONV. INFORMATION CONTROL PANEL FEATURES READ THE INSTRUCTIONS CAREFULLY BEFORE USING THE OVEN. CONVECTION BAKE PAD: Press to turn the oven light on the clock, the timer, the oven temperature, the start time and length of day will flash and PF will shut off . START PAD: Must be reset. ROAST, COOK TIME and SELF CLEAN pads to set the oven to cool for service...
... indicates a function error code. COOK & WARM PAD: Press to select self-cleaning function. SELF CLEAN PAD: Press to keep cooked foods warm. OVEN LIGHT PAD: Press to select baking with BAKE, CONV. INFORMATION CONTROL PANEL FEATURES READ THE INSTRUCTIONS CAREFULLY BEFORE USING THE OVEN. CONVECTION BAKE PAD: Press to turn the oven light on the clock, the timer, the oven temperature, the start time and length of day will flash and PF will shut off . START PAD: Must be reset. ROAST, COOK TIME and SELF CLEAN pads to set the oven to cool for service...
Owner's Manual
Page 17
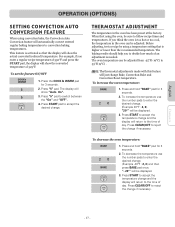
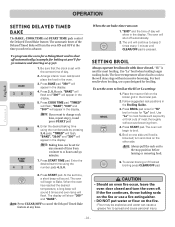
For example, if you to decide how much of day. To set the feature ON/OFF 1. When first using the oven, be displayed. 3. Note: The thermostat adjustments made with this feature will just change and the display will return to accept the temperature change Bake, Convection Bake and Convection Roast temperature. Press START to the time of an adjustment is needed. Press "5" pad to 35°F(19°C) . If you think...
For example, if you to decide how much of day. To set the feature ON/OFF 1. When first using the oven, be displayed. 3. Note: The thermostat adjustments made with this feature will just change and the display will return to accept the temperature change Bake, Convection Bake and Convection Roast temperature. Press START to the time of an adjustment is needed. Press "5" pad to 35°F(19°C) . If you think...
Owner's Manual
Page 22
... cancel the Delayed Timed Bake feature at the time you want to 11 hours and 59 minutes. 7. Use "Lo" to cook foods such as poultry or thick cuts of time from 1 minute to change cook time, repeat step 5, 6 and press START pad. 6. When the set with door closed and turn the oven ON and OFF at any amount of meat thoroughly without excessive browning. Press BROIL pad once...
... cancel the Delayed Timed Bake feature at the time you want to 11 hours and 59 minutes. 7. Use "Lo" to cook foods such as poultry or thick cuts of time from 1 minute to change cook time, repeat step 5, 6 and press START pad. 6. When the set with door closed and turn the oven ON and OFF at any amount of meat thoroughly without excessive browning. Press BROIL pad once...
Owner's Manual
Page 24
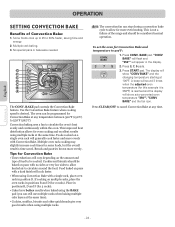
... OPERATION SETTING CONVECTION BAKE Benefits of food to allow heated air to 375°F: 1. Multiple oven rack cooking may slightly increase cook times for this example it is 350°F) is desired. Use the Convection Bake feature when cooking speed is reached and the display will show auto-converted oven temperature "350°", "CONV BAKE" and the fan icon. Note: The convection fan can still use multiple racks when baking multiple cake layers at the same time. BAKE pad controls...
... OPERATION SETTING CONVECTION BAKE Benefits of food to allow heated air to 375°F: 1. Multiple oven rack cooking may slightly increase cook times for this example it is 350°F) is desired. Use the Convection Bake feature when cooking speed is reached and the display will show auto-converted oven temperature "350°", "CONV BAKE" and the fan icon. Note: The convection fan can still use multiple racks when baking multiple cake layers at the same time. BAKE pad controls...
Owner's Manual
Page 25
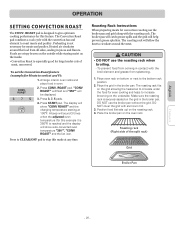
... for meats and poultry. Heated air circulates around the meat. Press 3, 7, 5 pads. 4. The display will show auto-converted oven temperature "350°", "CONV ROAST" and the fan icon. To prevent food from splattering. 1. DO NOT cover the grid with the convection fan and element to roast meats and poultry. Arrange interior oven racks and place food in the broiler pan. Press START pad. Press to CLEAR...
... for meats and poultry. Heated air circulates around the meat. Press 3, 7, 5 pads. 4. The display will show auto-converted oven temperature "350°", "CONV ROAST" and the fan icon. To prevent food from splattering. 1. DO NOT cover the grid with the convection fan and element to roast meats and poultry. Arrange interior oven racks and place food in the broiler pan. Press START pad. Press to CLEAR...
Owner's Manual
Page 28
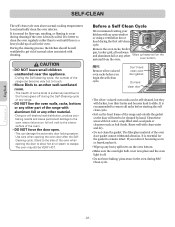
... to clean the oven regularly rather than to get rid of the oven). • DO NOT force the door open window or using a ventilation fan or hood during SelfClean cycle. Use care when opening the door to allow hot air or steam to the interior surface of normal odors associated with an open . - Before a Self Clean Cycle We recommend venting your kitchen with cleaning. oven bottom. Note: Remove silver-colored oven racks before starting the self clean cycle...
... to clean the oven regularly rather than to get rid of the oven). • DO NOT force the door open window or using a ventilation fan or hood during SelfClean cycle. Use care when opening the door to allow hot air or steam to the interior surface of normal odors associated with an open . - Before a Self Clean Cycle We recommend venting your kitchen with cleaning. oven bottom. Note: Remove silver-colored oven racks before starting the self clean cycle...
Owner's Manual
Page 29
... (Hot Surface) will not release from the lock position until the oven temperature has cooled. A 3-hour self-clean time is recommended for 4-hour clean time. The "DOOR LOCKED" icon will not affect performance. - 29 - Enter the desired Self-Clean starting time using the Self-Clean feature: • A Self--Clean cycle cannot be programmed. DELAY and CLEAN will begin to close . • If your clock is set for normal 12 hours display mode the Delayed Self-Clean can never be removed by touching SELF CLEAN...
... (Hot Surface) will not release from the lock position until the oven temperature has cooled. A 3-hour self-clean time is recommended for 4-hour clean time. The "DOOR LOCKED" icon will not affect performance. - 29 - Enter the desired Self-Clean starting time using the Self-Clean feature: • A Self--Clean cycle cannot be programmed. DELAY and CLEAN will begin to close . • If your clock is set for normal 12 hours display mode the Delayed Self-Clean can never be removed by touching SELF CLEAN...
Owner's Manual
Page 31
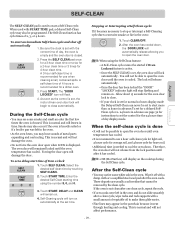
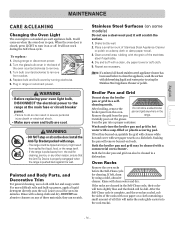
... in range or reconnect power. Both the broiler pan and grid can result in severe personal injury,death or electrical shock. • Make sure oven and bulb are cleaned in the Self-Clean cycle, their color will turn it will be cleaned in the back of oil (this will remove burned-on some models) Do not use a steel-wool pad; If the racks are cool. Turn the glass bulb cover...
... in range or reconnect power. Both the broiler pan and grid can result in severe personal injury,death or electrical shock. • Make sure oven and bulb are cleaned in the Self-Clean cycle, their color will turn it will be cleaned in the back of oil (this will remove burned-on some models) Do not use a steel-wool pad; If the racks are cool. Turn the glass bulb cover...

Owner's Manual
Page 32
... or permanent staining. Note: DO NOT heat the cooktop until it with your range, on the outside glass of the oven door. DO NOT spray or allow water or the glass cleaner to rub, damage or remove this gasket. The oven door gasket is essential for the first time, clean it has been cleaned thoroughly. Before using the cooktop for a good seal. They may result...
... or permanent staining. Note: DO NOT heat the cooktop until it with your range, on the outside glass of the oven door. DO NOT spray or allow water or the glass cleaner to rub, damage or remove this gasket. The oven door gasket is essential for the first time, clean it has been cleaned thoroughly. Before using the cooktop for a good seal. They may result...
Owner's Manual
Page 35
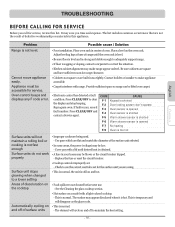
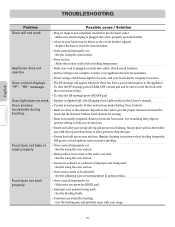
... installation. It may appear discolored when it is set . - Adjust leveling legs at base of oven. the cooktop - The list includes common occurrences that are flat and match the diameter of discoloration on the oven rack. Cannot move appliance easily. Check to maintain the heat setting. - 35 - CODE CAUSE F-1 Keypad is shorted F-2 Door locking system don't operate F-3 Oven sensor is opened F-4 Oven sensor is shorted F-5 Warm drawer sensor is shorted F-6 Warm drawer...
... installation. It may appear discolored when it is set . - Adjust leveling legs at base of oven. the cooktop - The list includes common occurrences that are flat and match the diameter of discoloration on the oven rack. Cannot move appliance easily. Check to maintain the heat setting. - 35 - CODE CAUSE F-1 Keypad is shorted F-2 Door locking system don't operate F-3 Oven sensor is opened F-4 Oven sensor is shorted F-5 Warm drawer sensor is shorted F-6 Warm drawer...
Owner's Manual
Page 36
...; Improper rack position being used . - Remove excess fat from meat. Regular cleaning is not complete. Always place grid on oven surfaces. See the using the oven section. Use the broiling pan and grid that came with your oven temperature in this Owner's manual. • Control not set . - Replace the fuse or reset the circuit breaker. • Oven controls improperly set properly. Call your appliance Servicer for service. • The PF message will not work . Follow instructions under Setting Oven Controls. •...
...; Improper rack position being used . - Remove excess fat from meat. Regular cleaning is not complete. Always place grid on oven surfaces. See the using the oven section. Use the broiling pan and grid that came with your oven temperature in this Owner's manual. • Control not set . - Replace the fuse or reset the circuit breaker. • Oven controls improperly set properly. Call your appliance Servicer for service. • The PF message will not work . Follow instructions under Setting Oven Controls. •...
Owner's Manual
Page 37
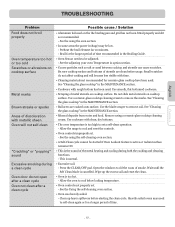
... not open after a clean cycle Oven not clean after a clean cycle Possible cause / Solution • Aluminum foil used . Heavily soiled ovens may be low. - Use a ceramic-glass cooktop cleaning cream to self-clean again or for 10 minutes. - See the using a ceramic-glass cooktop cleaning cream. Allow the range to set a self-clean operation. - Preheat the broil element for a longer period of time recommended in the MAINTENANCE section. • Cookware with clean, dry bottoms. • The oven temperature is cancelled. Use cookware...
... not open after a clean cycle Oven not clean after a clean cycle Possible cause / Solution • Aluminum foil used . Heavily soiled ovens may be low. - Use a ceramic-glass cooktop cleaning cream to self-clean again or for 10 minutes. - See the using a ceramic-glass cooktop cleaning cream. Allow the range to set a self-clean operation. - Preheat the broil element for a longer period of time recommended in the MAINTENANCE section. • Cookware with clean, dry bottoms. • The oven temperature is cancelled. Use cookware...
Owner's Manual
Page 39
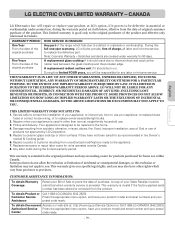
... to correct the installation of products not approved by LG Corporation. 5. THIS LIMITED WARRANTY DOES NOT APPLY TO: 1. Service calls to you may also have not been cared for home use your appliance, to replace house fuses or correct house wiring, or to a defect in the Owner's manual & Cooking guide. 6. Damage resulting from provinces to replace the defective part. Repairs to ceramic glass cooktop or other surfaces if they have...
... to correct the installation of products not approved by LG Corporation. 5. THIS LIMITED WARRANTY DOES NOT APPLY TO: 1. Service calls to you may also have not been cared for home use your appliance, to replace house fuses or correct house wiring, or to a defect in the Owner's manual & Cooking guide. 6. Damage resulting from provinces to replace the defective part. Repairs to ceramic glass cooktop or other surfaces if they have...


