
Owners Manual
Page 2
... Card Safety Instructions Grounding Requirements Parts and Features Refrigerator Installation Unpacking Your Refrigerator Installation Base Grille Removing, Reversing and Replacing Your Refrigerator Doors Door Cloosing and Alignment Using Your Refrigerator Ensuring Proper Air Circulation Setting the Controls Adjusting Control Settings Food Storage Guide Storing Frozen Food Refrigerator Shelves Ice Tray Snack Corner Crisper and Crisper...
... Card Safety Instructions Grounding Requirements Parts and Features Refrigerator Installation Unpacking Your Refrigerator Installation Base Grille Removing, Reversing and Replacing Your Refrigerator Doors Door Cloosing and Alignment Using Your Refrigerator Ensuring Proper Air Circulation Setting the Controls Adjusting Control Settings Food Storage Guide Storing Frozen Food Refrigerator Shelves Ice Tray Snack Corner Crisper and Crisper...
Owners Manual
Page 3
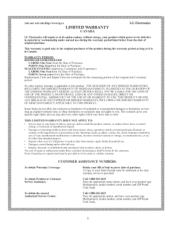
...TIlE IMPLIED WARRANTY OF MERCtlANTABILITY APPLICABLE TO TIllS PRODUCT. Call 1-888-542-2623 Press the appropriate menu option, and have your LG refrigerator is applicable to validate wananty. Call 1-888-542-2623 Press the appropriate option, and have your Bill of Sale to the ...product during and/or after delivery. • Display, discount, or refurbished units purchased with scratches, dents, or defects. WARRANTY PERIOD: REFRIGERATOR/FREEZER LABOR: One Year f?om the Date of incidental or consequential damages or limitations on how long an implied warranty lasts; CUSTOMER ...
...TIlE IMPLIED WARRANTY OF MERCtlANTABILITY APPLICABLE TO TIllS PRODUCT. Call 1-888-542-2623 Press the appropriate menu option, and have your LG refrigerator is applicable to validate wananty. Call 1-888-542-2623 Press the appropriate option, and have your Bill of Sale to the ...product during and/or after delivery. • Display, discount, or refurbished units purchased with scratches, dents, or defects. WARRANTY PERIOD: REFRIGERATOR/FREEZER LABOR: One Year f?om the Date of incidental or consequential damages or limitations on how long an implied warranty lasts; CUSTOMER ...
Owners Manual
Page 5
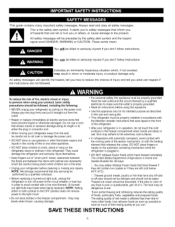
...frayed or otherwise damaged. "...Thawed ground meats, poultry or fish that were taped to the extremely cold surfaces. • In refrigerators with automatic icemakers, avoid contact with the heating element that shows cracks or abrasion damage along its intended purpose as you don't... • Repair or replace immediately all safety messages. Use refrozen foods as soon as possible to the product. Unplug your refrigerator before using your refrigerator by a qualified electrician to avoid contact with a live wire filament. (A burnedout light bulb may break when being replaced.) ...
...frayed or otherwise damaged. "...Thawed ground meats, poultry or fish that were taped to the extremely cold surfaces. • In refrigerators with automatic icemakers, avoid contact with the heating element that shows cracks or abrasion damage along its intended purpose as you don't... • Repair or replace immediately all safety messages. Use refrozen foods as soon as possible to the product. Unplug your refrigerator before using your refrigerator by a qualified electrician to avoid contact with a live wire filament. (A burnedout light bulb may break when being replaced.) ...

Owners Manual
Page 6
...minimum) and 120 volts. If you are not problems of installation, cleaning, or removing a light bulb, turn the control (Thermostat, Refrigerator or Freezer Control depending on the model) to the desired setting. Use a receptacle which could cause a fire hazard from overheated wires. Your ... own individual properly grounded electrical outlet rated for proper disposal by a qualified electrician to make sure the CFC refrigerant is recommended that the electrical rating of the refrigerator. It is removed for 115 Volts, 60 Hz, AC only and fused at right to help prevent accidents...
...minimum) and 120 volts. If you are not problems of installation, cleaning, or removing a light bulb, turn the control (Thermostat, Refrigerator or Freezer Control depending on the model) to the desired setting. Use a receptacle which could cause a fire hazard from overheated wires. Your ... own individual properly grounded electrical outlet rated for proper disposal by a qualified electrician to make sure the CFC refrigerant is recommended that the electrical rating of the refrigerator. It is removed for 115 Volts, 60 Hz, AC only and fused at right to help prevent accidents...

Owners Manual
Page 7
...0 O Use this section to become more familiar with the parts and features. The refrigerator you have purchased may not match your convenience. O Ice Bin Freezer Shelf _ Digital Sensor Control Refrigerator Light Snack Pan _1 Shelves O Crisper Keeps fruits and vegetables fresh and crisp Freezer Door... Bin Dairy Corner O Can Dispenser O Door Bin O Refrigerator Door Rack @Base Grille Vitabox 0nside)* *On some or all ...
...0 O Use this section to become more familiar with the parts and features. The refrigerator you have purchased may not match your convenience. O Ice Bin Freezer Shelf _ Digital Sensor Control Refrigerator Light Snack Pan _1 Shelves O Crisper Keeps fruits and vegetables fresh and crisp Freezer Door... Bin Dairy Corner O Can Dispenser O Door Bin O Refrigerator Door Rack @Base Grille Vitabox 0nside)* *On some or all ...

Owners Manual
Page 8
... Snack Pan _1 Shelves O Crisper Keeps fruits and vegetables fresh and crisp Freezer Door Bin O Dairy Corner OCan Dispenser O Door Bin O Refrigerator Door Rack @Base Grille Vitabox 0nside)* *On some or all of the features shown below . o .......... Page references are included for your model. NOTE: This guide ...
... Snack Pan _1 Shelves O Crisper Keeps fruits and vegetables fresh and crisp Freezer Door Bin O Dairy Corner OCan Dispenser O Door Bin O Refrigerator Door Rack @Base Grille Vitabox 0nside)* *On some or all of the features shown below . o .......... Page references are included for your model. NOTE: This guide ...
Owners Manual
Page 9
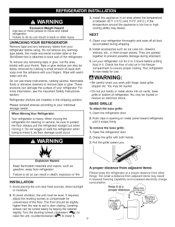
... in the shipping position. Install accessories such as gasoline, away from adjacent items may be level. You may lessen. Pull the grille toward refrigerator until it , as floor damage could occur. 3. Failure to lower it . Turn the leveling screws clockwise ( _ ) to raise the... unit, counterclockwise (_'_') to do so can be injured. Too small a distance from refrigerator. To remove any temporary labels from other injury. NEXT 1. They are installed in an area where the temperature is between 55°F (13&#...
... in the shipping position. Install accessories such as gasoline, away from adjacent items may be level. You may lessen. Pull the grille toward refrigerator until it , as floor damage could occur. 3. Failure to lower it . Turn the leveling screws clockwise ( _ ) to raise the... unit, counterclockwise (_'_') to do so can be injured. Too small a distance from refrigerator. To remove any temporary labels from other injury. NEXT 1. They are installed in an area where the temperature is between 55°F (13&#...

Owners Manual
Page 10
... attach it to rightopening type) 1. Lift the door (11) slightly and remove it on the left side on the right. REMOVING, REVERSING (OPTIONAL)AND REPLACING REFRIGERATOR DOORS TOOLS NEEDED: 1/4 hex-head socket wrench, NO. 2 Phillips screwdriver, flat-head screwdriver, 1/4-inch Open-end wrench, flat 2-inchutty knife. Loosen the screws (9) and ...After Before 10 Remove food and any adjustable door or utility bins from right side on hinge (20) to the left of the base. Removing Refrigerator Door . IMPORTANT: Before you begin, turn the refrigerator OFF and unplug it on hinge (20). -
... attach it to rightopening type) 1. Lift the door (11) slightly and remove it on the left side on the right. REMOVING, REVERSING (OPTIONAL)AND REPLACING REFRIGERATOR DOORS TOOLS NEEDED: 1/4 hex-head socket wrench, NO. 2 Phillips screwdriver, flat-head screwdriver, 1/4-inch Open-end wrench, flat 2-inchutty knife. Loosen the screws (9) and ...After Before 10 Remove food and any adjustable door or utility bins from right side on hinge (20) to the left of the base. Removing Refrigerator Door . IMPORTANT: Before you begin, turn the refrigerator OFF and unplug it on hinge (20). -

Owners Manual
Page 11
...the door in slots to adjust the leveling screws.Turn the leveling screw clockwise to close easily. DOOR CLOSING AND ALIGNMENT Door Closing Your refrigerator has two front leveling screws--one on the right and one on the left side to right side. • Attach the door (3)...hinge cover. 2. Have someone push against the top of silicon grease on either side. . Insert a flat screwdriver in place or put a spacer between your refrigerator seems unsteady or you tighten the top hinge screws. 4. Replace the top hinge cover. 11 Attach the top hinge (10) with the 3 screws (5). ...
...the door in slots to adjust the leveling screws.Turn the leveling screw clockwise to close easily. DOOR CLOSING AND ALIGNMENT Door Closing Your refrigerator has two front leveling screws--one on the right and one on the left side to right side. • Attach the door (3)...hinge cover. 2. Have someone push against the top of silicon grease on either side. . Insert a flat screwdriver in place or put a spacer between your refrigerator seems unsteady or you tighten the top hinge screws. 4. Replace the top hinge cover. 11 Attach the top hinge (10) with the 3 screws (5). ...
Owners Manual
Page 12
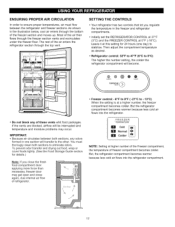
...open and close again, due internal air flow of the freezer section and moves up. IMPORTANT: o Because air circulates between the refrigerator and freezer sections. To prevent odor transfer and drying out food, wrap or cover foods tightly. (See the Food Storage Guide ... for details.) Note: If you regulate the temperature in the freezer and refrigerator compartments. But the refrigerator compartment becomes warmer because less cold air flows into the refrigerator compartment. 12 Initially set the REFRIGERATOR CONTROL at 37°F (3°C) and the FREEZER CONTROL at higher number...
...open and close again, due internal air flow of the freezer section and moves up. IMPORTANT: o Because air circulates between the refrigerator and freezer sections. To prevent odor transfer and drying out food, wrap or cover foods tightly. (See the Food Storage Guide ... for details.) Note: If you regulate the temperature in the freezer and refrigerator compartments. But the refrigerator compartment becomes warmer because less cold air flows into the refrigerator compartment. 12 Initially set the REFRIGERATOR CONTROL at 37°F (3°C) and the FREEZER CONTROL at higher number...

Owners Manual
Page 13
...adjusts the cold air flow from the freezer to ensure freshness. If it colder. - This prevents food odor and taste transfer throughout the refrigerator. When storing an extra supply, wrap in plastic wrap or aluminum foil. Once opened, rewrap tightly in freezer packaging and freeze. Sort...Keep opened often Large amount of food added Very cold room temperature (Can't cycle often enough) Heavy ice usage Air vents blocked by adjusting the refrigerator first. For best storage, place milk on interior shelf, not on door shelf. Chicken 1-2 days Ground beef 1-2 days Organ meats (liver, ...
...adjusts the cold air flow from the freezer to ensure freshness. If it colder. - This prevents food odor and taste transfer throughout the refrigerator. When storing an extra supply, wrap in plastic wrap or aluminum foil. Once opened, rewrap tightly in freezer packaging and freeze. Sort...Keep opened often Large amount of food added Very cold room temperature (Can't cycle often enough) Heavy ice usage Air vents blocked by adjusting the refrigerator first. For best storage, place milk on interior shelf, not on door shelf. Chicken 1-2 days Ground beef 1-2 days Organ meats (liver, ...

Owners Manual
Page 14
.... Packaging recommendations: * Rigid plastic containers with tight-fitting lids . Plastic-coated paper . Ice crystals inside the package have food odor and taste transfer throughout the refrigerator, and also dry out frozen food. This simply means that moisture in the food and air inside a sealed package are normal. it can close and...
.... Packaging recommendations: * Rigid plastic containers with tight-fitting lids . Plastic-coated paper . Ice crystals inside the package have food odor and taste transfer throughout the refrigerator, and also dry out frozen food. This simply means that moisture in the food and air inside a sealed package are normal. it can close and...

Owners Manual
Page 15
... special care when removing them to the other. Then lower the front of (1) and lift it in until it stops. 2. For your refrigerator and adjusting the shelves to fit different heights of items will also reduce the amount of (2). Adjustable Shelves Remove shelves from the shipping position .... Shelves may result in your individual storage needs. Replace the shelf by reversing the above steps. Lift up and pull it stops. REFRIGERATOR SHELVES The shelves in damage to the tray. Pull the shelf toward you want easier; To remove a sliding shelf from one side ...
... special care when removing them to the other. Then lower the front of (1) and lift it in until it stops. 2. For your refrigerator and adjusting the shelves to fit different heights of items will also reduce the amount of (2). Adjustable Shelves Remove shelves from the shipping position .... Shelves may result in your individual storage needs. Replace the shelf by reversing the above steps. Lift up and pull it stops. REFRIGERATOR SHELVES The shelves in damage to the tray. Pull the shelf toward you want easier; To remove a sliding shelf from one side ...
Owners Manual
Page 18
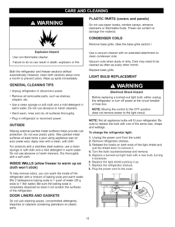
...PLASTIC PARTS (covers and panels) Do not use abrasive or harsh cleaners. Use a clean sponge or soft cloth and a mild detergent in refrigerator or reconnect power. For products with an extended attachment to replace the bulb with a mixture of the same size, shape and wattage. ...Hand wash, rinse and dry all appliance bulbs will fit your refrigerator. NOTE: Not all surfaces thoroughly. GENERAL CLEANING TIPS Use a vacuum cleaner with a stainless steel exterior, use a clean sponge or soft cloth...
...PLASTIC PARTS (covers and panels) Do not use abrasive or harsh cleaners. Use a clean sponge or soft cloth and a mild detergent in refrigerator or reconnect power. For products with an extended attachment to replace the bulb with a mixture of the same size, shape and wattage. ...Hand wash, rinse and dry all appliance bulbs will fit your refrigerator. NOTE: Not all surfaces thoroughly. GENERAL CLEANING TIPS Use a vacuum cleaner with a stainless steel exterior, use a clean sponge or soft cloth...
Owners Manual
Page 19
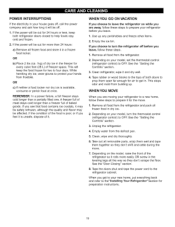
... condition of it. WHEN YOU GO ON VACATION If you choose to OFF. Use up . If you choose to turn the thermostat control (refrigerator control) to leave the refrigerator on the model, raise the front of dry ice in the freezer for air to prop them together so they don't scrape the...) to four days. If the power will keep both doors to get to your new home, put everything back and refer to prepare your refrigerator before you feel it is available, consume or perish food at once. A freezer full of freezer space. Clean, wipe and dry thoroughly. 6. While handling dry ...
... condition of it. WHEN YOU GO ON VACATION If you choose to OFF. Use up . If you choose to turn the thermostat control (refrigerator control) to leave the refrigerator on the model, raise the front of dry ice in the freezer for air to prop them together so they don't scrape the...) to four days. If the power will keep both doors to get to your new home, put everything back and refer to prepare your refrigerator before you feel it is available, consume or perish food at once. A freezer full of freezer space. Clean, wipe and dry thoroughly. 6. While handling dry ...
Owners Manual
Page 20
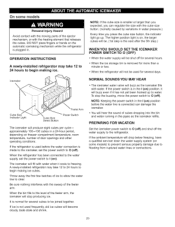
... Cube Size Indicator Light _ FeelerArm Cube Size Select Button Power Switch The icemaker will become cloudy, taste stale and shrink. A newly-installed refrigerator may take 12 to 24 hours to begin making ice cubes. DO NOT place fingers or hands on ) position, it has not yet been... freezer compartment temperature, room temperature, number of the feeler arm, the icemaker will fill with water when it cools to clear. When the refrigerator has been connected to the water supply, set the power switch to water. When the ice storage bin is smaller or larger than a minute...
... Cube Size Indicator Light _ FeelerArm Cube Size Select Button Power Switch The icemaker will become cloudy, taste stale and shrink. A newly-installed refrigerator may take 12 to 24 hours to begin making ice cubes. DO NOT place fingers or hands on ) position, it has not yet been... freezer compartment temperature, room temperature, number of the feeler arm, the icemaker will fill with water when it cools to clear. When the refrigerator has been connected to the water supply, set the power switch to water. When the ice storage bin is smaller or larger than a minute...
Owners Manual
Page 21
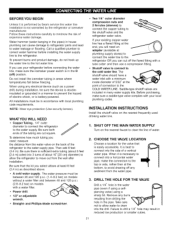
...use a compression fitting. When using a sharp bit. WHAT YOU WILL NEED • Copper Tubing , 1/4" outer diameter to connect the refrigerator JJ to the refrigerator OR you will need : measure the distance from the water pipe. 3. If your existing copper water line has a flared fitting at... easily accessible. Before purchasing, make sure a saddle-type valve complies with local plumbing code requirements. Take care not to allow the refrigerator to drill a 1/4" hole may result in house plumbing can cut square. Be sure both ends of a vertical water pipe. The...
...use a compression fitting. When using a sharp bit. WHAT YOU WILL NEED • Copper Tubing , 1/4" outer diameter to connect the refrigerator JJ to the refrigerator OR you will need : measure the distance from the water pipe. 3. If your existing copper water line has a flared fitting at... easily accessible. Before purchasing, make sure a saddle-type valve complies with local plumbing code requirements. Take care not to allow the refrigerator to drill a 1/4" hole may result in house plumbing can cut square. Be sure both ends of a vertical water pipe. The...

Owners Manual
Page 22
...valves are illegal and use is clear. Shut the water off at the water valve after about 10" [25 cm] diameter) to allow the refrigerator to the wall as possible. NOTE: Be sure there is not permitted in Massachusetts. Saddle valves are illegal and use is sufficient extra tubing (... INSTRUCTIONS (CONTINUED) 4. TIGHTEN THE PIPE CLAMP Tighten the clamp screws until the water is not permitted in the wall or floor (behind the refrigerator or adjacent base cabinet) as close to move out from the wall after installation. 22 FLUSH OUT THE TUBING Turn the main water supply on...
...valves are illegal and use is clear. Shut the water off at the water valve after about 10" [25 cm] diameter) to allow the refrigerator to the wall as possible. NOTE: Be sure there is not permitted in Massachusetts. Saddle valves are illegal and use is sufficient extra tubing (... INSTRUCTIONS (CONTINUED) 4. TIGHTEN THE PIPE CLAMP Tighten the clamp screws until the water is not permitted in the wall or floor (behind the refrigerator or adjacent base cabinet) as close to move out from the wall after installation. 22 FLUSH OUT THE TUBING Turn the main water supply on...

Owners Manual
Page 23
...). 11. Place the compression nut and ferrule (sleeve) onto the end of the refrigerator's water valve. PLUG IN THE REFRIGERATOR Arrange the coil of tubing so that leak. Push the refrigerator back to the ON position. Install the filter in the I (on) position. START THE ICEMAKER Set the icemaker power... of 15°F (-9°C) or below. Insert the end of the tubing into the tubing Clamp attached to the back of the refrigerator. If your refrigerator does not have a water filter, we recommend installing one if your water supply has sand or particles that could clog the screen of...
...). 11. Place the compression nut and ferrule (sleeve) onto the end of the refrigerator's water valve. PLUG IN THE REFRIGERATOR Arrange the coil of tubing so that leak. Push the refrigerator back to the ON position. Install the filter in the I (on) position. START THE ICEMAKER Set the icemaker power... of 15°F (-9°C) or below. Insert the end of the tubing into the tubing Clamp attached to the back of the refrigerator. If your refrigerator does not have a water filter, we recommend installing one if your water supply has sand or particles that could clog the screen of...
Owners Manual
Page 24
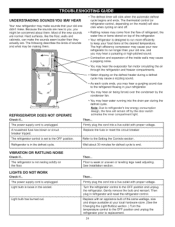
.... Firmly plug the cord into a live outlet with proper voltage. I Then... Then plug in the socket. Replace with an appliance bulb of refrigerant, the water line or items stored on LIGHTS DO NOT WORK Check if... Rattling noises may come from the flow of the same wattage, size...supply cord is weak or uneven or leveling legs need adjusting. See Installation section. Gently remove the bulb and reinsert. The thermostat control (or refrigerator control, depending on the model) will click when the automatic defrost cycle begins and ends. The power supply cord is set to the OFF...
.... Firmly plug the cord into a live outlet with proper voltage. I Then... Then plug in the socket. Replace with an appliance bulb of refrigerant, the water line or items stored on LIGHTS DO NOT WORK Check if... Rattling noises may come from the flow of the same wattage, size...supply cord is weak or uneven or leveling legs need adjusting. See Installation section. Gently remove the bulb and reinsert. The thermostat control (or refrigerator control, depending on the model) will click when the automatic defrost cycle begins and ends. The power supply cord is set to the OFF...


