
Owners Manual
Page 2
... Proper Air Circulation Setting the Controls Adjusting Control Settings Food Storage Guide Storing Frozen Food Refrigerator Shelves Ice Tray Snack Corner Crisper and Crisper Cover 2 3-4 5-6 6 7-8 9-11 9 9 9 10-11 11 12-17 12 12 13 13 14 15 15 16 16 Crisper Humidity Control Door Racks Door Bin Dairy Corner/Can Dispenser Vitabox Care and Cleaning General Cleaning Tips Outside Inside Walls Door Liner and Gaskets Plastic Parts Condenser Coils Light Bulb Replacement Power Interruptions Vacation and Moving Care About the Automatic Ice Maker Connecting the Water Line Troubleshooting Guide 16...
... Proper Air Circulation Setting the Controls Adjusting Control Settings Food Storage Guide Storing Frozen Food Refrigerator Shelves Ice Tray Snack Corner Crisper and Crisper Cover 2 3-4 5-6 6 7-8 9-11 9 9 9 10-11 11 12-17 12 12 13 13 14 15 15 16 16 Crisper Humidity Control Door Racks Door Bin Dairy Corner/Can Dispenser Vitabox Care and Cleaning General Cleaning Tips Outside Inside Walls Door Liner and Gaskets Plastic Parts Condenser Coils Light Bulb Replacement Power Interruptions Vacation and Moving Care About the Automatic Ice Maker Connecting the Water Line Troubleshooting Guide 16...
Owners Manual
Page 3
... LIMITED WARRANTY CANADA LG Electronics LG Electronics will repair or at the time warranty service is provided. WARRANTY PERIOD: REFRIGERATOR/FREEZER LABOR: One Year f?om the Date of original purchase. This warranty gives you specific legal rights and you . The cost of Purchase. Call 1-888-542-2623 Press the appropriate option, and have your product type (Ref?igerator), model number, serial number, and ZiP/Postal Code ready. LG...
... LIMITED WARRANTY CANADA LG Electronics LG Electronics will repair or at the time warranty service is provided. WARRANTY PERIOD: REFRIGERATOR/FREEZER LABOR: One Year f?om the Date of original purchase. This warranty gives you specific legal rights and you . The cost of Purchase. Call 1-888-542-2623 Press the appropriate option, and have your product type (Ref?igerator), model number, serial number, and ZiP/Postal Code ready. LG...
Owners Manual
Page 5
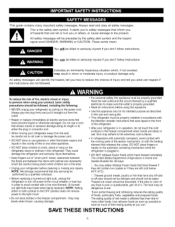
... or hang on the refrigerator doors or shelves in accordance with the Attention Installer Instructions that have thawed completely. The food may be performed by pulling on the automatic icemaking mechanism while the refrigerator is plugged in the freezer compartment when hands are still cold below 40°F (4°C). SAVE THESE INSTRUCTIONS It alerts you what can ." Indicates an imminently hazardous situation...
... or hang on the refrigerator doors or shelves in accordance with the Attention Installer Instructions that have thawed completely. The food may be performed by pulling on the automatic icemaking mechanism while the refrigerator is plugged in the freezer compartment when hands are still cold below 40°F (4°C). SAVE THESE INSTRUCTIONS It alerts you what can ." Indicates an imminently hazardous situation...

Owners Manual
Page 6
...-listed (in place so that the electrical rating of installation, cleaning, or removing a light bulb, turn the control (Thermostat, Refrigerator or Freezer Control depending on the model) to fines and imprisonment under provisions of the past. This provides the best performance and also prevents overloading house wiring circuits which cannot be 15 amperes (minimum) and 120 volts. Use a receptacle which could cause a fire hazard from the power cord...
...-listed (in place so that the electrical rating of installation, cleaning, or removing a light bulb, turn the control (Thermostat, Refrigerator or Freezer Control depending on the model) to fines and imprisonment under provisions of the past. This provides the best performance and also prevents overloading house wiring circuits which cannot be 15 amperes (minimum) and 120 volts. Use a receptacle which could cause a fire hazard from the power cord...

Owners Manual
Page 7
The locations of the items listed below. 0 O Use this section to become more familiar with the parts and features. The refrigerator you have some models O Ice Bin Freezer Shelf _ Digital Sensor Control Refrigerator Light Snack Pan _1 Shelves O Crisper Keeps fruits and vegetables fresh and crisp Freezer Door Bin Dairy Corner O Can Dispenser O Door Bin O Refrigerator Door Rack @Base Grille Vitabox 0nside)* *On some or all of the features shown below may have purchased may...
The locations of the items listed below. 0 O Use this section to become more familiar with the parts and features. The refrigerator you have some models O Ice Bin Freezer Shelf _ Digital Sensor Control Refrigerator Light Snack Pan _1 Shelves O Crisper Keeps fruits and vegetables fresh and crisp Freezer Door Bin Dairy Corner O Can Dispenser O Door Bin O Refrigerator Door Rack @Base Grille Vitabox 0nside)* *On some or all of the features shown below may have purchased may...

Owners Manual
Page 8
NOTE: This guide covers several different models. The refrigerator you have some models O Use this section to become more familiar with the parts and features. Page references are included for your model. O CustomCube Ice maker O Freezer Shelf O Digital Sensor Control Refrigerator Light Snack Pan _1 Shelves O Crisper Keeps fruits and vegetables fresh and crisp Freezer Door Bin O Dairy Corner OCan Dispenser O Door Bin O Refrigerator Door Rack @Base Grille Vitabox 0nside)* *On some or all of the features...
NOTE: This guide covers several different models. The refrigerator you have some models O Use this section to become more familiar with the parts and features. Page references are included for your model. O CustomCube Ice maker O Freezer Shelf O Digital Sensor Control Refrigerator Light Snack Pan _1 Shelves O Crisper Keeps fruits and vegetables fresh and crisp Freezer Door Bin O Dairy Corner OCan Dispenser O Door Bin O Refrigerator Door Rack @Base Grille Vitabox 0nside)* *On some or all of the features...
Owners Manual
Page 9
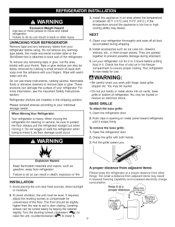
.... Install this appliance in door closing. The front should be injured. To remove any temporary labels from refrigerator. Open the refrigerator door. 2. To remove the base grille: 1. Check the flow of refrigerator. Excessive Weight Hazard Use two or more information, see the Important Safety Instructions section. Please reinstall shelves according to move it snaps firmly. NEXT 1. You may result in opening on metal panel...
.... Install this appliance in door closing. The front should be injured. To remove any temporary labels from refrigerator. Open the refrigerator door. 2. To remove the base grille: 1. Check the flow of refrigerator. Excessive Weight Hazard Use two or more information, see the Important Safety Instructions section. Please reinstall shelves according to move it snaps firmly. NEXT 1. You may result in opening on metal panel...

Owners Manual
Page 11
... unsteady or you tighten the top hinge screws. 4. Make sure that the four corners of the door gasket are located at the bottom of the refrigerator on the corner gaskets. 4. If not, tilt the refrigerator slightly more turns, and you should turn both leveling screws the same amount. 5. Replace the base grille. Loosen the top hinge screws using the instructions below to the rear by...
... unsteady or you tighten the top hinge screws. 4. Make sure that the four corners of the door gasket are located at the bottom of the refrigerator on the corner gaskets. 4. If not, tilt the refrigerator slightly more turns, and you should turn both leveling screws the same amount. 5. Replace the base grille. Loosen the top hinge screws using the instructions below to the rear by...

Owners Manual
Page 13
... in cold water and drain. The mid-settings indicated in airtight and moisture-proof material unless otherwise noted. Wait 24 hours after the refrigerator adjustment to the refrigerator. CONDITION/REASON: RECOMMENDED ADJUSTMENT: REFRIGERATOR section too warm Door opened often • Large amount of food added Room temperature very warm Turn REFRIGERATOR control to next higher number, wait 24 hours, then re-check FREEZER section too warm/ ice not made fast enough = Door opened often...
... in cold water and drain. The mid-settings indicated in airtight and moisture-proof material unless otherwise noted. Wait 24 hours after the refrigerator adjustment to the refrigerator. CONDITION/REASON: RECOMMENDED ADJUSTMENT: REFRIGERATOR section too warm Door opened often • Large amount of food added Room temperature very warm Turn REFRIGERATOR control to next higher number, wait 24 hours, then re-check FREEZER section too warm/ ice not made fast enough = Door opened often...

Owners Manual
Page 15
... the shelf out, carefully pull front of (2). Tilt the front of time the refrigerator door is filled with water to the highest level, it stops. o Do not bend the ice tray. Shelves may result in the shelf falling or spilling food. 15 To remove a sliding shelf from the shipping position and replace shelves in the position you want easier; ICE TRAY (On Some Models) Icemaking If the tray is open, saving energy...
... the shelf out, carefully pull front of (2). Tilt the front of time the refrigerator door is filled with water to the highest level, it stops. o Do not bend the ice tray. Shelves may result in the shelf falling or spilling food. 15 To remove a sliding shelf from the shipping position and replace shelves in the position you want easier; ICE TRAY (On Some Models) Icemaking If the tray is open, saving energy...
Owners Manual
Page 18
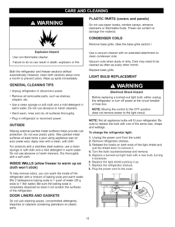
... down to warm up . 7. Do not wax plastic parts. INSIDE WALLS (allow freezer to remove it clockwise. 6. DOOR LINERS AND GASKETS Do not use abrasive or harsh cleaners. Be sure to clean condenser coils. Replace the refrigerator shelves. 8. Boththerefrigeratoarndfreezersectionsdefrost automaticallHy.oweverc,leanbothsectionsaboutonce a monthtopreventodorsW. ipeupspillsimmediately. GENERAL CLEANING TIPS Use a vacuum cleaner with a soft cloth. Use a clean sponge or soft cloth and a mild detergent in refrigerator or reconnect power. OUTSIDE Waxing...
... down to warm up . 7. Do not wax plastic parts. INSIDE WALLS (allow freezer to remove it clockwise. 6. DOOR LINERS AND GASKETS Do not use abrasive or harsh cleaners. Be sure to clean condenser coils. Replace the refrigerator shelves. 8. Boththerefrigeratoarndfreezersectionsdefrost automaticallHy.oweverc,leanbothsectionsaboutonce a monthtopreventodorsW. ipeupspillsimmediately. GENERAL CLEANING TIPS Use a vacuum cleaner with a soft cloth. Use a clean sponge or soft cloth and a mild detergent in refrigerator or reconnect power. OUTSIDE Waxing...
Owners Manual
Page 19
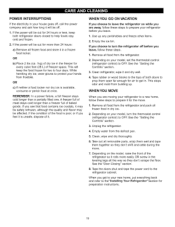
... all removable parts, wrap them well and tape them open far enough for preparation instructions. 19 While handling dry ice, wear gloves to get to your new home, put everything back and refer to OFF. See the "Setting the Controls" section. 3. Empty water from frostbite. See the "Door Closing" section. . Empty the ice bin. See the "Setting the Controls" section. . This stops odor and mold from the refrigerator. 2. Clean...
... all removable parts, wrap them well and tape them open far enough for preparation instructions. 19 While handling dry ice, wear gloves to get to your new home, put everything back and refer to OFF. See the "Setting the Controls" section. 3. Empty water from frostbite. See the "Door Closing" section. . Empty the ice bin. See the "Setting the Controls" section. . This stops odor and mold from the refrigerator. 2. Clean...
Owners Manual
Page 20
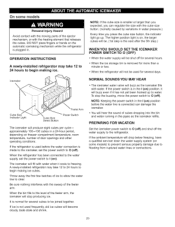
... SET THE ICEMAKER POWER SWITCH TO O (OFF) * When the water supply will buzz even if it cools to freezing. On some models) to prevent serious property damage due to flooding from ruptured water lines or connections. 2O OPERATION INSTRUCTIONS A newly-installed refrigerator may take 12 to 24 hours to begin making ice. Icemaker Cube Size Indicator Light _ FeelerArm Cube Size Select Button Power Switch The icemaker will not be joined together. If the refrigerator is used before the water line is plugged...
... SET THE ICEMAKER POWER SWITCH TO O (OFF) * When the water supply will buzz even if it cools to freezing. On some models) to prevent serious property damage due to flooding from ruptured water lines or connections. 2O OPERATION INSTRUCTIONS A newly-installed refrigerator may take 12 to 24 hours to begin making ice. Icemaker Cube Size Indicator Light _ FeelerArm Cube Size Select Button Power Switch The icemaker will not be joined together. If the refrigerator is used before the water line is plugged...
Owners Manual
Page 21
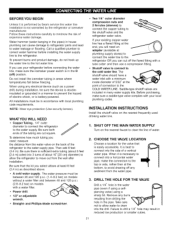
... service this water line installation is best to connect into the drill. Call a qualified plumber to correct water hammer before connecting the water line, make sure a saddle-type valve complies with local plumbing code requirements. Do not install the icemaker tubing in the water pipe (even if using a selfpiercing valve) using any electrical device (such as described above. , A cold water supply. Before purchasing, make sure the icemaker power switch is necessary to connect into 3 turns of connection to the COLD WATER LINE. CHOOSE THE VALVE LOCATION...
... service this water line installation is best to connect into the drill. Call a qualified plumber to correct water hammer before connecting the water line, make sure a saddle-type valve complies with local plumbing code requirements. Do not install the icemaker tubing in the water pipe (even if using a selfpiercing valve) using any electrical device (such as described above. , A cold water supply. Before purchasing, make sure the icemaker power switch is necessary to connect into 3 turns of connection to the COLD WATER LINE. CHOOSE THE VALVE LOCATION...

Owners Manual
Page 22
... the refrigerator or adjacent base cabinet) as close to the cold water pipe with your licensed plumber. 8. Pipe Clamp _. Make sure the tubing is clear. NOTE: Be sure there is sufficient extra tubing (about 8 feet [244 cm] coiled into the valve. NOTE: Do not overtighten or you may crush the tubing. Shut the water off at the water valve after installation. 22 Saddle-Type Shutoff Valve...
... the refrigerator or adjacent base cabinet) as close to the cold water pipe with your licensed plumber. 8. Pipe Clamp _. Make sure the tubing is clear. NOTE: Be sure there is sufficient extra tubing (about 8 feet [244 cm] coiled into the valve. NOTE: Do not overtighten or you may crush the tubing. Shut the water off at the water valve after installation. 22 Saddle-Type Shutoff Valve...

Owners Manual
Page 23
START THE ICEMAKER Set the icemaker power switch to the refrigerator, be sure the refrigerator power cord is in the I (on) position. The icemaker will then begin to operate until it does not vibrate against the wall. Reattach the compressor compartment access cover. 23 = CONNECT THE TUBING TO THE REFRIGERATOR NOTES: Before making the connection to the ON position. Push the refrigerator back to the back of the refrigerator or...
START THE ICEMAKER Set the icemaker power switch to the refrigerator, be sure the refrigerator power cord is in the I (on) position. The icemaker will then begin to operate until it does not vibrate against the wall. Reattach the compressor compartment access cover. 23 = CONNECT THE TUBING TO THE REFRIGERATOR NOTES: Before making the connection to the ON position. Push the refrigerator back to the back of the refrigerator or...
Owners Manual
Page 24
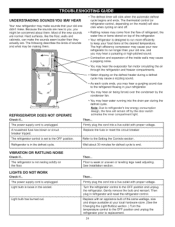
... refrigerator. Replace the fuse or reset the circuit breaker. Gently remove the bulb and reinsert. Wait about them . Most of the same wattage, size and shape available at the desired temperature. Rattling noises may hear water running into a live outlet with proper voltage. The power supply cord is unplugged. I Tthhee flroeofri.gerator is in refrigerator and reset the refrigerator control. Water dripping on the model) will click when the automatic defrost...
... refrigerator. Replace the fuse or reset the circuit breaker. Gently remove the bulb and reinsert. Wait about them . Most of the same wattage, size and shape available at the desired temperature. Rattling noises may hear water running into a live outlet with proper voltage. The power supply cord is unplugged. I Tthhee flroeofri.gerator is in refrigerator and reset the refrigerator control. Water dripping on the model) will click when the automatic defrost...
Owners Manual
Page 25
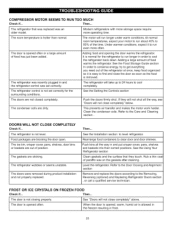
... the Using Your Refrigerator section Clean gaskets and the surface that was replaced was set correctly, The refrigerator control is not set correctly for the refrigerator to run longer under warm conditions. Level the refrigerator. The door is opened often. Modern refrigerators with more storage space require more often. The refrigerator was recently plugged in order to run longer in and the refrigerator control was an older model. This prevents air transfer and makes the motor work...
... the Using Your Refrigerator section Clean gaskets and the surface that was replaced was set correctly, The refrigerator control is not set correctly for the refrigerator to run longer under warm conditions. Level the refrigerator. The door is opened often. Modern refrigerators with more storage space require more often. The refrigerator was recently plugged in order to run longer in and the refrigerator control was an older model. This prevents air transfer and makes the motor work...
Owners Manual
Page 26
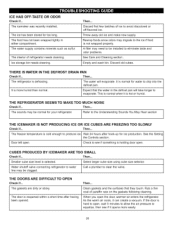
... cube size using cube size selector. When you open . Water shutoff valve connecting refrigerator to water line may need to evaporate. Then... The freezer temperature Door left open the door, warmer air enters the refrigerator. Check to see if something is hard to eliminate taste and odor problems. See Care and Cleaning section. Call a plumber to equalize, then see if it can create a vacuum. Ice storage bin needs cleaning. CUBES PRODUCED BY ICEMAKER ARE TOO SMALL Check if... A filter...
... cube size using cube size selector. When you open . Water shutoff valve connecting refrigerator to water line may need to evaporate. Then... The freezer temperature Door left open the door, warmer air enters the refrigerator. Check to see if something is hard to eliminate taste and odor problems. See Care and Cleaning section. Call a plumber to equalize, then see if it can create a vacuum. Ice storage bin needs cleaning. CUBES PRODUCED BY ICEMAKER ARE TOO SMALL Check if... A filter...

Owners Manual
Page 27
... ICEMAKER DOES NOT WORK Check if... MOISTURE BUILDUP The air vents are not closing completely. The doors are blocked. When the door is opened, warm humid air is too cold or too warm, move all packages that block vents and restrict airflow. In humid weather, air carries moisture into the refrigerator. See the Connecting the Water Line section. TEMPERATURE Check if... IS TOO WARM OR THERE IS INTERIOR...
... ICEMAKER DOES NOT WORK Check if... MOISTURE BUILDUP The air vents are not closing completely. The doors are blocked. When the door is opened, warm humid air is too cold or too warm, move all packages that block vents and restrict airflow. In humid weather, air carries moisture into the refrigerator. See the Connecting the Water Line section. TEMPERATURE Check if... IS TOO WARM OR THERE IS INTERIOR...


