

Owner's Manual
Page 2
...(U.S.A.) Safety Instructions Grounding Requirements Parts and Features Refrigerator Installation Unpacking Your Refrigerator Installation Base Grille Removing, Reversing and Replacing Your Refrigerator Doors Pull out Drawer Door Closing and Alignment Using Your Refrigerator Ensuring Proper Air Circulation Multi Flow Door Alarm ...Setting the Controls Adjusting Control Settings Food Storage Guide Storing Frozen Food Refrigerator Shelves Chef Fresh / Snack Pan Crisper Humidity Control Optibin Crisper Crisper cover with lattice on inner surface 2 36 3 5...
...(U.S.A.) Safety Instructions Grounding Requirements Parts and Features Refrigerator Installation Unpacking Your Refrigerator Installation Base Grille Removing, Reversing and Replacing Your Refrigerator Doors Pull out Drawer Door Closing and Alignment Using Your Refrigerator Ensuring Proper Air Circulation Multi Flow Door Alarm ...Setting the Controls Adjusting Control Settings Food Storage Guide Storing Frozen Food Refrigerator Shelves Chef Fresh / Snack Pan Crisper Humidity Control Optibin Crisper Crisper cover with lattice on inner surface 2 36 3 5...

Owner's Manual
Page 3
... other than normal, single-family household use during the warranty period listed below from the date of original purchase. LG Refrigerator / Freezer Warranty Period Product Parts Labor Refrigerator / Freezer 1 year 1 year [In-Home Service (Except Model GR-051)] Sealed System 7 years 1 year...WARRANTY OF MERCHANTABILITY APPLICABLE TO THIS PRODUCT. Repairs when your LG product is in material or workmanship under normal use . 4. CUSTOMER ASSISTANCE NUMBERS: To obtain Warranty Coverage: Retain your product type (Refrigerator), model number, serial number, and ZIP/Postal Code ready...
... other than normal, single-family household use during the warranty period listed below from the date of original purchase. LG Refrigerator / Freezer Warranty Period Product Parts Labor Refrigerator / Freezer 1 year 1 year [In-Home Service (Except Model GR-051)] Sealed System 7 years 1 year...WARRANTY OF MERCHANTABILITY APPLICABLE TO THIS PRODUCT. Repairs when your LG product is in material or workmanship under normal use . 4. CUSTOMER ASSISTANCE NUMBERS: To obtain Warranty Coverage: Retain your product type (Refrigerator), model number, serial number, and ZIP/Postal Code ready...

Owner's Manual
Page 5
... by a qualified electrician to the extremely cold surfaces. DO NOT place fingers or hands on the automatic icemaking mechanism while the refrigerator is the safety alert symbol. The United States Department of fire, electric shock, or injury to eat." "...Thawed ground meats,...out of foods, particularly fruits, vegetables and prepared foods. Read all instructions before cleaning or making any other foods. After your refrigerator before using your product, basic safety precautions should be dangerous to persons when using this or any repairs. DO NOT refreeze frozen...
... by a qualified electrician to the extremely cold surfaces. DO NOT place fingers or hands on the automatic icemaking mechanism while the refrigerator is the safety alert symbol. The United States Department of fire, electric shock, or injury to eat." "...Thawed ground meats,...out of foods, particularly fruits, vegetables and prepared foods. Read all instructions before cleaning or making any other foods. After your refrigerator before using your product, basic safety precautions should be dangerous to persons when using this or any repairs. DO NOT refreeze frozen...

Owner's Manual
Page 6
...prevents overloading house wiring circuits which cannot be plugged into its own individual properly grounded electrical outlet rated for proper disposal by LG Electronics, to avoid some risk. 6 However, if you are throwing away your personal responsibility and obligation to have a ... use. Use a receptacle which could cause a fire hazard from the electrical source. USE OF EXTENSION CORDS Because of your old refrigerator, please follow the instructions at 15 or 20 amperes. TO CONNECT ELECTRICITY Where a standard two-prong wall outlet is encountered, it...
...prevents overloading house wiring circuits which cannot be plugged into its own individual properly grounded electrical outlet rated for proper disposal by LG Electronics, to avoid some risk. 6 However, if you are throwing away your personal responsibility and obligation to have a ... use. Use a receptacle which could cause a fire hazard from the electrical source. USE OF EXTENSION CORDS Because of your old refrigerator, please follow the instructions at 15 or 20 amperes. TO CONNECT ELECTRICITY Where a standard two-prong wall outlet is encountered, it...

Owner's Manual
Page 7
... AND FEATURES A B C L D M E N F O G H P I Ice Tray (Inside of the features shown below . A Digital Sensor Control B Refrigerator Light C Shelves D Temperature Control E Chef Fresh / Snack Pan F Can Dispenser G Optibin Crisper Keeps fruits and vegetable fresh and crisper H Ice Bin I Q J.... NOTE: This guide covers several different models. The locations of H)* J Durabase K Divider L Dairy Bin M Design-A-Door N Egg Box O Refrigerator Door Rack P Freezer Light Q Pull out Drawer R Customcube Icemaker* *on some or all of the items listed below may have some models 7 The...
... AND FEATURES A B C L D M E N F O G H P I Ice Tray (Inside of the features shown below . A Digital Sensor Control B Refrigerator Light C Shelves D Temperature Control E Chef Fresh / Snack Pan F Can Dispenser G Optibin Crisper Keeps fruits and vegetable fresh and crisper H Ice Bin I Q J.... NOTE: This guide covers several different models. The locations of H)* J Durabase K Divider L Dairy Bin M Design-A-Door N Egg Box O Refrigerator Door Rack P Freezer Light Q Pull out Drawer R Customcube Icemaker* *on some or all of the items listed below may have some models 7 The...

Owner's Manual
Page 8
NOTE: This guide covers several different models. The locations of the features shown below . A Digital Sensor Control B Refrigerator Light C Shelves D Chef Fresh / Snack Pan E Optibin Crisper Keeps fruits and vegetable fresh and crisper F Ice Bin G Ice Tray (Inside of H)* H...Use this section to become more familiar with the parts and features. PARTS AND FEATURES A B J C K D L E M F N G H I Divider J Dairy Bin K Design-A-Door L Pull out Drawer M Refrigerator Door Rack N Freezer Light O Customcube Icemaker* *on some or all of the items listed below may have some models 8 The...
NOTE: This guide covers several different models. The locations of the features shown below . A Digital Sensor Control B Refrigerator Light C Shelves D Chef Fresh / Snack Pan E Optibin Crisper Keeps fruits and vegetable fresh and crisper F Ice Bin G Ice Tray (Inside of H)* H...Use this section to become more familiar with the parts and features. PARTS AND FEATURES A B J C K D L E M F N G H I Divider J Dairy Bin K Design-A-Door L Pull out Drawer M Refrigerator Door Rack N Freezer Light O Customcube Icemaker* *on some or all of the items listed below may have some models 8 The...

Owner's Manual
Page 9
...different models. The locations of the items listed below. PARTS AND FEATURES A B I Dairy Bin J Design-A-Door K Wire Freezer Shelf L Refrigerator Door Rack M Freezer Light N Freezer Door Rack *on some or all of the features shown below may have some models 9 A Digital Sensor Control... B Refrigerator Light C Shelves D Snack Pan E Optibin Crisper Keeps fruits and vegetable fresh and crisp F Ice Trays* G Ice Bin H Wire Durabase I C J D K E L F M G ...
...different models. The locations of the items listed below. PARTS AND FEATURES A B I Dairy Bin J Design-A-Door K Wire Freezer Shelf L Refrigerator Door Rack M Freezer Light N Freezer Door Rack *on some or all of the features shown below may have some models 9 A Digital Sensor Control... B Refrigerator Light C Shelves D Snack Pan E Optibin Crisper Keeps fruits and vegetable fresh and crisp F Ice Trays* G Ice Bin H Wire Durabase I C J D K E L F M G ...

Owner's Manual
Page 10
... Install this appliance in the shipping position. CAUTION: Avoid placing the unit near heat sources, direct sunlight, or moisture. 2. Clean your refrigerator run for cleaning or service, be adversely affected. They are installed in an area where the temperature is between 55°F (13°C)... Turn the leveling screws clockwise ( ) to raise the unit, counterclockwise ( ) to back 10 A proper distance from adjacents items Please keep the refrigerator at a proper distance More than 1"(2.5 cm) to top More than 0.125" (0.3 cm) to hinge side More than the rear to ensure proper...
... Install this appliance in the shipping position. CAUTION: Avoid placing the unit near heat sources, direct sunlight, or moisture. 2. Clean your refrigerator run for cleaning or service, be adversely affected. They are installed in an area where the temperature is between 55°F (13°C)... Turn the leveling screws clockwise ( ) to raise the unit, counterclockwise ( ) to back 10 A proper distance from adjacents items Please keep the refrigerator at a proper distance More than 1"(2.5 cm) to top More than 0.125" (0.3 cm) to hinge side More than the rear to ensure proper...

Owner's Manual
Page 11
...or utility bins from the left (on the left -opening type to rightopening type) 1. Lift the Refrigerator door (3) slightly and remove it . IMPORTANT: Before you begin, turn the refrigerator OFF and unplug it . Loosen the screw (5), remove the stoppers (6), and attach them on the ...remove it fits onto the middle hinge pin (5). Loosen the 2 screws (8) and the 2 screws (9), and lift off the top hinge (2). Removing Refrigerator Handle Take of the refrigerator door(2). 11 2 1 3. Remove the 3 screws and lift off the middle hinge (10). Install the door (4) so that it . NOTE...
...or utility bins from the left (on the left -opening type to rightopening type) 1. Lift the Refrigerator door (3) slightly and remove it . IMPORTANT: Before you begin, turn the refrigerator OFF and unplug it . Loosen the screw (5), remove the stoppers (6), and attach them on the ...remove it fits onto the middle hinge pin (5). Loosen the 2 screws (8) and the 2 screws (9), and lift off the top hinge (2). Removing Refrigerator Handle Take of the refrigerator door(2). 11 2 1 3. Remove the 3 screws and lift off the middle hinge (10). Install the door (4) so that it . NOTE...

Owner's Manual
Page 12
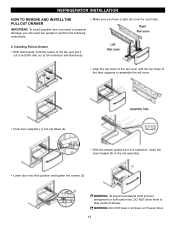
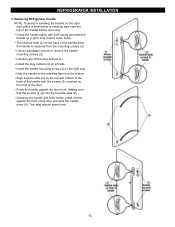
Remove the lower basket (1) by the sharp edges on handle with yours thumbs to lift it up to separate it from rail system. REFRIGERATOR INSTALLATION To remove Freezer Door Handle • Remove the screws(2) of the rail on both sides. •Grasp the handle tightly with both hands,and ...
Remove the lower basket (1) by the sharp edges on handle with yours thumbs to lift it up to separate it from rail system. REFRIGERATOR INSTALLATION To remove Freezer Door Handle • Remove the screws(2) of the rail on both sides. •Grasp the handle tightly with both hands,and ...
Owner's Manual
Page 13
... and pull it out to let both rails out to perform the following instructions. • Make sure you have a right rail cover for each side. 2. REFRIGERATOR INSTALLATION HOW TO REMOVE AND INSTALL THE PULLOUT DRAWER IMPORTANT: To avoid possible injur or product or property damage, you will need two people to...
... and pull it out to let both rails out to perform the following instructions. • Make sure you have a right rail cover for each side. 2. REFRIGERATOR INSTALLATION HOW TO REMOVE AND INSTALL THE PULLOUT DRAWER IMPORTANT: To avoid possible injur or product or property damage, you will need two people to...

Owner's Manual
Page 14
... (11), the 2 screws (12), and lift off the washer (8). IMPORTANT: Before you begin, turn the refrigerator OFF and unplug it on the left . Lift the Refrigerator door (3) slightly and remove it . Lift off the middle hinge (13). Removing Freezer Door Lift the door ... right. Take off the cover (4) using a slotted screwdriver and attach it . Pry off the base grille (14). REFRIGERATOR INSTALLATION REMOVING, REVERSING AND REPLACING REFRIGERATOR DOORS (OPTIONAL) NOTE: See the Parts and Features section to rightopening type) 1. Remove the 3 screws and lift of...
... (11), the 2 screws (12), and lift off the washer (8). IMPORTANT: Before you begin, turn the refrigerator OFF and unplug it on the left . Lift the Refrigerator door (3) slightly and remove it . Lift off the middle hinge (13). Removing Freezer Door Lift the door ... right. Take off the cover (4) using a slotted screwdriver and attach it . Pry off the base grille (14). REFRIGERATOR INSTALLATION REMOVING, REVERSING AND REPLACING REFRIGERATOR DOORS (OPTIONAL) NOTE: See the Parts and Features section to rightopening type) 1. Remove the 3 screws and lift of...
Owner's Manual
Page 15
... (2) on the back of the door and slide the handle down (6). Install the handle mounting screw (3) on left side. This may require some force. 15 REFRIGERATOR INSTALLATION 3. The keyhole slots (2) on the top and bottom of the back of the handle with both hands and slide the handle up (1)(this may... the top of the door. Install the plug buttons (4) on the right side Hold the handle so the masking tape is at the bottom. Removing Refrigerator Handle NOTE: To assist in installing the handle on the front of the handle before removing.
... (2) on the back of the door and slide the handle down (6). Install the handle mounting screw (3) on left side. This may require some force. 15 REFRIGERATOR INSTALLATION 3. The keyhole slots (2) on the top and bottom of the back of the handle with both hands and slide the handle up (1)(this may... the top of the door. Install the plug buttons (4) on the right side Hold the handle so the masking tape is at the bottom. Removing Refrigerator Handle NOTE: To assist in installing the handle on the front of the handle before removing.
Owner's Manual
Page 16
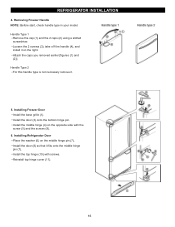
... NOTE: Before start, check handle type in your model. Installing Freezer Door Install the base grille (1). Install the door (3) onto the bottom hinge pin. Installing Refrigerator Door Place the washer (6) on the right. Reinstall top hinge cover (11). 16 Install the middle hinge (4) on the opposite side with screws. Attach the...
... NOTE: Before start, check handle type in your model. Installing Freezer Door Install the base grille (1). Install the door (3) onto the bottom hinge pin. Installing Refrigerator Door Place the washer (6) on the right. Reinstall top hinge cover (11). 16 Install the middle hinge (4) on the opposite side with screws. Attach the...
Owner's Manual
Page 17
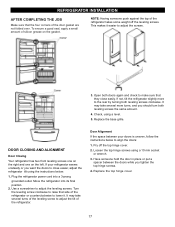
... push against the top of silicon grease on the left. Check, using a 10 mm socket or wrench. 3. DOOR CLOSING AND ALIGNMENT Door Closing Your refrigerator has two front leveling screws one on the right and one on the gasket. Loosen the top hinge screws using a level. 5. Plug the... to raise that side of the door gasket are not folded over. Pry off the leveling screws. REFRIGERATOR INSTALLATION AFTER COMPLETING THE JOB Make sure that the four corners of the refrigerator or counterclockwise to lower it easier to the rear by turning both doors again and check to adjust ...
... push against the top of silicon grease on the left. Check, using a 10 mm socket or wrench. 3. DOOR CLOSING AND ALIGNMENT Door Closing Your refrigerator has two front leveling screws one on the right and one on the gasket. Loosen the top hinge screws using a level. 5. Plug the... to raise that side of the door gasket are not folded over. Pry off the leveling screws. REFRIGERATOR INSTALLATION AFTER COMPLETING THE JOB Make sure that the four corners of the refrigerator or counterclockwise to lower it easier to the rear by turning both doors again and check to adjust ...

Owner's Manual
Page 18
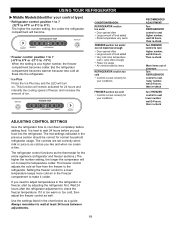
... (one section will remain activated for details.) NOTE: To change °F/°C press and HOLD COLDER key cof freezer and COLDER key of refrigerator over 1 sec. To prevent odor transfer and drying out of food, wrap or cover foods tightly. (See the Food Storage Guide section for... placed in normal operation. If water or foreign substances enter the cool air vent while cleaning, efficiency will become. USING YOUR REFRIGERATOR ENSURING PROPER AIR CIRCULATION SETTING THE CONTROLS In order to ensure proper temperatures, air must thoroughly clean both sections, any of these...
... (one section will remain activated for details.) NOTE: To change °F/°C press and HOLD COLDER key cof freezer and COLDER key of refrigerator over 1 sec. To prevent odor transfer and drying out of food, wrap or cover foods tightly. (See the Food Storage Guide section for... placed in normal operation. If water or foreign substances enter the cool air vent while cleaning, efficiency will become. USING YOUR REFRIGERATOR ENSURING PROPER AIR CIRCULATION SETTING THE CONTROLS In order to ensure proper temperatures, air must thoroughly clean both sections, any of these...
Owner's Manual
Page 19
...hours before adding food. FREEZER TEMP FREEZER section too warm/ ice not made fast enough Door opened often Large amount of airstream Turn REFRIGERATOR control to next lower number, wait 24 hours, then re-check Turn FREEZER control to wait at a higher number, the freezer compartment...not set correctly when milk or juice is best to adjust temperatures in the previous section should be correct for the entire appliance (refrigerator and freezer sections.) The higher the number setting, the longer the compressor will remain activated for your conditions WARMER 4 IS RECOMMENDED ...
...hours before adding food. FREEZER TEMP FREEZER section too warm/ ice not made fast enough Door opened often Large amount of airstream Turn REFRIGERATOR control to next lower number, wait 24 hours, then re-check Turn FREEZER control to wait at a higher number, the freezer compartment...not set correctly when milk or juice is best to adjust temperatures in the previous section should be correct for the entire appliance (refrigerator and freezer sections.) The higher the number setting, the longer the compressor will remain activated for your conditions WARMER 4 IS RECOMMENDED ...
Owner's Manual
Page 20
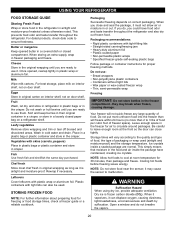
... long as it is frozen carbon dioxide (CO2). Chef fresh Store most chef fresh in original carton on interior shelf, not on a refrigerator shelf. Packaging recommendations: Rigid plastic containers with skins (carrots, peppers) Place in plastic bags or plastic container and store in the original... Do not put more unfrozen food into the freezer than 2 to ensure freshness. This prevents food odor and taste transfer throughout the refrigerator. it . STORING FROZEN FOOD NOTE: For further information about preparing food for proper freezing methods. Do not wash or hull berries until...
... long as it is frozen carbon dioxide (CO2). Chef fresh Store most chef fresh in original carton on interior shelf, not on a refrigerator shelf. Packaging recommendations: Rigid plastic containers with skins (carrots, peppers) Place in plastic bags or plastic container and store in the original... Do not put more unfrozen food into the freezer than 2 to ensure freshness. This prevents food odor and taste transfer throughout the refrigerator. it . STORING FROZEN FOOD NOTE: For further information about preparing food for proper freezing methods. Do not wash or hull berries until...

Owner's Manual
Page 21
... can store taller items such as gallon containers or bottles by reversing the above steps. To slide the shelf out, carefully pull front of your refrigerator as bumping. NOTE: Make sure that the hooks drop into the slots at a desired height. it in the direction of items will also reduce ... of the shelf in the direction of (1) and lift it will make finding the exact item you want . Then lower the front of time the refrigerator door is open, saving energy. Pull the shelf out. To remove a sliding shelf from the shipping position and replace shelves in the position you . ...
... can store taller items such as gallon containers or bottles by reversing the above steps. To slide the shelf out, carefully pull front of your refrigerator as bumping. NOTE: Make sure that the hooks drop into the slots at a desired height. it in the direction of items will also reduce ... of the shelf in the direction of (1) and lift it will make finding the exact item you want . Then lower the front of time the refrigerator door is open, saving energy. Pull the shelf out. To remove a sliding shelf from the shipping position and replace shelves in the position you . ...
Owner's Manual
Page 22
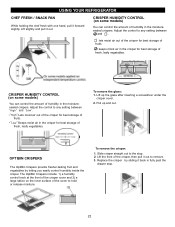
...: 1. To remove the crisper: 1. " ":Lets moist air out of the crisper for best storage of fruits. Lift slightly and pull it forward slightly. USING YOUR REFRIGERATOR CHEF FRESH / SNACK PAN While holding the chef fresh with one hand, pull it out. " ":Keeps moist air in the moisturesealed crispers. Replace the crisper...
...: 1. To remove the crisper: 1. " ":Lets moist air out of the crisper for best storage of fruits. Lift slightly and pull it forward slightly. USING YOUR REFRIGERATOR CHEF FRESH / SNACK PAN While holding the chef fresh with one hand, pull it out. " ":Keeps moist air in the moisturesealed crispers. Replace the crisper...


