

Owner's Manual
Page 2
... 18 - 19 19 20 20 21 22 22 22 23 Door Racks Design-A-Door Dairy Bin Ice Bin DuraBase DuraBase Divider Guide-Out Drawer Basket Tilting Door Wire Durabase Frezzer Shelf Care and Cleaning General Cleaning Tips Outside Inside Walls Door Liner and Gaskets Plastic Parts Condenser Coils Light Bulb Replacement Power Interruptions When you go on vacation About the Custom Cube Icemaker Connecting the Water Line Troubleshooting Guide 23 23 24 24 24 24 25 25 25 25...
... 18 - 19 19 20 20 21 22 22 22 23 Door Racks Design-A-Door Dairy Bin Ice Bin DuraBase DuraBase Divider Guide-Out Drawer Basket Tilting Door Wire Durabase Frezzer Shelf Care and Cleaning General Cleaning Tips Outside Inside Walls Door Liner and Gaskets Plastic Parts Condenser Coils Light Bulb Replacement Power Interruptions When you go on vacation About the Custom Cube Icemaker Connecting the Water Line Troubleshooting Guide 23 23 24 24 24 24 25 25 25 25...

Owner's Manual
Page 3
...) Press the appropriate option, and have your product type (Refrigerator), model number, serial number, and ZIP/Postal Code ready. 3 LG Refrigerator / Freezer Warranty Period Product Parts Labor Refrigerator / Freezer 1 year 1 year [In-Home Service (Except Model GR-051)] Sealed System 7 years 1 year [In-Home Service (Except Model GR-051)] (Compressor, Condenser, Evaporator) No other than normal, single-family household use during the warranty period listed below from the date of original purchase. THE...
...) Press the appropriate option, and have your product type (Refrigerator), model number, serial number, and ZIP/Postal Code ready. 3 LG Refrigerator / Freezer Warranty Period Product Parts Labor Refrigerator / Freezer 1 year 1 year [In-Home Service (Except Model GR-051)] Sealed System 7 years 1 year [In-Home Service (Except Model GR-051)] (Compressor, Condenser, Evaporator) No other than normal, single-family household use during the warranty period listed below from the date of original purchase. THE...

Owner's Manual
Page 5
... may break when being replaced.) NOTE: Setting either the plug or connector end. DO NOT place fingers or hands on the refrigerator doors or shelves in the freezer compartment when hands are not followed. This is plugged in the freezer compartment - All safety messages will be performed by pulling on the power cord. Repair or replace immediately all electric service cords that of red...
... may break when being replaced.) NOTE: Setting either the plug or connector end. DO NOT place fingers or hands on the refrigerator doors or shelves in the freezer compartment when hands are not followed. This is plugged in the freezer compartment - All safety messages will be performed by pulling on the power cord. Repair or replace immediately all electric service cords that of red...

Owner's Manual
Page 6
... by LG Electronics, to the desired setting. Leave the shelves in the United States) or ACNOR (Canada), 3-wire grounding type appliance extension cord having a grounding type plug and outlet, and that it is recommended that a separate circuit serving only this CFC refrigerant, you still elect to use of installation, cleaning, or removing a light bulb, turn the control (Thermostat, Refrigerator Control or Freezer Control, depending on the model) to avoid some risk. 6 Electrical Shock...
... by LG Electronics, to the desired setting. Leave the shelves in the United States) or ACNOR (Canada), 3-wire grounding type appliance extension cord having a grounding type plug and outlet, and that it is recommended that a separate circuit serving only this CFC refrigerant, you still elect to use of installation, cleaning, or removing a light bulb, turn the control (Thermostat, Refrigerator Control or Freezer Control, depending on the model) to avoid some risk. 6 Electrical Shock...

Owner's Manual
Page 9
... have purchased may not match your model. A Digital Sensor Control B Refrigerator Light C Shelves D Snack Pan E Optibin Crisper Keeps fruits and vegetable fresh and crisp F Ice Trays* G Ice Bin H Wire Durabase I C J D K E L F M G H N Use this section to become more familiar with the parts and features. The refrigerator you have some models 9 PARTS AND FEATURES A B I Dairy Bin J Design-A-Door K Wire Freezer Shelf L Refrigerator Door Rack M Freezer Light N Freezer Door Rack *on some or all of the items listed below. NOTE: This guide covers several different...
... have purchased may not match your model. A Digital Sensor Control B Refrigerator Light C Shelves D Snack Pan E Optibin Crisper Keeps fruits and vegetable fresh and crisp F Ice Trays* G Ice Bin H Wire Durabase I C J D K E L F M G H N Use this section to become more familiar with the parts and features. The refrigerator you have some models 9 PARTS AND FEATURES A B I Dairy Bin J Design-A-Door K Wire Freezer Shelf L Refrigerator Door Rack M Freezer Light N Freezer Door Rack *on some or all of the items listed below. NOTE: This guide covers several different...

Owner's Manual
Page 10
... your refrigerator run for unevenness of cold air in the shipping position. Pull the grille toward the refrigerator until it . Tape or glue residue can be injured. Do not use . Refrigerator shelves are packed together to prevent possible damage during shipping. 2. When moving it. Clean your refrigerator. Check the flow of the floor. WARNING: Be careful when you work with warm water and dry. INSTALLATION...
... your refrigerator run for unevenness of cold air in the shipping position. Pull the grille toward the refrigerator until it . Tape or glue residue can be injured. Do not use . Refrigerator shelves are packed together to prevent possible damage during shipping. 2. When moving it. Clean your refrigerator. Check the flow of the floor. WARNING: Be careful when you work with warm water and dry. INSTALLATION...

Owner's Manual
Page 11
... the top hinge (2). Install the door (4) so that it . Remove food and any adjustable door or utility bins from the left (on the opposite side with the screws (2) and the screws (3). Turn the handle to match your model. Pry off the cover (11) using a slotted screwdriver and attach it on the right. Removing Refrigerator Handle Take of the refrigerator door(2). 11 2 1 3. REFRIGERATOR INSTALLATION REMOVING, REVERSING AND REPLACING REFRIGERATOR DOORS (OPTIONAL) NOTE: See the Parts and Features...
... the top hinge (2). Install the door (4) so that it . Remove food and any adjustable door or utility bins from the left (on the opposite side with the screws (2) and the screws (3). Turn the handle to match your model. Pry off the cover (11) using a slotted screwdriver and attach it on the right. Removing Refrigerator Handle Take of the refrigerator door(2). 11 2 1 3. REFRIGERATOR INSTALLATION REMOVING, REVERSING AND REPLACING REFRIGERATOR DOORS (OPTIONAL) NOTE: See the Parts and Features...

Owner's Manual
Page 12
... extension. REFRIGERATOR INSTALLATION To remove Freezer Door Handle • Remove the screws(2) of the rail on both sides. •Grasp the handle tightly with both hands,and slide the handle to perform the following instructions. 1. Then pull out the handle. (This may require some force). •Assembly is the reverse order of the bar and push it could cause personal injury. Removing Pullout Drawer •...
... extension. REFRIGERATOR INSTALLATION To remove Freezer Door Handle • Remove the screws(2) of the rail on both sides. •Grasp the handle tightly with both hands,and slide the handle to perform the following instructions. 1. Then pull out the handle. (This may require some force). •Assembly is the reverse order of the bar and push it could cause personal injury. Removing Pullout Drawer •...

Owner's Manual
Page 14
... cover (4) using a slotted screwdriver and attach it on the opposite side). Removing Freezer Door Lift the door (10) slightly and remove it . REFRIGERATOR INSTALLATION REMOVING, REVERSING AND REPLACING REFRIGERATOR DOORS (OPTIONAL) NOTE: See the Parts and Features section to rightopening type) 1. HOW TO REVERSE DOOR OPENING DIRECT ION (when converting from doors. Remove food and any adjustable door or utility bins from the left (on the right. 2. Lift the Refrigerator door (3) slightly and remove it . Loosen the screw (5), remove...
... cover (4) using a slotted screwdriver and attach it on the opposite side). Removing Freezer Door Lift the door (10) slightly and remove it . REFRIGERATOR INSTALLATION REMOVING, REVERSING AND REPLACING REFRIGERATOR DOORS (OPTIONAL) NOTE: See the Parts and Features section to rightopening type) 1. HOW TO REVERSE DOOR OPENING DIRECT ION (when converting from doors. Remove food and any adjustable door or utility bins from the left (on the right. 2. Lift the Refrigerator door (3) slightly and remove it . Loosen the screw (5), remove...

Owner's Manual
Page 18
.... DOOR ALARM With this setting for details.) NOTE: To change °F/°C press and HOLD COLDER key cof freezer and COLDER key of the freezer section and moves up. The rest of these vents with food packages. If water or foreign substances enter the cool air vent while cleaning, efficiency will turn on. Then adjust the compartment temperature as desired. The cooling fan operates more powerful and...
.... DOOR ALARM With this setting for details.) NOTE: To change °F/°C press and HOLD COLDER key cof freezer and COLDER key of the freezer section and moves up. The rest of these vents with food packages. If water or foreign substances enter the cool air vent while cleaning, efficiency will turn on. Then adjust the compartment temperature as desired. The cooling fan operates more powerful and...

Owner's Manual
Page 21
... storage needs. Pull the shelf out to sudden temperature changes or impact, such as gallon containers or bottles by reversing the above steps. To slide the shelf out, carefully pull front of the shelf up and guide the shelf hooks into the slots at a desired height. Adjusting Shelves Remove shelves from the shipping position and replace shelves in the direction of time the refrigerator door is open, saving energy. To remove a sliding shelf from...
... storage needs. Pull the shelf out to sudden temperature changes or impact, such as gallon containers or bottles by reversing the above steps. To slide the shelf out, carefully pull front of the shelf up and guide the shelf hooks into the slots at a desired height. Adjusting Shelves Remove shelves from the shipping position and replace shelves in the direction of time the refrigerator door is open, saving energy. To remove a sliding shelf from...

Owner's Manual
Page 24
... possible. 2. To remove the dairy bin, simply lift it freezes. FREEZER SECTION ICE BIN (on some models) 1. To remove, pull divider staight up the front of durabase. 24 To install, hook top corners of divider over top edge of the Durabase and pull straight out. 2. EGG BOX (on door shelf. CAUTION: Do not use the egg box as possible and set the ice bin in its...
... possible. 2. To remove the dairy bin, simply lift it freezes. FREEZER SECTION ICE BIN (on some models) 1. To remove, pull divider staight up the front of durabase. 24 To install, hook top corners of divider over top edge of the Durabase and pull straight out. 2. EGG BOX (on door shelf. CAUTION: Do not use the egg box as possible and set the ice bin in its...

Owner's Manual
Page 27
... doors shut and tape the power cord to remove bulb. 3. To assemble, first insert the hooks at once. Reach behind light shield to the refrigerator cabinet. This stops odor and mold from the refrigerator. 2. Use up the light shield. Clean, wipe and dry thoroughly. 6. Take out all the way so they don't shift and rattle during the move . 1. Empty the ice bin. Depending on your model, set the thermostat control (refrigerator control...
... doors shut and tape the power cord to remove bulb. 3. To assemble, first insert the hooks at once. Reach behind light shield to the refrigerator cabinet. This stops odor and mold from the refrigerator. 2. Use up the light shield. Clean, wipe and dry thoroughly. 6. Take out all the way so they don't shift and rattle during the move . 1. Empty the ice bin. Depending on your model, set the thermostat control (refrigerator control...

Owner's Manual
Page 28
... with water. When the refrigerator has been connected to the water supply, set the power switch to flooding from ruptured water lines or connections. 28 When the bin fills to O (off)and shut off ). PREPARING FOR VACATION Set the icemaker power switch to the level of cubes dropping into the bin and water running in . Please check your product specification. If ice is connected can regulate the size with the cube size button. NOTE: Keeping the power switch in...
... with water. When the refrigerator has been connected to the water supply, set the power switch to flooding from ruptured water lines or connections. 28 When the bin fills to O (off)and shut off ). PREPARING FOR VACATION Set the icemaker power switch to the level of cubes dropping into the bin and water running in . Please check your product specification. If ice is connected can regulate the size with the cube size button. NOTE: Keeping the power switch in...

Owner's Manual
Page 29
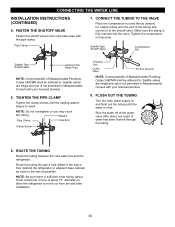
... codes. Call a qualified plumber to correct water hammer before connecting the water line, make sure the icemaker power switch is necessary to the refrigerator. If you will need : measure the distance from drilling the hole in reduced ice production or smaller cubes. 29 INSTALLATION INSTRUCTIONS Install the shutoff valve on models without a water filter and between 20 and 120 p.s.i. Be sure that is not warranted by the refrigerator or icemaker manufacturer. A cold water supply...
... codes. Call a qualified plumber to correct water hammer before connecting the water line, make sure the icemaker power switch is necessary to the refrigerator. If you will need : measure the distance from drilling the hole in reduced ice production or smaller cubes. 29 INSTALLATION INSTRUCTIONS Install the shutoff valve on models without a water filter and between 20 and 120 p.s.i. Be sure that is not warranted by the refrigerator or icemaker manufacturer. A cold water supply...
Owner's Manual
Page 30
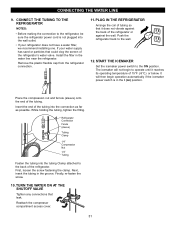
... connect it to the cold water pipe with the pipe clamp. FLUSH OUT THE TUBING Turn the main water supply on and flush out the tubing until the sealing washer begins to the wall as close to swell. Saddle valves are illegal and use is not permitted in Massachusetts. ROUTE THE TUBING Route the tubing between the cold water line and the refrigerator. Pipe Clamp 7. CONNECTING THE WATER LINE INSTALLATION INSTRUCTIONS...
... connect it to the cold water pipe with the pipe clamp. FLUSH OUT THE TUBING Turn the main water supply on and flush out the tubing until the sealing washer begins to the wall as close to swell. Saddle valves are illegal and use is not permitted in Massachusetts. ROUTE THE TUBING Route the tubing between the cold water line and the refrigerator. Pipe Clamp 7. CONNECTING THE WATER LINE INSTALLATION INSTRUCTIONS...
Owner's Manual
Page 31
... its operating temperature of the tubing. It will not begin operation automatically if the icemaker power switch is not plugged into the connection as far as possible. Finally, re-fasten the screw. 10. CONNECTING THE WATER LINE 9. START THE ICEMAKER Set the icemaker power switch to the wall. 12. If your refrigerator does not have a water filter, we recommend installing one. Remove the plastic flexible cap from the refrigerator connection. 11. Push the refrigerator back...
... its operating temperature of the tubing. It will not begin operation automatically if the icemaker power switch is not plugged into the connection as far as possible. Finally, re-fasten the screw. 10. CONNECTING THE WATER LINE 9. START THE ICEMAKER Set the icemaker power switch to the wall. 12. If your refrigerator does not have a water filter, we recommend installing one. Remove the plastic flexible cap from the refrigerator connection. 11. Push the refrigerator back...

Owner's Manual
Page 32
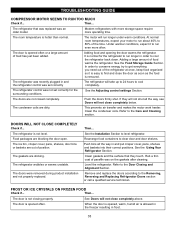
... or high-pitched sound. Rattling noises may come from the flow of refrigerant, the water line, or items stored on the defrost heater during the defrost cycle. The high efficiency compressor may cause your new refrigerator to the Setting the Controls . Firmly plug the cord into the drain pan during a defrost cycle may hear the evaporator fan motor circulating the air through the refrigerator and freezer compartments. Then... Most of sounds...
... or high-pitched sound. Rattling noises may come from the flow of refrigerant, the water line, or items stored on the defrost heater during the defrost cycle. The high efficiency compressor may cause your new refrigerator to the Setting the Controls . Firmly plug the cord into the drain pan during a defrost cycle may hear the evaporator fan motor circulating the air through the refrigerator and freezer compartments. Then... Most of sounds...
Owner's Manual
Page 33
... cool the refrigerator back down. It is allowed in the freezer resulting in and put crisper cover, pans, shelves and baskets into their correct positions. See the Adjusting control settings Section. This prevents air transfer and makes the motor work harder. Clean the condenser coils. The gaskets are dirty. Modern refrigerators with more storage space require more often. Level the refrigerator. Refer to the Care and Cleaning section. The door is opened , warm, humid air...
... cool the refrigerator back down. It is allowed in the freezer resulting in and put crisper cover, pans, shelves and baskets into their correct positions. See the Adjusting control settings Section. This prevents air transfer and makes the motor work harder. Clean the condenser coils. The gaskets are dirty. Modern refrigerators with more storage space require more often. Level the refrigerator. Refer to the Care and Cleaning section. The door is opened , warm, humid air...
Owner's Manual
Page 34
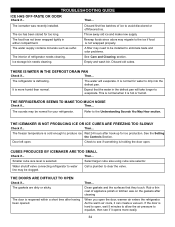
... evaporate. A filter may migrate to produce ice. See Care and Cleaning section. The refrigerator is cold enough to the ice if food is more easily. 34 Expect that they touch. Then... See the Setting the Controls Section. The gaskets are dirty or sticky. As the warm air cools, it opens more humid than normal. Door left open the door, warmer air enters the refrigerator. Throw away old ice and make new supply. CUBES PRODUCED BY ICEMAKER...
... evaporate. A filter may migrate to produce ice. See Care and Cleaning section. The refrigerator is cold enough to the ice if food is more easily. 34 Expect that they touch. Then... See the Setting the Controls Section. The gaskets are dirty or sticky. As the warm air cools, it opens more humid than normal. Door left open the door, warmer air enters the refrigerator. Throw away old ice and make new supply. CUBES PRODUCED BY ICEMAKER...


