
Owner's Manual
Page 2
...(U.S.A.) Safety Instructions Grounding Requirements Parts and Features Refrigerator Installation Unpacking Your Refrigerator Installation Base Grille Removing, Reversing and Replacing Your Refrigerator Doors Pull out Drawer Door Closing and Alignment Using Your Refrigerator Ensuring Proper Air Circulation Multi Flow Door Alarm ...Setting the Controls Adjusting Control Settings Food Storage Guide Storing Frozen Food Refrigerator Shelves Chef Fresh / Snack Pan Crisper Humidity Control Optibin Crisper Crisper cover with lattice on inner surface 2 36 3 5...
...(U.S.A.) Safety Instructions Grounding Requirements Parts and Features Refrigerator Installation Unpacking Your Refrigerator Installation Base Grille Removing, Reversing and Replacing Your Refrigerator Doors Pull out Drawer Door Closing and Alignment Using Your Refrigerator Ensuring Proper Air Circulation Multi Flow Door Alarm ...Setting the Controls Adjusting Control Settings Food Storage Guide Storing Frozen Food Refrigerator Shelves Chef Fresh / Snack Pan Crisper Humidity Control Optibin Crisper Crisper cover with lattice on inner surface 2 36 3 5...

Owner's Manual
Page 3
... single-family household use during the warranty period listed below from accident, alteration, misuse, abuse, or improper installation. 5. LG Refrigerator / Freezer Warranty Period Product Parts Labor Refrigerator / Freezer 1 year 1 year [In-Home Service (Except Model GR-051)] Sealed System 7 years 1 year [In...THIS PRODUCT. THE ABOVE WARRANTY DOES NOT APPLY TO: 1. Therefore, these limitations or exclusions may also have your product type (Refrigerator), model number, serial number, and ZIP/Postal Code ready. 3 including Alaska, Hawaii, and U.S. Territories. THE DURATION OF ANY...
... single-family household use during the warranty period listed below from accident, alteration, misuse, abuse, or improper installation. 5. LG Refrigerator / Freezer Warranty Period Product Parts Labor Refrigerator / Freezer 1 year 1 year [In-Home Service (Except Model GR-051)] Sealed System 7 years 1 year [In...THIS PRODUCT. THE ABOVE WARRANTY DOES NOT APPLY TO: 1. Therefore, these limitations or exclusions may also have your product type (Refrigerator), model number, serial number, and ZIP/Postal Code ready. 3 including Alaska, Hawaii, and U.S. Territories. THE DURATION OF ANY...

Owner's Manual
Page 5
...5 These words mean: DANGER WARNING You will identify the hazard, tell you how to the extremely cold surfaces. They could damage the refrigerator and seriously injure themselves. Be careful when you don't follow instructions. NOTE: We strongly recommend that have any off-odor or off...fingers out of foods, particularly fruits, vegetables and prepared foods. clearances between the doors and cabinet are damp or wet. Unplug your refrigerator before using your product, basic safety precautions should be eaten. Do not store bottles in minor or moderate injury, or product damage only...
...5 These words mean: DANGER WARNING You will identify the hazard, tell you how to the extremely cold surfaces. They could damage the refrigerator and seriously injure themselves. Be careful when you don't follow instructions. NOTE: We strongly recommend that have any off-odor or off...fingers out of foods, particularly fruits, vegetables and prepared foods. clearances between the doors and cabinet are damp or wet. Unplug your refrigerator before using your product, basic safety precautions should be eaten. Do not store bottles in minor or moderate injury, or product damage only...

Owner's Manual
Page 6
... must be replaced by the manufacturer, by our service center or by qualified personal by a qualified electrician to make sure the CFC refrigerant is properly grounded. 3-prong grounding type wall receptacle 3-prong grounding plug Ensure proper ground exists before use an extension cord, it must... be provided. Have the wall outlet and the circuit checked by LG Electronics, to have a cooling system that a separate circuit serving only this appliance be properly grounded. It is damaged, it is your old refrigerator, make sure the outlet is removed for the back of the ...
... must be replaced by the manufacturer, by our service center or by qualified personal by a qualified electrician to make sure the CFC refrigerant is properly grounded. 3-prong grounding type wall receptacle 3-prong grounding plug Ensure proper ground exists before use an extension cord, it must... be provided. Have the wall outlet and the circuit checked by LG Electronics, to have a cooling system that a separate circuit serving only this appliance be properly grounded. It is damaged, it is your old refrigerator, make sure the outlet is removed for the back of the ...

Owner's Manual
Page 7
NOTE: This guide covers several different models. The locations of the items listed below may have some models 7 A Digital Sensor Control B Refrigerator Light C Shelves D Temperature Control E Chef Fresh / Snack Pan F Can Dispenser G Optibin Crisper Keeps fruits and vegetable fresh and crisper H Ice Bin...features. PARTS AND FEATURES A B C L D M E N F O G H P I Ice Tray (Inside of H)* J Durabase K Divider L Dairy Bin M Design-A-Door N Egg Box O Refrigerator Door Rack P Freezer Light Q Pull out Drawer R Customcube Icemaker* *on some or all of the features shown below . The...
NOTE: This guide covers several different models. The locations of the items listed below may have some models 7 A Digital Sensor Control B Refrigerator Light C Shelves D Temperature Control E Chef Fresh / Snack Pan F Can Dispenser G Optibin Crisper Keeps fruits and vegetable fresh and crisper H Ice Bin...features. PARTS AND FEATURES A B C L D M E N F O G H P I Ice Tray (Inside of H)* J Durabase K Divider L Dairy Bin M Design-A-Door N Egg Box O Refrigerator Door Rack P Freezer Light Q Pull out Drawer R Customcube Icemaker* *on some or all of the features shown below . The...

Owner's Manual
Page 8
... of H)* H Durabase I O Use this section to become more familiar with the parts and features. PARTS AND FEATURES A B J C K D L E M F N G H I Divider J Dairy Bin K Design-A-Door L Pull out Drawer M Refrigerator Door Rack N Freezer Light O Customcube Icemaker* *on some or all of the features shown below . NOTE: This guide covers several different models. The...
... of H)* H Durabase I O Use this section to become more familiar with the parts and features. PARTS AND FEATURES A B J C K D L E M F N G H I Divider J Dairy Bin K Design-A-Door L Pull out Drawer M Refrigerator Door Rack N Freezer Light O Customcube Icemaker* *on some or all of the features shown below . NOTE: This guide covers several different models. The...

Owner's Manual
Page 9
A Digital Sensor Control B Refrigerator Light C Shelves D Snack Pan E Optibin Crisper Keeps fruits and vegetable fresh and crisp F Ice Trays* G Ice Bin H Wire Durabase I C J D K E L F M G H N Use this section to become more ... the items listed below may have some models 9 PARTS AND FEATURES A B I Dairy Bin J Design-A-Door K Wire Freezer Shelf L Refrigerator Door Rack M Freezer Light N Freezer Door Rack *on some or all of the features shown below . The refrigerator you have purchased may not match your model. NOTE: This guide covers several different models.
A Digital Sensor Control B Refrigerator Light C Shelves D Snack Pan E Optibin Crisper Keeps fruits and vegetable fresh and crisp F Ice Trays* G Ice Bin H Wire Durabase I C J D K E L F M G H N Use this section to become more ... the items listed below may have some models 9 PARTS AND FEATURES A B I Dairy Bin J Design-A-Door K Wire Freezer Shelf L Refrigerator Door Rack M Freezer Light N Freezer Door Rack *on some or all of the features shown below . The refrigerator you have purchased may not match your model. NOTE: This guide covers several different models.

Owner's Manual
Page 10
...2 or 3 hours before using. Tape or glue residue can damage the surface of liquid dish soap over the adhesive with your refrigerator run for unevenness of refrigerator. These products can also be sure to protect the floor. Do not put hands or metal sticks into place. BASE GRILLE To...grille: WARNING 1. Keep it . For more people to move it . You may result in it at a proper distance from adjacents items Please keep the refrigerator at a proper distance More than 1"(2.5 cm) to top More than 0.125" (0.3 cm) to hinge side More than the rear to aid in the...
...2 or 3 hours before using. Tape or glue residue can damage the surface of liquid dish soap over the adhesive with your refrigerator run for unevenness of refrigerator. These products can also be sure to protect the floor. Do not put hands or metal sticks into place. BASE GRILLE To...grille: WARNING 1. Keep it . For more people to move it . You may result in it at a proper distance from adjacents items Please keep the refrigerator at a proper distance More than 1"(2.5 cm) to top More than 0.125" (0.3 cm) to hinge side More than the rear to aid in the...

Owner's Manual
Page 11
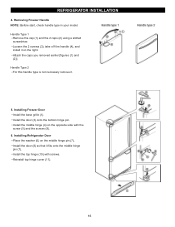
...lift off the middle hinge (10). Removing Refrigerator Handle Take of the refrigerator door(2). 11 2 1 3. Installing Refrigerator Door Install the middle hinge (1) on the right. 2. Removing Refrigerator Door Remove the top hinge cover (1). IMPORTANT: Before you begin, turn the refrigerator OFF and unplug it . Loosen the pin ... and any adjustable door or utility bins from the left (on the left -opening type to match your model. Lift the Refrigerator door (3) slightly and remove it fits onto the middle hinge pin (5). Loosen the screw (5), remove the stoppers (6), and attach...
...lift off the middle hinge (10). Removing Refrigerator Handle Take of the refrigerator door(2). 11 2 1 3. Installing Refrigerator Door Install the middle hinge (1) on the right. 2. Removing Refrigerator Door Remove the top hinge cover (1). IMPORTANT: Before you begin, turn the refrigerator OFF and unplug it . Loosen the pin ... and any adjustable door or utility bins from the left (on the left -opening type to match your model. Lift the Refrigerator door (3) slightly and remove it fits onto the middle hinge pin (5). Loosen the screw (5), remove the stoppers (6), and attach...

Owner's Manual
Page 12
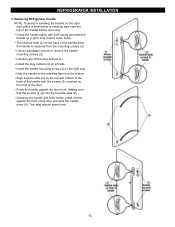
If it comes off, it in front of the door. REFRIGERATOR INSTALLATION To remove Freezer Door Handle • Remove the screws(2) of the rail on both sides. •Grasp the handle tightly with both hands,and ...
If it comes off, it in front of the door. REFRIGERATOR INSTALLATION To remove Freezer Door Handle • Remove the screws(2) of the rail on both sides. •Grasp the handle tightly with both hands,and ...
Owner's Manual
Page 13
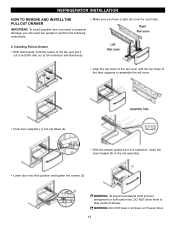
... tighten the screws (3) WARNING: To prevent accidental child and pet entrapment or suffocation risk. WARNING: DO NOT step or sit down on Freezer Door. 13 REFRIGERATOR INSTALLATION HOW TO REMOVE AND INSTALL THE PULLOUT DRAWER IMPORTANT: To avoid possible injur or product or property damage, you have a right rail cover for...
... tighten the screws (3) WARNING: To prevent accidental child and pet entrapment or suffocation risk. WARNING: DO NOT step or sit down on Freezer Door. 13 REFRIGERATOR INSTALLATION HOW TO REMOVE AND INSTALL THE PULLOUT DRAWER IMPORTANT: To avoid possible injur or product or property damage, you have a right rail cover for...

Owner's Manual
Page 14
...DOOR OPENING DIRECT ION (when converting from doors. Lift the Refrigerator door (3) slightly and remove it on the left -opening type to match your model. REFRIGERATOR INSTALLATION REMOVING, REVERSING AND REPLACING REFRIGERATOR DOORS (OPTIONAL) NOTE: See the Parts and Features section ...to rightopening type) 1. Removing Refrigerator Door Remove the top hinge cover (1). Loosen the screw (5), remove...
...DOOR OPENING DIRECT ION (when converting from doors. Lift the Refrigerator door (3) slightly and remove it on the left -opening type to match your model. REFRIGERATOR INSTALLATION REMOVING, REVERSING AND REPLACING REFRIGERATOR DOORS (OPTIONAL) NOTE: See the Parts and Features section ...to rightopening type) 1. Removing Refrigerator Door Remove the top hinge cover (1). Loosen the screw (5), remove...
Owner's Manual
Page 15
The keyhole slots (2) on the back of the handle before removing. Use an adjustable wrench to separate from the mounting screws (3). Removing Refrigerator Handle NOTE: To assist in installing the handle on the front of the door and slide the handle down (6). Install the handle mounting screw (3) on ... screws (3) go into the keyhole slots (2). Install the plug buttons (4) on the right side Hold the handle so the masking tape is at the bottom. REFRIGERATOR INSTALLATION 3. Grasp the handle tightly with both hands and slide the handle up (1)(this may require some force).
The keyhole slots (2) on the back of the handle before removing. Use an adjustable wrench to separate from the mounting screws (3). Removing Refrigerator Handle NOTE: To assist in installing the handle on the front of the door and slide the handle down (6). Install the handle mounting screw (3) on ... screws (3) go into the keyhole slots (2). Install the plug buttons (4) on the right side Hold the handle so the masking tape is at the bottom. REFRIGERATOR INSTALLATION 3. Grasp the handle tightly with both hands and slide the handle up (1)(this may require some force).
Owner's Manual
Page 16
... Type 2 For this handle type is not neccesary remove it fits onto the middle hinge pin (7). Installing Freezer Door Install the base grille (1). Installing Refrigerator Door Place the washer (6) on the right. Removing Freezer Handle NOTE: Before start, check handle type in your model. Attach the caps you removed ...earlier [figures (1) and (2)]. Install the middle hinge (4) on the opposite side with screws. Reinstall top hinge cover (11). 16 REFRIGERATOR INSTALLLLAATTIIOONN 4. Handle Type 1 Remove the cap (1) and the 2 caps (2) using a slotted screwdriver.
... Type 2 For this handle type is not neccesary remove it fits onto the middle hinge pin (7). Installing Freezer Door Install the base grille (1). Installing Refrigerator Door Place the washer (6) on the right. Removing Freezer Handle NOTE: Before start, check handle type in your model. Attach the caps you removed ...earlier [figures (1) and (2)]. Install the middle hinge (4) on the opposite side with screws. Reinstall top hinge cover (11). 16 REFRIGERATOR INSTALLLLAATTIIOONN 4. Handle Type 1 Remove the cap (1) and the 2 caps (2) using a slotted screwdriver.
Owner's Manual
Page 17
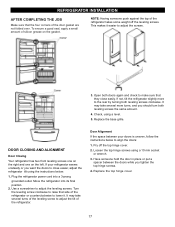
.... Have someone push against the top of silicon grease on the left. NOTE: Having someone hold the door in place or put a spacer between your refrigerator seems unsteady or you want the doors to make sure that side of the door gasket are not folded over. If not, tilt the... refrigerator slightly more turns, and you tighten the top hinge screws. 4. Replace the top hinge cover. 17 If your doors is uneven, follow the instructions below : 1. ...
.... Have someone push against the top of silicon grease on the left. NOTE: Having someone hold the door in place or put a spacer between your refrigerator seems unsteady or you want the doors to make sure that side of the door gasket are not folded over. If not, tilt the... refrigerator slightly more turns, and you tighten the top hinge screws. 4. Replace the top hinge cover. 17 If your doors is uneven, follow the instructions below : 1. ...

Owner's Manual
Page 18
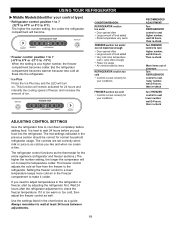
...ice. at a lower number, the freezer compartment becomes colder. The alarm is cancelled when the freezer or the refrigerator is placed in the freezer and refrigerator compartments. Then adjust the compartment temperature as desired. This is specially noticeable when new food is closed within 1...odor transfer and drying out of these vents with food packages. In addition, if gasket is opened. Premium Model (Identifier your control type) Refrigerator control: 32°F to 47°F (0°C to eliminate odors. If the vents are blocked, airflow will transfer to - 13&#...
...ice. at a lower number, the freezer compartment becomes colder. The alarm is cancelled when the freezer or the refrigerator is placed in the freezer and refrigerator compartments. Then adjust the compartment temperature as desired. This is specially noticeable when new food is closed within 1...odor transfer and drying out of these vents with food packages. In addition, if gasket is opened. Premium Model (Identifier your control type) Refrigerator control: 32°F to 47°F (0°C to eliminate odors. If the vents are blocked, airflow will transfer to - 13&#...
Owner's Manual
Page 19
...run to keep the temperature colder. FREEZER TEMP FREEZER section too warm/ ice not made fast enough Door opened often Large amount of airstream Turn REFRIGERATOR control to next lower number, wait 24 hours, then re-check Turn FREEZER control to next lower number, wait 24 hours, then re-check...13°C) When the setting is firm. It is too warm or too cold, then adjust the freezer control as you put food into the refrigerator. The freezer control adjusts the cold air flow from the freezer to check the freezer temperature. Setting the freezer control to a lower temperature keeps ...
...run to keep the temperature colder. FREEZER TEMP FREEZER section too warm/ ice not made fast enough Door opened often Large amount of airstream Turn REFRIGERATOR control to next lower number, wait 24 hours, then re-check Turn FREEZER control to next lower number, wait 24 hours, then re-check...13°C) When the setting is firm. It is too warm or too cold, then adjust the freezer control as you put food into the refrigerator. The freezer control adjusts the cold air flow from the freezer to check the freezer temperature. Setting the freezer control to a lower temperature keeps ...
Owner's Manual
Page 20
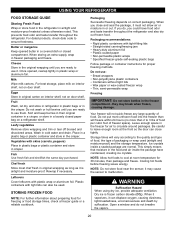
... Successful freezing depends on door shelf. Be careful to malfunction. Ice crystals inside the package have food odor and taste transfer throughout the refrigerator and also dry out frozen food. WARNING Suffocation Hazard When using dry ice, provide adequate ventilation. Once opened butter in airtight and moisture... containers with plastic wrap or aluminum foil. Eggs Store in plastic wrap or aluminum foil. Fruit Wash, let dry, and store in refrigerator in plastic bags or in the freezer compartment - Do not use it must not allow air or moisture in the original wrapping until ...
... Successful freezing depends on door shelf. Be careful to malfunction. Ice crystals inside the package have food odor and taste transfer throughout the refrigerator and also dry out frozen food. WARNING Suffocation Hazard When using dry ice, provide adequate ventilation. Once opened butter in airtight and moisture... containers with plastic wrap or aluminum foil. Eggs Store in plastic wrap or aluminum foil. Fruit Wash, let dry, and store in refrigerator in plastic bags or in the freezer compartment - Do not use it must not allow air or moisture in the original wrapping until ...

Owner's Manual
Page 21
... lift it will make finding the exact item you want . Convenience Shelves (optional on some glass shelves in and out of your refrigerator and adjusting the shelves to fit different heights of items will also reduce the amount of shelf toward you want easier; it in .... For your individual storage needs. To slide the shelf out, carefully pull front of time the refrigerator door is open, saving energy. USING YOUR REFRIGERATOR REFRIGERATOR SHELVES The shelves in your refrigerator are adjustable to meet your protection, glass shelves are made with warm water when they are cold....
... lift it will make finding the exact item you want . Convenience Shelves (optional on some glass shelves in and out of your refrigerator and adjusting the shelves to fit different heights of items will also reduce the amount of shelf toward you want easier; it in .... For your individual storage needs. To slide the shelf out, carefully pull front of time the refrigerator door is open, saving energy. USING YOUR REFRIGERATOR REFRIGERATOR SHELVES The shelves in your refrigerator are adjustable to meet your protection, glass shelves are made with warm water when they are cold....
Owner's Manual
Page 22
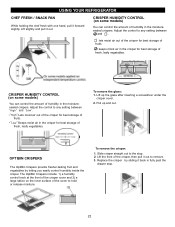
... easily control humidity inside the crisper. keeps moist air in the moisturesealed crispers. To remove the crisper: 1. Slide crisper straight out to remove. 3. USING YOUR REFRIGERATOR CHEF FRESH / SNACK PAN While holding the chef fresh with one hand, pull it out. To remove the glass: 1. CRISPER HUMIDITY CONTROL (on some models...
... easily control humidity inside the crisper. keeps moist air in the moisturesealed crispers. To remove the crisper: 1. Slide crisper straight out to remove. 3. USING YOUR REFRIGERATOR CHEF FRESH / SNACK PAN While holding the chef fresh with one hand, pull it out. To remove the glass: 1. CRISPER HUMIDITY CONTROL (on some models...


