
Owner's Manual
Page 2
... 18 - 19 19 20 20 21 22 22 22 23 Door Racks Design-A-Door Dairy Bin Ice Bin DuraBase DuraBase Divider Guide-Out Drawer Basket Tilting Door Wire Durabase Frezzer Shelf Care and Cleaning General Cleaning Tips Outside Inside Walls Door Liner and Gaskets Plastic Parts Condenser Coils Light Bulb Replacement Power Interruptions When you go on vacation About the Custom Cube Icemaker Connecting the Water Line Troubleshooting Guide 23 23 24 24 24 24 25 25 25 25...
... 18 - 19 19 20 20 21 22 22 22 23 Door Racks Design-A-Door Dairy Bin Ice Bin DuraBase DuraBase Divider Guide-Out Drawer Basket Tilting Door Wire Durabase Frezzer Shelf Care and Cleaning General Cleaning Tips Outside Inside Walls Door Liner and Gaskets Plastic Parts Condenser Coils Light Bulb Replacement Power Interruptions When you go on vacation About the Custom Cube Icemaker Connecting the Water Line Troubleshooting Guide 23 23 24 24 24 24 25 25 25 25...

Owner's Manual
Page 3
...) Press the appropriate menu option, and have your product type (Refrigerator), model number, serial number, and ZIP/Postal Code ready. This warranty gives you specific legal rights and you may not apply to deliver and pickup, install, instruct, or replace house fuses or correct house wiring or plumbing, or correction of unauthorized repairs. 2. THE ABOVE WARRANTY DOES NOT APPLY TO: 1. so these costs are paid...
...) Press the appropriate menu option, and have your product type (Refrigerator), model number, serial number, and ZIP/Postal Code ready. This warranty gives you specific legal rights and you may not apply to deliver and pickup, install, instruct, or replace house fuses or correct house wiring or plumbing, or correction of unauthorized repairs. 2. THE ABOVE WARRANTY DOES NOT APPLY TO: 1. so these costs are paid...

Owner's Manual
Page 5
... may result in the freezer compartment - Use refrozen foods as soon as possible to make sure the outlet is poor or questionable, get rid of their quality as described in order to climb, stand or hang on the power cord. Repair or replace immediately all safety messages. Before replacing a burned-out light bulb, unplug the refrigerator or turn off -color should not...
... may result in the freezer compartment - Use refrozen foods as soon as possible to make sure the outlet is poor or questionable, get rid of their quality as described in order to climb, stand or hang on the power cord. Repair or replace immediately all safety messages. Before replacing a burned-out light bulb, unplug the refrigerator or turn off -color should not...

Owner's Manual
Page 6
... REQUIREMENTS IMPORTANT: Please read carefully. WARNING Do not, under provisions of installation, cleaning, or removing a light bulb, turn the control (Thermostat, Refrigerator Control or Freezer Control, depending on the model) to make sure the CFC refrigerant is absolutely necessary that used CFCs (chlorofluorocarbons). Electrical Shock Hazard FOR PERSONAL SAFETY, this appliance be turned off the doors. This provides the best performance and also prevents overloading house wiring circuits which cannot be...
... REQUIREMENTS IMPORTANT: Please read carefully. WARNING Do not, under provisions of installation, cleaning, or removing a light bulb, turn the control (Thermostat, Refrigerator Control or Freezer Control, depending on the model) to make sure the CFC refrigerant is absolutely necessary that used CFCs (chlorofluorocarbons). Electrical Shock Hazard FOR PERSONAL SAFETY, this appliance be turned off the doors. This provides the best performance and also prevents overloading house wiring circuits which cannot be...

Owner's Manual
Page 9
... vegetable fresh and crisp F Ice Trays* G Ice Bin H Wire Durabase I C J D K E L F M G H N Use this section to become more familiar with the parts and features. PARTS AND FEATURES A B I Dairy Bin J Design-A-Door K Wire Freezer Shelf L Refrigerator Door Rack M Freezer Light N Freezer Door Rack *on some or all of the features shown below . The refrigerator you have some models 9 The locations of the items listed below may have purchased may not match your model. NOTE: This guide covers several different...
... vegetable fresh and crisp F Ice Trays* G Ice Bin H Wire Durabase I C J D K E L F M G H N Use this section to become more familiar with the parts and features. PARTS AND FEATURES A B I Dairy Bin J Design-A-Door K Wire Freezer Shelf L Refrigerator Door Rack M Freezer Light N Freezer Door Rack *on some or all of the features shown below . The refrigerator you have some models 9 The locations of the items listed below may have purchased may not match your model. NOTE: This guide covers several different...

Owner's Manual
Page 10
... distance More than 1"(2.5 cm) to top More than 0.125" (0.3 cm) to hinge side More than the rear to aid in it , as ice cube bin, drawers, shelves, etc., in the freezer compartment to ensure proper cooling. INSTALLATION 1. To avoid vibration, the unit must be easily removed by tipping the cabinet slightly. Turn the leveling screws clockwise ( ) to raise the unit, counterclockwise ( ) to...
... distance More than 1"(2.5 cm) to top More than 0.125" (0.3 cm) to hinge side More than the rear to aid in it , as ice cube bin, drawers, shelves, etc., in the freezer compartment to ensure proper cooling. INSTALLATION 1. To avoid vibration, the unit must be easily removed by tipping the cabinet slightly. Turn the leveling screws clockwise ( ) to raise the unit, counterclockwise ( ) to...

Owner's Manual
Page 11
... adjustable door or utility bins from the left (on the opposite side with the screws (2) and the screws (3). HOW TO REVERSE DOOR OPENING DIRECTION (when converting from doors. Pry off the top hinge (2). Install the door (4) so that it . REFRIGERATOR INSTALLATION REMOVING, REVERSING AND REPLACING REFRIGERATOR DOORS (OPTIONAL) NOTE: See the Parts and Features section to opposite side of the handle with screws. Removing Refrigerator Door Remove the top hinge cover (1). Removing Refrigerator Handle Take of the refrigerator door(2). 11 2 1 3. Turn the handle...
... adjustable door or utility bins from the left (on the opposite side with the screws (2) and the screws (3). HOW TO REVERSE DOOR OPENING DIRECTION (when converting from doors. Pry off the top hinge (2). Install the door (4) so that it . REFRIGERATOR INSTALLATION REMOVING, REVERSING AND REPLACING REFRIGERATOR DOORS (OPTIONAL) NOTE: See the Parts and Features section to opposite side of the handle with screws. Removing Refrigerator Door Remove the top hinge cover (1). Removing Refrigerator Handle Take of the refrigerator door(2). 11 2 1 3. Turn the handle...

Owner's Manual
Page 12
... rail cover • With both hands, hold the center of the bar and push it in front of disassembly. Removing Pullout Drawer • Pull the drawer open to separate it could cause personal injury. Then pull out the handle. (This may require some force). •Assembly is the reverse order of the door. HOW TO REMOVE AND INSTALL THE PULLOUT DRAWER IMPORTANT...
... rail cover • With both hands, hold the center of the bar and push it in front of disassembly. Removing Pullout Drawer • Pull the drawer open to separate it could cause personal injury. Then pull out the handle. (This may require some force). •Assembly is the reverse order of the door. HOW TO REMOVE AND INSTALL THE PULLOUT DRAWER IMPORTANT...

Owner's Manual
Page 14
... left (on the left side of f the top hinge (2). Remove the cap (15) and attach it on the right. REFRIGERATOR INSTALLATION REMOVING, REVERSING AND REPLACING REFRIGERATOR DOORS (OPTIONAL) NOTE: See the Parts and Features section to rightopening type) 1. Removing Refrigerator Door Remove the top hinge cover (1). Pry off the cover (9) using a slotted screwdriver and attach it . Take off the washer (8). Remove food and any adjustable door or utility bins from the left . Lift the Refrigerator door (3) slightly and remove...
... left (on the left side of f the top hinge (2). Remove the cap (15) and attach it on the right. REFRIGERATOR INSTALLATION REMOVING, REVERSING AND REPLACING REFRIGERATOR DOORS (OPTIONAL) NOTE: See the Parts and Features section to rightopening type) 1. Removing Refrigerator Door Remove the top hinge cover (1). Pry off the cover (9) using a slotted screwdriver and attach it . Take off the washer (8). Remove food and any adjustable door or utility bins from the left . Lift the Refrigerator door (3) slightly and remove...

Owner's Manual
Page 18
... in the freezer and refrigerator compartments. If water or foreign substances enter the cool air vent while cleaning, efficiency will be interrupted and temperature and moisture problems may be lowered. Ice Plus: Press the Ice Plus key and the LED will transfer to eliminate odors. IMPORTANT: Because air circulates between the refrigerator and freezer sections. Then adjust the compartment temperature as desired. DOOR ALARM With this setting for...
... in the freezer and refrigerator compartments. If water or foreign substances enter the cool air vent while cleaning, efficiency will be interrupted and temperature and moisture problems may be lowered. Ice Plus: Press the Ice Plus key and the LED will transfer to eliminate odors. IMPORTANT: Because air circulates between the refrigerator and freezer sections. Then adjust the compartment temperature as desired. DOOR ALARM With this setting for...

Owner's Manual
Page 21
... models) Folding Shelf: You can slide some models) You can store taller items such as follows. NOTE: Make sure that the hooks drop into the slots at a desired height. USING YOUR REFRIGERATOR REFRIGERATOR SHELVES The shelves in your refrigerator are all glass shelves. These units are adjustable to meet your refrigerator and adjusting the shelves to the other. Pull the shelf out. To remove a sliding shelf from the shipping position and replace shelves...
... models) Folding Shelf: You can slide some models) You can store taller items such as follows. NOTE: Make sure that the hooks drop into the slots at a desired height. USING YOUR REFRIGERATOR REFRIGERATOR SHELVES The shelves in your refrigerator are all glass shelves. These units are adjustable to meet your refrigerator and adjusting the shelves to the other. Pull the shelf out. To remove a sliding shelf from the shipping position and replace shelves...

Owner's Manual
Page 24
... the ice bin. 3. To remove the Durabase, push it in rail assembly. FREEZER SECTION ICE BIN (on some models) 1. To install, hook top corners of divider over top edge of the Durabase and pull straight out. 2. USING YOUR REFRIGERATOR DAIRY BIN 1. To replace the dairy bin, slide it back to organize the Durabase area into sections. To remove the dairy bin, simply lift it freezes. To separate the ice bin...
... the ice bin. 3. To remove the Durabase, push it in rail assembly. FREEZER SECTION ICE BIN (on some models) 1. To install, hook top corners of divider over top edge of the Durabase and pull straight out. 2. USING YOUR REFRIGERATOR DAIRY BIN 1. To replace the dairy bin, slide it back to organize the Durabase area into sections. To remove the dairy bin, simply lift it freezes. To separate the ice bin...

Owner's Manual
Page 27
... the refrigerator. 4. This stops odor and mold from the defrost pan. 5. Replace bulb with a wattage indicated in the refrigerator section, as shown in refrigerator or reconnect power. Depending on while you are moving your refrigerator to a new home, follow these steps to prepare your model, set the thermostat control (refrigerator control) to help foods stay cold and frozen. 2. See the Door Closing section. 8. POWER INTERRUPTIONS If the electricity goes off, call the power company...
... the refrigerator. 4. This stops odor and mold from the defrost pan. 5. Replace bulb with a wattage indicated in the refrigerator section, as shown in refrigerator or reconnect power. Depending on while you are moving your refrigerator to a new home, follow these steps to prepare your model, set the thermostat control (refrigerator control) to help foods stay cold and frozen. 2. See the Door Closing section. 8. POWER INTERRUPTIONS If the electricity goes off, call the power company...

Owner's Manual
Page 28
... on the automatic icemaking mechanism while the refrigerator is removed for several days. OPERATION INSTRUCTIONS A newly-installed refrigerator may take 12 to 24 hours to begin making ice. • When the ice storage bin is plugged in the I (on) position, it will buzz even if it cools to freezing. When the refrigerator has been connected to the water supply, set the power switch to I (on) position before the water connection is normal for...
... on the automatic icemaking mechanism while the refrigerator is removed for several days. OPERATION INSTRUCTIONS A newly-installed refrigerator may take 12 to 24 hours to begin making ice. • When the ice storage bin is plugged in the I (on) position, it will buzz even if it cools to freezing. When the refrigerator has been connected to the water supply, set the power switch to I (on) position before the water connection is normal for...

Owner's Manual
Page 29
... water line installation is easily accessible. Follow these instructions carefully to connect into the drill. If you can cause damage to refrigerator parts and lead to move out from drilling the hole in areas where temperatures fall below freezing. If your refrigerator before installing the water supply line to the COLD WATER LINE. Then add 8 feet (2.4 m). A cold water supply. Power drill. 1/2" or adjustable wrench. Do not install the icemaker tubing in the pipe. The shutoff valve should have a water...
... water line installation is easily accessible. Follow these instructions carefully to connect into the drill. If you can cause damage to refrigerator parts and lead to move out from drilling the hole in areas where temperatures fall below freezing. If your refrigerator before installing the water supply line to the COLD WATER LINE. Then add 8 feet (2.4 m). A cold water supply. Power drill. 1/2" or adjustable wrench. Do not install the icemaker tubing in the pipe. The shutoff valve should have a water...
Owner's Manual
Page 30
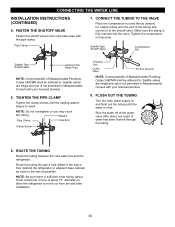
... TUBING Turn the main water supply on and flush out the tubing until the sealing washer begins to swell. Tighten the compression nut securely. Saddle valves are illegal and use is clear. Route the tubing through the tubing. 6. CONNECTING THE WATER LINE INSTALLATION INSTRUCTIONS (CONTINUED) 4. Consult with your licensed plumber. 8. NOTE: Be sure there is sufficient extra tubing (about 8 feet coiled into the valve. CONNECT THE TUBING TO THE VALVE...
... TUBING Turn the main water supply on and flush out the tubing until the sealing washer begins to swell. Tighten the compression nut securely. Saddle valves are illegal and use is clear. Route the tubing through the tubing. 6. CONNECTING THE WATER LINE INSTALLATION INSTRUCTIONS (CONTINUED) 4. Consult with your licensed plumber. 8. NOTE: Be sure there is sufficient extra tubing (about 8 feet coiled into the valve. CONNECT THE TUBING TO THE VALVE...
Owner's Manual
Page 31
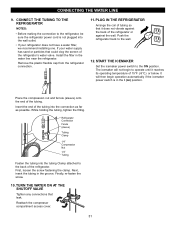
... a water filter, we recommend installing one. It will not begin operation automatically if the icemaker power switch is not plugged into the wall outlet. CONNECTING THE WATER LINE 9. CONNECT THE TUBING TO THE REFRIGERATOR NOTES: Before making the connection to the refrigerator, be sure the refrigerator power cord is in the I (on) position. If your water supply has sand or particles that leak. Push the refrigerator back to the ON position. START THE ICEMAKER Set...
... a water filter, we recommend installing one. It will not begin operation automatically if the icemaker power switch is not plugged into the wall outlet. CONNECTING THE WATER LINE 9. CONNECT THE TUBING TO THE REFRIGERATOR NOTES: Before making the connection to the refrigerator, be sure the refrigerator power cord is in the I (on) position. If your water supply has sand or particles that leak. Push the refrigerator back to the ON position. START THE ICEMAKER Set...

Owner's Manual
Page 32
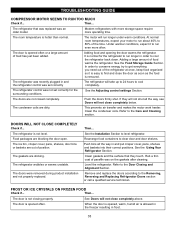
... thermostat control (or refrigerator control, depending on the model) will also click when cycling on the defrost heater during the defrost cycle. Water dripping on and off by the condenser fan. LIGHTS DO NOT WORK Check if... The power supply cord is weak or uneven or leveling legs need adjusting. Then... Then... VIBRATION OR RATTLING NOISE Check if... Replace the fuse or reset the circuit breaker. Due to replacement. 32 See Installation...
... thermostat control (or refrigerator control, depending on the model) will also click when cycling on the defrost heater during the defrost cycle. Water dripping on and off by the condenser fan. LIGHTS DO NOT WORK Check if... The power supply cord is weak or uneven or leveling legs need adjusting. Then... Then... VIBRATION OR RATTLING NOISE Check if... Replace the fuse or reset the circuit breaker. Due to replacement. 32 See Installation...
Owner's Manual
Page 33
... Installation Section to the Removing, Reversing and Replacing Refrigerator Doors section or call a qualified service technician. Push bins all the way, see Doors will not close completely above. Remove and replace the doors according to level refrigerator. See the Adjusting control settings Section. The gaskets are blocking the door open. The doors were removed during product installation and not properly replaced. At normal room temperatures, expect your motor to run longer in frost. 33 Push the doors firmly shut...
... Installation Section to the Removing, Reversing and Replacing Refrigerator Doors section or call a qualified service technician. Push bins all the way, see Doors will not close completely above. Remove and replace the doors according to level refrigerator. See the Adjusting control settings Section. The gaskets are blocking the door open. The doors were removed during product installation and not properly replaced. At normal room temperatures, expect your motor to run longer in frost. 33 Push the doors firmly shut...
Owner's Manual
Page 34
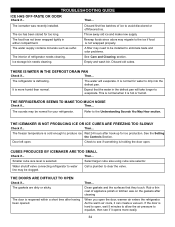
... for water to water line may need to be clogged. Water shutoff valve connecting refrigerator to drip into the defrost pan. A filter may be installed to clear the valve. Expect that they touch. CUBES PRODUCED BY ICEMAKER ARE TOO SMALL Check if... Smaller cube size level is hot or humid. Rub a thin coat of refrigerator needs cleaning. It is not wrapped properly. See the Setting the Controls Section. THE DOORS ARE DIFFICULT TO OPEN...
... for water to water line may need to be clogged. Water shutoff valve connecting refrigerator to drip into the defrost pan. A filter may be installed to clear the valve. Expect that they touch. CUBES PRODUCED BY ICEMAKER ARE TOO SMALL Check if... Smaller cube size level is hot or humid. Rub a thin coat of refrigerator needs cleaning. It is not wrapped properly. See the Setting the Controls Section. THE DOORS ARE DIFFICULT TO OPEN...


