
Owners Manual
Page 1
TYPE : PORTABLE AIR CONDITIONER MODEL : LP0817WSR LP1017WSR LP1217GSR LP1417SHR LP1417GSR LP1417WSRSM P/NO : COV34636802 Rev.2 www.lg.com Copyright © 2016 - 2018 LG Electronics Inc. All Rights Reserved. COV34636802 2018. 2. 5. 오오 6:10 Page 1 ENGLISH ESPAÑOL Read this owner's manual thoroughly before operating the appliance and retain it for future reference.
TYPE : PORTABLE AIR CONDITIONER MODEL : LP0817WSR LP1017WSR LP1217GSR LP1417SHR LP1417GSR LP1417WSRSM P/NO : COV34636802 Rev.2 www.lg.com Copyright © 2016 - 2018 LG Electronics Inc. All Rights Reserved. COV34636802 2018. 2. 5. 오오 6:10 Page 1 ENGLISH ESPAÑOL Read this owner's manual thoroughly before operating the appliance and retain it for future reference.

Owners Manual
Page 2
COV34636802 2018. 2. 5. 오오 6:10 Page 2 TABLE OF CONTENTS Important Safety Instructions 3 Electrical Safety 6 7 Before Using the Air Conditioner 8 Control Panel and Remote 10 Operation 12 SMART FUNCTIONS Using Smart ThinQ Application 13 15 16 16 17 Installation in Vertical-Sliding Windows 18 Installation in Horizontal-Sliding Windows 20 Heating Drainage 22 Emptying the Water Collection Tank 24 25 25 26 27 29 Arbitration Notice 30 2
COV34636802 2018. 2. 5. 오오 6:10 Page 2 TABLE OF CONTENTS Important Safety Instructions 3 Electrical Safety 6 7 Before Using the Air Conditioner 8 Control Panel and Remote 10 Operation 12 SMART FUNCTIONS Using Smart ThinQ Application 13 15 16 16 17 Installation in Vertical-Sliding Windows 18 Installation in Horizontal-Sliding Windows 20 Heating Drainage 22 Emptying the Water Collection Tank 24 25 25 26 27 29 Arbitration Notice 30 2

Owners Manual
Page 3
... to outdoor weather conditions. • Do not store or use , the appliance must be properly installed as described in this manual. • Connect to a properly rated, protected, and sized power circuit to avoid electrical overload. • Always plug into a grounded outlet. • Do not, under any other appliance. 3 All safety messages will not be sharp. • Disconnect the power cord or circuit breaker before installing or servicing...
... to outdoor weather conditions. • Do not store or use , the appliance must be properly installed as described in this manual. • Connect to a properly rated, protected, and sized power circuit to avoid electrical overload. • Always plug into a grounded outlet. • Do not, under any other appliance. 3 All safety messages will not be sharp. • Disconnect the power cord or circuit breaker before installing or servicing...

Owners Manual
Page 4
... disassembled, or has missing or broken parts, including a damaged cord or plug. • Repair or immediately replace all power cords that shows cracks or abrasion damage along its length or at the main circuit, then unplug the product and call for service. • If the product has been submerged, contact an LG Electronics Customer Information Center for instructions before cleaning. • In the event of the...
... disassembled, or has missing or broken parts, including a damaged cord or plug. • Repair or immediately replace all power cords that shows cracks or abrasion damage along its length or at the main circuit, then unplug the product and call for service. • If the product has been submerged, contact an LG Electronics Customer Information Center for instructions before cleaning. • In the event of the...

Owners Manual
Page 5
... skin, remove contaminated clothing and rinse skin thoroughly with soap and water. Contact a physician immediately. 5 ENGLISH COV34636802 2018. 2. 5. 오오 6:10 Page 5 SAFETY INSTRUCTIONS CAUTION To reduce the risk of the appliance. • Do not operate the appliance without the filter securely installed. • Clean the filter every two weeks. • Do not drink water drained from obstructions. • Use a soft...
... skin, remove contaminated clothing and rinse skin thoroughly with soap and water. Contact a physician immediately. 5 ENGLISH COV34636802 2018. 2. 5. 오오 6:10 Page 5 SAFETY INSTRUCTIONS CAUTION To reduce the risk of the appliance. • Do not operate the appliance without the filter securely installed. • Clean the filter every two weeks. • Do not drink water drained from obstructions. • Use a soft...

Owners Manual
Page 9
ENGLISH COV34636802 2018. 2. 5. 오오 6:10 Page 9 BEFORE USING THE AIR CONDITIONER the Press and slide to remove the battery cover on the back of the remote. • If the batteries leak onto your clothes or skin, remove contaminated clothing and rinse skin thoroughly with soap and water. Do not use the remote if the battery has leaked. • If the battery or the liquid inside it are ingested, do not induce vomiting or give food or drink. Contact a physician immediately. 9
ENGLISH COV34636802 2018. 2. 5. 오오 6:10 Page 9 BEFORE USING THE AIR CONDITIONER the Press and slide to remove the battery cover on the back of the remote. • If the batteries leak onto your clothes or skin, remove contaminated clothing and rinse skin thoroughly with soap and water. Do not use the remote if the battery has leaked. • If the battery or the liquid inside it are ingested, do not induce vomiting or give food or drink. Contact a physician immediately. 9

Owners Manual
Page 10
... remote and the sensor. After pressing the button, there is Cool. See the Operation section for more information. 10 The remote may not be changed in bright light or if there is in the Cool, Fan, and Heat modes. A chime sounds to turn on the control panel. See the Operation section for more information. Use the timer function to set using the remote. Modes include Cool, Dry (dehumidify), Fan, and Heat. NOTE: Press and hold the Mode button...
... remote and the sensor. After pressing the button, there is Cool. See the Operation section for more information. 10 The remote may not be changed in bright light or if there is in the Cool, Fan, and Heat modes. A chime sounds to turn on the control panel. See the Operation section for more information. Use the timer function to set using the remote. Modes include Cool, Dry (dehumidify), Fan, and Heat. NOTE: Press and hold the Mode button...

Owners Manual
Page 11
... activated from the remote. An E5 error code displays when the water drain tank needs to be used , the drain hose is automatically set temperature, fan speed, or the selected TIMER delay. one -hour increments. COV34636802 2018. 2. 5. 오오 6:10 Page 11 ENGLISH one -degree runs the compressor until cycles the compressor SLEEP mode can be emptied. If the louvers do not move properly, unplug and plug in the power cord.
... activated from the remote. An E5 error code displays when the water drain tank needs to be used , the drain hose is automatically set temperature, fan speed, or the selected TIMER delay. one -hour increments. COV34636802 2018. 2. 5. 오오 6:10 Page 11 ENGLISH one -degree runs the compressor until cycles the compressor SLEEP mode can be emptied. If the louvers do not move properly, unplug and plug in the power cord.
Owners Manual
Page 12
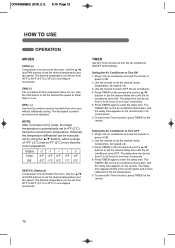
...;C 2°C HEAT( ) (Optional) Compressor runs and heats the room. Plug in the control panel and is preset and cannot be set from 60°F to 86°F (16°C to power it ON. 2. To cancel the Timer function, press TIMER on the remote and in Dry mode, the target temperature is automatically set to set the desired temperature and fan speed. Press TIMER on the remote and use the ƞ.Ơ buttons to...
...;C 2°C HEAT( ) (Optional) Compressor runs and heats the room. Plug in the control panel and is preset and cannot be set from 60°F to 86°F (16°C to power it ON. 2. To cancel the Timer function, press TIMER on the remote and in Dry mode, the target temperature is automatically set to set the desired temperature and fan speed. Press TIMER on the remote and use the ƞ.Ơ buttons to...

Owners Manual
Page 14
... open source code to you change your password after registering the appliance, please delete it to a Wi-Fi network. 2 Select the menu on the upper right side to users. • Functions may vary by model. LG Electronics will also provide open source licenses, that is contained in . 3 Select Register. 4 Select Air conditioner. 5 Follow the instruction on the smart phone. Product Registration 1 Run the LG...
... open source code to you change your password after registering the appliance, please delete it to a Wi-Fi network. 2 Select the menu on the upper right side to users. • Functions may vary by model. LG Electronics will also provide open source licenses, that is contained in . 3 Select Register. 4 Select Air conditioner. 5 Follow the instruction on the smart phone. Product Registration 1 Run the LG...

Owners Manual
Page 16
Set the grill and screws aside. 6. Reattach the grill on the diffuser, using the four screws removed in the same manner as assembling the hose to remove the four screws holding the grill on the end of the vent hose, use a Phillips screwdriver to the mounting bracket. (See steps 2 and 3.) 7. Tug the mounting bracket to make sure it is securely attached to the vent hose. 8. Tug the diffuser...
Set the grill and screws aside. 6. Reattach the grill on the diffuser, using the four screws removed in the same manner as assembling the hose to remove the four screws holding the grill on the end of the vent hose, use a Phillips screwdriver to the mounting bracket. (See steps 2 and 3.) 7. Tug the mounting bracket to make sure it is securely attached to the vent hose. 8. Tug the diffuser...

Owners Manual
Page 17
... window vent panel (Panel A) and an extension panel (Panel C). Fig. d 17 b For window openings from 27" to 34", use the window vent panel (Panel A) and an extension panel (Panel B). a For window openings from 18" to 50" high. c Fig. ENGLISH Fig. Window opening , as shown above. 2. COV34636802 2018. 2. 5. 오오 6:10 Page 17 INSTALLATION INSTRUCTIONS WINDOW VENT PANEL AND EXTENSIONS The window installation kit allows you to install the air conditioner in place with 1 type A screw. Select the panels required based on the window opening...
... window vent panel (Panel A) and an extension panel (Panel C). Fig. d 17 b For window openings from 27" to 34", use the window vent panel (Panel A) and an extension panel (Panel B). a For window openings from 18" to 50" high. c Fig. ENGLISH Fig. Window opening , as shown above. 2. COV34636802 2018. 2. 5. 오오 6:10 Page 17 INSTALLATION INSTRUCTIONS WINDOW VENT PANEL AND EXTENSIONS The window installation kit allows you to install the air conditioner in place with 1 type A screw. Select the panels required based on the window opening...

Owners Manual
Page 19
Insert the diffuser into the opening in the vent panel and slide it to lock it into the opening in the vent panel and slide the diffuser to lock the tabs in place. COV34636802 2018. 2. 5. 오오 6:10 Page 19 INSTALLATION INSTRUCTIONS INSTALLATION IN VERTICAL-SLIDING WINDOWS ENGLISH Insert the diffuser into place. Insert the type C screw in the hole in the vent panel. Slot (1) Insert (2) Slide Align the tabs on the diffuser with the slots in the diffuser to prevent the diffuser from sliding out of the vent opening. 19
Insert the diffuser into the opening in the vent panel and slide it to lock it into the opening in the vent panel and slide the diffuser to lock the tabs in place. COV34636802 2018. 2. 5. 오오 6:10 Page 19 INSTALLATION INSTRUCTIONS INSTALLATION IN VERTICAL-SLIDING WINDOWS ENGLISH Insert the diffuser into place. Insert the type C screw in the hole in the vent panel. Slot (1) Insert (2) Slide Align the tabs on the diffuser with the slots in the diffuser to prevent the diffuser from sliding out of the vent opening. 19

Owners Manual
Page 22
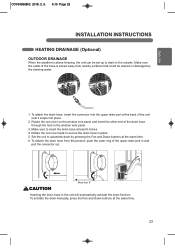
...;F/0°C) follow the indoor drainage instructions. Set the unit to avoid overflows. 3. If the outside temperature is not needed. To detach the drain hose, push the outer ring of the drain hose in and pull the connector out. 22 To attach the drain hose, insert the connector into place. 2. COV34636802 2018. 2. 5. 오오 6:10 Page 22 INSTALLATION INSTRUCTIONS HEATING DRAINAGE (Optional) If you use the Heat mode, you must install the drain hose.
...;F/0°C) follow the indoor drainage instructions. Set the unit to avoid overflows. 3. If the outside temperature is not needed. To detach the drain hose, push the outer ring of the drain hose in and pull the connector out. 22 To attach the drain hose, insert the connector into place. 2. COV34636802 2018. 2. 5. 오오 6:10 Page 22 INSTALLATION INSTRUCTIONS HEATING DRAINAGE (Optional) If you use the Heat mode, you must install the drain hose.
Owners Manual
Page 23
... activate the drain manually, press the Fan and Down buttons at least 8 inches. 4. Make sure to the outside. Make sure the outlet of the upper drain port in the window vent panel. 3. Set the unit to secure the drain hose in the unit will automatically activate the drain function. To attach the drain hose, insert the connector into place. 2. Rotate the nut cover on the window vent panel and insert...
... activate the drain manually, press the Fan and Down buttons at least 8 inches. 4. Make sure to the outside. Make sure the outlet of the upper drain port in the window vent panel. 3. Set the unit to secure the drain hose in the unit will automatically activate the drain function. To attach the drain hose, insert the connector into place. 2. Rotate the nut cover on the window vent panel and insert...

Owners Manual
Page 24
... error appears in the Cool or Fan mode. • Remove the drain plug when using the Dry (dehumidifying) mode. • Install a drain hose (16mm [5/8"] inside diameter) and place the open end of 75°F (24°C) once restarted. 24 NOTE: After the air conditioner is full. COV34636802 2018. 2. 5. 오오 6:10 Page 24 CARE AND CLEANING EMPTYING THE WATER COLLECTION TANK improves saves • This can be used when you need...
... error appears in the Cool or Fan mode. • Remove the drain plug when using the Dry (dehumidifying) mode. • Install a drain hose (16mm [5/8"] inside diameter) and place the open end of 75°F (24°C) once restarted. 24 NOTE: After the air conditioner is full. COV34636802 2018. 2. 5. 오오 6:10 Page 24 CARE AND CLEANING EMPTYING THE WATER COLLECTION TANK improves saves • This can be used when you need...

Owners Manual
Page 25
If the filters are heavily soiled, they can be washed in warm water using a mild detergent. COV34636802 2018. 2. 5. 오오 6:10 Page 25 CLEANING THE CASE CARE AND CLEANING ENGLISH CLEANING THE AIR FILTER filters each Use a vacuum cleaner to clean the filters. filters filters. 25
If the filters are heavily soiled, they can be washed in warm water using a mild detergent. COV34636802 2018. 2. 5. 오오 6:10 Page 25 CLEANING THE CASE CARE AND CLEANING ENGLISH CLEANING THE AIR FILTER filters each Use a vacuum cleaner to clean the filters. filters filters. 25

Owners Manual
Page 26
COV34636802 2018. 2. 5. 오오 6:10 Page 26 CARE AND CLEANING STORING THE AIR CONDITIONER extended period of time: Make sure the filters and drain cap are in place Remove and clean the filters, allow them to dry completely, then reinstall them. 26
COV34636802 2018. 2. 5. 오오 6:10 Page 26 CARE AND CLEANING STORING THE AIR CONDITIONER extended period of time: Make sure the filters and drain cap are in place Remove and clean the filters, allow them to dry completely, then reinstall them. 26

Owners Manual
Page 28
... network name (SSID) is set incorrectly. • The wireless network name (SSID) should be supported, depending on LG SmartThinQ. COV34636802 2018. 2. 5. 오오 6:10 Page 28 TROUBLESHOOTING BEFORE CALLING FOR SERVICE Problem Possible causes Corrective Action Your home appliance and smartphone is not connected to the appliance. Error Code Possible causes Corrective Action Software problem. 28 NOTE • Some...
... network name (SSID) is set incorrectly. • The wireless network name (SSID) should be supported, depending on LG SmartThinQ. COV34636802 2018. 2. 5. 오오 6:10 Page 28 TROUBLESHOOTING BEFORE CALLING FOR SERVICE Problem Possible causes Corrective Action Your home appliance and smartphone is not connected to the appliance. Error Code Possible causes Corrective Action Software problem. 28 NOTE • Some...

Owners Manual
Page 30
...LG for arbitration, LG will promptly pay all arbitration filing fees to the AAA unless you seek more than 30 calendar days from you prevail in which case the payment of the product or this product and do not need to pay under any arbitration initiated in advance of the Limited Warranty... Model & Serial Number"). Hearings and Location....product; If you must send notice to LG no other legal or equitable theory) arising out of a claim, either : (i) sending an email to [email protected], with a dispute involving any disputes between us /support/repair-service/schedule-repair...
...LG for arbitration, LG will promptly pay all arbitration filing fees to the AAA unless you seek more than 30 calendar days from you prevail in which case the payment of the product or this product and do not need to pay under any arbitration initiated in advance of the Limited Warranty... Model & Serial Number"). Hearings and Location....product; If you must send notice to LG no other legal or equitable theory) arising out of a claim, either : (i) sending an email to [email protected], with a dispute involving any disputes between us /support/repair-service/schedule-repair...


