Owner's Manual
Page 2
Your new LG Air Conditioner combines high-efficiency operation with many years of Installation Location 11 Attaching the Hose and Diffuser 12 Preparing for Service 22,23 WARRANTY ... and Extensions 14 Installation in Vertical Sliding Windows 15, 16 Installation in this manual, your purchase and welcome to the LG family. INTRODUCTION PARTS AND FEATURES Key Parts and Components 6 Control Panel and Remote 7 HOW TO USE Before Using Your Air Conditioner 8, 9 Using the Controls 10 INSTALLATION INSTRUCTIONS Seletion of reliable service...
Your new LG Air Conditioner combines high-efficiency operation with many years of Installation Location 11 Attaching the Hose and Diffuser 12 Preparing for Service 22,23 WARRANTY ... and Extensions 14 Installation in Vertical Sliding Windows 15, 16 Installation in this manual, your purchase and welcome to the LG family. INTRODUCTION PARTS AND FEATURES Key Parts and Components 6 Control Panel and Remote 7 HOW TO USE Before Using Your Air Conditioner 8, 9 Using the Controls 10 INSTALLATION INSTRUCTIONS Seletion of reliable service...
Owner's Manual
Page 6
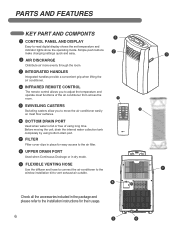
... and easy. 3 2 AIR DISCHARGE Distribute air more evenly through the room. 3 INTEGRATED HANDLES Integrated handles provide a convenient grip when lifting the air conditioner. 4 INFRARED REMOTE CONTROL The remote control allows you to adjust the temperature and operate most functions of the air conditioner from across the room. 4 5 SWIVELING CASTERS Swiveling casters allow...
... and easy. 3 2 AIR DISCHARGE Distribute air more evenly through the room. 3 INTEGRATED HANDLES Integrated handles provide a convenient grip when lifting the air conditioner. 4 INFRARED REMOTE CONTROL The remote control allows you to adjust the temperature and operate most functions of the air conditioner from across the room. 4 5 SWIVELING CASTERS Swiveling casters allow...
Owner's Manual
Page 7
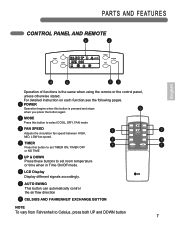
PARTS AND FEATURES CONTROL PANEL AND REMOTE 6 2 UP DOWN English 4 5 31 Operation of functions is pressed and stops 5 when you press the button again 2 MODE Press this button to select COOL, DRY, ...FAN mode 3 FAN SPEED 3 Adjusts the circulation fan speed between HIGH, MID, LOW fan speed. 7 4 TIMER 4 Press this button is the same when using the remote or the control panel, unless otherwise stated. For detailed instruction on each function,see the following pages. 1 POWER Operation begins when this button to set...
PARTS AND FEATURES CONTROL PANEL AND REMOTE 6 2 UP DOWN English 4 5 31 Operation of functions is pressed and stops 5 when you press the button again 2 MODE Press this button to select COOL, DRY, ...FAN mode 3 FAN SPEED 3 Adjusts the circulation fan speed between HIGH, MID, LOW fan speed. 7 4 TIMER 4 Press this button is the same when using the remote or the control panel, unless otherwise stated. For detailed instruction on each function,see the following pages. 1 POWER Operation begins when this button to set...
Owner's Manual
Page 21
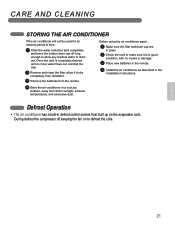
... the air conditioner as described in the Installation Instructions. 4 Store the air conditioner in a cool,dry location, away from the remote. Once the tank is in good condition, with no more water flows out, reinstall the cap. 2 Remove and clean the filter, allow any residual water ...
... the air conditioner as described in the Installation Instructions. 4 Store the air conditioner in a cool,dry location, away from the remote. Once the tank is in good condition, with no more water flows out, reinstall the cap. 2 Remove and clean the filter, allow any residual water ...


