Owner's Manual
Page 2
... operating and care instructions in Casement Windows 17, 18 CARE AND CLEANING Cleaning the Case 19 Cleaning the Air Filter 19 Water Drainage Storing the Air Conditioner Defrost Operation TROUBLESHOOTING Before Calling for Installation 13 Window Vent Panel and Extensions 14 Installation in Vertical Sliding Windows 15, 16 Installation in this manual, your purchase and welcome to the LG family. INTRODUCTION PARTS AND FEATURES Key Parts and Components 6 Control Panel and Remote 7 HOW TO USE Before Using Your Air Conditioner 8, 9 Using the Controls 10 INSTALLATION INSTRUCTIONS...
... operating and care instructions in Casement Windows 17, 18 CARE AND CLEANING Cleaning the Case 19 Cleaning the Air Filter 19 Water Drainage Storing the Air Conditioner Defrost Operation TROUBLESHOOTING Before Calling for Installation 13 Window Vent Panel and Extensions 14 Installation in Vertical Sliding Windows 15, 16 Installation in this manual, your purchase and welcome to the LG family. INTRODUCTION PARTS AND FEATURES Key Parts and Components 6 Control Panel and Remote 7 HOW TO USE Before Using Your Air Conditioner 8, 9 Using the Controls 10 INSTALLATION INSTRUCTIONS...
Owner's Manual
Page 3
... circuit and cause a fire or electric shock. • Do not remove the round grounding prong from the air conditioner before cleaning to lift and install the unit. Water can result in the risk of electric shock. • Do not clean the unit with water. If water enters the unit, unplug it can result in personal injury. • Do not disassemble or modify the air conditioner or the power cord...
... circuit and cause a fire or electric shock. • Do not remove the round grounding prong from the air conditioner before cleaning to lift and install the unit. Water can result in the risk of electric shock. • Do not clean the unit with water. If water enters the unit, unplug it can result in personal injury. • Do not disassemble or modify the air conditioner or the power cord...
Owner's Manual
Page 4
... air conditioner when removing or reinstalling the filter. This conserves energy and reduces the chance of accidents. • Secure the wheels with national wiring codes. • Do not alter or modify the plug or cord of this appliance, follow these instructions can result in death, fire, or electrical shock. • This unit must be sure to drain the air conditioner properly. • To prevent the coils...
... air conditioner when removing or reinstalling the filter. This conserves energy and reduces the chance of accidents. • Secure the wheels with national wiring codes. • Do not alter or modify the plug or cord of this appliance, follow these instructions can result in death, fire, or electrical shock. • This unit must be sure to drain the air conditioner properly. • To prevent the coils...
Owner's Manual
Page 5
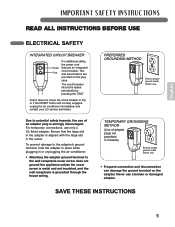
... the wall receptacle is aligned with the large slot in Canada) Ensure proper ground exists before use only a UL-listed adapter. Test and reset buttons are provided on the adapter. SAVE THESE INSTRUCTIONS 5 Due to potential safety hazards, the use a broken or damaged adapter. English IMPORTANT SAFETY INSTRUCTIONS READ ALL INSTRUCTIONS BEFORE USE ELECTRICAL SAFETY INTEGRATED CIRCUIT BREAKER Reset Test For additional safety, the power cord features an integrated circuit breaker.
... the wall receptacle is aligned with the large slot in Canada) Ensure proper ground exists before use only a UL-listed adapter. Test and reset buttons are provided on the adapter. SAVE THESE INSTRUCTIONS 5 Due to potential safety hazards, the use a broken or damaged adapter. English IMPORTANT SAFETY INSTRUCTIONS READ ALL INSTRUCTIONS BEFORE USE ELECTRICAL SAFETY INTEGRATED CIRCUIT BREAKER Reset Test For additional safety, the power cord features an integrated circuit breaker.
Owner's Manual
Page 6
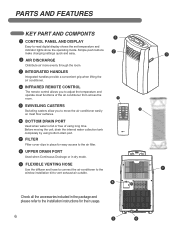
... digital display shows the set temperature and indicator lights show the operating mode. PARTS AND FEATURES KEY PART AND COMPONTS 1 1 CONTROL PANEL AND DISPLAY Easy-to move the air conditioner easily 9 on most functions of the air conditioner from across the room. 4 5 SWIVELING CASTERS Swiveling casters allow you to adjust the temperature and operate most floor surfaces. 6 BOTTOM DRAIN PORT Used when water is full or free of using bottom drain port. 7 FILTER Filter cover clips in...
... digital display shows the set temperature and indicator lights show the operating mode. PARTS AND FEATURES KEY PART AND COMPONTS 1 1 CONTROL PANEL AND DISPLAY Easy-to move the air conditioner easily 9 on most functions of the air conditioner from across the room. 4 5 SWIVELING CASTERS Swiveling casters allow you to adjust the temperature and operate most floor surfaces. 6 BOTTOM DRAIN PORT Used when water is full or free of using bottom drain port. 7 FILTER Filter cover clips in...
Owner's Manual
Page 7
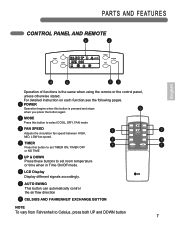
... using the remote or the control panel, unless otherwise stated. PARTS AND FEATURES CONTROL PANEL AND REMOTE 6 2 UP DOWN English 4 5 31 Operation of functions is pressed and stops 5 when you press the button again 2 MODE Press this button to select COOL, DRY, FAN mode 3 FAN SPEED 3 Adjusts the circulation fan speed between HIGH, MID, LOW fan speed. 7 4 TIMER 4 Press this button to set TIMER ON, TIMER OFF or NO TIME 5 UP & DOWN Press these buttons to set room temperature...
... using the remote or the control panel, unless otherwise stated. PARTS AND FEATURES CONTROL PANEL AND REMOTE 6 2 UP DOWN English 4 5 31 Operation of functions is pressed and stops 5 when you press the button again 2 MODE Press this button to select COOL, DRY, FAN mode 3 FAN SPEED 3 Adjusts the circulation fan speed between HIGH, MID, LOW fan speed. 7 4 TIMER 4 Press this button to set TIMER ON, TIMER OFF or NO TIME 5 UP & DOWN Press these buttons to set room temperature...
Owner's Manual
Page 8
... fresh air into the room. If the tape leaves behind any shipping tape before using the air conditioner. Such items could be damaged. • Do not bend the hose downward when window installation kit is a sufficient flow of the airflow path. They could overload the outlet and create a fire hazard. 2 Make sure the air conditioner and cord is intended for household use it directly...
... fresh air into the room. If the tape leaves behind any shipping tape before using the air conditioner. Such items could be damaged. • Do not bend the hose downward when window installation kit is a sufficient flow of the airflow path. They could overload the outlet and create a fire hazard. 2 Make sure the air conditioner and cord is intended for household use it directly...
Owner's Manual
Page 11
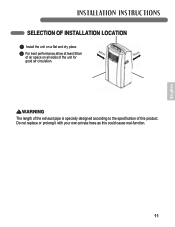
English 11 INSTALLATION INSTRUCTIONS SELECTION OF INSTALLATION LOCATION 1 Install the unit on a flat and dry place. 2 For best performance,allow at least 50cm 50cm of air space on all sides of this could cause mal-function. Do not replace or prolong it with your own private hose as this product. WARNING The length of the exhaust pipe is specially designed according to the specification of the unit for 50cm good air circulation.
English 11 INSTALLATION INSTRUCTIONS SELECTION OF INSTALLATION LOCATION 1 Install the unit on a flat and dry place. 2 For best performance,allow at least 50cm 50cm of air space on all sides of this could cause mal-function. Do not replace or prolong it with your own private hose as this product. WARNING The length of the exhaust pipe is specially designed according to the specification of the unit for 50cm good air circulation.
Owner's Manual
Page 12
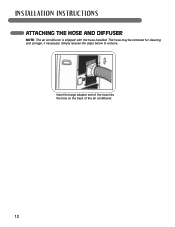
The hose may be removed for cleaning and storage, if necessary. INSTALLATION INSTRUCTIONS ATTACHING THE HOSE AND DIFFUSER NOTE: The air conditioner is shipped with the hose installed. Simply reverse the steps below to remove. Insert the large adapter end of the hose into the hole on the back of the air conditioner. 12
The hose may be removed for cleaning and storage, if necessary. INSTALLATION INSTRUCTIONS ATTACHING THE HOSE AND DIFFUSER NOTE: The air conditioner is shipped with the hose installed. Simply reverse the steps below to remove. Insert the large adapter end of the hose into the hole on the back of the air conditioner. 12
Owner's Manual
Page 13
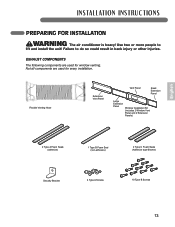
... unit! English INSTALLATION INSTRUCTIONS PREPARING FOR INSTALLATION WARNING The air conditioner is heavy! Use two or more people to do so could result in back injury or other injuries. Not all components are used for window venting. Flexible Venting Hose Extension Vent Panel Vent Panel Small Extension Panel Large Extension Panel Window Installation Kit (includes 2 Window Vent Panel and 2 Extension Panels) 2 Type A Foam Seals (adhesive) 1 Type B Foam Seal (non-adhesive) 2 Type C Foam Seals (Adhesive type-Shorter) Security Bracket 4 Type A Screws 10 Type...
... unit! English INSTALLATION INSTRUCTIONS PREPARING FOR INSTALLATION WARNING The air conditioner is heavy! Use two or more people to do so could result in back injury or other injuries. Not all components are used for window venting. Flexible Venting Hose Extension Vent Panel Vent Panel Small Extension Panel Large Extension Panel Window Installation Kit (includes 2 Window Vent Panel and 2 Extension Panels) 2 Type A Foam Seals (adhesive) 1 Type B Foam Seal (non-adhesive) 2 Type C Foam Seals (Adhesive type-Shorter) Security Bracket 4 Type A Screws 10 Type...
Owner's Manual
Page 14
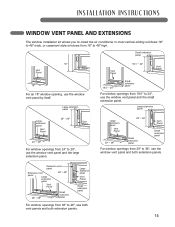
... panel Vent Panel 24" − 29" Vent Panel 24" − 29" For window openings from 36″ to 48″, use both vent panels and both extension panels. Extension vent panel Extension vent panel Large extension panel 36" − 48" Vent Panel 36" − 48" Small extension panel Large extension panel Vent Panel Small extension panel For window openings from 24" to 29", use the window vent panel and the large extension panel. INSTALLATION INSTRUCTIONS WINDOW VENT PANEL AND EXTENSIONS The window installation kit allows you to install the air conditioner...
... panel Vent Panel 24" − 29" Vent Panel 24" − 29" For window openings from 36″ to 48″, use both vent panels and both extension panels. Extension vent panel Extension vent panel Large extension panel 36" − 48" Vent Panel 36" − 48" Small extension panel Large extension panel Vent Panel Small extension panel For window openings from 24" to 29", use the window vent panel and the large extension panel. INSTALLATION INSTRUCTIONS WINDOW VENT PANEL AND EXTENSIONS The window installation kit allows you to install the air conditioner...
Owner's Manual
Page 15
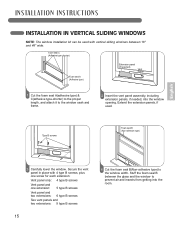
Secure the vent panel in place with vertical sliding windows between the glass and the window to prevent air and insects from getting into the window opening. INSTALLATION INSTRUCTIONS INSTALLATION IN VERTICAL SLIDING WINDOWS NOTE: The window installation kit can be used . Foam seal C (Adhesive type-shorter) Foam seal A (Adhesive type) Extension panel (if required) Vent Panel 1 Cut the foam seal A(adhesive type) & C(adhesive type-shorter) to the proper length, and attach it...
Secure the vent panel in place with vertical sliding windows between the glass and the window to prevent air and insects from getting into the window opening. INSTALLATION INSTRUCTIONS INSTALLATION IN VERTICAL SLIDING WINDOWS NOTE: The window installation kit can be used . Foam seal C (Adhesive type-shorter) Foam seal A (Adhesive type) Extension panel (if required) Vent Panel 1 Cut the foam seal A(adhesive type) & C(adhesive type-shorter) to the proper length, and attach it...

Owner's Manual
Page 16
Type A screws 6 Insert the oval end of the diffuser into the window installation kit until the locking tabs engage. Secure in place with a type B screw, as shown. INSTALLATION INSTRUCTIONS INSTALLATION IN VERTICAL SLIDING WINDOWS Security Bracket Type B screw 5 Install the security bracket with four Type A screws. 16
Type A screws 6 Insert the oval end of the diffuser into the window installation kit until the locking tabs engage. Secure in place with a type B screw, as shown. INSTALLATION INSTRUCTIONS INSTALLATION IN VERTICAL SLIDING WINDOWS Security Bracket Type B screw 5 Install the security bracket with four Type A screws. 16
Owner's Manual
Page 17
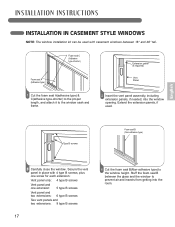
... window to prevent air and insects from getting into the window opening. INSTALLATION INSTRUCTIONS INSTALLATION IN CASEMENT STYLE WINDOWS NOTE: The window installation kit can be used . Type B screws Foam seal B (Non-adhesive type) English 3 Carefully close the window. Extend the extension panels, if used with 4 type B screws, plus one screw for each extension: Vent panel only: 4 type B screws Vent panel and one extension: 5 type B screws Vent panel and two extensions: 6 type B screws Two vent panels and two extensions: 9 type...
... window to prevent air and insects from getting into the window opening. INSTALLATION INSTRUCTIONS INSTALLATION IN CASEMENT STYLE WINDOWS NOTE: The window installation kit can be used . Type B screws Foam seal B (Non-adhesive type) English 3 Carefully close the window. Extend the extension panels, if used with 4 type B screws, plus one screw for each extension: Vent panel only: 4 type B screws Vent panel and one extension: 5 type B screws Vent panel and two extensions: 6 type B screws Two vent panels and two extensions: 9 type...
Owner's Manual
Page 19
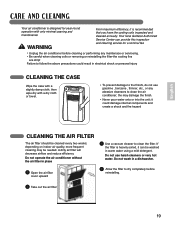
... and cleaned annually. A dirty air filter will decrease airflow and reduce efficiency Do not operate the air conditioner without the air filter in warm water using a mild detergent. Do not use gasoline , benzene , thinner, etc., or any abrasive cleansers to dry completely before cleaning or performing any maintenace or serviceing. 噝 Be careful when cleaning coils or removing or reinstalling the filter-the cooling fins are shrp! depending on indoor air...
... and cleaned annually. A dirty air filter will decrease airflow and reduce efficiency Do not operate the air conditioner without the air filter in warm water using a mild detergent. Do not use gasoline , benzene , thinner, etc., or any abrasive cleansers to dry completely before cleaning or performing any maintenace or serviceing. 噝 Be careful when cleaning coils or removing or reinstalling the filter-the cooling fins are shrp! depending on indoor air...
Owner's Manual
Page 20
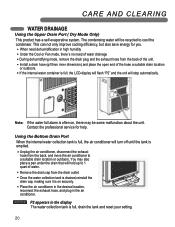
... hose a suitable drain location or outdoors. · If the internal water container is full, drain the tank and reset your setting. Contact the professional service for you. · When need dehumidification in high humidity · Under the Cool or Fan mode, there`s no need of water drainage · During dehumidifying mode, remove the drain plug and the exhaust hose from the drain outlet. NOTICE P2 apperars in the air conditioner. The condensing water will stop automatically. Using the Bottom Drain...
... hose a suitable drain location or outdoors. · If the internal water container is full, drain the tank and reset your setting. Contact the professional service for you. · When need dehumidification in high humidity · Under the Cool or Fan mode, there`s no need of water drainage · During dehumidifying mode, remove the drain plug and the exhaust hose from the drain outlet. NOTICE P2 apperars in the air conditioner. The condensing water will stop automatically. Using the Bottom Drain...
Owner's Manual
Page 21
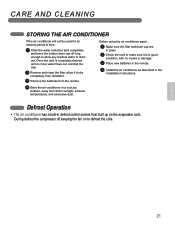
... new batteries in the remote. 4 Install the air conditioner as described in the Installation Instructions. 4 Store the air conditioner in place 2 Check the cord to drain out. Once the tank is completely drained and no more water flows out, reinstall the cap. 2 Remove and clean the filter, allow any residual water to make sure it . 3 Remove the batteries from direct sunlight, extreme temperatures, and excessive dust. CARE AND CLEANING STORING THE AIR CONDITIONER...
... new batteries in the remote. 4 Install the air conditioner as described in the Installation Instructions. 4 Store the air conditioner in place 2 Check the cord to drain out. Once the tank is completely drained and no more water flows out, reinstall the cap. 2 Remove and clean the filter, allow any residual water to make sure it . 3 Remove the batteries from direct sunlight, extreme temperatures, and excessive dust. CARE AND CLEANING STORING THE AIR CONDITIONER...
Owner's Manual
Page 22
...; Clean the air filter at least every two weeks. Solutions • Make sure electrical plug is running frequently or for the air conditioner. • Doors or windows are open windows or doors. • In especially hot, humid weather and when the air conditioner is plugged completely into a live, properly grounded outlet. • Replace the fuse or reset the circuit breaker. When power is full. Set the controls to High Fan or High Cool...
...; Clean the air filter at least every two weeks. Solutions • Make sure electrical plug is running frequently or for the air conditioner. • Doors or windows are open windows or doors. • In especially hot, humid weather and when the air conditioner is plugged completely into a live, properly grounded outlet. • Replace the fuse or reset the circuit breaker. When power is full. Set the controls to High Fan or High Cool...
Owner's Manual
Page 23
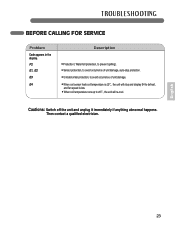
Cautions: Switch off the unit and unplug it immediately if anything abnormal happens. Then contact a qualified electrician. TROUBLESHOOTING BEFORE CALLING FOR SERVICE Problem Code appears in the display. P2 E1, E2 E3 E4 Description · Protection ( Water-full protection, to prevent spilling). · Sensor protection, to avoid occurrence of unit damage, auto-stop protection. · Unit-abnormal protection, to avoid occurrence of unit damage. ·...
Cautions: Switch off the unit and unplug it immediately if anything abnormal happens. Then contact a qualified electrician. TROUBLESHOOTING BEFORE CALLING FOR SERVICE Problem Code appears in the display. P2 E1, E2 E3 E4 Description · Protection ( Water-full protection, to prevent spilling). · Sensor protection, to avoid occurrence of unit damage, auto-stop protection. · Unit-abnormal protection, to avoid occurrence of unit damage. ·...
Owner's Manual
Page 24
... User's Guide, such as cleaning or replacing filters, cleaning coils, etc. 11.Use of accessories or components that are warranted for delivery or pick-up, installation, instruction, replacement of house fuses, connection of the original warranty period. TO CONTACT LG ELECTRONICS BY MAIL: LG Customer Interactive Center P. Box 240007 201 James Record Road Huntsville, Alabama 35824 ATTN: CIC 9. Improper repair includes the use during power failures and interruptions or inadequate electrical service...
... User's Guide, such as cleaning or replacing filters, cleaning coils, etc. 11.Use of accessories or components that are warranted for delivery or pick-up, installation, instruction, replacement of house fuses, connection of the original warranty period. TO CONTACT LG ELECTRONICS BY MAIL: LG Customer Interactive Center P. Box 240007 201 James Record Road Huntsville, Alabama 35824 ATTN: CIC 9. Improper repair includes the use during power failures and interruptions or inadequate electrical service...


