
Owners Manual
Page 3
... Cooking Table 25 Energy Saving 11 Turntable On/Off 11 Vent On/Off 11 Vent 4 Speed 11 Add 30 Sec 11 Microwave Power Levels 12 Custom Set 12 Multi -Stage Cooking 12 MAINTENANCE 26~27 Care and Cleaning 26 Metal Rack 26 Cleaning the Grease Filters 26 Charcoal Filter Replacement 26 Cooktop/Night Light Replacement 27 Oven Light Replacement 27 12 Custom Cook 12 Cooking Guide for Lower Power Levels 13 COOKING UTENSILS 28 Microwave Utensil Guide 28 Sensor Operating Instructions 14 Sensor Cooking Guide 14 FAQS 29 Sensor Popcorn 14 Sensor...
... Cooking Table 25 Energy Saving 11 Turntable On/Off 11 Vent On/Off 11 Vent 4 Speed 11 Add 30 Sec 11 Microwave Power Levels 12 Custom Set 12 Multi -Stage Cooking 12 MAINTENANCE 26~27 Care and Cleaning 26 Metal Rack 26 Cleaning the Grease Filters 26 Charcoal Filter Replacement 26 Cooktop/Night Light Replacement 27 Oven Light Replacement 27 12 Custom Cook 12 Cooking Guide for Lower Power Levels 13 COOKING UTENSILS 28 Microwave Utensil Guide 28 Sensor Operating Instructions 14 Sensor Cooking Guide 14 FAQS 29 Sensor Popcorn 14 Sensor...
Owners Manual
Page 4
... wire twist-ties and remove them before using your oven • Do not allow grease to accumulate on the hood or the filters. • Use care when cleaning the vent hood filters. Be sure to inspect purchased items for storage purposes. This type of burns, electric shock, fire, injury to persons, or exposure to excessive microwave energy. • Read all times. Do not allow children to heat, cook...
... wire twist-ties and remove them before using your oven • Do not allow grease to accumulate on the hood or the filters. • Use care when cleaning the vent hood filters. Be sure to inspect purchased items for storage purposes. This type of burns, electric shock, fire, injury to persons, or exposure to excessive microwave energy. • Read all times. Do not allow children to heat, cook...
Owners Manual
Page 5
... receiving antenna of the table or counter. • Preserve the oven floor: - It is not responsible for the operations described in your microwave oven. - Do not deep-fat fry in this microwave oven. Do not heat the oven floor excessively. - Stir the liquid both before removing the container. - Do not heat the following : • Relocate the Microwave Oven with the provided installation instructions. • This appliance...
... receiving antenna of the table or counter. • Preserve the oven floor: - It is not responsible for the operations described in your microwave oven. - Do not deep-fat fry in this microwave oven. Do not heat the oven floor excessively. - Stir the liquid both before removing the container. - Do not heat the following : • Relocate the Microwave Oven with the provided installation instructions. • This appliance...
Owners Manual
Page 6
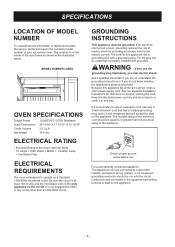
... the microwave oven is properly grounded. SPECIFICATIONS LOCATION OF MODEL NUMBER To request service information or replacement parts, the service center will accept the plug on properly placing the cord. Put the plug into an outlet that will require the complete model number of the extension cord should be run with a grounding plug. ELECTRICAL RATING * Electrical Rating of the Oven:120V AC 60Hz * 14 Amps / 1600 Watts ( MWO + Cooktop Lamp + Ventilation Fan) ELECTRICAL...
... the microwave oven is properly grounded. SPECIFICATIONS LOCATION OF MODEL NUMBER To request service information or replacement parts, the service center will accept the plug on properly placing the cord. Put the plug into an outlet that will require the complete model number of the extension cord should be run with a grounding plug. ELECTRICAL RATING * Electrical Rating of the Oven:120V AC 60Hz * 14 Amps / 1600 Watts ( MWO + Cooktop Lamp + Ventilation Fan) ELECTRICAL...
Owners Manual
Page 7
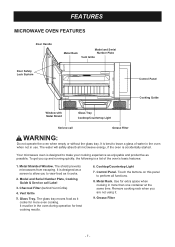
...Charcoal Filter (behind Vent Grille) 4. Glass Tray. Touch the buttons on this panel to perform all microwave energy, if the oven is designed as a screen to allow you to view food as it cooks. 2. Grease Filter - 7 - The water will safely absorb all functions. 8. It is accidentally started. Vent Grille 5. FEATURES MICROWAVE OVEN FEATURES Door Handle Metal Rack Model and Serial Number Plate Vent Grille Door Safety Lock System Control Panel Cooking Guide Window with Metal Shield Glass Tray Cooktop/Countertop Light Serivce call Label 3. To get you are not using...
...Charcoal Filter (behind Vent Grille) 4. Glass Tray. Touch the buttons on this panel to perform all microwave energy, if the oven is designed as a screen to allow you to view food as it cooks. 2. Grease Filter - 7 - The water will safely absorb all functions. 8. It is accidentally started. Vent Grille 5. FEATURES MICROWAVE OVEN FEATURES Door Handle Metal Rack Model and Serial Number Plate Vent Grille Door Safety Lock System Control Panel Cooking Guide Window with Metal Shield Glass Tray Cooktop/Countertop Light Serivce call Label 3. To get you are not using...
Owners Manual
Page 9
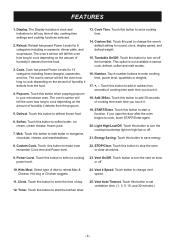
.... 13. Touch button to defrost frozen food. 6. Touch this button to change the oven's default setting for sound, clock, display speed, and defrost weight. 15. The oven's sensor will tell the oven how long to cook, touch START/Enter again. 20. Cook Time. This option is not available in your microwave oven. Touch number buttons to start the kitchen timer. 25. Light High/Low/Off. Energy Saving. Select type of cooking time each time you time of day. 12. Vent Auto Timeset. Touch this button to turn the cooktop/countertop light on the...
.... 13. Touch button to defrost frozen food. 6. Touch this button to change the oven's default setting for sound, clock, display speed, and defrost weight. 15. The oven's sensor will tell the oven how long to cook, touch START/Enter again. 20. Cook Time. This option is not available in your microwave oven. Touch number buttons to start the kitchen timer. 25. Light High/Low/Off. Energy Saving. Select type of cooking time each time you time of day. 12. Vent Auto Timeset. Touch this button to turn the cooktop/countertop light on the...
Owners Manual
Page 10
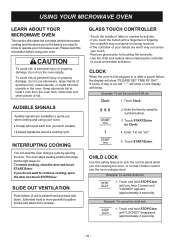
... door and touch START/Enter. If you need to know to operate your oven. Enter 1 to set the child lock. 1. INTERRUPTING COOKING You can stop the oven during a cycle by using your microwave oven. The oven stops heating and the fan stops, but the light stays on the display with a fingernail or fingertip, the controller may not sense it may not sense your hands are cleaning the oven, or so that children cannot use stoneware, large sheets...
... door and touch START/Enter. If you need to know to operate your oven. Enter 1 to set the child lock. 1. INTERRUPTING COOKING You can stop the oven during a cycle by using your microwave oven. The oven stops heating and the fan stops, but the light stays on the display with a fingernail or fingertip, the controller may not sense it may not sense your hands are cleaning the oven, or so that children cannot use stoneware, large sheets...
Owners Manual
Page 11
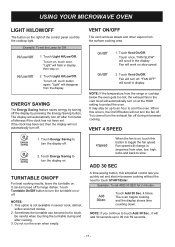
... of the control panel controls the cooktop light. Touch Energy Saving to touch. Sometimes the turntable can be turned off . Fan speed will flash in sensor cook, defrost, soften and melt modes. 2. Touch Vent On/Off. You cannot turn the turntable on or off for ON 1. "Light" will change in display. When this simplified control lets you continue to 99 min 59 seconds. - 11 - NOTE: If you quickly set and start microwave cooking without the need to slow...
... of the control panel controls the cooktop light. Touch Energy Saving to touch. Sometimes the turntable can be turned off . Fan speed will flash in sensor cook, defrost, soften and melt modes. 2. Touch Vent On/Off. You cannot turn the turntable on or off for ON 1. "Light" will change in display. When this simplified control lets you continue to 99 min 59 seconds. - 11 - NOTE: If you quickly set and start microwave cooking without the need to slow...
Owners Manual
Page 12
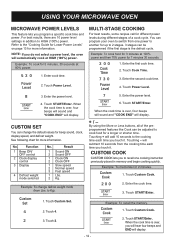
.... Touching - Enter the second cook time. 4. For best results, there are 10 power level settings in memory and begin cooking quickly. See following chart for different power levels during different stages of the preprogrammed features like Cook can change defrost weight mode (from the cooking time each time you do not select a power level, the oven will automatically cook at 100% power and then 70% power for beep sound, clock, display speed, and defrost weight. Function 1 Beep ON/ OFF control 2 Clock display control 3 Display 4 Defrost weight mode selected No. USING...
.... Touching - Enter the second cook time. 4. For best results, there are 10 power level settings in memory and begin cooking quickly. See following chart for different power levels during different stages of the preprogrammed features like Cook can change defrost weight mode (from the cooking time each time you do not select a power level, the oven will automatically cook at 100% power and then 70% power for beep sound, clock, display speed, and defrost weight. Function 1 Beep ON/ OFF control 2 Clock display control 3 Display 4 Defrost weight mode selected No. USING...
Owners Manual
Page 14
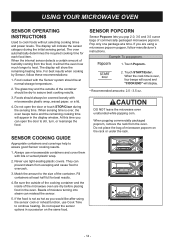
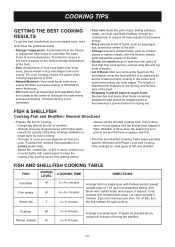
... food to cook foods without selecting cooking times and power levels. Touch START/Enter. SENSOR COOKING GUIDE Appropriate containers and coverings help to heat. Never use Cook Time to assure best cooking results. 3. The display will appear in succession on the rack or under the rack. Food cooked with lids or vented plastic wrap. 2. The glass tray and the outside of the cooking container and the inside of microwave popcorn on the same food. - 14 - At this time you are dry before placing food...
... food to cook foods without selecting cooking times and power levels. Touch START/Enter. SENSOR COOKING GUIDE Appropriate containers and coverings help to heat. Never use Cook Time to assure best cooking results. 3. The display will appear in succession on the rack or under the rack. Food cooked with lids or vented plastic wrap. 2. The glass tray and the outside of the cooking container and the inside of microwave popcorn on the same food. - 14 - At this time you are dry before placing food...
Owners Manual
Page 17
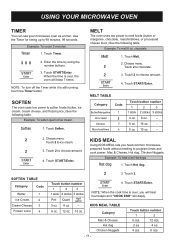
... table. Touch Melt. 2. Choose menu. 2 Touch 2 to ice cream. Touch 2 to chocolate. 2 3. prepared foods without needing to choose amount. Touch Hot dog. SOFTEN TABLE Category Code Butter 1 Ice Cream 2 Cream Cheese 3 Frozen Juice 4 2 3. Touch START/Enter. MELT TABLE Category Code Butter/Margarine 1 Chocolate 2 Cheese 3 Marshmallows 4 Touch button number 1 2 3 1 stick 4 oz. 8 oz. 5 oz. 2 sticks 3 sticks 8 oz. _ 16 oz. _ 10 oz. _ 2 2. Touch 2 to program times and cook power. Example: To heat 4 ea Hot dogs. 1. Touch...
... table. Touch Melt. 2. Choose menu. 2 Touch 2 to ice cream. Touch 2 to chocolate. 2 3. prepared foods without needing to choose amount. Touch Hot dog. SOFTEN TABLE Category Code Butter 1 Ice Cream 2 Cream Cheese 3 Frozen Juice 4 2 3. Touch START/Enter. MELT TABLE Category Code Butter/Margarine 1 Chocolate 2 Cheese 3 Marshmallows 4 Touch button number 1 2 3 1 stick 4 oz. 8 oz. 5 oz. 2 sticks 3 sticks 8 oz. _ 16 oz. _ 10 oz. _ 2 2. Touch 2 to program times and cook power. Example: To heat 4 ea Hot dogs. 1. Touch...
Owners Manual
Page 19
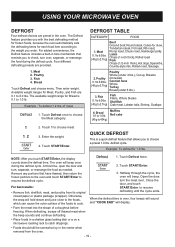
....), Cut up, Breasts 2. At this time, open the door and turn the meat over, Close the door, and touch START/Enter to cook. 1. Remove any portions that reminds you to catch drippings. • Foods should still be somewhat icy in a shallow glass baking dish or a on a microwave roasting rack to choose a preset 1.0 lbs. When defrosting, scrape off thawed meat when the beep sounds and continue defrosting. • Place foods...
....), Cut up, Breasts 2. At this time, open the door and turn the meat over, Close the door, and touch START/Enter to cook. 1. Remove any portions that reminds you to catch drippings. • Foods should still be somewhat icy in a shallow glass baking dish or a on a microwave roasting rack to choose a preset 1.0 lbs. When defrosting, scrape off thawed meat when the beep sounds and continue defrosting. • Place foods...
Owners Manual
Page 20
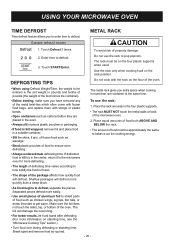
... parts of food such as chicken wings, leg tips, fish tails, or areas that start to get warm. Touch Defrost 3 times. Shallow packages will defrost. Break apart and remove food as rquired. - 20 - Use the rack only when cooking food on the four plastic supports when used. The metal rack gives you to enter time to ensure even defrosting. • Always underestimate defrosting time. Example: defrost 2 minutes METAL RACK CAUTION 1. Enter time to defrost...
... parts of food such as chicken wings, leg tips, fish tails, or areas that start to get warm. Touch Defrost 3 times. Shallow packages will defrost. Break apart and remove food as rquired. - 20 - Use the rack only when cooking food on the four plastic supports when used. The metal rack gives you to enter time to ensure even defrosting. • Always underestimate defrosting time. Example: defrost 2 minutes METAL RACK CAUTION 1. Enter time to defrost...
Owners Manual
Page 21
... from your microwave oven, read and follow the guidelines below provides specific directions with Power Level and Cooking Time settings for recipes in this book is based on the density and surface area of food. • Natural Moisture: Very moist foods cook more evenly because microwave energy is attracted to water molecules. • Stir foods such as casseroles and vegetables from the microwave, cover the food with foil...
... from your microwave oven, read and follow the guidelines below provides specific directions with Power Level and Cooking Time settings for recipes in this book is based on the density and surface area of food. • Natural Moisture: Very moist foods cook more evenly because microwave energy is attracted to water molecules. • Stir foods such as casseroles and vegetables from the microwave, cover the food with foil...
Owners Manual
Page 22
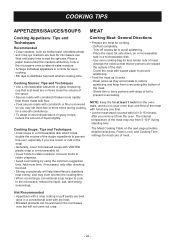
... meat. The Meat Cooking Table on a microwavable rack in a microwavable dish. - Place the meat, fat side down, on the next page provides detailed directions, Power Level, and Cooking Time settings for even cooking. • Stir dips to distribute heat and shorten cooking time. Drain juices as they cook in the microwave oven to absorb extra moisture. • Arrange individual appetizers in a circle for most cuts of the sauce. •...
... meat. The Meat Cooking Table on a microwavable rack in a microwavable dish. - Place the meat, fat side down, on the next page provides detailed directions, Power Level, and Cooking Time settings for even cooking. • Stir dips to distribute heat and shorten cooking time. Drain juices as they cook in the microwave oven to absorb extra moisture. • Arrange individual appetizers in a circle for most cuts of the sauce. •...
Owners Manual
Page 26
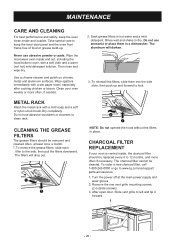
... slots, then push up . CLEANING THE GREASE FILTERS The grease filters should be replaced every 6 to clean rack. Do not use abrasive scrubbers or cleaners to 12 months, and more often, if needed. The aluminum will drop out. 1 2 2. To remove the grease filters, slide each filter to lock. 2 1 NOTE: Do not operate the hood without the filters in place. Take special care to www.lg.com/us/support/ parts-accessories. 1. Wipe spatters...
... slots, then push up . CLEANING THE GREASE FILTERS The grease filters should be replaced every 6 to clean rack. Do not use abrasive scrubbers or cleaners to 12 months, and more often, if needed. The aluminum will drop out. 1 2 2. To remove the grease filters, slide each filter to lock. 2 1 NOTE: Do not operate the hood without the filters in place. Take special care to www.lg.com/us/support/ parts-accessories. 1. Wipe spatters...
Owners Manual
Page 27
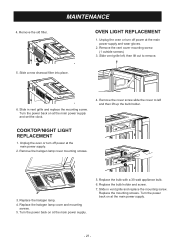
.... - 27 - COOKTOP/NIGHT LIGHT REPLACEMENT 1. Unplug the oven or turn off power at the main power supply. 5. Replace the bulb holder and screw. 7. Turn the power back on at the main power supply and wear gloves. 2. MAINTENANCE 4. Remove the old filter. 1 2 5. Remove the vent cover mounting screw. (1 outside screws) 3. Slide in vent grille and replace the mounting screw. Remove the halogen lamp cover mounting screws. 2 1 3. Replace the bulb with a 30 watt appliance bulb. 6. Replace the mounting screws. Unplug the oven or turn off power at the main power supply and set the clock...
.... - 27 - COOKTOP/NIGHT LIGHT REPLACEMENT 1. Unplug the oven or turn off power at the main power supply. 5. Replace the bulb holder and screw. 7. Turn the power back on at the main power supply and wear gloves. 2. MAINTENANCE 4. Remove the old filter. 1 2 5. Remove the vent cover mounting screw. (1 outside screws) 3. Slide in vent grille and replace the mounting screw. Remove the halogen lamp cover mounting screws. 2 1 3. Replace the bulb with a 30 watt appliance bulb. 6. Replace the mounting screws. Unplug the oven or turn off power at the main power supply and set the clock...
Owners Manual
Page 29
... cooking. Sometimes the door of the air exhaust vent? Q. Pop packaged microwave popcorn following manufacturer's guidelines or use regular paper bags. Why does steam come out of my microwave oven appears wavy. Only use the rack that I use either metal or aluminum pans in my microwave oven so that I get the best results? Can I use a rack in my microwave oven? A. A. Do not use the preprogrammed Popcorn button. Do not try to touch walls...
... cooking. Sometimes the door of the air exhaust vent? Q. Pop packaged microwave popcorn following manufacturer's guidelines or use regular paper bags. Why does steam come out of my microwave oven appears wavy. Only use the rack that I use either metal or aluminum pans in my microwave oven so that I get the best results? Can I use a rack in my microwave oven? A. A. Do not use the preprogrammed Popcorn button. Do not try to touch walls...
Owners Manual
Page 30
... sure a service call . If the oven interior light does not work: • the light bulb is properly installed on the electrical circuit. TROUBLESHOOTING BEFORE CALLING FOR SERVICE Check the following list to cook or cooks too rapidly: • be sure the Power Level is programmed properly. If arcing (sparks) occur: • be sure microwavable dishes were used. • be sure wire twist ties weren't used ) is loose or defective. A quick review of day clock does...
... sure a service call . If the oven interior light does not work: • the light bulb is properly installed on the electrical circuit. TROUBLESHOOTING BEFORE CALLING FOR SERVICE Check the following list to cook or cooks too rapidly: • be sure the Power Level is programmed properly. If arcing (sparks) occur: • be sure microwavable dishes were used. • be sure wire twist ties weren't used ) is loose or defective. A quick review of day clock does...
Owners Manual
Page 31
... repair or replace your home to prove date of the product and effective only when used in the Operating Guide, accident, vermin, fire, flood, improper installation, acts of God, unauthorized modification or alteration, incorrect electrical current or voltage, or commercial use, or use , during the warranty period set forth below, effective from the Date of Purchase. To Obtain Nearest Authorized Service Cente...
... repair or replace your home to prove date of the product and effective only when used in the Operating Guide, accident, vermin, fire, flood, improper installation, acts of God, unauthorized modification or alteration, incorrect electrical current or voltage, or commercial use, or use , during the warranty period set forth below, effective from the Date of Purchase. To Obtain Nearest Authorized Service Cente...


