
Owner's Manual
Page 3
... Oven Specifications 6 Defrosting Tips 22 Electrical Requirements 6 Q Defrost 22 Electrical Rating 6 Use of theTwo Position Metal Rack 22 Grounding Instructions 6 Microwave Oven Features 7 COOKING 23 Control panel features 8 Recipe Guide 23 Getting the Best Cooking Results 24 OPERATION 10 Fish & Shellfish 24 Learn about your Microwave Oven 10 Appetizers / Sauces / Soups 25...
... Oven Specifications 6 Defrosting Tips 22 Electrical Requirements 6 Q Defrost 22 Electrical Rating 6 Use of theTwo Position Metal Rack 22 Grounding Instructions 6 Microwave Oven Features 7 COOKING 23 Control panel features 8 Recipe Guide 23 Getting the Best Cooking Results 24 OPERATION 10 Fish & Shellfish 24 Learn about your Microwave Oven 10 Appetizers / Sauces / Soups 25...
Owner's Manual
Page 7
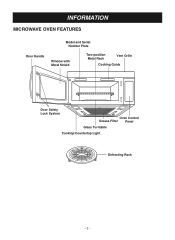
INFORMATION MICROWAVE OVEN FEATURES Model and Serial Number Plate Door Handle Window with Metal Shield Two-position Metal Rack Vent Grille Cooking Guide Door Safety Lock System Oven Control Grease Filter Panel Glass Turntable Cooktop/Countertop Light Defrosting Rack -7-
INFORMATION MICROWAVE OVEN FEATURES Model and Serial Number Plate Door Handle Window with Metal Shield Two-position Metal Rack Vent Grille Cooking Guide Door Safety Lock System Oven Control Grease Filter Panel Glass Turntable Cooktop/Countertop Light Defrosting Rack -7-
Owner's Manual
Page 8
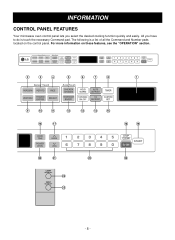
All you select the desired cooking function quickly and easily. For more information on the control panel. The following is touch the necessary Command pad. INFORMATION CONTROL PANEL FEATURES Your microwave oven control panel lets you have to do is a list of all the Command and Number pads located on these features, see the "OPERATION" section. 2 3 4 5 6 7 8 1 9 10 11 12 13 14 15 16 17 18 19 20 21 22 23 24 25 -8-
All you select the desired cooking function quickly and easily. For more information on the control panel. The following is touch the necessary Command pad. INFORMATION CONTROL PANEL FEATURES Your microwave oven control panel lets you have to do is a list of all the Command and Number pads located on these features, see the "OPERATION" section. 2 3 4 5 6 7 8 1 9 10 11 12 13 14 15 16 17 18 19 20 21 22 23 24 25 -8-
Owner's Manual
Page 11
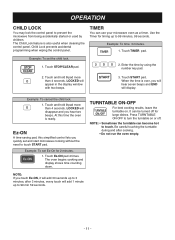
...LOCKED will disappear and you touch Ez-ON, it will display. Touch Ez-ON pad 4 times. Child Lock prevents accidental programming when wiping the control panel. Example: To set and start microwave cooking without the need to touch START pad. Example: To cancel the child lock. 1. Touch and hold...over, you quickly set the child lock. 1. When the time is also useful when cleaning the control panel. It can be turned off . Touch STOP/CLEAR pad. 2. OPERATION CHILD LOCK You may lock the control panel to 99 min 59 seconds. - 11 - Touch and hold 0 pad more than 4 seconds....
...LOCKED will disappear and you touch Ez-ON, it will display. Touch Ez-ON pad 4 times. Child Lock prevents accidental programming when wiping the control panel. Example: To set and start microwave cooking without the need to touch START pad. Example: To cancel the child lock. 1. Touch and hold...over, you quickly set the child lock. 1. When the time is also useful when cleaning the control panel. It can be turned off . Touch STOP/CLEAR pad. 2. OPERATION CHILD LOCK You may lock the control panel to 99 min 59 seconds. - 11 - Touch and hold 0 pad more than 4 seconds....
Owner's Manual
Page 31
... that Start Pad was pressed. • check that probe was programmed correctly. • check that door is firmly closed. • check that controls are set properly. A quick reference of this manual as well as reviewing additional information on the oven operates: • check for a blown circuit...of day clock does not always keep correct time: • check that the power cord is fully inserted into receptacle. • check that control panel was inserted correctly into the outlet receptacle. • be sure the oven is the only appliance on a separate circuit. • be sure...
... that Start Pad was pressed. • check that probe was programmed correctly. • check that door is firmly closed. • check that controls are set properly. A quick reference of this manual as well as reviewing additional information on the oven operates: • check for a blown circuit...of day clock does not always keep correct time: • check that the power cord is fully inserted into receptacle. • check that control panel was inserted correctly into the outlet receptacle. • be sure the oven is the only appliance on a separate circuit. • be sure...


