
Owner's Manual
Page 3
... OVEN ...... 6 Location of Model Number 6 Oven Specifications 6 Electrical Requirements 6 Grounding Instructions 6 Microwave Oven Features 7 Control Panel Features 8 USING YOUR MICROWAVE OVEN 10 Learn About Your Microwave Oven 10 Clock 10 Timer 10 Vent Fan 10 Vent Auto Time Set 10 Light Hi/Low/Off 10 Light Timer 11 Child Lock 12 EZ-ON 12 Hold Warm 12 Custom Set 13 Cooking at High Power Levels 13 Microwave Power Levels 13 Multi Stage Cooking 13 Cooking Guide for Lower Power Levels 14 Popcorn 15 Potato 15 Beverage 15 Auto Cook 16 Reheat 16 Poultry 16 Auto Cook Table...
... OVEN ...... 6 Location of Model Number 6 Oven Specifications 6 Electrical Requirements 6 Grounding Instructions 6 Microwave Oven Features 7 Control Panel Features 8 USING YOUR MICROWAVE OVEN 10 Learn About Your Microwave Oven 10 Clock 10 Timer 10 Vent Fan 10 Vent Auto Time Set 10 Light Hi/Low/Off 10 Light Timer 11 Child Lock 12 EZ-ON 12 Hold Warm 12 Custom Set 13 Cooking at High Power Levels 13 Microwave Power Levels 13 Multi Stage Cooking 13 Cooking Guide for Lower Power Levels 14 Popcorn 15 Potato 15 Beverage 15 Auto Cook 16 Reheat 16 Poultry 16 Auto Cook Table...
Owner's Manual
Page 4
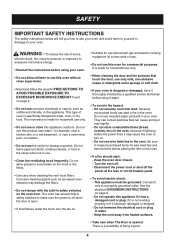
... use wire twist-ties in safety switches on . • Suitable for use above both gas and electric cooking equipment 36 inches wide or less. • Do not use this appliance. Do not operate this appliance if it has a damaged cord or plug, if it is open. • If food flames under the hood, turn on page 6. - The microwave is made for household use only. • When cleaning...
... use wire twist-ties in safety switches on . • Suitable for use above both gas and electric cooking equipment 36 inches wide or less. • Do not use this appliance. Do not operate this appliance if it has a damaged cord or plug, if it is open. • If food flames under the hood, turn on page 6. - The microwave is made for household use only. • When cleaning...
Owner's Manual
Page 5
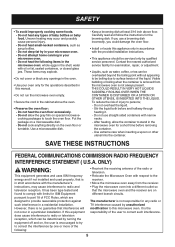
... microwave oven. Do not heat the following : • Reorient the receiving antenna of the following items in the microwave oven: whole eggs in your microwave oven. - These items may explode. • Do not cover or block any openings in the oven. • Use your microwave oven. - Do not allow the container to touch the oven floor. Do not cook anything directly on a microwavable dish. - Carefully read and follow the instructions...
... microwave oven. Do not heat the following : • Reorient the receiving antenna of the following items in the microwave oven: whole eggs in your microwave oven. - These items may explode. • Do not cover or block any openings in the oven. • Use your microwave oven. - Do not allow the container to touch the oven floor. Do not cook anything directly on a microwavable dish. - Carefully read and follow the instructions...
Owner's Manual
Page 6
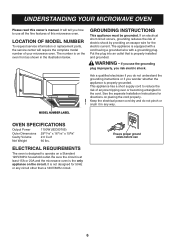
... a cord having a grounded wire with a grounding plug. See the separate Installation Instructions for 50Hz or any way. Keep the electrical power cord dry and do not understand the grounding instructions or if you risk electric shock. MODEL NUMBER LABEL OVEN SPECIFICATIONS Output Power Outer Dimensions Cavity Volume Net Weight 1100W (IEC60705) 2915/16" x 167/16" x 155/8" 2.0 Cu.ft 60 lbs. ELECTRICAL REQUIREMENTS The oven is designed to use the...
... a cord having a grounded wire with a grounding plug. See the separate Installation Instructions for 50Hz or any way. Keep the electrical power cord dry and do not understand the grounding instructions or if you risk electric shock. MODEL NUMBER LABEL OVEN SPECIFICATIONS Output Power Outer Dimensions Cavity Volume Net Weight 1100W (IEC60705) 2915/16" x 167/16" x 155/8" 2.0 Cu.ft 60 lbs. ELECTRICAL REQUIREMENTS The oven is designed to use the...
Owner's Manual
Page 7
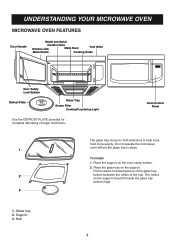
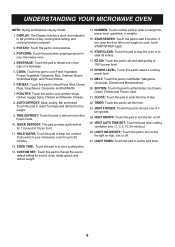
... inside the glass tray bottom ridge. 1. Do not operate the microwave oven without the glass tray in both directions to help cook food more evenly. The rollers on the support. Support 3. Fit the raised, hollowed groove of the glass tray bottom between the rollers of larger food items. Oven Control Panel The glass tray moves in place. Hub 7 UNDERSTANDING YOUR MICROWAVE OVEN MICROWAVE OVEN FEATURES Door Handle Model and Serial Number Plate Window with Metal Rack Vent Grille Metal Shield Cooking Guide Door Safety Lock System Defrost Plate Glass Tray Grease Filter Cooktop...
... inside the glass tray bottom ridge. 1. Do not operate the microwave oven without the glass tray in both directions to help cook food more evenly. The rollers on the support. Support 3. Fit the raised, hollowed groove of the glass tray bottom between the rollers of larger food items. Oven Control Panel The glass tray moves in place. Hub 7 UNDERSTANDING YOUR MICROWAVE OVEN MICROWAVE OVEN FEATURES Door Handle Model and Serial Number Plate Window with Metal Rack Vent Grille Metal Shield Cooking Guide Door Safety Lock System Defrost Plate Glass Tray Grease Filter Cooktop...
Owner's Manual
Page 9
... quick defrost for sound, clock, disply speed, and defrost weight. 14. CLOCK: Touch this pad to tell you open the door after oven begins to melt Butter / Margarine, Chocolate, Cheese and Marshmallows. 20. TIMER: Touch this pad to reheat one of a beverage. 5. DISPLAY: The Display includes a clock and indicators to set the light timer. 9 LIGHT TIMER: Touch this pad to set the timer. 23. VENT AUTO TIME SET: Touch this pad when popping popcorn in your microwave oven. 4. CUSTOM SET: Touch this pad to change...
... quick defrost for sound, clock, disply speed, and defrost weight. 14. CLOCK: Touch this pad to tell you open the door after oven begins to melt Butter / Margarine, Chocolate, Cheese and Marshmallows. 20. TIMER: Touch this pad to reheat one of a beverage. 5. DISPLAY: The Display includes a clock and indicators to set the light timer. 9 LIGHT TIMER: Touch this pad to set the timer. 23. VENT AUTO TIME SET: Touch this pad when popping popcorn in your microwave oven. 4. CUSTOM SET: Touch this pad to change...
Owner's Manual
Page 10
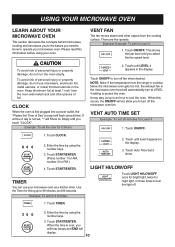
... for night light, or three times to protect the oven. VENT AUTO TIME SET Example: To set for Level 4. 1. Keep aluminum foil at LEVEL 4 setting to turn at least 1 inch from the oven wall metal rack and other vapors from the range or cooktop below the microwave oven gets too hot, the exhaust fan in the display. Touch START/ENTER. To avoid risk of foil. CLOCK When the oven is first plugged into a power outlet, the "Please Set Time of...
... for night light, or three times to protect the oven. VENT AUTO TIME SET Example: To set for Level 4. 1. Keep aluminum foil at LEVEL 4 setting to turn at least 1 inch from the oven wall metal rack and other vapors from the range or cooktop below the microwave oven gets too hot, the exhaust fan in the display. Touch START/ENTER. To avoid risk of foil. CLOCK When the oven is first plugged into a power outlet, the "Please Set Time of...

Owner's Manual
Page 12
... start microwave cooking without the need to touch the START/ENTER. The Child Lock feature is over, you will hear two beeps and HOLD WARM will appear in your microwave oven for up to lock the control panel when you are cleaning the oven, or so that children cannot use HOLD WARM. 1. Child Lock prevents accidental programming when wiping the control panel. Example: To set EZ-ON for up to 90 minutes. • Food cooked covered...
... start microwave cooking without the need to touch the START/ENTER. The Child Lock feature is over, you will hear two beeps and HOLD WARM will appear in your microwave oven for up to lock the control panel when you are cleaning the oven, or so that children cannot use HOLD WARM. 1. Child Lock prevents accidental programming when wiping the control panel. Example: To set EZ-ON for up to 90 minutes. • Food cooked covered...
Owner's Manual
Page 13
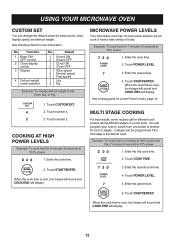
...1 Beep ON/ OFF control 2 Clock display control 3 Display 4 Defrost weight mode selected No. Touch number 2. Enter the cook time. 2. MICROWAVE POWER LEVELS Your microwave oven has 10 cook power levels to let you cook or heat a wide variety of a cook cycle. Enter the power level. 4. Touch START/ENTER. MULTI STAGE COOKING For best results, some recipes call for up to Kg). 1. You can change defrost weight mode (from one power to another for different cook powers during different stages of foods. Example: To cook food for beep sound, clock, display speed, and defrost weight...
...1 Beep ON/ OFF control 2 Clock display control 3 Display 4 Defrost weight mode selected No. Touch number 2. Enter the cook time. 2. MICROWAVE POWER LEVELS Your microwave oven has 10 cook power levels to let you cook or heat a wide variety of a cook cycle. Enter the power level. 4. Touch START/ENTER. MULTI STAGE COOKING For best results, some recipes call for up to Kg). 1. You can change defrost weight mode (from one power to another for different cook powers during different stages of foods. Example: To cook food for beep sound, clock, display speed, and defrost weight...
Owner's Manual
Page 15
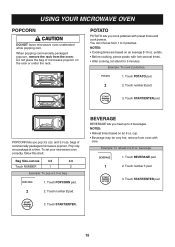
.... Touch number 1 pad. 3. POPCORN lets you heat up to 4 potatoes. cup. • Beverage may be very hot; beverage. 1. Touch POPCORN pad. 2. Touch number 2 pad. potato. • Before cooking, pierce potato with preset times and cook powers. Touch BEVERAGE pad. 2. remove from 1 to 2 beverages. BEVERAGE BEVERAGE lets you pop 3.5 ozs. When popping commercially packaged popcorn, remove the rack from the oven; Do not place the bag of commercially packaged microwave popcorn. Touch START/ENTER...
.... Touch number 1 pad. 3. POPCORN lets you heat up to 4 potatoes. cup. • Beverage may be very hot; beverage. 1. Touch POPCORN pad. 2. Touch number 2 pad. potato. • Before cooking, pierce potato with preset times and cook powers. Touch BEVERAGE pad. 2. remove from 1 to 2 beverages. BEVERAGE BEVERAGE lets you pop 3.5 ozs. When popping commercially packaged popcorn, remove the rack from the oven; Do not place the bag of commercially packaged microwave popcorn. Touch START/ENTER...

Owner's Manual
Page 21
... convenience, the AUTO DEFROST includes a built-in the center when removed from its original closed paper or plastic package (wrapper). POULTRY 3. BREAD After touching AUTO DEFROST once, select the food category. Example : To defrost 1.2 lbs of larger food items. Place the defrost plate on the glass tray plastic side down the defrost time. Place the item to be defrosted directly on a microwave roasting rack to catch drippings. • Foods should still...
... convenience, the AUTO DEFROST includes a built-in the center when removed from its original closed paper or plastic package (wrapper). POULTRY 3. BREAD After touching AUTO DEFROST once, select the food category. Example : To defrost 1.2 lbs of larger food items. Place the defrost plate on the glass tray plastic side down the defrost time. Place the item to be defrosted directly on a microwave roasting rack to catch drippings. • Foods should still...
Owner's Manual
Page 22
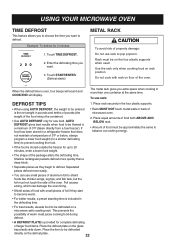
... the four plastic supports. • When using AUTO DEFROST, the weight to be defrosted directly on floor of the oven. Place the item to be entered is over, four beeps will sound and COOK END will display. Place rack securely in pounds and tenths of pounds (the weight of microwave oven. 2. USING YOUR MICROWAVE OVEN TIME DEFROST This feature allows you to choose the time you want to defrost. Touch START/ENTER. (Defrost starts) METAL RACK To avoid...
... the four plastic supports. • When using AUTO DEFROST, the weight to be defrosted directly on floor of the oven. Place the item to be entered is over, four beeps will sound and COOK END will display. Place rack securely in pounds and tenths of pounds (the weight of microwave oven. 2. USING YOUR MICROWAVE OVEN TIME DEFROST This feature allows you to choose the time you want to defrost. Touch START/ENTER. (Defrost starts) METAL RACK To avoid...
Owner's Manual
Page 23
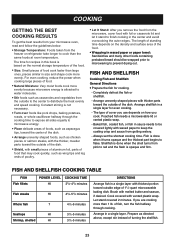
... The type of food cook faster than 1 lb. Poached fish needs a microwavable lid or vented plastic wrap. - Brush with vented plastic wrap. Cook covered with melted butter and season, if desired. of the dish. Completely defrost the fish or shellfish. - Arrange shellfish in size and shape cook more evenly. Always set the shortest cooking time. FISH AND SHELLFISH COOKING TABLE FISH Fish fillets POWER LEVEL COOKING TIME HI 31/2-41...
... The type of food cook faster than 1 lb. Poached fish needs a microwavable lid or vented plastic wrap. - Brush with vented plastic wrap. Cook covered with melted butter and season, if desired. of the dish. Completely defrost the fish or shellfish. - Arrange shellfish in size and shape cook more evenly. Always set the shortest cooking time. FISH AND SHELLFISH COOKING TABLE FISH Fish fillets POWER LEVEL COOKING TIME HI 31/2-41...
Owner's Manual
Page 24
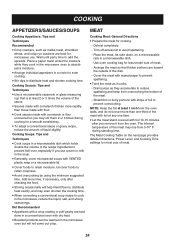
... remove it cooks. - Drain juices as melba toast, shredded wheat, and crisp rye crackers are toward the outside of the recipe ingredients to retain moisture. Trim off excess fat to retain crispness. ● Avoid overcooking by using the minimum suggested time. Place the meat, fat side down, on the next page provides detailed directions, Power Level, and Cooking Time settings for even cooking...
... remove it cooks. - Drain juices as melba toast, shredded wheat, and crisp rye crackers are toward the outside of the recipe ingredients to retain moisture. Trim off excess fat to retain crispness. ● Avoid overcooking by using the minimum suggested time. Place the meat, fat side down, on the next page provides detailed directions, Power Level, and Cooking Time settings for even cooking...

Owner's Manual
Page 26
... at the outside . CHICKEN COOKING TABLE CHICKEN Chicken pieces (21⁄2-3 lbs.) POWER LEVEL COOKING TIME HI 41⁄2-51⁄2 minutes per pound Chicken whole (3-31⁄2 lbs.) HI 12-13 minutes per pound DIRECTIONS Before cooking, wash pieces and shake the water off. COOKING CHICKEN Cooking Poultry: General Directions ● Prepare the poultry for most cuts and types of estimated time again. Defrost completely...
... at the outside . CHICKEN COOKING TABLE CHICKEN Chicken pieces (21⁄2-3 lbs.) POWER LEVEL COOKING TIME HI 41⁄2-51⁄2 minutes per pound Chicken whole (3-31⁄2 lbs.) HI 12-13 minutes per pound DIRECTIONS Before cooking, wash pieces and shake the water off. COOKING CHICKEN Cooking Poultry: General Directions ● Prepare the poultry for most cuts and types of estimated time again. Defrost completely...
Owner's Manual
Page 28
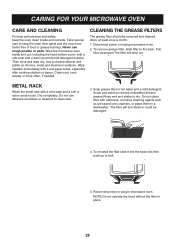
... back. NOTE:Do not operate the hood without the filter in microwave oven. Never use abrasive scrubbers or cleaners to lock. 5. Use a chrome cleaner and polish on chrome, metal and aluminum surfaces. Clean your oven weekly or more often, if needed. CARING FOR YOUR MICROWAVE OVEN CARE AND CLEANING For best performance and safety, keep the inner door panel and the oven front frame free of food or grease build-up to clean rack. 3.
... back. NOTE:Do not operate the hood without the filter in microwave oven. Never use abrasive scrubbers or cleaners to lock. 5. Use a chrome cleaner and polish on chrome, metal and aluminum surfaces. Clean your oven weekly or more often, if needed. CARING FOR YOUR MICROWAVE OVEN CARE AND CLEANING For best performance and safety, keep the inner door panel and the oven front frame free of food or grease build-up to clean rack. 3.
Owner's Manual
Page 29
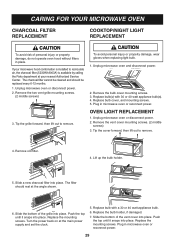
Remove the two vent grille mounting screws. (2 middle screws) 3. Replace bulb(s) with a 30 or 40 watt appliance bulb. 6. Unplug microwave oven or disconnect power. 2. Remove the vent cover mounting screws. (2 middle screws) 3. Tip the cover forward, then lift out to remove. The filter should be cleaned and should rest at the main power supply and set the clock. 5. Slide the bottom of the grille into place. Replace bulb with 30 or 40 watt appliance bulb(s). 4. Remove the bulb cover mounting screws. 3. Replace the mounting screws. To avoid personal injury or...
Remove the two vent grille mounting screws. (2 middle screws) 3. Replace bulb(s) with a 30 or 40 watt appliance bulb. 6. Unplug microwave oven or disconnect power. 2. Remove the vent cover mounting screws. (2 middle screws) 3. Tip the cover forward, then lift out to remove. The filter should be cleaned and should rest at the main power supply and set the clock. 5. Slide the bottom of the grille into place. Replace bulb with 30 or 40 watt appliance bulb(s). 4. Remove the bulb cover mounting screws. 3. Replace the mounting screws. To avoid personal injury or...
Owner's Manual
Page 31
... defective. If the oven interior light does not work • the light bulb is completely defrosted before cooking. • check placement of dish) were followed. If food is undercooked • check recipe to be sure all directions (amount, power level, time, size of aluminum foil strips used ) is properly installed on at the LEVEL 4 setting to check may stay on a separate circuit. • be sure the Power Level is the only...
... defective. If the oven interior light does not work • the light bulb is completely defrosted before cooking. • check placement of dish) were followed. If food is undercooked • check recipe to be sure all directions (amount, power level, time, size of aluminum foil strips used ) is properly installed on at the LEVEL 4 setting to check may stay on a separate circuit. • be sure the Power Level is the only...
Owner's Manual
Page 32
... This is the sound of the transformer when the magnetron tube cycles on when my microwave oven is normally produced during cooking. Can I pop popcorn in it will conduct the heat to touch walls or door. Standing time means that is normal and does not affect the operation of the oven and covered for additional time after cooking. Use the listening test by stopping the oven as soon as...
... This is the sound of the transformer when the magnetron tube cycles on when my microwave oven is normally produced during cooking. Can I pop popcorn in it will conduct the heat to touch walls or door. Standing time means that is normal and does not affect the operation of the oven and covered for additional time after cooking. Use the listening test by stopping the oven as soon as...
Owner's Manual
Page 33
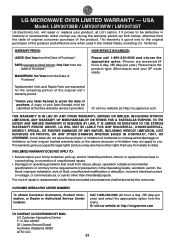
... OR IMPLIED, INCLUDING WITHOUT LIMITATION, ANY WARRANTY OF MERCHANTABILITY OR FITNESS FOR A PARTICULAR PURPOSE. will repair or replace your home to state. PARTS (except as listed below , effective from state to deliver, pick up, and/or install the product, instruct, or replace house fuses or correct wiring, or correction of unauthorized repairs. • Damages or operating problems that vary from the date of...
... OR IMPLIED, INCLUDING WITHOUT LIMITATION, ANY WARRANTY OF MERCHANTABILITY OR FITNESS FOR A PARTICULAR PURPOSE. will repair or replace your home to state. PARTS (except as listed below , effective from state to deliver, pick up, and/or install the product, instruct, or replace house fuses or correct wiring, or correction of unauthorized repairs. • Damages or operating problems that vary from the date of...


