Owners Manual
Page 3
... and Rice 25 Pasta Cooking Table 25 Rice Cooking Table 25 MAINTENANCE 26~27 Care and Cleaning 26 Metal Rack 26 Cleaning the Grease Filters 26 Charcoal Filter Replacement 26 Cooktop/Night Light Replacement 27 Oven Light Replacement 27 COOKING UTENSILS 28 Microwave Utensil Guide 28 FAQS 29 Sensor Reheat 15 TROUBLESHOOTING...
... and Rice 25 Pasta Cooking Table 25 Rice Cooking Table 25 MAINTENANCE 26~27 Care and Cleaning 26 Metal Rack 26 Cleaning the Grease Filters 26 Charcoal Filter Replacement 26 Cooktop/Night Light Replacement 27 Oven Light Replacement 27 COOKING UTENSILS 28 Microwave Utensil Guide 28 FAQS 29 Sensor Reheat 15 TROUBLESHOOTING...

Owners Manual
Page 4
...property damage. • Suitable for use above both gas and electric cooking equipment up to accumulate on the hood or the filters. • Use care when cleaning the vent hood filters. Watch the oven carefully, especially if you see flames or a fire occurs. Do not store combustible items (bread, ...them before using your oven is not designed for household use only. • When cleaning the door and the surfaces that may damage the filters. • Do not tamper with the built-in severe the hood. Turn the oven off cooking equipment if personal injury or death. you...
...property damage. • Suitable for use above both gas and electric cooking equipment up to accumulate on the hood or the filters. • Use care when cleaning the vent hood filters. Watch the oven carefully, especially if you see flames or a fire occurs. Do not store combustible items (bread, ...them before using your oven is not designed for household use only. • When cleaning the door and the surfaces that may damage the filters. • Do not tamper with the built-in severe the hood. Turn the oven off cooking equipment if personal injury or death. you...

Owners Manual
Page 7
...Label 3. Glass Tray. Use for extra space when cooking in the oven during operation for more than one container at the same time. Charcoal Filter (behind Vent Grille) 4. It must be in more even cooking. Cooktop/Countertop Light 7. Press the buttons on this panel to view food ...as it cooks for best cooking results. 6. Grease Filter - 7 - Metal Shielded Window. Vent Grille 5. Metal Rack. The water will safely absorb all functions. 8. It is best to make your cooking experience...
...Label 3. Glass Tray. Use for extra space when cooking in the oven during operation for more than one container at the same time. Charcoal Filter (behind Vent Grille) 4. It must be in more even cooking. Cooktop/Countertop Light 7. Press the buttons on this panel to view food ...as it cooks for best cooking results. 6. Grease Filter - 7 - Metal Shielded Window. Vent Grille 5. Metal Rack. The water will safely absorb all functions. 8. It is best to make your cooking experience...
Owners Manual
Page 26
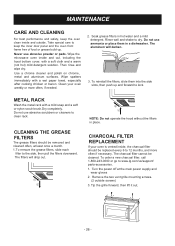
... the power off at least once a month. 1. METAL RACK Wash the metal rack with a wet paper towel, especially after cooking chicken or bacon. CHARCOAL FILTER REPLACEMENT If your oven weekly or more often if necessary. MAINTENANCE CARE AND CLEANING For best performance and safety, keep the inner door panel and... the oven front frame free of food or grease build-up and forward to www.lg.com/us/support/ parts-accessories. 1. Take special care to clean rack. Never use abrasive scrubbers or cleaners to keep the oven clean ...
... the power off at least once a month. 1. METAL RACK Wash the metal rack with a wet paper towel, especially after cooking chicken or bacon. CHARCOAL FILTER REPLACEMENT If your oven weekly or more often if necessary. MAINTENANCE CARE AND CLEANING For best performance and safety, keep the inner door panel and... the oven front frame free of food or grease build-up and forward to www.lg.com/us/support/ parts-accessories. 1. Take special care to clean rack. Never use abrasive scrubbers or cleaners to keep the oven clean ...
Owners Manual
Page 27
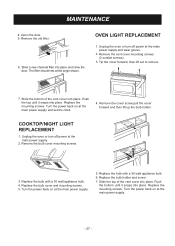
...the door. 5. Slide the bottom of the vent cover into place. Remove the bulb cover mounting screws. 3. Replace the bulb holder and screw. 7. The filter should rest at the main power supply. 5. Push the top until it snaps into place. Replace the bulb with a 30 watt appliance bulb. 6. Turn ...the main power supply and set the clock. 4. COOKTOP/NIGHT LIGHT REPLACEMENT 1. Replace the bulb with a 30 watt appliance bulb. 4. Remove the old filter. 6. Replace the mounting screws. Remove the cover screw,pull the cover forward and then lift up the bulb holder. Slide the top of the vent...
...the door. 5. Slide the bottom of the vent cover into place. Remove the bulb cover mounting screws. 3. Replace the bulb holder and screw. 7. The filter should rest at the main power supply. 5. Push the top until it snaps into place. Replace the bulb with a 30 watt appliance bulb. 6. Turn ...the main power supply and set the clock. 4. COOKTOP/NIGHT LIGHT REPLACEMENT 1. Replace the bulb with a 30 watt appliance bulb. 4. Remove the old filter. 6. Replace the mounting screws. Remove the cover screw,pull the cover forward and then lift up the bulb holder. Slide the top of the vent...


