Specification
Page 2
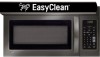
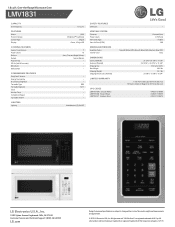
... registered trademarks of LG Corp. Over-the-Range Microwave Oven LMV1831 CAPACITY Oven Capacity FEATURES Watts Exterior Design Control Type Display COOKING FEATURES Sensor Cook Options Power Levels Defrost Reheat Popcorn Key EZ On (Add 30 seconds) More/Less Melt/Soften CONVENIENCE FEATURES EasyClean® Interior Energy Savings Key Bi-Level Cooking Rack Turntable Type Turntable Diameter Clock Kitchen Timer Completion Beeper Turntable On/Off LIGHTING Lighting 1.8 cu. Non-metric weights and measurements are subject to change without notice...
... registered trademarks of LG Corp. Over-the-Range Microwave Oven LMV1831 CAPACITY Oven Capacity FEATURES Watts Exterior Design Control Type Display COOKING FEATURES Sensor Cook Options Power Levels Defrost Reheat Popcorn Key EZ On (Add 30 seconds) More/Less Melt/Soften CONVENIENCE FEATURES EasyClean® Interior Energy Savings Key Bi-Level Cooking Rack Turntable Type Turntable Diameter Clock Kitchen Timer Completion Beeper Turntable On/Off LIGHTING Lighting 1.8 cu. Non-metric weights and measurements are subject to change without notice...

INSTALLATION
Page 2
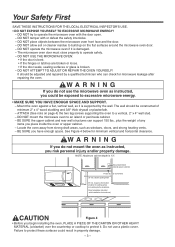
... qualified service personnel. • You will need a DEDICATED 120V, 60Hz, AC only, 15 or 20A, fused electrical supply (located in electric shock, fire or other personal injury. - 2 - Locate and disconnect the power to install this oven. This appliance is properly grounded or if you begin. BE SURE TO READ THE FOLLOWING SAFETY INSTRUCTIONS: Model Number Plate Figure 1 Mounting Plate Figure 2 wW A R N I N G If you use an extension cord. •...
... qualified service personnel. • You will need a DEDICATED 120V, 60Hz, AC only, 15 or 20A, fused electrical supply (located in electric shock, fire or other personal injury. - 2 - Locate and disconnect the power to install this oven. This appliance is properly grounded or if you begin. BE SURE TO READ THE FOLLOWING SAFETY INSTRUCTIONS: Model Number Plate Figure 1 Mounting Plate Figure 2 wW A R N I N G If you use an extension cord. •...
INSTALLATION
Page 3
... mount the oven as instructed, you could result in property damage. - 3 - DO NOT allow soil or cleaner residue to build up on page 4) the two lag screws supporting the oven to cooking surface or countertop before installation. (Use templates included with or defeat the safety interlocks. - The microwave oven door must close properly to operate the microwave oven with the door open. - DO NOT ATTEMPT TO ADJUST OR REPAIR THE OVEN...
... mount the oven as instructed, you could result in property damage. - 3 - DO NOT allow soil or cleaner residue to build up on page 4) the two lag screws supporting the oven to cooking surface or countertop before installation. (Use templates included with or defeat the safety interlocks. - The microwave oven door must close properly to operate the microwave oven with the door open. - DO NOT ATTEMPT TO ADJUST OR REPAIR THE OVEN...

INSTALLATION
Page 4
... parts. Not Actual Size (for wall stud holes) Two 1/4" x 3" toggle bolts - TO REDUCE THE RISK OF FIRE AND ELECTRIC SHOCK, INSTALL AT LEAST 13-3/4 INCHES ABOVE A COOKTOP(OR RANGE) SUITABLE FOR USE ABOVE GAS OR ELECTRIC COOKING EQUIPMENT 36 INCHES OR LESS WIDE. and the mounting area must be assembled as shown) Not used if venting into the wall. One power cord clamp and One dark-colored mounting screw...
... parts. Not Actual Size (for wall stud holes) Two 1/4" x 3" toggle bolts - TO REDUCE THE RISK OF FIRE AND ELECTRIC SHOCK, INSTALL AT LEAST 13-3/4 INCHES ABOVE A COOKTOP(OR RANGE) SUITABLE FOR USE ABOVE GAS OR ELECTRIC COOKING EQUIPMENT 36 INCHES OR LESS WIDE. and the mounting area must be assembled as shown) Not used if venting into the wall. One power cord clamp and One dark-colored mounting screw...
INSTALLATION
Page 9
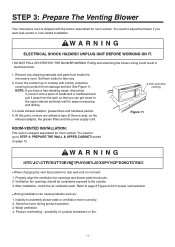
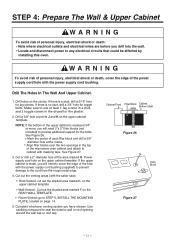
... of cardboard or hardboard and pull it from damage and dirt. You need to adjust the blower if you can get closer to STEP 4: PREPARE THE WALL & UPPER CABINET located on the exhaust adaptor, the grease filters and the power supply cord. wW A R N I N G ELECTRICAL SHOCK HAZARD! Remove any ), on page 13 . A thick, protective covering Figure 11 ROOM-VENTED INSTALLATION: This oven is shipped assembled for later use. 2. You need...
... of cardboard or hardboard and pull it from damage and dirt. You need to adjust the blower if you can get closer to STEP 4: PREPARE THE WALL & UPPER CABINET located on the exhaust adaptor, the grease filters and the power supply cord. wW A R N I N G ELECTRICAL SHOCK HAZARD! Remove any ), on page 13 . A thick, protective covering Figure 11 ROOM-VENTED INSTALLATION: This oven is shipped assembled for later use. 2. You need...

INSTALLATION
Page 10
... Mounting Screw Knockouts Parts B Parts B Figure 13 8. Take care to assure the damper hinge is installed so that it is at the inside rear of the microwave oven. 3. Remove the blower plate from Back plate. Discard knockouts. See Figure 14. 5. Rotate the blower unit so that the exhaust ports face the rear of the cabinet. Check that the damper swings freely. Reattach the blower plate to cut and remove knockouts B from cabinet...
... Mounting Screw Knockouts Parts B Parts B Figure 13 8. Take care to assure the damper hinge is installed so that it is at the inside rear of the microwave oven. 3. Remove the blower plate from Back plate. Discard knockouts. See Figure 14. 5. Rotate the blower unit so that the exhaust ports face the rear of the cabinet. Check that the damper swings freely. Reattach the blower plate to cut and remove knockouts B from cabinet...
INSTALLATION
Page 13
... 27. 3. Power supply cord hole on the REAR WALL TEMPLATE. Wall-Vented: Cut out the shaded area marked F on the upper cabinet template. Complete whichever venting system you will need 2"x 2" filler blocks (not included) to cabinet with masking tape. Use caulking compound to the cord from the rough metal edge. 4. STEP 4: Prepare The Wall & Upper Cabinet wW A R N I N G To avoid risk of personal injury, electrical shock or death, cover the...
... 27. 3. Power supply cord hole on the REAR WALL TEMPLATE. Wall-Vented: Cut out the shaded area marked F on the upper cabinet template. Complete whichever venting system you will need 2"x 2" filler blocks (not included) to cabinet with masking tape. Use caulking compound to the cord from the rough metal edge. 4. STEP 4: Prepare The Wall & Upper Cabinet wW A R N I N G To avoid risk of personal injury, electrical shock or death, cover the...
INSTALLATION
Page 15
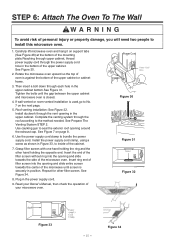
.... STEP 6: Attach The Oven To The Wall wW A R N I N G To avoid risk of personal injury or property damage, you will need two people to bundle the power supply cord. Read your Owner's Manual, then check the operation of the cabinet. 7. See Figure 30. 2. Use the power supply cord clamp to install this microwave oven. 1. Grasp filter screen with one hand holding the opposite end. Power Cord Power Cord Hole Figure 30...
.... STEP 6: Attach The Oven To The Wall wW A R N I N G To avoid risk of personal injury or property damage, you will need two people to bundle the power supply cord. Read your Owner's Manual, then check the operation of the cabinet. 7. See Figure 30. 2. Use the power supply cord clamp to install this microwave oven. 1. Grasp filter screen with one hand holding the opposite end. Power Cord Power Cord Hole Figure 30...
Owners Manual
Page 3
... MICROWAVE ENERGY 2 IMPORTANT SAFETY INSTRUCTIONS 4~5 SPECIFICATIONS 6 Location of Model Number 6 Oven Specifications 6 Electrical Rating 6 Electrical Requirements 6 Grounding Instructions 6 Cooking Guide for Sensor Cook 16 Timer On/Off 17 Hold Warm 17 Soften 17 Melt 17 Soften Table 18 Melt Table 18 Defrost Weight/Time 19 Defrost Table 19 Quick Defrost 19 Defrosting Tips 20 Metal Rack 20 FEATURES 7~9 Microwave Oven Features 7 Oven Control Panel 8 ~9 COOKING TIPS 21~25 Getting the Best Cooking Results 21 Fish & Shellfish 21 USING YOUR MICROWAVE OVEN...
... MICROWAVE ENERGY 2 IMPORTANT SAFETY INSTRUCTIONS 4~5 SPECIFICATIONS 6 Location of Model Number 6 Oven Specifications 6 Electrical Rating 6 Electrical Requirements 6 Grounding Instructions 6 Cooking Guide for Sensor Cook 16 Timer On/Off 17 Hold Warm 17 Soften 17 Melt 17 Soften Table 18 Melt Table 18 Defrost Weight/Time 19 Defrost Table 19 Quick Defrost 19 Defrosting Tips 20 Metal Rack 20 FEATURES 7~9 Microwave Oven Features 7 Oven Control Panel 8 ~9 COOKING TIPS 21~25 Getting the Best Cooking Results 21 Fish & Shellfish 21 USING YOUR MICROWAVE OVEN...

Owners Manual
Page 4
... for household use corrosive chemicals or vapors, such as lye-based oven - Severely overcooked foods can start in safety switches to make sure the power is cooking, the vent fan turns on the hood or the filters. - found on . - Keep the oven door closed. Turn the oven off the food. power at all the instructions before placing the item in the oven. - Connect it thoroughly checked by a qualified service technician before using your oven...
... for household use corrosive chemicals or vapors, such as lye-based oven - Severely overcooked foods can start in safety switches to make sure the power is cooking, the vent fan turns on the hood or the filters. - found on . - Keep the oven door closed. Turn the oven off the food. power at all the instructions before placing the item in the oven. - Connect it thoroughly checked by a qualified service technician before using your oven...
Owners Manual
Page 5
... table or counter. • Preserve the oven floor: - Do not allow the container to radio and receiver. Do not cook anything directly on a microwavable dish. - To reduce the risk of baby bottles or baby food. SAVE THESE INSTRUCTIONS FEDERAL COMMUNICATIONS COMMISSION RADIO FREQUENCY INTEREFERENCE STATEMENT (U.S.A. Uneven heating may explode. • Do not cover or block any radio or in a residential installation. Use...
... table or counter. • Preserve the oven floor: - Do not allow the container to radio and receiver. Do not cook anything directly on a microwavable dish. - To reduce the risk of baby bottles or baby food. SAVE THESE INSTRUCTIONS FEDERAL COMMUNICATIONS COMMISSION RADIO FREQUENCY INTEREFERENCE STATEMENT (U.S.A. Uneven heating may explode. • Do not cover or block any radio or in a residential installation. Use...
Owners Manual
Page 6
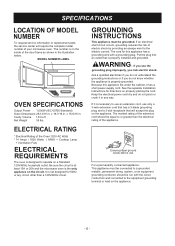
.... - 6 - SPECIFICATIONS LOCATION OF MODEL NUMBER To request service information or replacement parts, the service center will accept the plug on the appliance. The cord for 50Hz or any way. Because this appliance has a grounding wire with the circuit conductors and connected to operate on a Standard 120V/60Hz household outlet. MODEL NUMBER LABEL OVEN SPECIFICATIONS Output Power 1,000W (IEC 60705 Standard) Outer Dimensions 29-13/16 in . If an electrical short circuit...
.... - 6 - SPECIFICATIONS LOCATION OF MODEL NUMBER To request service information or replacement parts, the service center will accept the plug on the appliance. The cord for 50Hz or any way. Because this appliance has a grounding wire with the circuit conductors and connected to operate on a Standard 120V/60Hz household outlet. MODEL NUMBER LABEL OVEN SPECIFICATIONS Output Power 1,000W (IEC 60705 Standard) Outer Dimensions 29-13/16 in . If an electrical short circuit...

Owners Manual
Page 7
... more even cooking. Model and Serial Number Plate & Cooking Guide Label 3. Control Panel. It is accidentally started. Glass Tray. Remove cooking rack when you to allow you are not using it cooks for more than one container at the same time. Charcoal Filter (behind Vent Grille) 4. Vent Grille 5. The shield prevents microwaves from escaping. The glass tray moves food as it cooks. 2. Press the buttons on this panel to leave a glass of the oven's basic features: 1. Use for best cooking results. 6. Cooktop/Countertop Light 7. FEATURES MICROWAVE OVEN FEATURES Metal...
... more even cooking. Model and Serial Number Plate & Cooking Guide Label 3. Control Panel. It is accidentally started. Glass Tray. Remove cooking rack when you to allow you are not using it cooks for more than one container at the same time. Charcoal Filter (behind Vent Grille) 4. Vent Grille 5. The shield prevents microwaves from escaping. The glass tray moves food as it cooks. 2. Press the buttons on this panel to leave a glass of the oven's basic features: 1. Use for best cooking results. 6. Cooktop/Countertop Light 7. FEATURES MICROWAVE OVEN FEATURES Metal...

Owners Manual
Page 9
... the turntable. The oven's sensor will tell the cooking time, power level, quantities or weights. Press this button to set the kitchen timer. 7. Hold Warm. Press this button to enter the time of humidity it detects from the popcorn. 5. START/Enter. Energy Saving. Press this button followed by number buttons to reheat a casserole, dinner plate, and soup/sauce. The oven's sensor will tell the oven how long to keep hot, cooked foods warm in your microwave oven. Cook Time. Vent Hi...
... the turntable. The oven's sensor will tell the cooking time, power level, quantities or weights. Press this button to set the kitchen timer. 7. Hold Warm. Press this button to enter the time of humidity it detects from the popcorn. 5. START/Enter. Energy Saving. Press this button followed by number buttons to reheat a casserole, dinner plate, and soup/sauce. The oven's sensor will tell the oven how long to keep hot, cooked foods warm in your microwave oven. Cook Time. Vent Hi...

Owners Manual
Page 19
... START/Enter. NOTE: After you wish to 454 g) 5.Set Time NOTE: To defrost by time rather than weight, press Defrost Weight/Time five times, enter the amount of a button. The oven will not stop following the beep unless the door is 0.1 to choose the Meat category. 2. At this time, open the door and turn the meat over , four beeps will sound and End will hold steam and juice close to the foods...
... START/Enter. NOTE: After you wish to 454 g) 5.Set Time NOTE: To defrost by time rather than weight, press Defrost Weight/Time five times, enter the amount of a button. The oven will not stop following the beep unless the door is 0.1 to choose the Meat category. 2. At this time, open the door and turn the meat over , four beeps will sound and End will hold steam and juice close to the foods...

Owners Manual
Page 20
... supports. • The rack MUST NOT touch the metal walls or back of the microwave oven. 2. Separated pieces defrost more information on the rack position. The foil can damage the oven lining. • For better results, let food stand after defrosting. (For more easily. • Use small pieces of aluminum foil to shield parts of food such as rquired. Use the rack only when cooking food on standing time...
... supports. • The rack MUST NOT touch the metal walls or back of the microwave oven. 2. Separated pieces defrost more information on the rack position. The foil can damage the oven lining. • For better results, let food stand after defrosting. (For more easily. • Use small pieces of aluminum foil to shield parts of food such as rquired. Use the rack only when cooking food on standing time...

Owners Manual
Page 26
... use abrasive powder or pads. METAL RACK Wash the metal rack with a wet paper towel, especially after cooking chicken or bacon. Wipe the microwave oven inside and outside screws) 3. MAINTENANCE CARE AND CLEANING For best performance and safety, keep the inner door panel and the oven front frame free of food or grease build-up and forward to lock. Clean your oven is vented inside, the charcoal filter should be cleaned. To remove the grease filters, slide each filter...
... use abrasive powder or pads. METAL RACK Wash the metal rack with a wet paper towel, especially after cooking chicken or bacon. Wipe the microwave oven inside and outside screws) 3. MAINTENANCE CARE AND CLEANING For best performance and safety, keep the inner door panel and the oven front frame free of food or grease build-up and forward to lock. Clean your oven is vented inside, the charcoal filter should be cleaned. To remove the grease filters, slide each filter...

Owners Manual
Page 27
... - Open the door. 5. Slide a new charcoal filter into place. Remove the vent cover mounting screws. (2 outside screws) 3. Slide the bottom of the vent cover into place. Turn the power back on at the main power supply and set the clock. 4. Replace the bulb cover and mounting screws. 5. Slide the top of the vent cover into place. Push the top until it snaps into place and close the door. Replace the bulb with a 30 watt appliance bulb. 6. Remove the old filter. 6. OVEN LIGHT REPLACEMENT 1. Remove the cover screw,pull...
... - Open the door. 5. Slide a new charcoal filter into place. Remove the vent cover mounting screws. (2 outside screws) 3. Slide the bottom of the vent cover into place. Turn the power back on at the main power supply and set the clock. 4. Replace the bulb cover and mounting screws. 5. Slide the top of the vent cover into place. Push the top until it snaps into place and close the door. Replace the bulb with a 30 watt appliance bulb. 6. Remove the old filter. 6. OVEN LIGHT REPLACEMENT 1. Remove the cover screw,pull...
Owners Manual
Page 30
... the oven interior light does not work: • the light bulb is really necessary. A quick review of this manual as well as the additional information in house. • check that timer wasn't started instead of aluminum foil strips used ) is the only appliance on supports. If the Display shows a time counting down but the oven is not cooking: •check that door is firmly closed . • check that Start button...
... the oven interior light does not work: • the light bulb is really necessary. A quick review of this manual as well as the additional information in house. • check that timer wasn't started instead of aluminum foil strips used ) is the only appliance on supports. If the Display shows a time counting down but the oven is not cooking: •check that door is firmly closed . • check that Start button...
Owners Manual
Page 31
... repair or replace your home to the original purchaser of Purchase. WARRANTY PERIOD: ** Model: LMV1831 Labor: 1 Year from misuse, abuse, operation outside environmental specifications or contrary to be borne by the consumer. - 31 - USA LG Electronics Inc. Service trips to your product, at LG's option, if it proves to the requirements or precautions in the United States, including U.S. Damages or operating problems...
... repair or replace your home to the original purchaser of Purchase. WARRANTY PERIOD: ** Model: LMV1831 Labor: 1 Year from misuse, abuse, operation outside environmental specifications or contrary to be borne by the consumer. - 31 - USA LG Electronics Inc. Service trips to your product, at LG's option, if it proves to the requirements or precautions in the United States, including U.S. Damages or operating problems...


