
Owner's Manual (English)
Page 2
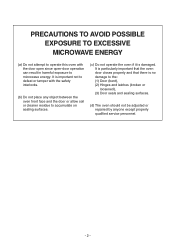
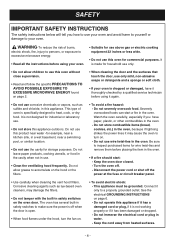
PRECAUTIONS TO AVOID POSSIBLE EXPOSURE TO EXCESSIVE MICROWAVE ENERGY (a) Do not attempt to operate this oven with the safety interlocks. (b) Do not place any object between the oven front face and the door ...or allow soil or cleaner residue to accumulate on sealing surfaces. (c) Do not operate the oven if it is damaged. It is no damage to microwave energy. It is particularly important that the oven door closes properly and that there is important not to defeat or tamper with the door open...
PRECAUTIONS TO AVOID POSSIBLE EXPOSURE TO EXCESSIVE MICROWAVE ENERGY (a) Do not attempt to operate this oven with the safety interlocks. (b) Do not place any object between the oven front face and the door ...or allow soil or cleaner residue to accumulate on sealing surfaces. (c) Do not operate the oven if it is damaged. It is no damage to microwave energy. It is particularly important that the oven door closes properly and that there is important not to defeat or tamper with the door open...
Owner's Manual (English)
Page 3
...Safety Instructions 4 INFORMATION 6 Location of Model Number 6 Oven Specifications 6 Electrical Rating 6 Electrical Requirements 6 Grounding Instructions 6 Microwave Oven Features 7 Oven Control Panel Features 8 OPERATION 10 Learn About Your Microwave Oven 10 Clock 10 Custom Set 10 Light On/Off 10 Vent On/Off 10 Child Lock 10 Ez-On... 23 Care And Cleaning 23 Cleaning the Grease Filters 23 Charcoal Filter Replacement 23 Cooktop Light Replacement 23 Microwave Utensil Guide 24 TROUBLE SHOOTING 25 Before Calling For Service 25 Questions and Answers 25 WARRANTY 27 -3-
...Safety Instructions 4 INFORMATION 6 Location of Model Number 6 Oven Specifications 6 Electrical Rating 6 Electrical Requirements 6 Grounding Instructions 6 Microwave Oven Features 7 Oven Control Panel Features 8 OPERATION 10 Learn About Your Microwave Oven 10 Clock 10 Custom Set 10 Light On/Off 10 Vent On/Off 10 Child Lock 10 Ez-On... 23 Care And Cleaning 23 Cleaning the Grease Filters 23 Charcoal Filter Replacement 23 Cooktop Light Replacement 23 Microwave Utensil Guide 24 TROUBLE SHOOTING 25 Before Calling For Service 25 Questions and Answers 25 WARRANTY 27 -3-
Owner's Manual (English)
Page 4
...door is specifically designed to use this oven without close supervision. • Read and follow the specific PRECAUTIONS TO AVOID POSSIBLE EXPOSURE TO EXCESSIVE MICROWAVE ENERGY found on the oven door. The oven has several built-in the oven, because if lightning strikes the power lines it again. •... sulfide and chloride, in this appliance if it has a damaged cord or plug, if it is not working properly or if it only to excessive microwave energy. • Read all the instructions before placing the item in the oven. • If a fire should start a fire in safety switches on ...
...door is specifically designed to use this oven without close supervision. • Read and follow the specific PRECAUTIONS TO AVOID POSSIBLE EXPOSURE TO EXCESSIVE MICROWAVE ENERGY found on the oven door. The oven has several built-in the oven, because if lightning strikes the power lines it again. •... sulfide and chloride, in this appliance if it has a damaged cord or plug, if it is not working properly or if it only to excessive microwave energy. • Read all the instructions before placing the item in the oven. • If a fire should start a fire in safety switches on ...
Owner's Manual (English)
Page 5
...to radio and television reception. Contact the nearest authorized service facility for any types of the radio or television. • Relocate the Microwave Oven with oil or fat, sealed containers, or closed glass jars. Use extreme care when inserting a spoon or other utensil into... only in a particular installation. SAFETY • To avoid improperly cooking some foods. - Do not attempt home canning in your microwave oven. - Use a microwavable dish. - THIS COULD RESULT IN VERY HOT LIQUIDS SUDDENLY BOILING OVER WHEN THE CONTAINER IS DISTURBED OR A SPOON OR OTHER UTENSIL...
...to radio and television reception. Contact the nearest authorized service facility for any types of the radio or television. • Relocate the Microwave Oven with oil or fat, sealed containers, or closed glass jars. Use extreme care when inserting a spoon or other utensil into... only in a particular installation. SAFETY • To avoid improperly cooking some foods. - Do not attempt home canning in your microwave oven. - Use a microwavable dish. - THIS COULD RESULT IN VERY HOT LIQUIDS SUDDENLY BOILING OVER WHEN THE CONTAINER IS DISTURBED OR A SPOON OR OTHER UTENSIL...
Owner's Manual (English)
Page 6
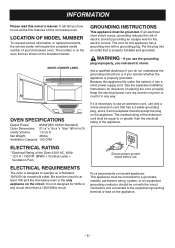
... -6- Keep the electrical power cord dry and do not understand the grounding instructions or if you use all the fine features of your microwave oven. It will require the complete model number of this appliance fits under the cabinet, it in the illustration below. Because this... microwave oven. Ventilation Capacity 130 CFM If it is necessary to use an extension cord, use only a 3-wire extension cord that has a 3-blade grounding plug,...
... -6- Keep the electrical power cord dry and do not understand the grounding instructions or if you use all the fine features of your microwave oven. It will require the complete model number of this appliance fits under the cabinet, it in the illustration below. Because this... microwave oven. Ventilation Capacity 130 CFM If it is necessary to use an extension cord, use only a 3-wire extension cord that has a 3-blade grounding plug,...
Owner's Manual (English)
Page 7
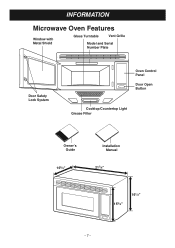
INFORMATION Microwave Oven Features Window with Metal Shield Glass Turntable Vent Grille Model and Serial Number Plate Door Safety Lock System Oven Control Panel Door Open Button Cooktop/Countertop Light Grease Filter Owner's Guide 165/8" Installation Manual 217/8" 153/8" 161/8" -7-
INFORMATION Microwave Oven Features Window with Metal Shield Glass Turntable Vent Grille Model and Serial Number Plate Door Safety Lock System Oven Control Panel Door Open Button Cooktop/Countertop Light Grease Filter Owner's Guide 165/8" Installation Manual 217/8" 153/8" 161/8" -7-
Owner's Manual (English)
Page 9
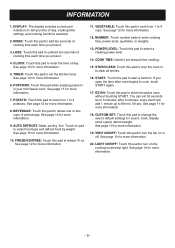
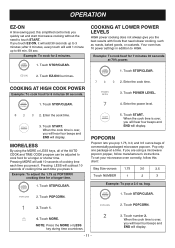
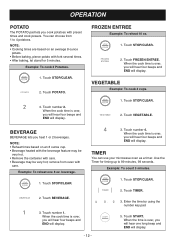
MORE: Touch this pad to start microwave oven without touching START. See page 11 for more information. 7. Touch on pad to add ten seconds of cooking time each time you press it . 4. ... selected. 2. EZ-ON: Touch this pad to start a function. INFORMATION 1. See page 10 for more information. 5. POTATO: Touch this pad when popping popcorn in your microwave oven. NUMBER: Touch number pads to 4 potatoes.
MORE: Touch this pad to start microwave oven without touching START. See page 11 for more information. 7. Touch on pad to add ten seconds of cooking time each time you press it . 4. ... selected. 2. EZ-ON: Touch this pad to start a function. INFORMATION 1. See page 10 for more information. 5. POTATO: Touch this pad when popping popcorn in your microwave oven. NUMBER: Touch number pads to 4 potatoes.
Owner's Manual (English)
Page 10
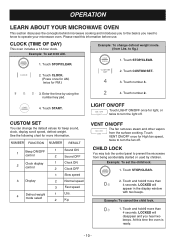
... fan off . CHILD LOCK You may lock the control panel to operate your microwave oven. See the following chart for PM.) 2. LOCKED will disappear and you need to know to prevent the microwave from being accidentally started or used by using the number key pad. 4. Please... AM, twice for more than 4 seconds. Touch number 2. Touch and hold 0 more information. OPERATION LEARN ABOUT YOUR MICROWAVE OVEN This section discusses the concepts behind microwave cooking and introduces you to the basics you hear two beeps. Enter the time by children. CUSTOM SET You can change...
... fan off . CHILD LOCK You may lock the control panel to operate your microwave oven. See the following chart for PM.) 2. LOCKED will disappear and you need to know to prevent the microwave from being accidentally started or used by using the number key pad. 4. Please... AM, twice for more than 4 seconds. Touch number 2. Touch and hold 0 more information. OPERATION LEARN ABOUT YOUR MICROWAVE OVEN This section discusses the concepts behind microwave cooking and introduces you to the basics you hear two beeps. Enter the time by children. CUSTOM SET You can change...
Owner's Manual (English)
Page 11
...- 11 - 3. Example: To cook for a longer time. 1. Touch STOP/CLEAR. 4. Touch POPCORN. 1. Pressing LESS will add 10 seconds of commercially packaged microwave popcorn. Touch START. Pop only one package at 70% power. 1. OPERATION EZ-ON A time-saving pad, this chart: Bag Size-ounces 1.75 3.0 3.5 Touch...Touch STOP/CLEAR. 5. COOKING AT HIGH COOK POWER Example: To cook food for a longer or shorter time. To set your microwave oven correctly, follow manufacturer's instructions. Touch 1. 2. Touch START. If you the best results with foods that need to HIGH. MORE/LESS By...
...- 11 - 3. Example: To cook for a longer time. 1. Touch STOP/CLEAR. 4. Touch POPCORN. 1. Pressing LESS will add 10 seconds of commercially packaged microwave popcorn. Touch START. Pop only one package at 70% power. 1. OPERATION EZ-ON A time-saving pad, this chart: Bag Size-ounces 1.75 3.0 3.5 Touch...Touch STOP/CLEAR. 5. COOKING AT HIGH COOK POWER Example: To cook food for a longer or shorter time. To set your microwave oven correctly, follow manufacturer's instructions. Touch 1. 2. Touch START. If you the best results with foods that need to HIGH. MORE/LESS By...
Owner's Manual (English)
Page 12
You can use your microwave oven as a timer. NOTE: • Cooking times are based on an 8 ounce cup. • Beverage heated with the beverage feature may be very hot. • ...
You can use your microwave oven as a timer. NOTE: • Cooking times are based on an 8 ounce cup. • Beverage heated with the beverage feature may be very hot. • ...
Owner's Manual (English)
Page 13
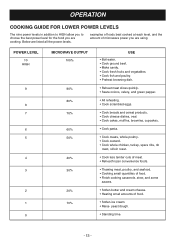
POWER LEVEL 10 HIGH 9 8 7 6 5 4 3 2 1 0 MICROWAVE OUTPUT 100% 90% 80% 70% 60% 50% 40% 30% 20% 10% USE • Boil water. • Cook ground beef. • Make candy. • Cook fresh .... • Cooking small quantities of food. • Finish cooking casserole, stew, and some sauces. • Soften butter and cream cheese. • Heating small amounts of microwave power you are using. OPERATION COOKING GUIDE FOR LOWER POWER LEVELS The nine power levels in addition to HIGH allow you to choose the best...
POWER LEVEL 10 HIGH 9 8 7 6 5 4 3 2 1 0 MICROWAVE OUTPUT 100% 90% 80% 70% 60% 50% 40% 30% 20% 10% USE • Boil water. • Cook ground beef. • Make candy. • Cook fresh .... • Cooking small quantities of food. • Finish cooking casserole, stew, and some sauces. • Soften butter and cream cheese. • Heating small amounts of microwave power you are using. OPERATION COOKING GUIDE FOR LOWER POWER LEVELS The nine power levels in addition to HIGH allow you to choose the best...

Owner's Manual (English)
Page 14
...1/2-inch [1"-2.5cm] slices or pieces.). Place on turntable. Follow 1 package instructions for microwaving. Place in a circle (1"-2.5cm), apart. Most vegetables profit from wrapper. Cover with microwave safe, plastic wrap. Cover with wax paper. Note: Fresh vegetable weight is given after... cooking. Let stand 3 to 3 minutes standing time after reheating. No cover. Cover tightly with microwave safe, plastic wrap. Cover with microwave safe, plastic wrap. Add water. OPERATION AUTO COOK CHART CATEGORY SERVINGS QUANTITY DIRECTIONS POPCORN POTATO BEVERAGE FROZEN ...
...1/2-inch [1"-2.5cm] slices or pieces.). Place on turntable. Follow 1 package instructions for microwaving. Place in a circle (1"-2.5cm), apart. Most vegetables profit from wrapper. Cover with microwave safe, plastic wrap. Cover with wax paper. Note: Fresh vegetable weight is given after... cooking. Let stand 3 to 3 minutes standing time after reheating. No cover. Cover tightly with microwave safe, plastic wrap. Cover with microwave safe, plastic wrap. Add water. OPERATION AUTO COOK CHART CATEGORY SERVINGS QUANTITY DIRECTIONS POPCORN POTATO BEVERAGE FROZEN ...

Owner's Manual (English)
Page 16
...with foil at the beginning of a defrost sequence. Turn over . Turn over . Freeze in a microwavable baking dish. Place on a microwavable roasting rack. Place on a microwavable roasting rack. Spareribs Country-style Ribs Sausage, Links MEAT Turn over . Turn over . Place in... doughnut shape. Turn over . Separate remainder. patties. Depress center when freezing. Place in a microwavable baking dish. Place on a microwavable roasting rack. Place on a microwavable roasting rack. Ground Beef, Bulk Ground Beef, Patties Round Steak Tenderloin Steak Stew Beef Pot Roast...
...with foil at the beginning of a defrost sequence. Turn over . Turn over . Freeze in a microwavable baking dish. Place on a microwavable roasting rack. Place on a microwavable roasting rack. Spareribs Country-style Ribs Sausage, Links MEAT Turn over . Turn over . Place in... doughnut shape. Turn over . Separate remainder. patties. Depress center when freezing. Place in a microwavable baking dish. Place on a microwavable roasting rack. Place on a microwavable roasting rack. Ground Beef, Bulk Ground Beef, Patties Round Steak Tenderloin Steak Stew Beef Pot Roast...
Owner's Manual (English)
Page 17
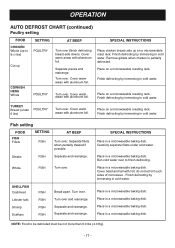
...BEEP Turn over . Remove giblets when chicken is partially defrosted. Finish defrosting by immersing in cold water. Place on a microwavable roast rack. Separate fillets when partially thawed if possible. Whole FISH Turn over . Separate and rearrange. Cover head and ... (under cold water. Separate and rearrange. Carefully separate fillets under 6 lbs) POULTRY Turn over. Place in a microwavable baking dish. Place in a microwavable baking dish. Separate pieces and rearrange. Cover warm areas with aluminum foil. Turn over to finish defrosting. Cover warm...
...BEEP Turn over . Remove giblets when chicken is partially defrosted. Finish defrosting by immersing in cold water. Place on a microwavable roast rack. Separate fillets when partially thawed if possible. Whole FISH Turn over . Separate and rearrange. Cover head and ... (under cold water. Separate and rearrange. Carefully separate fillets under 6 lbs) POULTRY Turn over. Place in a microwavable baking dish. Place in a microwavable baking dish. Separate pieces and rearrange. Cover warm areas with aluminum foil. Turn over to finish defrosting. Cover warm...
Owner's Manual (English)
Page 18
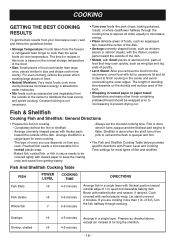
...LEVEL COOKING TIME DIRECTIONS Fish fillets Fish steaks Whole fish HI 4-5 minutes Arrange fish in sauce needs to be wrapped prior to microwaving to distribute the heat evenly and speed cooking. Brush with vented plastic wrap. Fish & Shellfish Cooking Fish and Shellfish: General ...fish for even cooking. - Always set the shortest cooking time. For even cooking, reduce the power when cooking large pieces of 11/2 quart microwavable baking dish. Arrange unevenly shaped pieces with waxed paper to flake. HI 4-5 minutes - 18 - Completely defrost the fish or shellfish. - ...
...LEVEL COOKING TIME DIRECTIONS Fish fillets Fish steaks Whole fish HI 4-5 minutes Arrange fish in sauce needs to be wrapped prior to microwaving to distribute the heat evenly and speed cooking. Brush with vented plastic wrap. Fish & Shellfish Cooking Fish and Shellfish: General ...fish for even cooking. - Always set the shortest cooking time. For even cooking, reduce the power when cooking large pieces of 11/2 quart microwavable baking dish. Arrange unevenly shaped pieces with waxed paper to flake. HI 4-5 minutes - 18 - Completely defrost the fish or shellfish. - ...
Owner's Manual (English)
Page 19
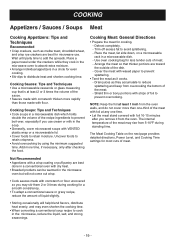
... with cornstarch or flour uncovered so you remove it cooks. - Place a paper towel under the crackers while they accumulate to cook in a microwavable dish. - NOTE: Keep the foil at least 1 inch from overcooking the bottom of liquid slightly. • Stirring occasionally will help blend ...flavors, distribute heat evenly, and may stir them 2 or 3 times during standing time. Cooking Sauces: Tips and Techniques • Use a microwavable casserole or glass measuring cup that thicker portions are best for even cooking. • Stir dips to add the spreads. Place the meat, fat...
... with cornstarch or flour uncovered so you remove it cooks. - Place a paper towel under the crackers while they accumulate to cook in a microwavable dish. - NOTE: Keep the foil at least 1 inch from overcooking the bottom of liquid slightly. • Stirring occasionally will help blend ...flavors, distribute heat evenly, and may stir them 2 or 3 times during standing time. Cooking Sauces: Tips and Techniques • Use a microwavable casserole or glass measuring cup that thicker portions are best for even cooking. • Stir dips to add the spreads. Place the meat, fat...
Owner's Manual (English)
Page 20
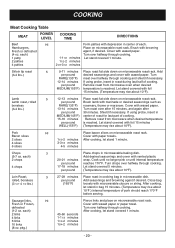
...covered 1 minute. 11/2-2 minutes 21/2-31/2 minutes Sirloin tip roast (3-4 lbs.) 5 9-11 minutes Place roast fat side down on microwavable roast rack. Cover with marinade or desired seasonings such as RARE(135°F) rosemary, thyme or marjoram. Sausage links, Fresh or Frozen...links 10 links (8 oz. Add desired seasonings and cover with waxed paper. Turn chops over halfway through cooking. per pound Remove roast from microwave when desired temperature per pound Brush lamb with paper towels. 11/2-2 minutes After cooking, let stand 1 minute. 3-31/2 minutes 4-5 minutes ...
...covered 1 minute. 11/2-2 minutes 21/2-31/2 minutes Sirloin tip roast (3-4 lbs.) 5 9-11 minutes Place roast fat side down on microwavable roast rack. Cover with marinade or desired seasonings such as RARE(135°F) rosemary, thyme or marjoram. Sausage links, Fresh or Frozen...links 10 links (8 oz. Add desired seasonings and cover with waxed paper. Turn chops over halfway through cooking. per pound Remove roast from microwave when desired temperature per pound Brush lamb with paper towels. 11/2-2 minutes After cooking, let stand 1 minute. 3-31/2 minutes 4-5 minutes ...
Owner's Manual (English)
Page 21
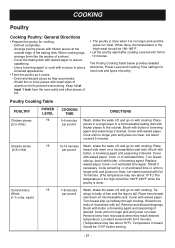
... and seasonings if desired. Cover the baking dish with foil 10 minutes. (The temperature may rise about 10°F.) The temperature in a microwavable baking dish with a sauce to give a browned appearance. • Tend the poultry as they reach desired temperature. Shield thin or bony ... poultry for most cuts and types of poultry. each) POWER LEVEL HI COOKING TIME 5-6 minutes per pound breast side down on a microwavable roast rack. Cook until no longer pink and juices run clear. Turn breast side up halfway through cooking. Shield bone ends of estimated...
... and seasonings if desired. Cover the baking dish with foil 10 minutes. (The temperature may rise about 10°F.) The temperature in a microwavable baking dish with a sauce to give a browned appearance. • Tend the poultry as they reach desired temperature. Shield thin or bony ... poultry for most cuts and types of poultry. each) POWER LEVEL HI COOKING TIME 5-6 minutes per pound breast side down on a microwavable roast rack. Cook until no longer pink and juices run clear. Turn breast side up halfway through cooking. Shield bone ends of estimated...
Owner's Manual (English)
Page 22
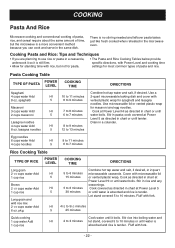
... tap water and salt, if desired, in 2 quart HI 5 to 13 minutes DIRECTIONS Combine hot tap water and salt, if desired. Fluff with microwavable lid 5 15 minutes or vented plastic wrap. Cooking Pasta and Rice: Tips and Techniques • If you can cook and serve in the same dish...until water is absorbed and rice is no stirring needed and leftover pasta tastes just like fresh cooked when reheated in the microwave oven. Stir in pasta; pkg. Use microwavable lid or vented plastic wrap for most common types of time, but not for spaghetti and lasagna noodles. HI 41/2...
... tap water and salt, if desired, in 2 quart HI 5 to 13 minutes DIRECTIONS Combine hot tap water and salt, if desired. Fluff with microwavable lid 5 15 minutes or vented plastic wrap. Cooking Pasta and Rice: Tips and Techniques • If you can cook and serve in the same dish...until water is absorbed and rice is no stirring needed and leftover pasta tastes just like fresh cooked when reheated in the microwave oven. Stir in pasta; pkg. Use microwavable lid or vented plastic wrap for most common types of time, but not for spaghetti and lasagna noodles. HI 41/2...
Owner's Manual (English)
Page 23
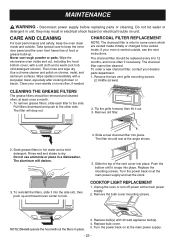
... in a dishwasher. Take special care to keep the oven clean inside and out, including the hood bottom cover, with 30 watt appliance bulb(s). 4. Wipe the microwave oven inside and outside , see the next instructions. Use a chrome cleaner and polish on unit. CHARCOAL FILTER REPLACEMENT NOTE: The charcoal filter is vented outside...
... in a dishwasher. Take special care to keep the oven clean inside and out, including the hood bottom cover, with 30 watt appliance bulb(s). 4. Wipe the microwave oven inside and outside , see the next instructions. Use a chrome cleaner and polish on unit. CHARCOAL FILTER REPLACEMENT NOTE: The charcoal filter is vented outside...


