

Owner's Manual
Page 2
... unless proper ventilation is intended to alert the user to protect it for ventilation and to ensure reliable operation of electric shock to . WARNING: Do not install this owner's manual carefully and retain it from over heating. CAUTION: Do not block any ventilation openings. DO NOT STARE INTO BEAM. Shall the unit require maintenance, contact an authorized service center.
... unless proper ventilation is intended to alert the user to protect it for ventilation and to ensure reliable operation of electric shock to . WARNING: Do not install this owner's manual carefully and retain it from over heating. CAUTION: Do not block any ventilation openings. DO NOT STARE INTO BEAM. Shall the unit require maintenance, contact an authorized service center.

Owner's Manual
Page 3
Protect the power cord from the equipment: Remove the old battery or battery pack, follow the steps in a residential installation. exits the appliance. When installing the product, ensure that the plug is no objects filled interference by one or more of these conditions could void the user's authority to operate this owner's manual to which powers only that to be placed upon . If...
Protect the power cord from the equipment: Remove the old battery or battery pack, follow the steps in a residential installation. exits the appliance. When installing the product, ensure that the plug is no objects filled interference by one or more of these conditions could void the user's authority to operate this owner's manual to which powers only that to be placed upon . If...
Owner's Manual
Page 6
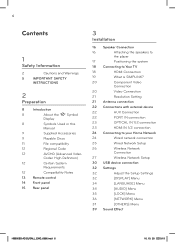
...Code 12 AVCHD (Advanced Video Codec High Definition) 12 Certain System Requirements 12 Compatibility Notes 13 Remote control 14 Front panel 15 Rear panel 3 Installation 16 Speaker Connection 16 Attaching the speakers to the player 17 Positioning the system 18 Connecting to your Home Network 24 Wired network connection 25 Wired Network Setup 26 Wireless Network Connection 27 Wireless Network Setup 30 USB device connection 32 Settings 32 Adjust the Setup Settings 32 [DISPLAY] Menu 34 [LANGUAGE] Menu 34 [AUDIO] Menu 35 [LOCK] Menu 36 [NETWORK] Menu...
...Code 12 AVCHD (Advanced Video Codec High Definition) 12 Certain System Requirements 12 Compatibility Notes 13 Remote control 14 Front panel 15 Rear panel 3 Installation 16 Speaker Connection 16 Attaching the speakers to the player 17 Positioning the system 18 Connecting to your Home Network 24 Wired network connection 25 Wired Network Setup 26 Wireless Network Connection 27 Wireless Network Setup 30 USB device connection 32 Settings 32 Adjust the Setup Settings 32 [DISPLAY] Menu 34 [LANGUAGE] Menu 34 [AUDIO] Menu 35 [LOCK] Menu 36 [NETWORK] Menu...

Owner's Manual
Page 7
... and VR disc 2 51 Viewing a photo 53 Listening to music 7 56 Playing the iPod Appendix 58 Radio Operations 96 Controlling a TV with the supplied 3 59 Playing content via your home remote control network 96 Setting up the remote to 64 Using the NetCast™ Entertainment control your TV Access 97 Area Code List 64 Using Netflix 98 Language code List 4 67 Playing VUDU videos 99 Network Software Update 70 Playing CinemaNow videos 99 Network update notifi...
... and VR disc 2 51 Viewing a photo 53 Listening to music 7 56 Playing the iPod Appendix 58 Radio Operations 96 Controlling a TV with the supplied 3 59 Playing content via your home remote control network 96 Setting up the remote to 64 Using the NetCast™ Entertainment control your TV Access 97 Area Code List 64 Using Netflix 98 Language code List 4 67 Playing VUDU videos 99 Network Software Update 70 Playing CinemaNow videos 99 Network update notifi...
Owner's Manual
Page 13
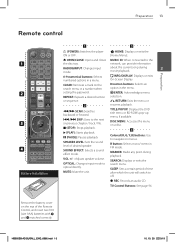
... the disc tray. X (PAUSE): Pauses playback SPEAKER LEVEL: Sets the sound level of time after which the unit will switch to optical directly. MARKER: Marks any point during 2 mode. z REC: Records an audio CD. CLEAR: Removes a mark on the search menu or a number when Direction buttons: Selects an option in a menu. OPTICAL: Changes input mode to off. TV Control Buttons: See page 96. TITLE/POPUP: Displays the DVD title menu or BD-ROM's pop-up menu, if available. network...
... the disc tray. X (PAUSE): Pauses playback SPEAKER LEVEL: Sets the sound level of time after which the unit will switch to optical directly. MARKER: Marks any point during 2 mode. z REC: Records an audio CD. CLEAR: Removes a mark on the search menu or a number when Direction buttons: Selects an option in a menu. OPTICAL: Changes input mode to off. TV Control Buttons: See page 96. TITLE/POPUP: Displays the DVD title menu or BD-ROM's pop-up menu, if available. network...
Owner's Manual
Page 19
... jack using [HDMI Color Setting] option on the disc type or playing status, some SIMPLINK operation may not output. control; Play, Pause, Scan, Skip, Stop, Power Off, • If there is compatible with SIMPLINK are controlled by LG TV's remote disconnect the HDMI cable. Try switching off the player and then turn off the HDMI/DVI device and this unit and LG TV's with 720x480p, 1280x720p, 1920x1080i or 1920x1080p video input. To solve the problem, turn...
... jack using [HDMI Color Setting] option on the disc type or playing status, some SIMPLINK operation may not output. control; Play, Pause, Scan, Skip, Stop, Power Off, • If there is compatible with SIMPLINK are controlled by LG TV's remote disconnect the HDMI cable. Try switching off the player and then turn off the HDMI/DVI device and this unit and LG TV's with 720x480p, 1280x720p, 1920x1080i or 1920x1080p video input. To solve the problem, turn...
Owner's Manual
Page 21
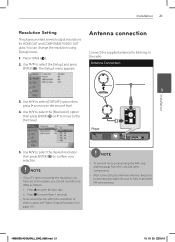
... resolution of video output, see "Video Output Resolution" on the player, you can change the resolution using [Setup] menu. 1. Antenna Connection 3 Installation 3. Use U/u to select the desired resolution then press ENTER ( ) to open the disc tray. 2. Press Z to confirm your TV does not accept the resolution you have set on page 101. Press x for more than 5 seconds. • Since several output resolutions for listening to select the [Setup] and press...
... resolution of video output, see "Video Output Resolution" on the player, you can change the resolution using [Setup] menu. 1. Antenna Connection 3 Installation 3. Use U/u to select the desired resolution then press ENTER ( ) to open the disc tray. 2. Press Z to confirm your TV does not accept the resolution you have set on page 101. Press x for more than 5 seconds. • Since several output resolutions for listening to select the [Setup] and press...

Owner's Manual
Page 23
... the unit's speakers. You can also use the F (Function) button on the unit. Connect the HDMI OUT jack of your personal computer to 480p, 720p, 1080i or 1080p. • The video signal from the HDMI input cannot be output from the component or composite video outputs. • The player sends audio from the HDMI inputs to both the HDMI output and to HDMI IN 1/2 jack, change the video resolution in the HDMI IN 1/2 mode. HDMI IN 1/2 Connection 3 Optical Connection Installation TTootthheeddiiggititaal l ooppttiiccaalloouuttppuuttjajacckk...
... the unit's speakers. You can also use the F (Function) button on the unit. Connect the HDMI OUT jack of your personal computer to 480p, 720p, 1080i or 1080p. • The video signal from the HDMI input cannot be output from the component or composite video outputs. • The player sends audio from the HDMI inputs to both the HDMI output and to HDMI IN 1/2 jack, change the video resolution in the HDMI IN 1/2 mode. HDMI IN 1/2 Connection 3 Optical Connection Installation TTootthheeddiiggititaal l ooppttiiccaalloouuttppuuttjajacckk...

Owner's Manual
Page 25
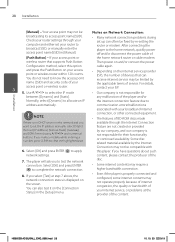
.... 10. 20 9:19 Adjust the [NETWORK] setting as follow. 1. The new connection setting resets the current network settings. Use U/u to your home network. 4. Installation 25 Wired Network Setup Before setting the wired network, you need to connect the broadband internet to select the [Wired] and press ENTER ( ). 5. Use U/u/I /i and numerical buttons. Select [Connection Setting] option in the [Setup] menu then press ENTER ( ). 3 NOTE Installation If there is a DHCP server on the local area network (LAN) via wired connection, this player will ask you make a mistake while...
.... 10. 20 9:19 Adjust the [NETWORK] setting as follow. 1. The new connection setting resets the current network settings. Use U/u to your home network. 4. Installation 25 Wired Network Setup Before setting the wired network, you need to connect the broadband internet to select the [Wired] and press ENTER ( ). 5. Use U/u/I /i and numerical buttons. Select [Connection Setting] option in the [Setup] menu then press ENTER ( ). 3 NOTE Installation If there is a DHCP server on the local area network (LAN) via wired connection, this player will ask you make a mistake while...
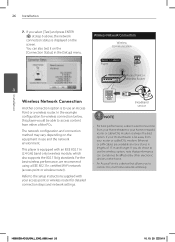
Owner's Manual
Page 26
...) wireless module, which also supports the 802.11b/g standards. This player is equipped with your home network's router or cable/DSL modem is to your access point or wireless router for wireless connection below, this player would be affected by other electronic devices in lengths of the PCs. WAN Broadband service NOTE • For best performance, a direct wired connection from your Home theatre to use and the network environment...
...) wireless module, which also supports the 802.11b/g standards. This player is equipped with your home network's router or cable/DSL modem is to your access point or wireless router for wireless connection below, this player would be affected by other electronic devices in lengths of the PCs. WAN Broadband service NOTE • For best performance, a direct wired connection from your Home theatre to use and the network environment...
Owner's Manual
Page 28
... displayed on the internet service provider (ISP), the number of the content. For details, contact your access point or wireless router. 3 5. any malfunction of service. If you select [Test] at the provider of devices that supports Push Button Then power on your access point or the home network router or cable modem. Installation 28 Installation [Manual] - and press the Push Button on and/or connect the power Configuration method, select this player...
... displayed on the internet service provider (ISP), the number of the content. For details, contact your access point or wireless router. 3 5. any malfunction of service. If you select [Test] at the provider of devices that supports Push Button Then power on your access point or the home network router or cable modem. Installation 28 Installation [Manual] - and press the Push Button on and/or connect the power Configuration method, select this player...
Owner's Manual
Page 34
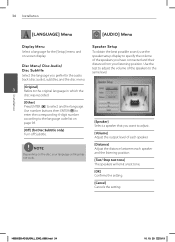
Use number buttons then ENTER ( ) to enter the corresponding 4-digit number according to adjust. [Volume] Adjust the output level of each speaker and the listening position. [Test/ Stop test tone] The speakers will emit a test tone. [OK] Confirms the setting. [Cancel] Cancels the setting. Disc Menu/ Disc Audio/ Disc Subtitle Select the language you want to the language code list on page 98. [Off ] (for Disc Subtitle only) Turn off Subtitle. [Speaker] Select a speaker that you prefer for the [Setup] menu and on the...
Use number buttons then ENTER ( ) to enter the corresponding 4-digit number according to adjust. [Volume] Adjust the output level of each speaker and the listening position. [Test/ Stop test tone] The speakers will emit a test tone. [OK] Confirms the setting. [Cancel] Cancels the setting. Disc Menu/ Disc Audio/ Disc Subtitle Select the language you want to the language code list on page 98. [Off ] (for Disc Subtitle only) Turn off Subtitle. [Speaker] Select a speaker that you prefer for the [Setup] menu and on the...
Owner's Manual
Page 37
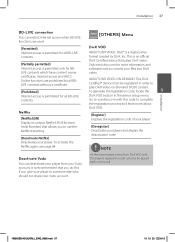
... www.divx.com for all BD-LIVE contents. Installation [Register] Displays the registration code of your player. [Deregister] Deactivate your Vudu account. All the downloaded videos from your player and display the deactivation code. Internet access and AACS Online functions are used. [OTHERS] Menu [Permitted] Internet access is permitted for all BD-LIVE contents. [Partially permitted] Internet access is recommended that you do this if you...
... www.divx.com for all BD-LIVE contents. Installation [Register] Displays the registration code of your player. [Deregister] Deactivate your Vudu account. All the downloaded videos from your player and display the deactivation code. Internet access and AACS Online functions are used. [OTHERS] Menu [Permitted] Internet access is permitted for all BD-LIVE contents. [Partially permitted] Internet access is recommended that you do this if you...

Owner's Manual
Page 38
... the connected USB storage. Installation HB905SB-AD.BUSALL_ENG_6866.indd 38 10. 10. 20 9:19 NOTE If you have to set this option to [Off ] to view the notice of Network Service Disclaimer on -line services and network settings again. Initialize Factory Set You can update the software by connecting the unit directly to [On], the unit automatically turns itself off after the Screen Saver is operated by the user. If...
... the connected USB storage. Installation HB905SB-AD.BUSALL_ENG_6866.indd 38 10. 10. 20 9:19 NOTE If you have to set this option to [Off ] to view the notice of Network Service Disclaimer on -line services and network settings again. Initialize Factory Set You can update the software by connecting the unit directly to [On], the unit automatically turns itself off after the Screen Saver is operated by the user. If...

Owner's Manual
Page 57
... iPod is not connected firmly. Press RADIO&INPUT to select iPod IN mode. your iPod, please visit www.apple.com/support/ipod. the communication between this unit. Starts playback the music or message. Operation 57 Enjoying the iPod IN mode You can operate your iPod by using the supplied remote control and controls on your iPod software to latest version. • If this unit displays an error message, follow the U/u/I/i B Selects an option in the menu...
... iPod is not connected firmly. Press RADIO&INPUT to select iPod IN mode. your iPod, please visit www.apple.com/support/ipod. the communication between this unit. Starts playback the music or message. Operation 57 Enjoying the iPod IN mode You can operate your iPod by using the supplied remote control and controls on your iPod software to latest version. • If this unit displays an error message, follow the U/u/I/i B Selects an option in the menu...

Owner's Manual
Page 58
58 Operation Radio Operations Be sure that you want. 5. Adjust the volume by rotating VOLUME on the front panel or by using TUNING (-/+). 3. Press B (blue) (MONO/STEREO) colored button on the remote control. Scanning stops when the unit tunes in . Or Press TUNING (-/+) repeatedly. 4 3. Press ENTER ( ) a preset number will flash up. "ERASE ALL" will flash in the display window. 4. The last received station is stored. 6. This will change . Press RADIO&INPUT until the TUNER (FM/ AM) appears in...
58 Operation Radio Operations Be sure that you want. 5. Adjust the volume by rotating VOLUME on the front panel or by using TUNING (-/+). 3. Press B (blue) (MONO/STEREO) colored button on the remote control. Scanning stops when the unit tunes in . Or Press TUNING (-/+) repeatedly. 4 3. Press ENTER ( ) a preset number will flash up. "ERASE ALL" will flash in the display window. 4. The last received station is stored. 6. This will change . Press RADIO&INPUT until the TUNER (FM/ AM) appears in...

Owner's Manual
Page 67
... your player before using [Deactivate Vudu] option on the setup menu (see page 99. Activating your player You must activate your LG Blu-ray disc player. 5. Operation 67 Playing VUDU videos You can deactivate streaming from Vudu to your player using the player to watch movies & TV episodes from VUDU streamed over the internet from VUDU. 1. For details on software updates, see page 37). • If a newer software is needed, a software update screen will...
... your player before using [Deactivate Vudu] option on the setup menu (see page 99. Activating your player You must activate your LG Blu-ray disc player. 5. Operation 67 Playing VUDU videos You can deactivate streaming from Vudu to your player using the player to watch movies & TV episodes from VUDU streamed over the internet from VUDU. 1. For details on software updates, see page 37). • If a newer software is needed, a software update screen will...
Owner's Manual
Page 94
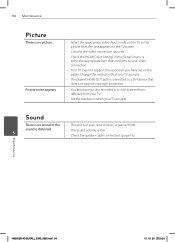
... the [HDMI Color Setting] in scan, slow motion, or pause mode. sound is distorted. 5 • The sound volume is low. • Check the speaker cable connection. (page 16) Maintenance HB905SB-AD.BUSALL_ENG_6866.indd 94 10. 10. 20 9:20 Picture noise appears • Select the appropriate video input mode on the player. 94 Maintenance Picture There is no sound or the • The unit is in the [Setup] menu is set on...
... the [HDMI Color Setting] in scan, slow motion, or pause mode. sound is distorted. 5 • The sound volume is low. • Check the speaker cable connection. (page 16) Maintenance HB905SB-AD.BUSALL_ENG_6866.indd 94 10. 10. 20 9:20 Picture noise appears • Select the appropriate video input mode on the player. 94 Maintenance Picture There is no sound or the • The unit is in the [Setup] menu is set on...
Owner's Manual
Page 95
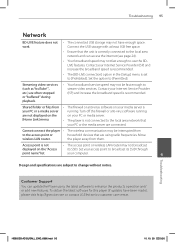
... connected to the local area network that your computer. 6 Design and specifications are often stopped or "buffered" during playback. • Your broadband service speed may not be interrupted from to the access point or household devices that the unit is set to the local area network and can update the Player using radio frequencies. To obtain the latest software for this player (if updates...
... connected to the local area network that your computer. 6 Design and specifications are often stopped or "buffered" during playback. • Your broadband service speed may not be interrupted from to the access point or household devices that the unit is set to the local area network and can update the Player using radio frequencies. To obtain the latest software for this player (if updates...
Specification
Page 2
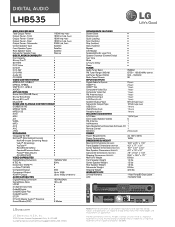
...1620kHz Radio Tuner Presets 50 Inputs/Outputs Digital Audio In (Optical) 2 (rear) HDMI™ In 2 (rear) HDMI™ Out 1 (rear) Component Video Out 1 (rear) Composite Video Out 1 (rear) FM Antenna Input 1 (rear) AM Antenna Input 1 (rear) LAN Port (RJ-45) 1 (rear) Speaker Output/Type 5/Push-type (rear) Subwoofer Output/Type 1/Push-type (rear) USB 2.0 In 1 (front) iPod/iPhone Dock 1 (front) Portable Audio In 1 (front) Included Accessories A/ V Cable 1 (RCA Type) Color-coded Speaker Cables 5 FM Antenna 1 AM Antenna 1 Nero...
...1620kHz Radio Tuner Presets 50 Inputs/Outputs Digital Audio In (Optical) 2 (rear) HDMI™ In 2 (rear) HDMI™ Out 1 (rear) Component Video Out 1 (rear) Composite Video Out 1 (rear) FM Antenna Input 1 (rear) AM Antenna Input 1 (rear) LAN Port (RJ-45) 1 (rear) Speaker Output/Type 5/Push-type (rear) Subwoofer Output/Type 1/Push-type (rear) USB 2.0 In 1 (front) iPod/iPhone Dock 1 (front) Portable Audio In 1 (front) Included Accessories A/ V Cable 1 (RCA Type) Color-coded Speaker Cables 5 FM Antenna 1 AM Antenna 1 Nero...


