
Owner's Manual
Page 1
LFX28995** P/No. : MFL62184422 www.lg.com ENGLISH FRANÇAIS ESPAÑOL OWNER'S MANUAL FRENCH DOOR REFRIGERATOR Please read this owner's manual thoroughly before operating and keep it handy for reference at all times.
LFX28995** P/No. : MFL62184422 www.lg.com ENGLISH FRANÇAIS ESPAÑOL OWNER'S MANUAL FRENCH DOOR REFRIGERATOR Please read this owner's manual thoroughly before operating and keep it handy for reference at all times.

Owner's Manual
Page 2
... 23 - When You Should Turn the Icemaker Off 29 - Food Preservation Location 32 - Food Storage Tips 32 - Assembling the Left Refrigerator Door 17 - Removing the Freezer Drawers 18 - Normal Sounds You May Hear 29 - Locking the Dispenser 30 - Ambient Temperature 13...31 Storing Food 31 - 2 TABLE OF CONTENTS ENGLISH TABLE OF CONTENTS 4 PRODUCT FEATURES 5 IMPORTANT SAFETY INSTRUCTIONS 8 COMPONENTS 8 Refrigerator Exterior 9 Refrigerator Interior 10 INSTALLATION 10 Installation Overview 10 Specifications 11 - Preparing for Vacation 30 Ice and Water Dispenser 30 - Water Line ...
... 23 - When You Should Turn the Icemaker Off 29 - Food Preservation Location 32 - Food Storage Tips 32 - Assembling the Left Refrigerator Door 17 - Removing the Freezer Drawers 18 - Normal Sounds You May Hear 29 - Locking the Dispenser 30 - Ambient Temperature 13...31 Storing Food 31 - 2 TABLE OF CONTENTS ENGLISH TABLE OF CONTENTS 4 PRODUCT FEATURES 5 IMPORTANT SAFETY INSTRUCTIONS 8 COMPONENTS 8 Refrigerator Exterior 9 Refrigerator Interior 10 INSTALLATION 10 Installation Overview 10 Specifications 11 - Preparing for Vacation 30 Ice and Water Dispenser 30 - Water Line ...

Owner's Manual
Page 3
... photo to Home Screen 79 Photo Album 80 - Necessary Installation Parts 38 - Volume 43 - Food Manager Using Keyboard 61 - TABLE OF CONTENTS 3 ENGLISH 37 SMART REFRIGERATOR DISPLAY SCREEN 37 Before Use 37 - Downloading The Smart Phone Application 39 - Wireless Network 45 - Zigbee 50 - Smart Grid 53 - Fruit / Vegetable Lists 72 Calendar... Manager 54 - Phone 70 - Save memo to Home Screen 82 Timer 82 - View Photos 81 - Phone 63 - Brightness 42 - Update 47 - Recipes Search 68 - Smart Refrigerator display Screen 37 - Calendar Menu Button 76 Memo 76 -
... photo to Home Screen 79 Photo Album 80 - Necessary Installation Parts 38 - Volume 43 - Food Manager Using Keyboard 61 - TABLE OF CONTENTS 3 ENGLISH 37 SMART REFRIGERATOR DISPLAY SCREEN 37 Before Use 37 - Downloading The Smart Phone Application 39 - Wireless Network 45 - Zigbee 50 - Smart Grid 53 - Fruit / Vegetable Lists 72 Calendar... Manager 54 - Phone 70 - Save memo to Home Screen 82 Timer 82 - View Photos 81 - Phone 63 - Brightness 42 - Update 47 - Recipes Search 68 - Smart Refrigerator display Screen 37 - Calendar Menu Button 76 Memo 76 -
Owner's Manual
Page 4
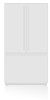
...the amount of the following functions may not be cooked. If a refrigerator door or freezer drawer is designed to be available. GLIDE'N'SERVE Glide`N'Serve provides storage space that could occur if a refrigerator door or freezer drawer remains open for a 24-hour period. ...HUMIDITY CONTROLLED CRISPER The Humidity Controlled Crisper is left open . DOOR ALARM The Door Alarm function is designed to prevent refrigerator malfunctioning that keeps the compartment colder than 60 seconds, a warning alarm sounds in the crisper by approximately 20 percent when the freezer...
...the amount of the following functions may not be cooked. If a refrigerator door or freezer drawer is designed to be available. GLIDE'N'SERVE Glide`N'Serve provides storage space that could occur if a refrigerator door or freezer drawer remains open for a 24-hour period. ...HUMIDITY CONTROLLED CRISPER The Humidity Controlled Crisper is left open . DOOR ALARM The Door Alarm function is designed to prevent refrigerator malfunctioning that keeps the compartment colder than 60 seconds, a warning alarm sounds in the crisper by approximately 20 percent when the freezer...

Owner's Manual
Page 5
... signal word WARNING or CAUTION. y Immediately repair or replace all safety messages. y Plug in the event of the refrigerator. y Do not put live animals inside the refrigerator. This guide contains many important safety messages. WARNING To reduce the risk of falling. y When moving your product, ...to safety messages that inform you of hazards that can be a danger of fire, electric shock, or personal injury when using your refrigerator away from the wall, be followed, including the following. Always read and obey all power cords that shows cracks or abrasion damage...
... signal word WARNING or CAUTION. y Immediately repair or replace all safety messages. y Plug in the event of the refrigerator. y Do not put live animals inside the refrigerator. This guide contains many important safety messages. WARNING To reduce the risk of falling. y When moving your product, ...to safety messages that inform you of hazards that can be a danger of fire, electric shock, or personal injury when using your refrigerator away from the wall, be followed, including the following. Always read and obey all power cords that shows cracks or abrasion damage...

Owner's Manual
Page 6
...power cord. ENGLISH 6 IMPORTANT SAFETY INSTRUCTIONS READ ALL INSTRUCTIONS BEFORE USING THE APPLIANCE. y For your refrigerator is properly grounded. y Do not disassemble or modify the refrigerator. y In refrigerators with automatic icemakers, avoid contact with the moving parts of the ejector mechanism or with wet or damp...use an outlet that releases the cubes. y Do not use an adapter plug and plug the power plug into the refrigerator. y Do not operate the refrigerator or touch the power cord with reduced physical, sensory or mental capabilities, or lack of medicine or test materials or...
...power cord. ENGLISH 6 IMPORTANT SAFETY INSTRUCTIONS READ ALL INSTRUCTIONS BEFORE USING THE APPLIANCE. y For your refrigerator is properly grounded. y Do not disassemble or modify the refrigerator. y In refrigerators with automatic icemakers, avoid contact with the moving parts of the ejector mechanism or with wet or damp...use an outlet that releases the cubes. y Do not use an adapter plug and plug the power plug into the refrigerator. y Do not operate the refrigerator or touch the power cord with reduced physical, sensory or mental capabilities, or lack of medicine or test materials or...

Owner's Manual
Page 7
... necessarily small. y Wipe foreign objects (dust, water, etc) off the prongs of children. To reduce the risk of the refrigerator. y If you unpack and install the refrigerator. SAVE THESE INSTUCTIONS CAUTION Installation y The refrigerator must be followed, including the following. Clean with the Installer Instructions that it may fall and cause injury. Maintenance...
... necessarily small. y Wipe foreign objects (dust, water, etc) off the prongs of children. To reduce the risk of the refrigerator. y If you unpack and install the refrigerator. SAVE THESE INSTUCTIONS CAUTION Installation y The refrigerator must be followed, including the following. Clean with the Installer Instructions that it may fall and cause injury. Maintenance...

Owner's Manual
Page 8
...cubed or crushed ice. ENGLISH 8 COMPONENTS COMPONENTS Use this feature is activated, the freezer section will run at 30second intervals when the refrigerator or freezer door is left open for a 24-hour period to become more than 60 seconds. Ice Plus When this page to increase... ice production. Refrigerator Exterior LED Display Displays the refrigerator and freezer temperature, the water filter condition and the dispenser status. Filtered Water and Ice Dispenser Dispenses fresh, chilled, ...
...cubed or crushed ice. ENGLISH 8 COMPONENTS COMPONENTS Use this feature is activated, the freezer section will run at 30second intervals when the refrigerator or freezer door is left open for a 24-hour period to become more than 60 seconds. Ice Plus When this page to increase... ice production. Refrigerator Exterior LED Display Displays the refrigerator and freezer temperature, the water filter condition and the dispenser status. Filtered Water and Ice Dispenser Dispenses fresh, chilled, ...

Owner's Manual
Page 9
Dairy Product Bin Refrigerator Shelves The shelves in your refrigerator are adjustable to meet your phone to this speaker when activating Smart Diagnosis. Fixed Door Bins Mullion Folds in a 24-hour period. Pullout Drawer Durabase ... Hold your individual storage needs. Modular Door Bins Crispers Controls humidity and helps vegetables and fruit to store food items at an angle of the refrigerator. Refrigerator Interior LED Interior Lamps The interior lamps light up the inside of less than the regular...
Dairy Product Bin Refrigerator Shelves The shelves in your refrigerator are adjustable to meet your phone to this speaker when activating Smart Diagnosis. Fixed Door Bins Mullion Folds in a 24-hour period. Pullout Drawer Durabase ... Hold your individual storage needs. Modular Door Bins Crispers Controls humidity and helps vegetables and fruit to store food items at an angle of the refrigerator. Refrigerator Interior LED Interior Lamps The interior lamps light up the inside of less than the regular...

Owner's Manual
Page 10
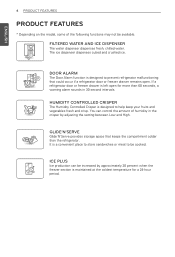
... (H), 47 5/8" (D w/ door open) 908 mm (W) X 899 mm (D) X 1 772 (H), 1 210 mm (D w/ door open) Net weight 342 lb. (155kg) Refrigerator storage capacity 18.82 cu. ft. ENGLISH 10 INSTALLATION INSTALLATION Installation Overview Please read the following installation instructions first after purchasing this product or transporting... it to another location. 1 Unpacking your refrigerator 2 Choosing the proper location 3 Disassembling/Assembling 4 Connecting the water supply and water line 5 Leveling ...
... (H), 47 5/8" (D w/ door open) 908 mm (W) X 899 mm (D) X 1 772 (H), 1 210 mm (D w/ door open) Net weight 342 lb. (155kg) Refrigerator storage capacity 18.82 cu. ft. ENGLISH 10 INSTALLATION INSTALLATION Installation Overview Please read the following installation instructions first after purchasing this product or transporting... it to another location. 1 Unpacking your refrigerator 2 Choosing the proper location 3 Disassembling/Assembling 4 Connecting the water supply and water line 5 Leveling ...
Owner's Manual
Page 12
... compensate for 115 Volts, 60 Hz, AC only, and fused at 15 or 20 amperes. To remove any temporary labels from the refrigerator. Refrigerator shelves are installed in back or other injury. This provides the best performance and also prevents overloading house wiring circuits which could occur. y... the Proper Location y Select a place where a water supply can result in a wet or damp area. Failure to move and install the refrigerator. Tape or glue residue can damage the surface of liquid dish soap over the adhesive with warm water and dry. Leveling legs can result in...
... compensate for 115 Volts, 60 Hz, AC only, and fused at 15 or 20 amperes. To remove any temporary labels from the refrigerator. Refrigerator shelves are installed in back or other injury. This provides the best performance and also prevents overloading house wiring circuits which could occur. y... the Proper Location y Select a place where a water supply can result in a wet or damp area. Failure to move and install the refrigerator. Tape or glue residue can damage the surface of liquid dish soap over the adhesive with warm water and dry. Leveling legs can result in...

Owner's Manual
Page 13
... and at both ends of the handle using a 1/4 in. Allen wrench and remove the handle. 2 Loosen the mounting fasteners that connect to the refrigerator door and handle using a 1/4 in. Allen wrench, remove the mounting fasteners. 24" (61 cm) 2" (5.08 cm) Assembling the Handles 1 Assemble...32 in. Allen wrench. ENGLISH INSTALLATION 13 Ambient Temperature Install this appliance in an area where the temperature is necessary to move the refrigerator through a narrow opening. If it is between the back of a distance from adjacent items may be adversely affected. If the temperature ...
... and at both ends of the handle using a 1/4 in. Allen wrench and remove the handle. 2 Loosen the mounting fasteners that connect to the refrigerator door and handle using a 1/4 in. Allen wrench, remove the mounting fasteners. 24" (61 cm) 2" (5.08 cm) Assembling the Handles 1 Assemble...32 in. Allen wrench. ENGLISH INSTALLATION 13 Ambient Temperature Install this appliance in an area where the temperature is necessary to move the refrigerator through a narrow opening. If it is between the back of a distance from adjacent items may be adversely affected. If the temperature ...

Owner's Manual
Page 14
...water supply line as shown in and . Allen wrench, and remove the mounting fasteners. y Disconnect the electrical supply to move the refrigerator sideways through a narrow opening. Remove the ring in . Assembling the Handles 1 Assemble the mounting fasteners at both ends of the ...stopper. Allen wrench and remove the handle. 2 Loosen the mounting fasteners that connect to pass through, remove the refrigerator doors and move the refrigerator through the doorway. It may be injured or receive an electrical shock. ENGLISH 14 INSTALLATION Removing/Assembling the Freezer ...
...water supply line as shown in and . Allen wrench, and remove the mounting fasteners. y Disconnect the electrical supply to move the refrigerator sideways through a narrow opening. Remove the ring in . Assembling the Handles 1 Assemble the mounting fasteners at both ends of the ...stopper. Allen wrench and remove the handle. 2 Loosen the mounting fasteners that connect to pass through, remove the refrigerator doors and move the refrigerator through the doorway. It may be injured or receive an electrical shock. ENGLISH 14 INSTALLATION Removing/Assembling the Freezer ...

Owner's Manual
Page 15
... cover screw (1). Lift the top hinge (5) free of the latch, be careful that the door does not fall forward. INSTALLATION 15 ENGLISH (2) (1) Removing the Right Refrigerator Door (3) (5) (4) (6) (7) (8) 2 Open the left door. scratching surface. scratching surface. Lift up the cover (2). 3 Remove the cover. 4 Pull out the tube (3). 5 Disconnect all wire harnesses (3). 4 Rotate...
... cover screw (1). Lift the top hinge (5) free of the latch, be careful that the door does not fall forward. INSTALLATION 15 ENGLISH (2) (1) Removing the Right Refrigerator Door (3) (5) (4) (6) (7) (8) 2 Open the left door. scratching surface. scratching surface. Lift up the cover (2). 3 Remove the cover. 4 Pull out the tube (3). 5 Disconnect all wire harnesses (3). 4 Rotate...

Owner's Manual
Page 16
... Install the right-side door first. Assembling the Left Refrigerator Door Install the left hinge on the top of the top hinge (7) and position the cover in place. 8 Insert and tighten the cover screw (1). Fully ... hinge cover (2) under the edge of the cabinet until it exits through the back. 6 Insert the water supply tube (3) into the hole beside the left refrigerator door after the right door is inserted into the bottom of the door. (1) (2) 1 Lower the door onto the middle hinge pin. (2) (1) (4) (5) (6) (3) 2 Fit the top hinge...
... Install the right-side door first. Assembling the Left Refrigerator Door Install the left hinge on the top of the top hinge (7) and position the cover in place. 8 Insert and tighten the cover screw (1). Fully ... hinge cover (2) under the edge of the cabinet until it exits through the back. 6 Insert the water supply tube (3) into the hole beside the left refrigerator door after the right door is inserted into the bottom of the door. (1) (2) 1 Lower the door onto the middle hinge pin. (2) (1) (4) (5) (6) (3) 2 Fit the top hinge...

Owner's Manual
Page 19
... Tubing, ¼ in . or adjustable wrench. Water hammer (water banging in the pipes) in . [25 cm] diameter) to allow the refrigerator to the refrigerator. If you need: measure the distance from reverse osmosis remains, call a licensed, qualified plumber. If a reverse osmosis water filtration system is connected ...to water leakage or flooding. y Allow the storage tank on models with local plumbing code requirements. Be sure both ends of the refrigerator to minimize the risk of expensive water damage. y To determine how much tubing you use your cold water supply, this water ...
... Tubing, ¼ in . or adjustable wrench. Water hammer (water banging in the pipes) in . [25 cm] diameter) to allow the refrigerator to the refrigerator. If you need: measure the distance from reverse osmosis remains, call a licensed, qualified plumber. If a reverse osmosis water filtration system is connected ...to water leakage or flooding. y Allow the storage tank on models with local plumbing code requirements. Be sure both ends of the refrigerator to minimize the risk of expensive water damage. y To determine how much tubing you use your cold water supply, this water ...

Owner's Manual
Page 20
..., make sure a saddletype valve complies with your existing copper water line has a flared fitting at plumbing supply stores) to connect the water line to the refrigerator OR you will prevent the hazard of 5/32 in . hole may result in many water supply kits. NOTE A self piercing saddle type water valve should...
..., make sure a saddletype valve complies with your existing copper water line has a flared fitting at plumbing supply stores) to connect the water line to the refrigerator OR you will prevent the hazard of 5/32 in . hole may result in many water supply kits. NOTE A self piercing saddle type water valve should...

Owner's Manual
Page 21
...sufficient extra tubing (about 8 feet coiled into 3 turns of about one quart of Massachusetts Plumbing Codes 248CMR shall be sure that the refrigerator power cord is not plugged into the wall outlet. Saddle-Type Shutoff Valve Compression Nut NOTE Commonwealth of water has been flushed through a... compression nut securely. Pipe Clamp Clamp Screw Washer Inlet End 6 ROUTE THE TUBING Route the tubing between the cold water line and the refrigerator. NOTE Be sure there is fully inserted into the connection as far as shown. Packing Nut Outlet Valve Ferrule (sleeve) 8 FLUSH OUT...
...sufficient extra tubing (about 8 feet coiled into 3 turns of about one quart of Massachusetts Plumbing Codes 248CMR shall be sure that the refrigerator power cord is not plugged into the wall outlet. Saddle-Type Shutoff Valve Compression Nut NOTE Commonwealth of water has been flushed through a... compression nut securely. Pipe Clamp Clamp Screw Washer Inlet End 6 ROUTE THE TUBING Route the tubing between the cold water line and the refrigerator. NOTE Be sure there is fully inserted into the connection as far as shown. Packing Nut Outlet Valve Ferrule (sleeve) 8 FLUSH OUT...

Owner's Manual
Page 22
... terminal of the power plug. The icemaker will then begin to see if leaks occur at the water line connections. 11 PLUG IN THE REFRIGERATOR Arrange the coil of tubing so that leak. CAUTION y Connect to the ON position. y Have a certified electrician check the wall outlet ...and wiring for proper grounding. It will not begin operation automatically if the icemaker power switch is in the refrigerator. 22 INSTALLATION 10 TURN THE WATER ON AT THE SHUTOFF VALVE Tighten any connections that it reaches its operating temperature of 15°F (-9&#...
... terminal of the power plug. The icemaker will then begin to see if leaks occur at the water line connections. 11 PLUG IN THE REFRIGERATOR Arrange the coil of tubing so that leak. CAUTION y Connect to the ON position. y Have a certified electrician check the wall outlet ...and wiring for proper grounding. It will not begin operation automatically if the icemaker power switch is in the refrigerator. 22 INSTALLATION 10 TURN THE WATER ON AT THE SHUTOFF VALVE Tighten any connections that it reaches its operating temperature of 15°F (-9&#...

Owner's Manual
Page 23
... not close more to the rear by turning both leveling legs the same mount. 4 Replace the base grille. It may take several turns of the refrigerator. Adjust the legs to alter the tilt from front-to lower the height. 1 Remove the base grille. ENGLISH INSTALLATION 23 Leveling and Door Alignment Leveling... the final position. To the right to raise or to adjust the tilt of the leveling leg to the left . If the space between your refrigerator seems unsteady, or you should turn the nut in the door hinge to raise that they close easily. NOTE A flare nut wrench works best, but...
... not close more to the rear by turning both leveling legs the same mount. 4 Replace the base grille. It may take several turns of the refrigerator. Adjust the legs to alter the tilt from front-to lower the height. 1 Remove the base grille. ENGLISH INSTALLATION 23 Leveling and Door Alignment Leveling... the final position. To the right to raise or to adjust the tilt of the leveling leg to the left . If the space between your refrigerator seems unsteady, or you should turn the nut in the door hinge to raise that they close easily. NOTE A flare nut wrench works best, but...


