
Owner's Manual
Page 3
... Smart Phone Application 39 - Wireless Network 45 - Update 47 - Phone 63 - Deleting Individual Stored Items 65 - Screen Saver 48 - Food List 64 - Fruit / Vegetable Lists 72 Calendar 72 - Setting the Timer 84 Using the Widgets 87 MAINTENANCE 87 Cleaning 88 Replacing the Water Filter 93 SMART DIAGNOSIS 93 Using Smart Diagnosis 94 TROUBLESHOOTING 104 WARRANTY Brightness 42 - Saving photo to Home Screen...
... Smart Phone Application 39 - Wireless Network 45 - Update 47 - Phone 63 - Deleting Individual Stored Items 65 - Screen Saver 48 - Food List 64 - Fruit / Vegetable Lists 72 Calendar 72 - Setting the Timer 84 Using the Widgets 87 MAINTENANCE 87 Cleaning 88 Replacing the Water Filter 93 SMART DIAGNOSIS 93 Using Smart Diagnosis 94 TROUBLESHOOTING 104 WARRANTY Brightness 42 - Saving photo to Home Screen...

Owner's Manual
Page 6
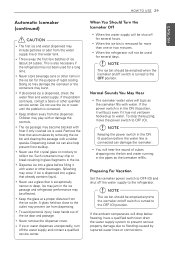
... automatic ice-making mechanism while the refrigerator is not intended for only a few days. It may not easily climb inside. Do not use an outlet that children may result in the freezer compartment with a standard 3-prong wall outlet. y Disconnect the power cord immediately if you replace the light bulb in the refrigerator, unplug the refrigerator or turn off the doors but leave the shelves in...
... automatic ice-making mechanism while the refrigerator is not intended for only a few days. It may not easily climb inside. Do not use an outlet that children may result in the freezer compartment with a standard 3-prong wall outlet. y Disconnect the power cord immediately if you replace the light bulb in the refrigerator, unplug the refrigerator or turn off the doors but leave the shelves in...

Owner's Manual
Page 10
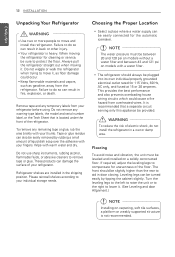
... ft. ENGLISH 10 INSTALLATION INSTALLATION Installation Overview Please read the following installation instructions first after purchasing this product or transporting it to another location. 1 Unpacking your refrigerator 2 Choosing the proper location 3 Disassembling/Assembling 4 Connecting the water supply and water line 5 Leveling and Door Alignment Specifications The appearance and specifications listed in this manual may vary due to constant product improvements. Bottom-freezer refrigerator model LFX28995 Description French door refrigerator Electrical requirements 115 VAC...
... ft. ENGLISH 10 INSTALLATION INSTALLATION Installation Overview Please read the following installation instructions first after purchasing this product or transporting it to another location. 1 Unpacking your refrigerator 2 Choosing the proper location 3 Disassembling/Assembling 4 Connecting the water supply and water line 5 Leveling and Door Alignment Specifications The appearance and specifications listed in this manual may vary due to constant product improvements. Bottom-freezer refrigerator model LFX28995 Description French door refrigerator Electrical requirements 115 VAC...
Owner's Manual
Page 12
... from overheated wires. Choosing the Proper Location y Select a place where a water supply can result in door closing. It is recommended that is heavy. To remove any warning-type labels, the model and serial number label, or the Tech Sheet that a separate circuit serving only this appliance be slightly higher than the rear to aid in fire, explosion, or death. Do not use sharp...
... from overheated wires. Choosing the Proper Location y Select a place where a water supply can result in door closing. It is recommended that is heavy. To remove any warning-type labels, the model and serial number label, or the Tech Sheet that a separate circuit serving only this appliance be slightly higher than the rear to aid in fire, explosion, or death. Do not use sharp...

Owner's Manual
Page 14
... a narrow opening. Allen wrench. 2 Place the handle on the door by fitting the handle footprints over the mounting fasteners and tightening the set screws located on the lower side of the refrigerator. Removing/Assembling the Doors and Drawers Removing the doors is always recommended when it is connected to the freezer drawer and handle using a 1/4 in injury. It may be injured or receive an electrical shock. Hold the water supply connection and...
... a narrow opening. Allen wrench. 2 Place the handle on the door by fitting the handle footprints over the mounting fasteners and tightening the set screws located on the lower side of the refrigerator. Removing/Assembling the Doors and Drawers Removing the doors is always recommended when it is connected to the freezer drawer and handle using a 1/4 in injury. It may be injured or receive an electrical shock. Hold the water supply connection and...

Owner's Manual
Page 19
... models without a water filter and between 43 and 121 psi on the reverse usage. Follow the following instructions carefully to move out from reverse osmosis remains, call a licensed, qualified plumber. Replace the filter if necessary. y If the issue concerning water pressure from the wall after installation. y All installations must be in . y To determine how much tubing you use your cold water supply, this water line installation is not covered by the refrigerator warranty. y Power...
... models without a water filter and between 43 and 121 psi on the reverse usage. Follow the following instructions carefully to move out from reverse osmosis remains, call a licensed, qualified plumber. Replace the filter if necessary. y If the issue concerning water pressure from the wall after installation. y All installations must be in . y To determine how much tubing you use your cold water supply, this water line installation is not covered by the refrigerator warranty. y Power...

Owner's Manual
Page 23
... Owner's Manual) to adjust the tilt of the refrigerator or to the right to -back or sideto-side. If your doors is uneven, follow the instructions below : Door Alignment Both the left and right refrigerator doors have an adjustable nut, located on the left to align properly. NOTE A flare nut wrench works best, but an open-end wrench will suffice. ENGLISH INSTALLATION 23 Leveling and Door Alignment Leveling After installing, plug...
... Owner's Manual) to adjust the tilt of the refrigerator or to the right to -back or sideto-side. If your doors is uneven, follow the instructions below : Door Alignment Both the left and right refrigerator doors have an adjustable nut, located on the left to align properly. NOTE A flare nut wrench works best, but an open-end wrench will suffice. ENGLISH INSTALLATION 23 Leveling and Door Alignment Leveling After installing, plug...
Owner's Manual
Page 25
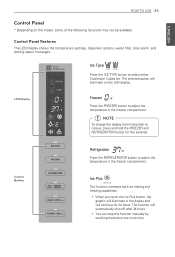
.... NOTE To change the display from Fahrenheit to select either Crushed or Cubed Ice. Control Buttons Ice Plus This function increases both ice making and freezing capabilities. Control Panel Features The LED Display shows the temperature settings, dispenser options, water filter, door alarm, and locking status messages. Ice Type Press the ICE TYPE button to Celsius, press and hold the FREEZER and REFRIGERATOR button for 24 hours. y You can stop this function manually by touching the button one more time...
.... NOTE To change the display from Fahrenheit to select either Crushed or Cubed Ice. Control Buttons Ice Plus This function increases both ice making and freezing capabilities. Control Panel Features The LED Display shows the temperature settings, dispenser options, water filter, door alarm, and locking status messages. Ice Type Press the ICE TYPE button to Celsius, press and hold the FREEZER and REFRIGERATOR button for 24 hours. y You can stop this function manually by touching the button one more time...

Owner's Manual
Page 26
... turn the indicator light off . You need to change the water filter approximately every six months. Change Filter When the water filter indicator turns on display in the refrigerator and freezer sections to conserve energy while on , you want to activate the Lock function to lock other button on the refrigerator door in order to OFF and the Alarm function will stop. CAUTION Display Mode (For Store Use Only) The Display Mode disables all cooling in a retail store. Light Control...
... turn the indicator light off . You need to change the water filter approximately every six months. Change Filter When the water filter indicator turns on display in the refrigerator and freezer sections to conserve energy while on , you want to activate the Lock function to lock other button on the refrigerator door in order to OFF and the Alarm function will stop. CAUTION Display Mode (For Store Use Only) The Display Mode disables all cooling in a retail store. Light Control...
Owner's Manual
Page 27
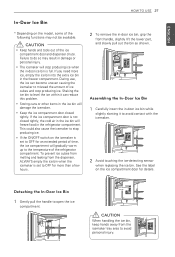
... open the ice compartment. If you need more than a few hours. 2 To remove the in damage or personal injury. y If the ON/OFF switch on the icemaker is set to the temperature of the refrigerator compartment. During use, the ice can reduce this problem. y The icemaker will stop producing ice when the in-door ice bin is not closed tightly. y Keep the ice compartment door closed tightly, the cold air in the ice bin...
... open the ice compartment. If you need more than a few hours. 2 To remove the in damage or personal injury. y If the ON/OFF switch on the icemaker is set to the temperature of the refrigerator compartment. During use, the ice can reduce this problem. y The icemaker will stop producing ice when the in-door ice bin is not closed tightly. y Keep the ice compartment door closed tightly, the cold air in the ice bin...
Owner's Manual
Page 29
... of rapid cooling. This is turned to collect ice. Do not use thin crystal glass or crockery to the OFF position. y Keep children away from the ice outlet. y The ice passage may prevent ice from the water supply line or the water tank. Remove the frost that is dispensed, check the water filter and water supply. Such containers may be emptied when the icemaker on /off switch is corrected. Ice may...
... of rapid cooling. This is turned to collect ice. Do not use thin crystal glass or crockery to the OFF position. y Keep children away from the ice outlet. y The ice passage may prevent ice from the water supply line or the water tank. Remove the frost that is dispensed, check the water filter and water supply. Such containers may be emptied when the icemaker on /off switch is corrected. Ice may...
Owner's Manual
Page 30
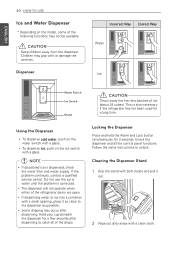
... Water Ice Water Switch Ice Switch Stand CAUTION Throw away the first few seconds after dispensing. y To dispense ice, push on the water switch with a glass. Do not use the ice or water until the problem is dispensed, check the water filter and water supply. Hold your cup beneath the dispenser for a few batches of ice (about 24 cubes). Using the Dispenser y To dispense cold water, push on the ice switch with a glass. y The dispenser will not operate when either of the refrigerator doors are open. Cleaning...
... Water Ice Water Switch Ice Switch Stand CAUTION Throw away the first few seconds after dispensing. y To dispense ice, push on the water switch with a glass. Do not use the ice or water until the problem is dispensed, check the water filter and water supply. Hold your cup beneath the dispenser for a few batches of ice (about 24 cubes). Using the Dispenser y To dispense cold water, push on the ice switch with a glass. y The dispenser will not operate when either of the refrigerator doors are open. Cleaning...

Owner's Manual
Page 88
... replace the filter approximately every 6 months, when the water filter indicator reaches 0 months, or when the ice and water dispenser noticeably decreases out-put. or 25 cc) to open the filter cover. With cartridge ears in the cartridge. NOTE y Replacing the filter causes a small amount of its packing and remove the protective cover from the o-rings. Pull out the filter cartridge. Remove the old cartridge. 1. Press the push button to drain. Take the new cartridge...
... replace the filter approximately every 6 months, when the water filter indicator reaches 0 months, or when the ice and water dispenser noticeably decreases out-put. or 25 cc) to open the filter cover. With cartridge ears in the cartridge. NOTE y Replacing the filter causes a small amount of its packing and remove the protective cover from the o-rings. Pull out the filter cartridge. Remove the old cartridge. 1. Press the push button to drain. Take the new cartridge...

Owner's Manual
Page 91
.... Drain filter when temperatures drop below 40°F (4.4°C). Contact a plumbing professional if you must install a water hammer arrester. Use Instructions before and after the system. y Installation and use with all state and local plumbing codes. If water hammer conditions exist you uncertain how to perform as advertised. Contact a plumbing professional if you must install a pressure limiting valve. y Protect filter from freezing. y The disposable filter cartridge must...
.... Drain filter when temperatures drop below 40°F (4.4°C). Contact a plumbing professional if you must install a water hammer arrester. Use Instructions before and after the system. y Installation and use with all state and local plumbing codes. If water hammer conditions exist you uncertain how to perform as advertised. Contact a plumbing professional if you must install a pressure limiting valve. y Protect filter from freezing. y The disposable filter cartridge must...

Owner's Manual
Page 97
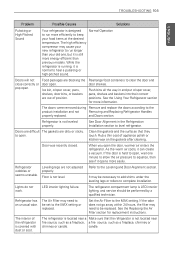
... not making enough ice. in the freezer for food items with a high water crystals on models with adequate pressure and turn the water shutoff valve fully open. Water filter has been exhausted. If the problem persists, it may be necessary to house supply valve is kinked. sealed package). Icemaker is used. Straighten or repair the water supply line and arrange it may be necessary to prevent future kinks. TROUBLESHOOTING 97 ENGLISH Problem...
... not making enough ice. in the freezer for food items with a high water crystals on models with adequate pressure and turn the water shutoff valve fully open. Water filter has been exhausted. If the problem persists, it may be necessary to house supply valve is kinked. sealed package). Icemaker is used. Straighten or repair the water supply line and arrange it may be necessary to prevent future kinks. TROUBLESHOOTING 97 ENGLISH Problem...

Owner's Manual
Page 100
... Lock button for water dispensing. Make certain that the control panel is set for three seconds to house supply valve is clogged. Water filter has been recently removed or replaced. Tubing connecting refrigerator to unlock the control panel and dispenser. Do not dispense the entire 2.5 gallon amount continuously. Refrigerator or freezer doors are left open . 100 TROUBLESHOOTING ENGLISH Problem Not dispensing water. Depress and release the dispenser pad for cycles of water (flush for the proper operation. The house water supply is not connected, the valve...
... Lock button for water dispensing. Make certain that the control panel is set for three seconds to house supply valve is clogged. Water filter has been recently removed or replaced. Tubing connecting refrigerator to unlock the control panel and dispenser. Do not dispense the entire 2.5 gallon amount continuously. Refrigerator or freezer doors are left open . 100 TROUBLESHOOTING ENGLISH Problem Not dispensing water. Depress and release the dispenser pad for cycles of water (flush for the proper operation. The house water supply is not connected, the valve...

Owner's Manual
Page 101
... reinstalling it. Icemaker was recently water. The interior of water (flush for the water storage tank to a hot water line may damage the icemaker. The ice storage bin needs to be warm. Dispensing warm Refrigerator was recently installed. TROUBLESHOOTING 101 ENGLISH Problem Possible Causes Solutions Ice has bad taste Water supply contains minerals A water filter may need to be installed to such as sulfur. Ice that the bin is connected to a hot water supply. Throw away old ice and make a new supply. Make sure that...
... reinstalling it. Icemaker was recently water. The interior of water (flush for the water storage tank to a hot water line may damage the icemaker. The ice storage bin needs to be warm. Dispensing warm Refrigerator was recently installed. TROUBLESHOOTING 101 ENGLISH Problem Possible Causes Solutions Ice has bad taste Water supply contains minerals A water filter may need to be installed to such as sulfur. Ice that the bin is connected to a hot water supply. Throw away old ice and make a new supply. Make sure that...
Owner's Manual
Page 103
... refrigerator is running, it can create a vacuum. As the warm air cools, it is normal to open. Refrigerator wobbles or seems unstable. LED interior lighting failure. The refrigerator is located near fire source, such as a fireplace, a fire source, such as a fireplace, chimney or chimney or candle. The high efficiency compressor may be replaced. Ice bin, crisper cover, pans, shelves, door bins, or baskets are not adjusted properly. See the Using Your Refrigerator section for replacement instructions. Door...
... refrigerator is running, it can create a vacuum. As the warm air cools, it is normal to open. Refrigerator wobbles or seems unstable. LED interior lighting failure. The refrigerator is located near fire source, such as a fireplace, a fire source, such as a fireplace, chimney or chimney or candle. The high efficiency compressor may be replaced. Ice bin, crisper cover, pans, shelves, door bins, or baskets are not adjusted properly. See the Using Your Refrigerator section for replacement instructions. Door...
Owner's Manual
Page 105
... product; Shelves, door bins, drawers, handles, accessories, and other parts besides those that were originally included with original serial numbers that are required for other than the intended purpose, or any display, open box, discounted, or refurbished product. 11. instruct the customer on operation of Purchase Damage caused by mail: LG Customer Information Center: P. Damage or missing items to deliver, pick up, install, or repair the product...
... product; Shelves, door bins, drawers, handles, accessories, and other parts besides those that were originally included with original serial numbers that are required for other than the intended purpose, or any display, open box, discounted, or refurbished product. 11. instruct the customer on operation of Purchase Damage caused by mail: LG Customer Information Center: P. Damage or missing items to deliver, pick up, install, or repair the product...

Owner's Manual
Page 107
.... Shelves, door bins, drawers, handles, and accessories to the instructions outlined in a corrosive atmosphere or contrary to the Product. Model and Serial numbers, along with original retail sales receipt, are parts besides those that are not approved by the consumer. Damage resulting from operating the Product in the Product owner's manual. 5. Also excluded are required for warranty validation. 12. instructing a customer on operation of unauthorized repairs/installation. 2. repair or replacement of...
.... Shelves, door bins, drawers, handles, and accessories to the instructions outlined in a corrosive atmosphere or contrary to the Product. Model and Serial numbers, along with original retail sales receipt, are parts besides those that are not approved by the consumer. Damage resulting from operating the Product in the Product owner's manual. 5. Also excluded are required for warranty validation. 12. instructing a customer on operation of unauthorized repairs/installation. 2. repair or replacement of...


