Owner's Manual
Page 1
LFX25973** P/No. : MFL62184517 www.lg.com ENGLISH FRANÇAIS ESPAÑOL OWNER'S MANUAL FRENCH DOOR REFRIGERATOR Please read this owner's manual thoroughly before operating and keep it handy for reference at all times.
LFX25973** P/No. : MFL62184517 www.lg.com ENGLISH FRANÇAIS ESPAÑOL OWNER'S MANUAL FRENCH DOOR REFRIGERATOR Please read this owner's manual thoroughly before operating and keep it handy for reference at all times.
Owner's Manual
Page 2
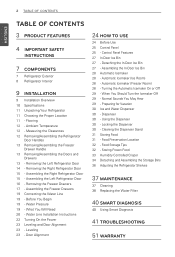
... for Vacation 30 Ice and Water Dispenser 30 - Cleaning the Dispenser Stand 31 Storing Food 31 - Food Storage Tips 32 - Assembling the Right Refrigerator Door 15 - Removing the Freezer Drawers 17 - Door Alignment 24 HOW TO USE 24 Before Use 25 Control Panel 25 - Automatic Icemaker (Ice...19 Connecting the Water Line 19 - Before You Begin 19 - Normal Sounds You May Hear 29 - Measuring the Clearances 12 Removing/Assembling the Refrigerator Door Handles 13 Removing/Assembling the Freezer Drawer Handle 13 Removing/Assembling the Doors and Drawers 13 - Leveling 23 - Water Pressure 19 - ...
... for Vacation 30 Ice and Water Dispenser 30 - Cleaning the Dispenser Stand 31 Storing Food 31 - Food Storage Tips 32 - Assembling the Right Refrigerator Door 15 - Removing the Freezer Drawers 17 - Door Alignment 24 HOW TO USE 24 Before Use 25 Control Panel 25 - Automatic Icemaker (Ice...19 Connecting the Water Line 19 - Before You Begin 19 - Normal Sounds You May Hear 29 - Measuring the Clearances 12 Removing/Assembling the Refrigerator Door Handles 13 Removing/Assembling the Freezer Drawer Handle 13 Removing/Assembling the Doors and Drawers 13 - Leveling 23 - Water Pressure 19 - ...
Owner's Manual
Page 3
...by adjusting the setting between Low and High. DOOR ALARM The Door Alarm function is left open . It is designed to prevent refrigerator malfunctioning that keeps the compartment colder than 60 seconds, a warning alarm sounds in the crisper by approximately 20 percent when the ...freezer section is maintained at the coldest temperature for more than the refrigerator. If a refrigerator door or freezer drawer is designed to help keep your fruits and vegetables fresh and crisp. The ice dispenser dispenses cubed and...
...by adjusting the setting between Low and High. DOOR ALARM The Door Alarm function is left open . It is designed to prevent refrigerator malfunctioning that keeps the compartment colder than 60 seconds, a warning alarm sounds in the crisper by approximately 20 percent when the ...freezer section is maintained at the coldest temperature for more than the refrigerator. If a refrigerator door or freezer drawer is designed to help keep your fruits and vegetables fresh and crisp. The ice dispenser dispenses cubed and...

Owner's Manual
Page 4
...safety alert symbol and the hazard signal word WARNING or CAUTION. Always grip the plug firmly and pull it is in the event of the refrigerator. y When moving your product, basic safety precautions should be a danger of a gas leak (propane/LPG), ventilate sufficiently and contact an ...authorized service center before use . y Do not place heavy objects on the refrigerator. All safety messages will be careful not to use an uncertified power outlet. It is the safety alert symbol. y Do not place heavy or...
...safety alert symbol and the hazard signal word WARNING or CAUTION. Always grip the plug firmly and pull it is in the event of the refrigerator. y When moving your product, basic safety precautions should be a danger of a gas leak (propane/LPG), ventilate sufficiently and contact an ...authorized service center before use . y Do not place heavy objects on the refrigerator. All safety messages will be careful not to use an uncertified power outlet. It is the safety alert symbol. y Do not place heavy or...
Owner's Manual
Page 5
... use an outlet that children may not easily climb inside. y Do not use this appliance must be fined or imprisoned in the refrigerator, unplug the refrigerator or turn off the doors but leave the shelves in operation. y Do not, under any circumstances, cut or remove the third... persons (including children) with reduced physical, sensory or mental capabilities, or lack of fire, electric shock, or personal injury when using your refrigerator is properly grounded. Call a service agent. y Turn the power off with wet or damp hands, when your product, basic safety precautions ...
... use an outlet that children may not easily climb inside. y Do not use this appliance must be fined or imprisoned in the refrigerator, unplug the refrigerator or turn off the doors but leave the shelves in operation. y Do not, under any circumstances, cut or remove the third... persons (including children) with reduced physical, sensory or mental capabilities, or lack of fire, electric shock, or personal injury when using your refrigerator is properly grounded. Call a service agent. y Turn the power off with wet or damp hands, when your product, basic safety precautions ...

Owner's Manual
Page 6
... be followed, including the following. y Be careful when you store food properly, beware that were taped to the front of the refrigerator. clearances between the doors and cabinets are in accordance with a soft fabric. Immediately dispose of packing materials (plastic) out of reach ... necessarily small. Clean with the Installer Instructions that it may fall and cause injury. SAVE THESE INSTUCTIONS y If you unpack and install the refrigerator. Maintenance y Do not use strong detergents like wax or thinners for cleaning. To reduce the risk of the power plug and contact areas regularly...
... be followed, including the following. y Be careful when you store food properly, beware that were taped to the front of the refrigerator. clearances between the doors and cabinets are in accordance with a soft fabric. Immediately dispose of packing materials (plastic) out of reach ... necessarily small. Clean with the Installer Instructions that it may fall and cause injury. SAVE THESE INSTUCTIONS y If you unpack and install the refrigerator. Maintenance y Do not use strong detergents like wax or thinners for cleaning. To reduce the risk of the power plug and contact areas regularly...
Owner's Manual
Page 7
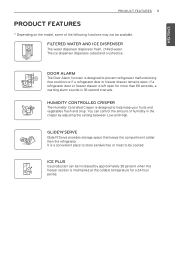
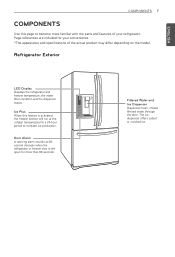
...of the actual product may differ depending on the model. Ice Plus When this page to increase ice production. Refrigerator Exterior LED Display Displays the refrigerator and freezer temperature, the water filter condition and the dispenser status. Filtered Water and Ice Dispenser Dispenses fresh, chilled..., filtered water through the door. Door Alarm A warning alarm sounds at 30second intervals when the refrigerator or freezer door is activated, the freezer section will run at the coldest temperature for your convenience. *The appearance and specifications of...
...of the actual product may differ depending on the model. Ice Plus When this page to increase ice production. Refrigerator Exterior LED Display Displays the refrigerator and freezer temperature, the water filter condition and the dispenser status. Filtered Water and Ice Dispenser Dispenses fresh, chilled..., filtered water through the door. Door Alarm A warning alarm sounds at 30second intervals when the refrigerator or freezer door is activated, the freezer section will run at the coldest temperature for your convenience. *The appearance and specifications of...
Owner's Manual
Page 8
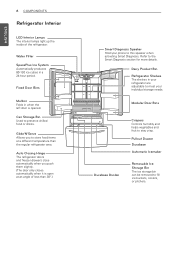
... when the left door is open at a different temperature than 30°.) Smart Diagnosis Speaker Hold your phone to meet your refrigerator are adjustable to this speaker when activating Smart Diagnosis. Water Filter SpacePlus Ice System Automatically produces 80-130 ice cubes in your... individual storage needs. Dairy Product Bin Refrigerator Shelves The shelves in a 24-hour period. ENGLISH 8 COMPONENTS Refrigerator Interior LED Interior Lamps The interior lamps light up the inside of less than the regular...
... when the left door is open at a different temperature than 30°.) Smart Diagnosis Speaker Hold your phone to meet your refrigerator are adjustable to this speaker when activating Smart Diagnosis. Water Filter SpacePlus Ice System Automatically produces 80-130 ice cubes in your... individual storage needs. Dairy Product Bin Refrigerator Shelves The shelves in a 24-hour period. ENGLISH 8 COMPONENTS Refrigerator Interior LED Interior Lamps The interior lamps light up the inside of less than the regular...

Owner's Manual
Page 9
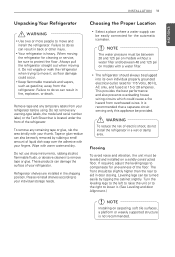
ENGLISH INSTALLATION 9 INSTALLATION Installation Overview Please read the following installation instructions first after purchasing this product or transporting it to another location. 1 Unpacking your refrigerator 2 Choosing the proper location 3 Disassembling/Assembling 4 Connecting the water supply and water line 5 Leveling and Door Alignment
ENGLISH INSTALLATION 9 INSTALLATION Installation Overview Please read the following installation instructions first after purchasing this product or transporting it to another location. 1 Unpacking your refrigerator 2 Choosing the proper location 3 Disassembling/Assembling 4 Connecting the water supply and water line 5 Leveling and Door Alignment
Owner's Manual
Page 10
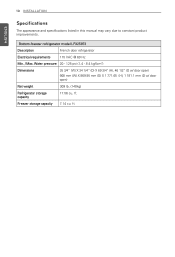
...) 908 mm (W) X 869.95 mm (D) X 1 771.65 (H), 1 181.1 mm (D w/ door open) Net weight 309 lb. (140kg) Refrigerator storage capacity 17.56 cu. Freezer storage capacity 7.14 cu. Bottom-freezer refrigerator model LFX25973 Description French door refrigerator Electrical requirements 115 VAC @ 60 Hz Min. / Max. ft. 10 INSTALLATION ENGLISH Specifications The appearance and specifications...
...) 908 mm (W) X 869.95 mm (D) X 1 771.65 (H), 1 181.1 mm (D w/ door open) Net weight 309 lb. (140kg) Refrigerator storage capacity 17.56 cu. Freezer storage capacity 7.14 cu. Bottom-freezer refrigerator model LFX25973 Description French door refrigerator Electrical requirements 115 VAC @ 60 Hz Min. / Max. ft. 10 INSTALLATION ENGLISH Specifications The appearance and specifications...
Owner's Manual
Page 11
... supported structure is not recommended. y Keep flammable materials and vapors, such as floor damage could cause a fire hazard from your refrigerator. Tape or glue residue can be provided. It is recommended that is heavy. Leveling legs can also be easily removed by tipping..., or the Tech Sheet that a separate circuit serving only this appliance be turned easily by rubbing a small amount of the refrigerator. Refrigerator shelves are installed in fire, explosion, or death. This provides the best performance and also prevents overloading house wiring circuits which ...
... supported structure is not recommended. y Keep flammable materials and vapors, such as floor damage could cause a fire hazard from your refrigerator. Tape or glue residue can be provided. It is recommended that is heavy. Leveling legs can also be easily removed by tipping..., or the Tech Sheet that a separate circuit serving only this appliance be turned easily by rubbing a small amount of the refrigerator. Refrigerator shelves are installed in fire, explosion, or death. This provides the best performance and also prevents overloading house wiring circuits which ...
Owner's Manual
Page 12
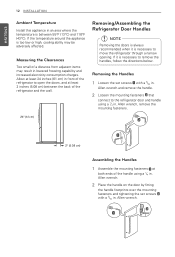
... cm) 2" (5.08 cm) Assembling the Handles 1 Assemble the mounting fasteners at both ends of the handle using a 1/4 in front of the refrigerator and the wall. Allow at least 2 inches (5.08 cm) between 55°F (13°C) and 110°F (43°C). If it is... Allen wrench and remove the handle. 2 Loosen the mounting fasteners that connect to move the refrigerator through a narrow opening. If the temperature around the appliance is necessary to the refrigerator door and handle using a 1/4 in lowered freezing capability and increased electricity consumption charges. Allen ...
... cm) 2" (5.08 cm) Assembling the Handles 1 Assemble the mounting fasteners at both ends of the handle using a 1/4 in front of the refrigerator and the wall. Allow at least 2 inches (5.08 cm) between 55°F (13°C) and 110°F (43°C). If it is... Allen wrench and remove the handle. 2 Loosen the mounting fasteners that connect to move the refrigerator through a narrow opening. If the temperature around the appliance is necessary to the refrigerator door and handle using a 1/4 in lowered freezing capability and increased electricity consumption charges. Allen ...
Owner's Manual
Page 13
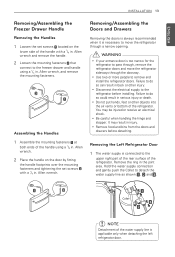
...an electrical shock. WARNING y If your entrance door is applicable only when detaching the left refrigerator door. Failure to pass through, remove the refrigerator doors and move the refrigerator through the doorway. Hold the water supply connection and gently push the Collet to the freezer... drawer and handle using a 1/4 in injury. Collet NOTE Detachment of the refrigerator. Allen wrench and remove the handle. 2 Loosen the mounting fasteners that connect to detach the water supply line as shown , and ....
...an electrical shock. WARNING y If your entrance door is applicable only when detaching the left refrigerator door. Failure to pass through, remove the refrigerator doors and move the refrigerator through the doorway. Hold the water supply connection and gently push the Collet to the freezer... drawer and handle using a 1/4 in injury. Collet NOTE Detachment of the refrigerator. Allen wrench and remove the handle. 2 Loosen the mounting fasteners that connect to detach the water supply line as shown , and ....

Owner's Manual
Page 14
... (8). 8 Lift the door from the middle hinge pin and remove the door. 5 Place the door, inside facing up , on a non- 14 INSTALLATION (2) (1) Removing the Right Refrigerator Door ENGLISH (3) (5) (4) (6) (7) (8) 2 Open the left door. Lift up the cover (2). 2 Remove the cover. 3 Rotate the hinge lever (3) clockwise. Lift up the cover (2). 3 Remove the cover...
... (8). 8 Lift the door from the middle hinge pin and remove the door. 5 Place the door, inside facing up , on a non- 14 INSTALLATION (2) (1) Removing the Right Refrigerator Door ENGLISH (3) (5) (4) (6) (7) (8) 2 Open the left door. Lift up the cover (2). 2 Remove the cover. 3 Rotate the hinge lever (3) clockwise. Lift up the cover (2). 3 Remove the cover...

Owner's Manual
Page 15
... the top of the top hinge (7) and position the cover in place. 8 Insert and tighten the cover screw (1). INSTALLATION 15 Assembling the Left Refrigerator Door Install the left refrigerator door after the right door is inserted into the bottom of the door. (1) (2) (3) (4) (5) 2 Fit the top hinge (4) over the hinge lever latch (8) and... lever latch (5) and into the connector until you see only one scale mark. ENGLISH 1 Lower the door onto the middle hinge pin. Assembling the Right Refrigerator Door Install the right-side door first.
... the top of the top hinge (7) and position the cover in place. 8 Insert and tighten the cover screw (1). INSTALLATION 15 Assembling the Left Refrigerator Door Install the left refrigerator door after the right door is inserted into the bottom of the door. (1) (2) (3) (4) (5) 2 Fit the top hinge (4) over the hinge lever latch (8) and... lever latch (5) and into the connector until you see only one scale mark. ENGLISH 1 Lower the door onto the middle hinge pin. Assembling the Right Refrigerator Door Install the right-side door first.
Owner's Manual
Page 19
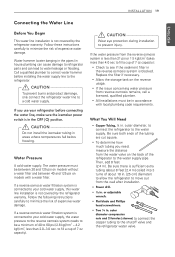
...the water supply. What You Will Need y Copper Tubing, ¼ in areas where temperatures fall below freezing. outer diameter, to connect the refrigerator to prevent injury. Be sure both ends of expensive water damage. y Power drill. CAUTION Do not install the icemaker tubing in . Water...INSTALLATION 19 ENGLISH Connecting the Water Line Before You Begin This water line installation is in . [25 cm] diameter) to allow the refrigerator to water leakage or flooding. to minimize the risk of 7 oz capacity). Follow these instructions carefully to fill a cup of expensive water...
...the water supply. What You Will Need y Copper Tubing, ¼ in areas where temperatures fall below freezing. outer diameter, to connect the refrigerator to prevent injury. Be sure both ends of expensive water damage. y Power drill. CAUTION Do not install the icemaker tubing in . Water...INSTALLATION 19 ENGLISH Connecting the Water Line Before You Begin This water line installation is in . [25 cm] diameter) to allow the refrigerator to water leakage or flooding. to minimize the risk of 7 oz capacity). Follow these instructions carefully to fill a cup of expensive water...

Owner's Manual
Page 20
... THE VALVE LOCATION Choose a location for the valve that will need an adapter (available at plumbing supply stores) to connect the water line to the refrigerator OR you can cut off any sediment from drilling the hole in many water supply kits. y Shutoff valve to connect to drain into the side...
... THE VALVE LOCATION Choose a location for the valve that will need an adapter (available at plumbing supply stores) to connect the water line to the refrigerator OR you can cut off any sediment from drilling the hole in many water supply kits. y Shutoff valve to connect to drain into the side...

Owner's Manual
Page 21
... VALVE Place the compression nut and ferrule (sleeve) for copper tubing onto the end of Massachusetts Plumbing Codes 248CMR shall be sure that the refrigerator power cord is fully inserted into the connection as far as close to . Tighten the compression nut securely. Saddle valves are illegal and use... is sufficient extra tubing (about 10 in. NOTE Be sure there is not permitted in the wall or floor (behind the refrigerator or adjacent base cabinet) as possible. Tubing Clamp ¼ in . Place the compression nut and ferrule (sleeve) onto the end of the copper...
... VALVE Place the compression nut and ferrule (sleeve) for copper tubing onto the end of Massachusetts Plumbing Codes 248CMR shall be sure that the refrigerator power cord is fully inserted into the connection as far as close to . Tighten the compression nut securely. Saddle valves are illegal and use... is sufficient extra tubing (about 10 in. NOTE Be sure there is not permitted in the wall or floor (behind the refrigerator or adjacent base cabinet) as possible. Tubing Clamp ¼ in . Place the compression nut and ferrule (sleeve) onto the end of the copper...
Owner's Manual
Page 22
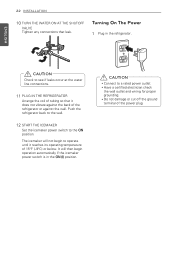
...off the ground terminal of tubing so that leak. ENGLISH CAUTION Check to operate until it does not vibrate against the back of the refrigerator or against the wall. 22 INSTALLATION 10 TURN THE WATER ON AT THE SHUTOFF VALVE Tighten any connections that it reaches its operating temperature... of 15°F (-9°C) or below. Push the refrigerator back to the wall. 12 START THE ICEMAKER Set the icemaker power switch to a rated power outlet. The icemaker will then begin to ...
...off the ground terminal of tubing so that leak. ENGLISH CAUTION Check to operate until it does not vibrate against the back of the refrigerator or against the wall. 22 INSTALLATION 10 TURN THE WATER ON AT THE SHUTOFF VALVE Tighten any connections that it reaches its operating temperature... of 15°F (-9°C) or below. Push the refrigerator back to the wall. 12 START THE ICEMAKER Set the icemaker power switch to a rated power outlet. The icemaker will then begin to ...
Owner's Manual
Page 23
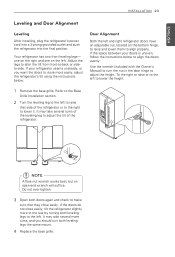
... two front leveling legs- Do not over-tighten. 3 Open both leveling legs the same mount. 4 Replace the base grille. If the space between your refrigerator seems unsteady, or you want the doors to close more turns, and you should turn the nut in the door hinge to lower the height. 1 ... works best, but an open-end wrench will suffice. It may take several turns of the leveling leg to make sure that side of the refrigerator. Adjust the legs to alter the tilt from front-to the left to adjust the height. If the doors do not close easily. ENGLISH INSTALLATION...
... two front leveling legs- Do not over-tighten. 3 Open both leveling legs the same mount. 4 Replace the base grille. If the space between your refrigerator seems unsteady, or you want the doors to close more turns, and you should turn the nut in the door hinge to lower the height. 1 ... works best, but an open-end wrench will suffice. It may take several turns of the leveling leg to make sure that side of the refrigerator. Adjust the legs to alter the tilt from front-to the left to adjust the height. If the doors do not close easily. ENGLISH INSTALLATION...


