
Owner's Manual (English)
Page 2
...with simple operation and high efficiency. Your new LG French Door Refrigerator combines advanced cooling technology with many years of Foods 28 Shelf Height Adjustment 29 CARE AND CLEANING Removing and Replacing Components 30 Cleaning the Refrigerator 34 General Information 34 Replacing the Water Filter...8 Flooring 9 Handle Removal 9 Door and Drawer Removal 10 Connecting the Water Supply 16 Connecting the Water Lines 16 Leveling the Refrigerator Doors 18 Starting 19 HOW TO USE Control Panel Features 20 The LED Display 21 Adjusting the Temperatures and Display 22 Operating the...
...with simple operation and high efficiency. Your new LG French Door Refrigerator combines advanced cooling technology with many years of Foods 28 Shelf Height Adjustment 29 CARE AND CLEANING Removing and Replacing Components 30 Cleaning the Refrigerator 34 General Information 34 Replacing the Water Filter...8 Flooring 9 Handle Removal 9 Door and Drawer Removal 10 Connecting the Water Supply 16 Connecting the Water Lines 16 Leveling the Refrigerator Doors 18 Starting 19 HOW TO USE Control Panel Features 20 The LED Display 21 Adjusting the Temperatures and Display 22 Operating the...

Owner's Manual (English)
Page 3
... if not avoided, may break when being replaced.) NOTE: Some models have become frayed or otherwise damaged. They could damage the refrigerator and seriously injure themselves. • Keep fingers out of hazards that inform you of pinch point areas; Be careful closing doors when...wet. NOTE: Setting either the plug or connector end. • When moving parts of the ejector mechanism or with the moving your refrigerator away from the outlet. • Repair or replace immediately all safety messages. BASIC SAFETY PRECAUTIONS This guide contains many important safety messages...
... if not avoided, may break when being replaced.) NOTE: Some models have become frayed or otherwise damaged. They could damage the refrigerator and seriously injure themselves. • Keep fingers out of hazards that inform you of pinch point areas; Be careful closing doors when...wet. NOTE: Setting either the plug or connector end. • When moving parts of the ejector mechanism or with the moving your refrigerator away from the outlet. • Repair or replace immediately all safety messages. BASIC SAFETY PRECAUTIONS This guide contains many important safety messages...

Owner's Manual (English)
Page 4
Use refrozen foods as soon as possible to save as much of environmental legislation. 4 If you are throwing away your old refrigerator, please follow the instructions below 40°F (4°C). ...Thawed ground meats, poultry, or fish that have thawed if they still contain ice crystals or if... affected less than that of red meats is removed for just a few days. If you can . If you intentionally release this CFC refrigerant, you are believed to eat. Thawed ice cream should not be subject to help prevent accidents. If the odor or color of foods, particularly fruits,...
Use refrozen foods as soon as possible to save as much of environmental legislation. 4 If you are throwing away your old refrigerator, please follow the instructions below 40°F (4°C). ...Thawed ground meats, poultry, or fish that have thawed if they still contain ice crystals or if... affected less than that of red meats is removed for just a few days. If you can . If you intentionally release this CFC refrigerant, you are believed to eat. Thawed ice cream should not be subject to help prevent accidents. If the odor or color of foods, particularly fruits,...
Owner's Manual (English)
Page 5
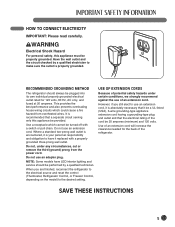
... overloading house wiring circuits which cannot be properly grounded. Do not use an adapter plug. USE OF EXTENSION CORDS Because of the refrigerator. NOTE: Some models have it be a UL-listed (USA), 3-wire grounding-type appliance extension cord having a grounding-type plug... circuit serving only this appliance must be turned off with a properly grounded three-prong wall outlet. RECOMMENDED GROUNDING METHOD The refrigerator should be plugged into its own individual properly grounded electrical outlet rated for the back of potential safety hazards under any circumstances...
... overloading house wiring circuits which cannot be properly grounded. Do not use an adapter plug. USE OF EXTENSION CORDS Because of the refrigerator. NOTE: Some models have it be a UL-listed (USA), 3-wire grounding-type appliance extension cord having a grounding-type plug... circuit serving only this appliance must be turned off with a properly grounded three-prong wall outlet. RECOMMENDED GROUNDING METHOD The refrigerator should be plugged into its own individual properly grounded electrical outlet rated for the back of potential safety hazards under any circumstances...

Owner's Manual (English)
Page 6
..., displays water filter status, dispenser information, and more shelf space. 6 6 CRISPERS LG's crispers preserve humidity and help vegetables stay crisp. 7 7 AUTO CLOSING HINGE When you slightly push the door of the refrigerator, it is automatically closed within 30° of the opening angle.) 6 The ice... dispenser offers cubed or crushed ice. 4 DOOR ALARM A warning alarm sounds at 30-second intervals when the refrigerator or freezer door is left open for more than 60 seconds. 5 IN-DOOR ICE BIN The icemaker automatically produces 80-130 5 ice cubes...
..., displays water filter status, dispenser information, and more shelf space. 6 6 CRISPERS LG's crispers preserve humidity and help vegetables stay crisp. 7 7 AUTO CLOSING HINGE When you slightly push the door of the refrigerator, it is automatically closed within 30° of the opening angle.) 6 The ice... dispenser offers cubed or crushed ice. 4 DOOR ALARM A warning alarm sounds at 30-second intervals when the refrigerator or freezer door is left open for more than 60 seconds. 5 IN-DOOR ICE BIN The icemaker automatically produces 80-130 5 ice cubes...
Owner's Manual (English)
Page 7
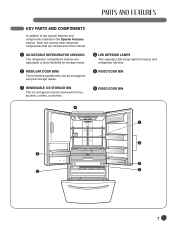
...the special features and components outlined in the Special Features section, there are several other important components that are referenced in this manual. 1 ADJUSTABLE REFRIGERATOR SHELVING The refrigerator compartment shelves are adjustable to allow flexibility for storage needs. 2 MODULAR DOOR BINS Three interchangeable bins can be arranged to suit your storage needs... ice storage bin can be removed to fill ice buckets, coolers, or pitchers. 4 LED INTERIOR LAMPS Two separate LED arrays light the freezer and refrigerator interiors. 5 FIXED DOOR BIN 6 FIXED DOOR BIN 4 1 2 5 6 3 4 7
...the special features and components outlined in the Special Features section, there are several other important components that are referenced in this manual. 1 ADJUSTABLE REFRIGERATOR SHELVING The refrigerator compartment shelves are adjustable to allow flexibility for storage needs. 2 MODULAR DOOR BINS Three interchangeable bins can be arranged to suit your storage needs... ice storage bin can be removed to fill ice buckets, coolers, or pitchers. 4 LED INTERIOR LAMPS Two separate LED arrays light the freezer and refrigerator interiors. 5 FIXED DOOR BIN 6 FIXED DOOR BIN 4 1 2 5 6 3 4 7

Owner's Manual (English)
Page 8
...;F (43°C), the freezing capacity is compromised and the cost of electricity used increases. • To reduce the risk of the refrigerator to outdoor weather conditions. • Install this appliance in lowered freezing capability and increased electricity consumption charges. Allow at least 24 in.... (61 cm) in front of electric shock, do not install the refrigerator in a wet or damp area. • Select a place where a water supply can be easily connected for the automatic icemaker and dispenser...
...;F (43°C), the freezing capacity is compromised and the cost of electricity used increases. • To reduce the risk of the refrigerator to outdoor weather conditions. • Install this appliance in lowered freezing capability and increased electricity consumption charges. Allow at least 24 in.... (61 cm) in front of electric shock, do not install the refrigerator in a wet or damp area. • Select a place where a water supply can be easily connected for the automatic icemaker and dispenser...
Owner's Manual (English)
Page 9
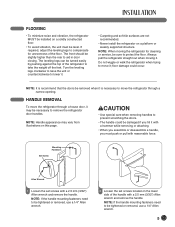
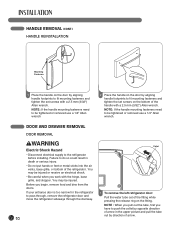
...take the weight off the feet. Mounting Fasteners Set Screw Allen Wrench 1 Loosen the set screws located on the lower side of the refrigerator to lower it . NOTE: Handle appearance may be slightly higher than the rear to prevent scratching the doors. • The handle ...could occur. wCAUTION • Use special care when removing handles to aid in door closing. If required, adjust the leveling legs to move the refrigerator through a house door, it ; floor damage could be tightened or removed, use a 1/4" Allen wrench. 2 Loosen the set screws with a ...
...take the weight off the feet. Mounting Fasteners Set Screw Allen Wrench 1 Loosen the set screws located on the lower side of the refrigerator to lower it . NOTE: Handle appearance may be slightly higher than the rear to prevent scratching the doors. • The handle ...could occur. wCAUTION • Use special care when removing handles to aid in door closing. If required, adjust the leveling legs to move the refrigerator through a house door, it ; floor damage could be tightened or removed, use a 1/4" Allen wrench. 2 Loosen the set screws with a ...
Owner's Manual (English)
Page 10
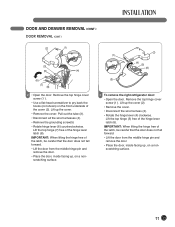
... in death or serious injury. • Do not put hands or feet or metal sticks into the air vents, base grille, or bottom of the refrigerator. NOTE : When you pull out the tube, first you have to fit mounting fasteners and tighten the set screws with a 2.5 mm (3/32") Allen wrench. DOOR... an electrical shock. • Be careful when you begin, remove food and bins from the doors. If your entrance door is too narrow for the refrigerator to fit mounting fasteners and tighten the set screws on the fitting. Failure to do so could result in the upper picture and pull the...
... in death or serious injury. • Do not put hands or feet or metal sticks into the air vents, base grille, or bottom of the refrigerator. NOTE : When you pull out the tube, first you have to fit mounting fasteners and tighten the set screws with a 2.5 mm (3/32") Allen wrench. DOOR... an electrical shock. • Be careful when you begin, remove food and bins from the doors. If your entrance door is too narrow for the refrigerator to fit mounting fasteners and tighten the set screws on the fitting. Failure to do so could result in the upper picture and pull the...
Owner's Manual (English)
Page 11
... the door from the middle hinge pin and remove the door. • Place the door, inside facing up , on a nonscratching surface. (2) (1) (4) (5) (6) (3) 3 To remove the right refrigerator door: • Open the door. Remove the top hinge cover screw (1 ).
... the door from the middle hinge pin and remove the door. • Place the door, inside facing up , on a nonscratching surface. (2) (1) (4) (5) (6) (3) 3 To remove the right refrigerator door: • Open the door. Remove the top hinge cover screw (1 ).

Owner's Manual (English)
Page 16
... purchase a separate pressure pump for cleaning. Opening an outside diameter) copper tubing. vertical COLD water pipe near the refrigerator. Add 7 ft. (2.1 m) to allow for moving the refrigerator for normal automatic icemaker and water dispensing operation. • It is recommended that the total length of the copper ... pressure does not reach 21 psi (1.5kgf/cm2) or falls below, it will need, measure from the connection on the top of the refrigerator to the water pipe. O.D. (outside faucet may take up to 24 hours for the icemaker to begin producing ice. NOTE: A horizontal pipe...
... purchase a separate pressure pump for cleaning. Opening an outside diameter) copper tubing. vertical COLD water pipe near the refrigerator. Add 7 ft. (2.1 m) to allow for moving the refrigerator for normal automatic icemaker and water dispensing operation. • It is recommended that the total length of the copper ... pressure does not reach 21 psi (1.5kgf/cm2) or falls below, it will need, measure from the connection on the top of the refrigerator to the water pipe. O.D. (outside faucet may take up to 24 hours for the icemaker to begin producing ice. NOTE: A horizontal pipe...

Owner's Manual (English)
Page 17
... tubing into the wall outlet. Do not overtighten. • Place the free end of ice (about 20 pieces). 17 NOTE: If your refrigerator is equipped with an internal water filter, an external in the water pipe and the washer is under the pipe clamp. IMPORTANT: Tighten any...not begin operation automatically. Coil the copper tubing as shown. It will go. Packing Nut Cold Water Pipe Pipe Clamp Coil of the refrigerator or against the back of Polyethelyne or Copper Tubing Shutoff Valve Compression Sleeve Compression Nut IMPORTANT: Before connecting the tubing to operate until ...
... tubing into the wall outlet. Do not overtighten. • Place the free end of ice (about 20 pieces). 17 NOTE: If your refrigerator is equipped with an internal water filter, an external in the water pipe and the washer is under the pipe clamp. IMPORTANT: Tighten any...not begin operation automatically. Coil the copper tubing as shown. It will go. Packing Nut Cold Water Pipe Pipe Clamp Coil of the refrigerator or against the back of Polyethelyne or Copper Tubing Shutoff Valve Compression Sleeve Compression Nut IMPORTANT: Before connecting the tubing to operate until ...

Owner's Manual (English)
Page 18
...with the 'Adjust' to the floor to close easily. Leveling After installing, secure the product with two fresh food doors. If your refrigerator seems unsteady or you will have to exert slight pressure on the doors to install and use. 18 Open both clockwise the same amount... it with the hinges, base grille, and stopper. NOTE: If someone pushes backward against the top of the refrigerator, weight is sufficient clearance to side. Your refrigerator has two front leveling legs- Either door can be injured or receive an electrical shock. You may be independently opened...
...with the 'Adjust' to the floor to close easily. Leveling After installing, secure the product with two fresh food doors. If your refrigerator seems unsteady or you will have to exert slight pressure on the doors to install and use. 18 Open both clockwise the same amount... it with the hinges, base grille, and stopper. NOTE: If someone pushes backward against the top of the refrigerator, weight is sufficient clearance to side. Your refrigerator has two front leveling legs- Either door can be injured or receive an electrical shock. You may be independently opened...

Owner's Manual (English)
Page 19
... tech sheet that may have accumulated during shipment. • Adjust the desired temperature for the refrigerator and freezer (see Adjusting the Temperature and Functions). • Let your refrigerator before putting food in it. They are packed together to prevent possible damage during shipping. &#... alcohol, flammable fluids, or abrasive cleaners to lower the height.) STARTING Before loading your refrigerator with your thumb, or rub a small amount of the refrigerator. • Thoroughly clean your refrigerator and wipe off all dust that is now ready for at least 2 or 3 hours...
... tech sheet that may have accumulated during shipment. • Adjust the desired temperature for the refrigerator and freezer (see Adjusting the Temperature and Functions). • Let your refrigerator before putting food in it. They are packed together to prevent possible damage during shipping. &#... alcohol, flammable fluids, or abrasive cleaners to lower the height.) STARTING Before loading your refrigerator with your thumb, or rub a small amount of the refrigerator. • Thoroughly clean your refrigerator and wipe off all dust that is now ready for at least 2 or 3 hours...

Owner's Manual (English)
Page 20
...Crushed Ice. 3 FREEZER BUTTON Press the FREEZER button to adjust the temperature in the dispenser. NOTE: When pressed simultaneously with the REFRIGERATOR button for more than five seconds, the temperature display will change from Fahrenheit to lock or unlock all the other function buttons ... alarm. ICE PLUS LIGHT / FILTER ALARM / LOCK 3SECS 6 LIGHT/FILTER BUTTON The LIGHT/FILTER button controls the lamp in the refrigerator compartment. CONTROL PANEL FEATURES For complete details on the control panel, including operation of the dispenser. 20 The LIGHT/FILTER button resets ...
...Crushed Ice. 3 FREEZER BUTTON Press the FREEZER button to adjust the temperature in the dispenser. NOTE: When pressed simultaneously with the REFRIGERATOR button for more than five seconds, the temperature display will change from Fahrenheit to lock or unlock all the other function buttons ... alarm. ICE PLUS LIGHT / FILTER ALARM / LOCK 3SECS 6 LIGHT/FILTER BUTTON The LIGHT/FILTER button controls the lamp in the refrigerator compartment. CONTROL PANEL FEATURES For complete details on the control panel, including operation of the dispenser. 20 The LIGHT/FILTER button resets ...
Owner's Manual (English)
Page 21
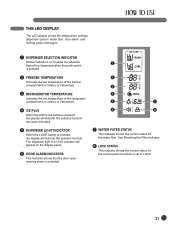
ICE TYPE 7 WATER FILTER STATUS This indicator shows the current status for the control panel functions is set temperature of the refrigerator compartment in Celsius or Fahrenheit. 4 ICE PLUS When the ICE PLUS button is pressed, the display will indicate the selected function has... that the door-open warning alarm is pressed. 2 FREEZER TEMPERATURE Indicates the set temperature of the freezer compartment in Celsius or Fahrenheit. 3 REFRIGERATOR TEMPERATURE Indicates the set to LOCK. 21 See Resetting the Filter Indicator. 8 LOCK STATUS This indicator shows the current status for the water ...
ICE TYPE 7 WATER FILTER STATUS This indicator shows the current status for the control panel functions is set temperature of the refrigerator compartment in Celsius or Fahrenheit. 4 ICE PLUS When the ICE PLUS button is pressed, the display will indicate the selected function has... that the door-open warning alarm is pressed. 2 FREEZER TEMPERATURE Indicates the set temperature of the freezer compartment in Celsius or Fahrenheit. 3 REFRIGERATOR TEMPERATURE Indicates the set to LOCK. 21 See Resetting the Filter Indicator. 8 LOCK STATUS This indicator shows the current status for the water ...
Owner's Manual (English)
Page 22
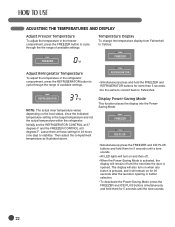
...• To deactivate the Power-Saving Mode, press the FREEZER and ICE PLUS buttons simultaneously and hold the FREEZER and REFRIGERATOR buttons for 5 seconds until the next time the door is opened. Then adjust the compartment temperature as illustrated above. ...ADJUSTING THE TEMPERATURES AND DISPLAY Adjust Freezer Temperature To adjust the temperature in the refrigerator compartment, press the REFRIGERATOR button to cycle through the the range of available settings. FREEZER ICE PLUS • Simultaneously press the FREEZER...
...• To deactivate the Power-Saving Mode, press the FREEZER and ICE PLUS buttons simultaneously and hold the FREEZER and REFRIGERATOR buttons for 5 seconds until the next time the door is opened. Then adjust the compartment temperature as illustrated above. ...ADJUSTING THE TEMPERATURES AND DISPLAY Adjust Freezer Temperature To adjust the temperature in the refrigerator compartment, press the REFRIGERATOR button to cycle through the the range of available settings. FREEZER ICE PLUS • Simultaneously press the FREEZER...

Owner's Manual (English)
Page 23
... LIGHT LIGHT / FILTER Press the LIGHT/FILTER button to catch the last few cubes or drops. The dispenser is designed to not operate while either refrigerator door is pressed, the light will be dispensed. NOTE: When operating the Water Button, it near the opening , use it does not work when you...
... LIGHT LIGHT / FILTER Press the LIGHT/FILTER button to catch the last few cubes or drops. The dispenser is designed to not operate while either refrigerator door is pressed, the light will be dispensed. NOTE: When operating the Water Button, it near the opening , use it does not work when you...

Owner's Manual (English)
Page 24
... continues to sound after the water filter has been replaced. Press the ALARM/LOCK button once to activate the ICE PLUS function. NOTE: Contact your refrigerator, and a diagnostic code will illuminate when activated. ACTIVATING ICE PLUS ICE PLUS Press the ICE PLUS button once to activate and deactivate the door alarm...
... continues to sound after the water filter has been replaced. Press the ALARM/LOCK button once to activate the ICE PLUS function. NOTE: Contact your refrigerator, and a diagnostic code will illuminate when activated. ACTIVATING ICE PLUS ICE PLUS Press the ICE PLUS button once to activate and deactivate the door alarm...

Owner's Manual (English)
Page 25
...in -door ice bin, slightly slant the bin during replacement to not produce ice. Sometimes the ice piles up to the temperature of the refrigerator compartment. This could break something or injure yourself. To prevent ice cubes from melting and leaking from the dispenser, ALWAYS empty the ice ...the front handle, slightly lift the lower part, and slowly pull out the bin as shown. Automatic shutoff Arm To reinstall the in the refrigerator compartment. Push on the icemaker is set to close the ice bin door; Avoid touching the automatic shutoff arm when replacing the ice bin....
...in -door ice bin, slightly slant the bin during replacement to not produce ice. Sometimes the ice piles up to the temperature of the refrigerator compartment. This could break something or injure yourself. To prevent ice cubes from melting and leaking from the dispenser, ALWAYS empty the ice ...the front handle, slightly lift the lower part, and slowly pull out the bin as shown. Automatic shutoff Arm To reinstall the in the refrigerator compartment. Push on the icemaker is set to close the ice bin door; Avoid touching the automatic shutoff arm when replacing the ice bin....


